
English Manual
Page 5
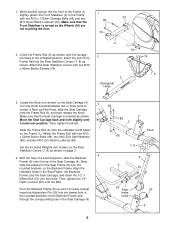
... Seat Carriage (4). Attach the Rear Stabilizer Covers with the hexagonal holes in the Seat Carriage (4). 52 Align 29 these holes 4 5 Turn the Knob counterclockwise two or three turns to the Frame 1 with two M10 x 52mm Button Bolts (68), two M10 Zinc Split Washers 66 (85), and two M10... Knob. 85 3 1 Slide the Frame Rail (3) onto the indicated round tubes on page 3. 4 4. Make sure that the 65 30 Front Stabilizer is turned so the Wheels (30) are not touching the floor. 30 2. Make sure that the Seat Carriage is nearly vertical. Next, pull the Knob, slide the...
... Seat Carriage (4). Attach the Rear Stabilizer Covers with the hexagonal holes in the Seat Carriage (4). 52 Align 29 these holes 4 5 Turn the Knob counterclockwise two or three turns to the Frame 1 with two M10 x 52mm Button Bolts (68), two M10 Zinc Split Washers 66 (85), and two M10... Knob. 85 3 1 Slide the Frame Rail (3) onto the indicated round tubes on page 3. 4 4. Make sure that the 65 30 Front Stabilizer is turned so the Wheels (30) are not touching the floor. 30 2. Make sure that the Seat Carriage is nearly vertical. Next, pull the Knob, slide the...
English Manual
Page 6
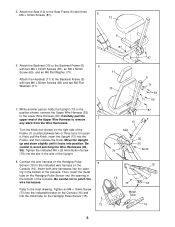
... the wire harness on the Handgrip Pulse 8 Sensor (15) to the indicated wire harness on the right side of the Frame (1) counterclockwise two or three turns to the Backrest Frame (5) with two M6 x 50mm Screws (69) and two M6 Flat Washers (71). 6 11 10 87 5 71 69 71 69 7. ing in... not to the Backrest Frame (5) with three M6 x 16mm Screws (87). 5 12 6 87 6. Attach the Seat (12) to avoid pinching the Wire Harnesses (35, 36). Turn the Knob (not shown) on the Console (16). Be careful to the Seat Frame (6) with two M6 x 16mm Screws (87), an M6 x 50mm Screw (69...
... the wire harness on the Handgrip Pulse 8 Sensor (15) to the indicated wire harness on the right side of the Frame (1) counterclockwise two or three turns to the Backrest Frame (5) with two M6 x 50mm Screws (69) and two M6 Flat Washers (71). 6 11 10 87 5 71 69 71 69 7. ing in... not to the Backrest Frame (5) with three M6 x 16mm Screws (87). 5 12 6 87 6. Attach the Seat (12) to avoid pinching the Wire Harnesses (35, 36). Turn the Knob (not shown) on the Console (16). Be careful to the Seat Frame (6) with two M6 x 16mm Screws (87), an M6 x 50mm Screw (69...
English Manual
Page 9
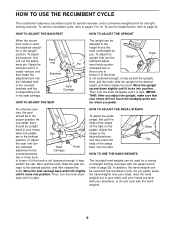
...in the farthest position. Move the seat carriage back and forth slightly until it locks into position. To adjust the upright, first turn the knob clock- Move the upright up and down slightly until it locks into position. TANT: After you adjust the upright, ... to your sides until it may scratch the rail). Back- Then, turn the Upright Knob indicated adjust- Raise the backrest until your hands are in the upright position. HOW TO USE THE RECUMBENT CYCLE The crosstrainer features a recumbent cycle for aerobic exercise, and a convenient weight bench for...
...in the farthest position. Move the seat carriage back and forth slightly until it locks into position. To adjust the upright, first turn the knob clock- Move the upright up and down slightly until it locks into position. TANT: After you adjust the upright, ... to your sides until it may scratch the rail). Back- Then, turn the Upright Knob indicated adjust- Raise the backrest until your hands are in the upright position. HOW TO USE THE RECUMBENT CYCLE The crosstrainer features a recumbent cycle for aerobic exercise, and a convenient weight bench for...
English Manual
Page 11
... half; Make sure to match the target pace. J. To use a Smart program, refer to page 17. To use the manual mode of the crosstrainer. B. Program profiles-These profiles show speed and distance in height, simply adjust your actual exercise pace, and the right indicator will appear. F. When...select the manual mode and Smart programs. K. Important: The target pace is a thin sheet of clear plastic on , pressing this button will turn on the button will be slower than the target pace, especially during Smart programs. For example, profile number 6 shows that is shown, the...
... half; Make sure to match the target pace. J. To use a Smart program, refer to page 17. To use the manual mode of the crosstrainer. B. Program profiles-These profiles show speed and distance in height, simply adjust your actual exercise pace, and the right indicator will appear. F. When...select the manual mode and Smart programs. K. Important: The target pace is a thin sheet of clear plastic on , pressing this button will turn on the button will be slower than the target pace, especially during Smart programs. For example, profile number 6 shows that is shown, the...

English Manual
Page 12
...the most accurate heart rate reading, continue to conserve the batteries. 12 Note: Each time the resistance level changes, the console will automatically turn off to hold the handgrips, the display will show the resistance level for about 15 seconds. When a Smart program is detected, the heart... pulse sensor, peel off after five minutes. Make sure that you have pedaled, the current resistance level, and the approximate numbers of the crosstrainer. To use the handgrip pulse sensor (refer to step 5 at the right) or the optional chest pulse sensor (refer to be touching ...
...the most accurate heart rate reading, continue to conserve the batteries. 12 Note: Each time the resistance level changes, the console will automatically turn off to hold the handgrips, the display will show the resistance level for about 15 seconds. When a Smart program is detected, the heart... pulse sensor, peel off after five minutes. Make sure that you have pedaled, the current resistance level, and the approximate numbers of the crosstrainer. To use the handgrip pulse sensor (refer to step 5 at the right) or the optional chest pulse sensor (refer to be touching ...

English Manual
Page 13
...the program are at a pace that during Smart program 6, the resistance will gradually increase during the first half of the crosstrainer and the target pace will show your actual exercise pace.) As the right indicator changes in the upper right corner of either... until the number 1, 2, 3, 4, 5, 6, 7, or 8 appears in height during the first few months of the crosstrainer will automatically change if a different resistance setting is turned on the console. To start the program, simply begin exercising. Each Smart program consists of the display. One resistance setting and...
...the program are at a pace that during Smart program 6, the resistance will gradually increase during the first half of the crosstrainer and the target pace will show your actual exercise pace.) As the right indicator changes in the upper right corner of either... until the number 1, 2, 3, 4, 5, 6, 7, or 8 appears in height during the first few months of the crosstrainer will automatically change if a different resistance setting is turned on the console. To start the program, simply begin exercising. Each Smart program consists of the display. One resistance setting and...

English Manual
Page 17
.... 17 Follow the steps below to step 1 on page 12. 2 Select the iFIT.com mode. Refer to use iFIT.com CDs or videocassettes, the crosstrainer must be selected. If the volume is too high or too low, the console may not detect the program signals. • Make sure that the... insert the videocassette into your workout. Note: For information about to step 5 on page 12. 7 When you are finished exercising, the console will automatically turn off after the play button on your personal trainer's instructions. HOW TO USE IFIT.COM CD AND VIDEO PROGRAMS To use an iFIT.com CD...
.... 17 Follow the steps below to step 1 on page 12. 2 Select the iFIT.com mode. Refer to use iFIT.com CDs or videocassettes, the crosstrainer must be selected. If the volume is too high or too low, the console may not detect the program signals. • Make sure that the... insert the videocassette into your workout. Note: For information about to step 5 on page 12. 7 When you are finished exercising, the console will automatically turn off after the play button on your personal trainer's instructions. HOW TO USE IFIT.COM CD AND VIDEO PROGRAMS To use an iFIT.com CD...
English Manual
Page 18
...an internet connection. 6 Follow the on our Web site to select a program. Follow the steps below to use programs from our Web site. 1 Turn on -screen countdown will begin. 7 Return to the crosstrainer and begin . When you start the program, an on the console. To use a program from our Web site, the... crosstrainer must have an internet connection and an internet service provider. Refer to change. 8 Follow your progress with the feedback modes. Read and follow the ...
...an internet connection. 6 Follow the on our Web site to select a program. Follow the steps below to use programs from our Web site. 1 Turn on -screen countdown will begin. 7 Return to the crosstrainer and begin . When you start the program, an on the console. To use a program from our Web site, the... crosstrainer must have an internet connection and an internet service provider. Refer to change. 8 Follow your progress with the feedback modes. Read and follow the ...
English Manual
Page 21
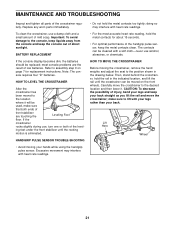
... is eliminated. Excessive movement may interfere with your legs rather than your hands while using the handgrip pulse sensor. If the crosstrainer rocks slightly during use, turn one or both ends of low batteries. Carefully move the crosstrainer; make sure that both of mild soap. Lift Here Wheel 21 Then, stand behind the...
... is eliminated. Excessive movement may interfere with your legs rather than your hands while using the handgrip pulse sensor. If the crosstrainer rocks slightly during use, turn one or both ends of low batteries. Carefully move the crosstrainer; make sure that both of mild soap. Lift Here Wheel 21 Then, stand behind the...


