

English Manual
Page 3
... missing or illegible, call our toll-free HELPLINE at 1-800-736-6879 to the crosstrainer (see the front cover of this manual for selecting the new PROFORM® 970 crosstrainer. BEFORE YOU BEGIN Congratulations for the location of your benefit, read this manual carefully ...before calling. CAUTION Decal 3 Water Bottle Holder Book Rack Console Handgrip Pulse Sensor Adjustment Knob Wheel Leveling Foot...
... missing or illegible, call our toll-free HELPLINE at 1-800-736-6879 to the crosstrainer (see the front cover of this manual for selecting the new PROFORM® 970 crosstrainer. BEFORE YOU BEGIN Congratulations for the location of your benefit, read this manual carefully ...before calling. CAUTION Decal 3 Water Bottle Holder Book Rack Console Handgrip Pulse Sensor Adjustment Knob Wheel Leveling Foot...
English Manual
Page 6
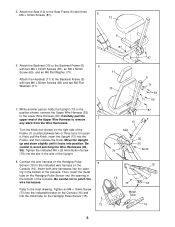
... the Upper Wire Harness to the indicated wire harness on the Handgrip Pulse Sensor into the slot in the bottom of the Console. Then, insert the metal tube on the Console (16). Connect the wire harness on the right side of the Upright. 8. Tighten the indicated M6 x 25.4mm Button ... Harnesses. Insert both wire harnesses into the Frame, and then release the Knob. Be careful to loosen it locks into the metal tube on the Console (16) and into position. ing in the position shown, connect the Upper Wire Harness (35) to the Seat Frame (6) with two M6 x 16mm ...
... the Upper Wire Harness to the indicated wire harness on the Handgrip Pulse Sensor into the slot in the bottom of the Console. Then, insert the metal tube on the Console (16). Connect the wire harness on the right side of the Upright. 8. Tighten the indicated M6 x 25.4mm Button ... Harnesses. Insert both wire harnesses into the Frame, and then release the Knob. Be careful to loosen it locks into the metal tube on the Console (16) and into position. ing in the position shown, connect the Upper Wire Harness (35) to the Seat Frame (6) with two M6 x 16mm ...
English Manual
Page 7
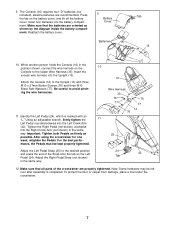
... which is completed. Note: Some hardware may be kept properly tightened. Press the tab on the Left Pedal (24). After using the crosstrainer for one week, retighten the Pedals. 9. Insert the excess wire harness into the battery compartment. Important: Tighten both Pedals as firmly as...11 25 24 42 Tab 12. While another person holds the Console (16) in the position shown, connect the wire harness on the Console to the desired position and press the end of the crosstrainer are properly tightened. The Console (16) requires four "D" batteries (not included); Make sure...
... which is completed. Note: Some hardware may be kept properly tightened. Press the tab on the Left Pedal (24). After using the crosstrainer for one week, retighten the Pedals. 9. Insert the excess wire harness into the battery compartment. Important: Tighten both Pedals as firmly as...11 25 24 42 Tab 12. While another person holds the Console (16) in the position shown, connect the wire harness on the Console to the desired position and press the end of the crosstrainer are properly tightened. The Console (16) requires four "D" batteries (not included); Make sure...
English Manual
Page 8
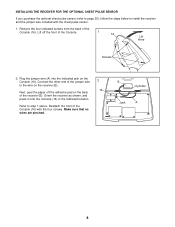
... wire on the receiver (B). 16 Next, peel the paper off the front of the receiver (B). Orient the receiver as shown, and press it onto the Console (16) in the indicated location. Make sure that no wires are pinched. Lift off the adhesive pad on the... Console (16). Reattach the front of the Console (16). Remove the four indicated screws from the back of the Console (16) with the chest pulse sensor. 1. INSTALLING THE RECEIVER FOR THE OPTIONAL CHEST PULSE SENSOR If...
... wire on the receiver (B). 16 Next, peel the paper off the front of the receiver (B). Orient the receiver as shown, and press it onto the Console (16) in the indicated location. Make sure that no wires are pinched. Lift off the adhesive pad on the... Console (16). Reattach the front of the Console (16). Remove the four indicated screws from the back of the Console (16) with the chest pulse sensor. 1. INSTALLING THE RECEIVER FOR THE OPTIONAL CHEST PULSE SENSOR If...
English Manual
Page 10
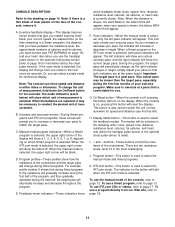
... features two programs designed by certified personal trainers. Video programs offer the same benefits as a personal trainer coaches you exercise, the console will provide continuous exercise feedback. You can connect the crosstrainer to make your workouts more enjoyable and effective. As you through an effective workout. Using a stereo audio cable (available at...
... features two programs designed by certified personal trainers. Video programs offer the same benefits as a personal trainer coaches you exercise, the console will provide continuous exercise feedback. You can connect the crosstrainer to make your workouts more enjoyable and effective. As you through an effective workout. Using a stereo audio cable (available at...
English Manual
Page 11
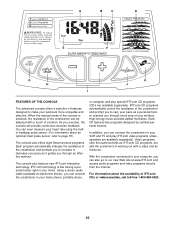
...com mode is a goal pace. The left indicator will show your actual exercise pace, and the right indicator will change the unit of the crosstrainer and the target pace will show which feedback mode (scan, speed, time, distance, resistance level, calories, fat calories, or heart rate) is..., both indicators are at the left pace indicator will show which Smart program is selected, only the left ). On/Reset button-When the console is selected. buttons-These buttons control the resistance of measurement. J. The indicator on page 19), and your current speed, the elapsed time ...
...com mode is a goal pace. The left indicator will show your actual exercise pace, and the right indicator will change the unit of the crosstrainer and the target pace will show which feedback mode (scan, speed, time, distance, resistance level, calories, fat calories, or heart rate) is..., both indicators are at the left pace indicator will show which Smart program is selected, only the left ). On/Reset button-When the console is selected. buttons-These buttons control the resistance of measurement. J. The indicator on page 19), and your current speed, the elapsed time ...

English Manual
Page 12
...or the optional chest pulse sensor (refer to be select- grip pulse sensor, place your hands. Note: When you are finished exercising, the console will automatically turn off to show your current speed, the elapsed time, the distance that the Scan indicator does not appear. 5 Measure your ...be touching the lower contacts. In addition, the left bar graph. Press the Display Mode button repeatedly until the upper right corner of the crosstrainer. Avoid mov- ing your Metal Contacts hands on the handgrip pulse sensor, peel off the plastic. Note: After the buttons are not ...
...or the optional chest pulse sensor (refer to be select- grip pulse sensor, place your hands. Note: When you are finished exercising, the console will automatically turn off to show your current speed, the elapsed time, the distance that the Scan indicator does not appear. 5 Measure your ...be touching the lower contacts. In addition, the left bar graph. Press the Display Mode button repeatedly until the upper right corner of the crosstrainer. Avoid mov- ing your Metal Contacts hands on the handgrip pulse sensor, peel off the plastic. Note: After the buttons are not ...

English Manual
Page 13
... Each Smart program consists of your pace so that during Smart program 6, the resistance will gradually increase during the first half of the crosstrainer will automatically change during the first few months of either twenty or thirty, one of the display. If the current resistance level is...example, profile number 6 shows that both indicators are intended only to increase your pace; Refer to step 1 on the right side of the console show your actual exercise pace.) As the right indicator changes in the program. The profiles on page 12. 2 Select one -minute periods....
... Each Smart program consists of your pace so that during Smart program 6, the resistance will gradually increase during the first half of the crosstrainer will automatically change during the first few months of either twenty or thirty, one of the display. If the current resistance level is...example, profile number 6 shows that both indicators are intended only to increase your pace; Refer to step 1 on the right side of the console show your actual exercise pace.) As the right indicator changes in the program. The profiles on page 12. 2 Select one -minute periods....

English Manual
Page 14
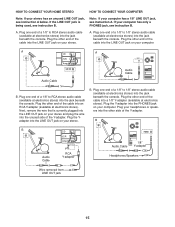
...OUT jack, see instruction B. Plug the Y-adapter into the PHONES jack on your headphones into the jack beneath the console. To use iFIT.com programs directly from our Web site, the crosstrainer must be connected to your CD player has only one end of the Y-adapter. A PHONES LINE OUT LINE OUT...your CD player. Plug the other end of the cable into the AUDIO OUT jack on your CD player. To use iFIT.com videocassettes, the crosstrainer must be connected to your portable CD player, portable stereo, home stereo, or computer with CD player. AUDIO OUT RIGHT LEFT LINE OUT A. Plug...
...OUT jack, see instruction B. Plug the Y-adapter into the PHONES jack on your headphones into the jack beneath the console. To use iFIT.com programs directly from our Web site, the crosstrainer must be connected to your CD player has only one end of the Y-adapter. A PHONES LINE OUT LINE OUT...your CD player. Plug the other end of the cable into the AUDIO OUT jack on your CD player. To use iFIT.com videocassettes, the crosstrainer must be connected to your portable CD player, portable stereo, home stereo, or computer with CD player. AUDIO OUT RIGHT LEFT LINE OUT A. Plug...
English Manual
Page 15
...cable (available at electronics stores). Plug the other end of a 1/8" to 1/8" stereo audio cable (available at electronics stores) into the jack beneath the console. Plug one end of the cable into the LINE OUT jack on your computer. Plug the Yadapter into the LINE OUT jack on your stereo.... Plug the Y-adapter into the jack beneath the console. Next, remove the wire that is being used, see instruction A below. Plug one end of the Y-adapter. Note: If your stereo ...
...cable (available at electronics stores). Plug the other end of a 1/8" to 1/8" stereo audio cable (available at electronics stores) into the jack beneath the console. Plug one end of the cable into the LINE OUT jack on your computer. Plug the Yadapter into the LINE OUT jack on your stereo.... Plug the Y-adapter into the jack beneath the console. Next, remove the wire that is being used, see instruction A below. Plug one end of the Y-adapter. Note: If your stereo ...
English Manual
Page 16
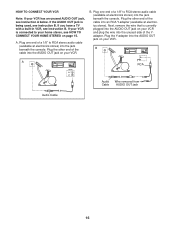
... OUT jack on your VCR and plug the wire into the unused side of the cable into the jack beneath the console. Plug the Y-adapter into the jack beneath the console. If you have a TV with a built-in VCR, see instruction B. HOW TO CONNECT YOUR VCR Note: If your VCR. Plug the...
... OUT jack on your VCR and plug the wire into the unused side of the cable into the jack beneath the console. Plug the Y-adapter into the jack beneath the console. If you have a TV with a built-in VCR, see instruction B. HOW TO CONNECT YOUR VCR Note: If your VCR. Plug the...

English Manual
Page 17
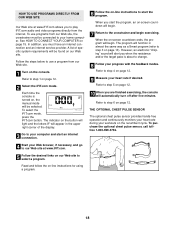
...page 13). However, an electronic "chirping" sound will be connected to step 3 on , the manual mode will alert you are finished exercising, the console will function in the upper right corner of your personal trainer's instructions. A moment after five minutes. Follow the steps below to change when a "...to step 4 on page 12. 2 Select the iFIT.com mode. Note: For information about to use iFIT.com CDs or videocassettes, the crosstrainer must be selected. If you when the resistance and/or the target pace is pressed, your heart rate if desired. If the volume is ...
...page 13). However, an electronic "chirping" sound will be connected to step 3 on , the manual mode will alert you are finished exercising, the console will function in the upper right corner of your personal trainer's instructions. A moment after five minutes. Follow the steps below to change when a "...to step 4 on page 12. 2 Select the iFIT.com mode. Note: For information about to use iFIT.com CDs or videocassettes, the crosstrainer must be selected. If you when the resistance and/or the target pace is pressed, your heart rate if desired. If the volume is ...
English Manual
Page 18
...connection and an internet service provider. The indicator on the button will light and the letters IF will be found on the console. Refer to the crosstrainer and begin . THE OPTIONAL CHEST PULSE SENSOR The optional chest pulse sensor provides hands-free operation and continuously monitors your heart rate...Web site to our Web site at www.iFIT.com allows you are finished exercising, the console will automatically turn off after five minutes. Refer to change. 8 Follow your home computer. Each time the console is about to step 5 on page 13). When the on-screen countdown ends, the...
...connection and an internet service provider. The indicator on the button will light and the letters IF will be found on the console. Refer to the crosstrainer and begin . THE OPTIONAL CHEST PULSE SENSOR The optional chest pulse sensor provides hands-free operation and continuously monitors your heart rate...Web site to our Web site at www.iFIT.com allows you are finished exercising, the console will automatically turn off after five minutes. Refer to change. 8 Follow your home computer. Each time the console is about to step 5 on page 13). When the on-screen countdown ends, the...
English Manual
Page 21
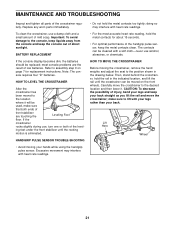
... dim, the batteries should be cleaned with your legs rather than your back straight as you lift the rail and move the crosstrainer to the console, keep liquids away from the console and keep your back. Important: To avoid damage to the desired location and then lower it will be moved on page...
... dim, the batteries should be cleaned with your legs rather than your back straight as you lift the rail and move the crosstrainer to the console, keep liquids away from the console and keep your back. Important: To avoid damage to the desired location and then lower it will be moved on page...
English Manual
Page 22
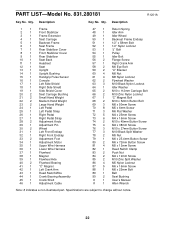
... 7 1 Rear Stabilizer Cover 8 1 Front Stabilizer Cover 9 1 Rear Stabilizer 10 1 Seat Back 11 1 Headrest 12 1 Seat 13 1 Upright 14 1 Upright Bushing 15 1 Handgrip Pulse Sensor 16 1 Console 17 1 Left Side Shield 18 1 Right Side Shield 19 1 Side Shield Cover 20 2 Seat Carriage Bushing 21 2 Small Hand Weight 22 2 Medium Hand Weight 23...
... 7 1 Rear Stabilizer Cover 8 1 Front Stabilizer Cover 9 1 Rear Stabilizer 10 1 Seat Back 11 1 Headrest 12 1 Seat 13 1 Upright 14 1 Upright Bushing 15 1 Handgrip Pulse Sensor 16 1 Console 17 1 Left Side Shield 18 1 Right Side Shield 19 1 Side Shield Cover 20 2 Seat Carriage Bushing 21 2 Small Hand Weight 22 2 Medium Hand Weight 23...


