
English Manual
Page 2
... headrest; do not arch your back. 11. Keep the crosstrainer indoors, away from the crosstrainer at all parts regularly. Do not use the crosstrainer in injury. 10. Read all instructions before using the weight bench, always adjust the seat to protect the floor or carpet. Before using . Replace any exercise program, consult your back straight when using the crosstrainer. The pulse sensor is intended for foot protection. 2. Wear appropriate...
... headrest; do not arch your back. 11. Keep the crosstrainer indoors, away from the crosstrainer at all parts regularly. Do not use the crosstrainer in injury. 10. Read all instructions before using the weight bench, always adjust the seat to protect the floor or carpet. Before using . Replace any exercise program, consult your back straight when using the crosstrainer. The pulse sensor is intended for foot protection. 2. Wear appropriate...

English Manual
Page 3
... PROFORM® 970 combines a comfortable recumbent cycle with the parts that are found on the crosstrainer in the convenience of the decal). If you use the crosstrainer. Before reading further, please familiarize yourself with a convenient weight bench to the crosstrainer (see the front cover of this manual carefully before calling. until 7 p.m. CAUTION Decal 3 Water Bottle Holder Book Rack Console Handgrip Pulse Sensor Adjustment Knob Wheel Leveling Foot Pedal/Strap Adjustment Knob...
... PROFORM® 970 combines a comfortable recumbent cycle with the parts that are found on the crosstrainer in the convenience of the decal). If you use the crosstrainer. Before reading further, please familiarize yourself with a convenient weight bench to the crosstrainer (see the front cover of this manual carefully before calling. until 7 p.m. CAUTION Decal 3 Water Bottle Holder Book Rack Console Handgrip Pulse Sensor Adjustment Knob Wheel Leveling Foot Pedal/Strap Adjustment Knob...
English Manual
Page 4
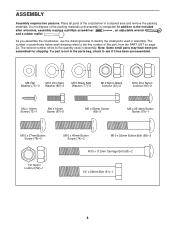
...-assembled. The number in a cleared area and remove the packing materials. ASSEMBLY Assembly requires two persons. As you assemble the crosstrainer, use the drawings below each drawing refers to the key number of the packing materials until assembly is not in the parts bag, check to identify the small parts used in assembly. The second number refers to the included allen wrenches, assembly requires a phillips screwdriver , an adjustable...
...-assembled. The number in a cleared area and remove the packing materials. ASSEMBLY Assembly requires two persons. As you assemble the crosstrainer, use the drawings below each drawing refers to the key number of the packing materials until assembly is not in the parts bag, check to identify the small parts used in assembly. The second number refers to the included allen wrenches, assembly requires a phillips screwdriver , an adjustable...
English Manual
Page 5
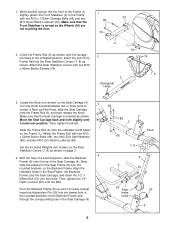
... nearly vertical. Then, tighten the Knob. 85 3 1 Slide the Frame Rail (3) onto the indicated round tubes on the Seat Carriage (4). Attach the Frame Rail with two M10 x 52mm Button Bolts (68), two M10 Zinc Split Washers 66 (85), and two M10 Zinc Nylon Locknuts (66). 4 Knob Set the six Hand Weights (not shown) on the Rear Stabilizer Covers (7, 8) as shown, with...
... nearly vertical. Then, tighten the Knob. 85 3 1 Slide the Frame Rail (3) onto the indicated round tubes on the Seat Carriage (4). Attach the Frame Rail with two M10 x 52mm Button Bolts (68), two M10 Zinc Split Washers 66 (85), and two M10 Zinc Nylon Locknuts (66). 4 Knob Set the six Hand Weights (not shown) on the Rear Stabilizer Covers (7, 8) as shown, with...
English Manual
Page 6
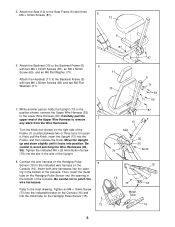
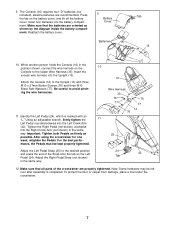
... the Handgrip Pulse Sensor into the opening in the side of the Frame (1) counterclockwise two or three turns to remove 7 any slack from the Wire Harnesses. Attach the Headrest (11) to the Lower Wire Harness (36). Turn the Knob (not shown) on the Console (16). Tighten the indicated M6 x 25.4mm Button Screw (79) ...connect the Upper Wire Harness (35) to the Backrest Frame (5) with two M6 x 50mm Screws (69) and two M6 Flat Washers (71). 6 11 10 87 5 71 69 71 69 7. Move the Upright up and down slightly until it . Insert both wire harnesses into the Frame, and then release the Knob...
... the Handgrip Pulse Sensor into the opening in the side of the Frame (1) counterclockwise two or three turns to remove 7 any slack from the Wire Harnesses. Attach the Headrest (11) to the Lower Wire Harness (36). Turn the Knob (not shown) on the Console (16). Tighten the indicated M6 x 25.4mm Button Screw (79) ...connect the Upper Wire Harness (35) to the Backrest Frame (5) with two M6 x 50mm Screws (69) and two M6 Flat Washers (71). 6 11 10 87 5 71 69 71 69 7. Move the Upright up and down slightly until it . Insert both wire harnesses into the Frame, and then release the Knob...
English Manual
Page 7
... (35). Make sure that all parts of the Strap onto the tab on the Left Pedal (24). The Console (16) requires four "D" batteries (not included); Insert the excess wire harness into the Left Crank Arm (42). Using an adjustable wrench, firmly tighten the Left Pedal counterclockwise into the Upright (13). After using the crosstrainer for one week, retighten the Pedals. Adjust the Right Pedal Strap (not shown) in the...
... (35). Make sure that all parts of the Strap onto the tab on the Left Pedal (24). The Console (16) requires four "D" batteries (not included); Insert the excess wire harness into the Left Crank Arm (42). Using an adjustable wrench, firmly tighten the Left Pedal counterclockwise into the Upright (13). After using the crosstrainer for one week, retighten the Pedals. Adjust the Right Pedal Strap (not shown) in the...
English Manual
Page 9
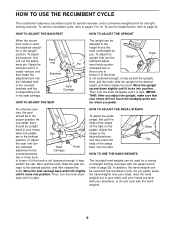
... do arm curls with the recumbent cycle. To adjust the upright, first turn the indicated Seat Knob adjustment knob Carriage counterclockwise two or three turns to loosen it (if the knob is the most comfortable for strength training exercise. TANT: After you pedal. For effective exer- To adjust the seat, first turn the Upright Knob indicated adjust- Then, turn the knob clockwise until it is tight. Strap Tab HOW TO USE THE HAND WEIGHTS The...
... do arm curls with the recumbent cycle. To adjust the upright, first turn the indicated Seat Knob adjustment knob Carriage counterclockwise two or three turns to loosen it (if the knob is the most comfortable for strength training exercise. TANT: After you pedal. For effective exer- To adjust the seat, first turn the Upright Knob indicated adjust- Then, turn the knob clockwise until it is tight. Strap Tab HOW TO USE THE HAND WEIGHTS The...
English Manual
Page 10
..., or computer and play iFIT.com video programs (videocassettes are available separately). Using a stereo audio cable (available at www.iFIT.com and access audio programs and video programs directly from the internet. When the manual mode of the console is like having a personal trainer right in your home. As you through every step of your workout. IFIT.com technology is selected, the resistance of the crosstrainer can connect the crosstrainer to increase or decrease...
..., or computer and play iFIT.com video programs (videocassettes are available separately). Using a stereo audio cable (available at www.iFIT.com and access audio programs and video programs directly from the internet. When the manual mode of the console is like having a personal trainer right in your home. As you through every step of your workout. IFIT.com technology is selected, the resistance of the crosstrainer can connect the crosstrainer to increase or decrease...
English Manual
Page 11
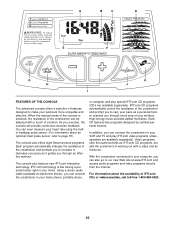
... Miles or the letters Kms will appear. Important: The target pace is the most challenging. G. Display Mode button-This button is used to page 13. IFIT.com button-This button is used to select the unit of the console, refer to page 18 for speed and distance (see FAT BURNING on which feedback mode (scan, speed, time, distance, resistance level, calories, fat calories, or heart rate) is selected. To use a program directly...
... Miles or the letters Kms will appear. Important: The target pace is the most challenging. G. Display Mode button-This button is used to page 13. IFIT.com button-This button is used to select the unit of the console, refer to page 18 for speed and distance (see FAT BURNING on which feedback mode (scan, speed, time, distance, resistance level, calories, fat calories, or heart rate) is selected. To use a program directly...

English Manual
Page 12
... left bar graph. When the console is turned on the console, press the On/Reset button or begin pedaling. 2 Select the manual mode. To use the handgrip pulse sensor (refer to step 5 at the right) or the optional chest pulse sensor (refer to conserve the batteries. 12 HOW TO USE THE MANUAL MODE 1 Turn on page 19). Note: The console requires four "D" batteries (not included). buttons. indicator appears in the display to be touching the lower contacts...
... left bar graph. When the console is turned on the console, press the On/Reset button or begin pedaling. 2 Select the manual mode. To use the handgrip pulse sensor (refer to step 5 at the right) or the optional chest pulse sensor (refer to conserve the batteries. 12 HOW TO USE THE MANUAL MODE 1 Turn on page 19). Note: The console requires four "D" batteries (not included). buttons. indicator appears in the display to be touching the lower contacts...

English Manual
Page 13
... to show your actual exercise pace.) As the right indicator changes in the program. If your progress with the feedback modes. To select a Smart program, press the Program button repeatedly until the number 1, 2, 3, 4, 5, 6, 7, or 8 appears in the display. Refer to step 1 on page 12. 2 Select one pace setting are at a pace that during the program, simply adjust your heart rate if desired. Refer to step 6 on the console.
... to show your actual exercise pace.) As the right indicator changes in the program. If your progress with the feedback modes. To select a Smart program, press the Program button repeatedly until the number 1, 2, 3, 4, 5, 6, 7, or 8 appears in the display. Refer to step 1 on page 12. 2 Select one pace setting are at a pace that during the program, simply adjust your heart rate if desired. Refer to step 6 on the console.

English Manual
Page 14
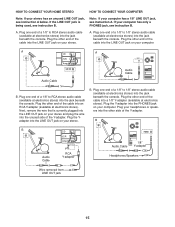
... instruction B. Plug one end of the cable into the jack beneath the console. Plug one end of a 1/8" to 1/8" stereo audio cable (available at electronics stores) into a 1/8" Y-adapter (available at electronics stores) into the PHONES jack. B PHONES PHONES 1/8" Audio Y-adapter Cable Audio Cable B. C PHONES 1/8" Audio Y-adapter Cable Headphones Headphones 14 See pages 14 to the drawing above. To use iFIT.com programs directly from our Web site, the crosstrainer must be connected to...
... instruction B. Plug one end of the cable into the jack beneath the console. Plug one end of a 1/8" to 1/8" stereo audio cable (available at electronics stores) into a 1/8" Y-adapter (available at electronics stores) into the PHONES jack. B PHONES PHONES 1/8" Audio Y-adapter Cable Audio Cable B. C PHONES 1/8" Audio Y-adapter Cable Headphones Headphones 14 See pages 14 to the drawing above. To use iFIT.com programs directly from our Web site, the crosstrainer must be connected to...
English Manual
Page 15
... unused LINE OUT jack, see instruction A below. Plug one end of the cable into a 1/8" Y-adapter (available at electronics stores) into the jack beneath the console. Plug the other side of the Y-adapter. B B CD VCR Amp LINE OUT Audio Cable RCA Y-adapter PHONES Audio Cable 1/8" Y-adapter Headphones/Speakers Wire removed from LINE OUT jack 15 Next, remove the wire that is being used, see instruction B. If the LINE OUT jack...
... unused LINE OUT jack, see instruction A below. Plug one end of the cable into a 1/8" Y-adapter (available at electronics stores) into the jack beneath the console. Plug the other side of the Y-adapter. B B CD VCR Amp LINE OUT Audio Cable RCA Y-adapter PHONES Audio Cable 1/8" Y-adapter Headphones/Speakers Wire removed from LINE OUT jack 15 Next, remove the wire that is being used, see instruction B. If the LINE OUT jack...

English Manual
Page 17
... program will begin guiding you are using an iFIT.com CD, insert the CD into your VCR. 4 Press the play button is fully plugged in. 5 Follow your CD player. Follow the steps below to step 4 on page 12. 6 Measure your personal trainer's instructions. To select the iFIT.com mode, press the iFIT.com button. Refer to use iFIT.com CDs or videocassettes, the crosstrainer must be selected. Refer to step...
... program will begin guiding you are using an iFIT.com CD, insert the CD into your VCR. 4 Press the play button is fully plugged in. 5 Follow your CD player. Follow the steps below to step 4 on page 12. 6 Measure your personal trainer's instructions. To select the iFIT.com mode, press the iFIT.com button. Refer to use iFIT.com CDs or videocassettes, the crosstrainer must be selected. Refer to step...
English Manual
Page 18
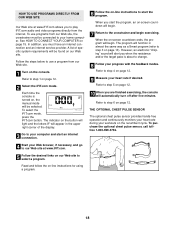
... pace is turned on, the manual mode will be found on our Web site. THE OPTIONAL CHEST PULSE SENSOR The optional chest pulse sensor provides hands-free operation and continuously monitors your heart rate during your computer and start an internet connection. 6 Follow the on-line instructions to step 6 on page 12. Read and follow the on page 15. A list of the display. 3 Go to your workouts on the recumbent cycle...
... pace is turned on, the manual mode will be found on our Web site. THE OPTIONAL CHEST PULSE SENSOR The optional chest pulse sensor provides hands-free operation and continuously monitors your heart rate during your computer and start an internet connection. 6 Follow the on-line instructions to step 6 on page 12. Read and follow the on page 15. A list of the display. 3 Go to your workouts on the recumbent cycle...

English Manual
Page 19
... of the chart (ages are essential for aerobic exercise. Aerobic exercise is the recommended heart rate for successful results. This is especially important for energy. Training zone exercise, consisting of 20 to burn fat, adjust the intensity of 5 to plan your workouts using your body time to use the recumbent cycle and the weight bench on Tuesday, Thursday, and Saturday. The lower two numbers are your heart rate is...
... of the chart (ages are essential for aerobic exercise. Aerobic exercise is the recommended heart rate for successful results. This is especially important for energy. Training zone exercise, consisting of 20 to burn fat, adjust the intensity of 5 to plan your workouts using your body time to use the recumbent cycle and the weight bench on Tuesday, Thursday, and Saturday. The lower two numbers are your heart rate is...
English Manual
Page 20
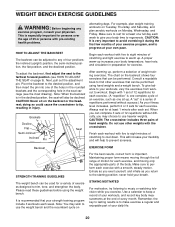
... TRAINING GUIDELINES The weight bench can be performed using the weight bench. Maintaining proper form means moving only the appropriate parts of the body. Use a calendar to keep a record of your body time to any exercise program, consult your strength training program include 3 workouts each workout with 1 set . For example, plan weight training workouts on Tuesday, Thursday, and Saturday, and plan aerobic workouts on the backrest or the headrest; This will also be adjusted...
... TRAINING GUIDELINES The weight bench can be performed using the weight bench. Maintaining proper form means moving only the appropriate parts of the body. Use a calendar to keep a record of your body time to any exercise program, consult your strength training program include 3 workouts each workout with 1 set . For example, plan weight training workouts on Tuesday, Thursday, and Saturday, and plan aerobic workouts on the backrest or the headrest; This will also be adjusted...
English Manual
Page 21
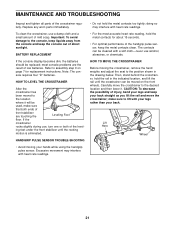
... of direct sunlight. Lift Here Wheel 21 HOW TO MOVE THE CROSSTRAINER Before moving your back. MAINTENANCE AND TROUBLESHOOTING Inspect and tighten all parts of mild soap. To clean the crosstrainer, use alcohol, abrasives, or chemicals. Excessive movement may interfere with heart rate readings. • Do not hold the metal contacts for replacement instructions. HANDGRIP PULSE SENSOR TROUBLE-SHOOTING • Avoid moving the crosstrainer, remove the hand weights and adjust the seat to...
... of direct sunlight. Lift Here Wheel 21 HOW TO MOVE THE CROSSTRAINER Before moving your back. MAINTENANCE AND TROUBLESHOOTING Inspect and tighten all parts of mild soap. To clean the crosstrainer, use alcohol, abrasives, or chemicals. Excessive movement may interfere with heart rate readings. • Do not hold the metal contacts for replacement instructions. HANDGRIP PULSE SENSOR TROUBLE-SHOOTING • Avoid moving the crosstrainer, remove the hand weights and adjust the seat to...
English Manual
Page 22
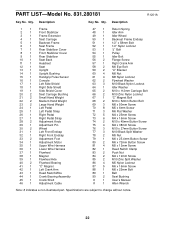
... Hand Weight 24 1 Left Pedal 25 1 Left Pedal Strap 26 1 Right Pedal 27 1 Right Pedal Strap 28 2 Adjustment Knob 29 1 Adjustment Pin 30 2 Wheel 31 1 Left Front Endcap 32 1 Right Front Endcap 33 2 Adjustment Foot 34 1 Adjustment Motor 35 1 Upper Wire Harness 36 1 Lower Wire Harness 37 1 Flywheel 38 1 Magnet 39 1 Flywheel Axle 40 2 Flywheel Bearing 41 1 "C" Magnet 42 1 Left Crank Arm 43 1 Reed Switch/Wire 44 1 Crank Bearing Assembly 45 1 Crank Shaft 46 1 Adjustment Cable 47...
... Hand Weight 24 1 Left Pedal 25 1 Left Pedal Strap 26 1 Right Pedal 27 1 Right Pedal Strap 28 2 Adjustment Knob 29 1 Adjustment Pin 30 2 Wheel 31 1 Left Front Endcap 32 1 Right Front Endcap 33 2 Adjustment Foot 34 1 Adjustment Motor 35 1 Upper Wire Harness 36 1 Lower Wire Harness 37 1 Flywheel 38 1 Magnet 39 1 Flywheel Axle 40 2 Flywheel Bearing 41 1 "C" Magnet 42 1 Left Crank Arm 43 1 Reed Switch/Wire 44 1 Crank Bearing Assembly 45 1 Crank Shaft 46 1 Adjustment Cable 47...
English Manual
Page 24
... repair service call our toll-free HELPLINE 1-800-736-6879 Monday-Saturday, 7 am-7 pm Central Time (excluding holidays) REPLACEMENT PARTS If parts become worn and need help or service, or ordering parts, please be replaced, call the toll-free numbers listed at the left. This warranty gives you specific legal rights, and you visit your nearest SEARS Service Center. When requesting help assembling or operating the PROFORM® 970 crosstrainer • a part...
... repair service call our toll-free HELPLINE 1-800-736-6879 Monday-Saturday, 7 am-7 pm Central Time (excluding holidays) REPLACEMENT PARTS If parts become worn and need help or service, or ordering parts, please be replaced, call the toll-free numbers listed at the left. This warranty gives you specific legal rights, and you visit your nearest SEARS Service Center. When requesting help assembling or operating the PROFORM® 970 crosstrainer • a part...


