
Owner's Manual
Page 2
... an SD memory card (for AVIC-Z120BT) 14 - Inserting an SD memory card (for AVICX920BT) 17 Plugging and unplugging a USB storage device 18 - Introduction Manual overview 9 - POI list) 24 Operating the on each menu 23 Shortcut Menu 23 - How to operate your iPod 19 Flow from actual screens. Plugging in this Pioneer product. Disconnecting your model properly...
... an SD memory card (for AVIC-Z120BT) 14 - Inserting an SD memory card (for AVICX920BT) 17 Plugging and unplugging a USB storage device 18 - Introduction Manual overview 9 - POI list) 24 Operating the on each menu 23 Shortcut Menu 23 - How to operate your iPod 19 Flow from actual screens. Plugging in this Pioneer product. Disconnecting your model properly...
Owner's Manual
Page 3
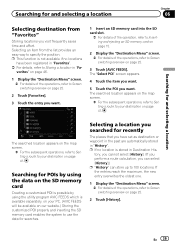
... 45 Canceling the route guidance 45 Registering and editing locations Storing a location in the "Favorites" list 47 - Subscribing to read MSN Direct information on the SD memory card 39 Selecting a location you searched for recently 39 Searching for a location by specifying the house number 35 - Checking the local weather information 54 - Searching...
... 45 Canceling the route guidance 45 Registering and editing locations Storing a location in the "Favorites" list 47 - Subscribing to read MSN Direct information on the SD memory card 39 Selecting a location you searched for recently 39 Searching for a location by specifying the house number 35 - Checking the local weather information 54 - Searching...
Owner's Manual
Page 7
... for Guidance and Phone 163 - Setting video input 2 (AV2) 168 - Using the high pass filter 175 - How to the splash screen stored in the SD memory card 164 - Setting for city map 155 Displaying the traffic notification icon 155 Displaying the Bluetooth connection icon 156 Setting the current street name display 156...
... for Guidance and Phone 163 - Setting video input 2 (AV2) 168 - Using the high pass filter 175 - How to the splash screen stored in the SD memory card 164 - Setting for city map 155 Displaying the traffic notification icon 155 Displaying the Bluetooth connection icon 156 Setting the current street name display 156...

Owner's Manual
Page 9
... contains warnings, cautions, and other notes are collectively referred to as the "external storage device (USB, SD)". En 9 Familiarity with # at the end of the manual. "External storage device (USB, SD)" The SD memory card, SDHC memory card, microSD card, microSDHC card and USB memory device are presented in ALL CAPITAL, BOLD lettering: e.g.) MENU button, MAP button...
... contains warnings, cautions, and other notes are collectively referred to as the "external storage device (USB, SD)". En 9 Familiarity with # at the end of the manual. "External storage device (USB, SD)" The SD memory card, SDHC memory card, microSD card, microSDHC card and USB memory device are presented in ALL CAPITAL, BOLD lettering: e.g.) MENU button, MAP button...
Owner's Manual
Page 10
... this navigation system, refer to the information on our website. 10 En p iPhone is prohibited. Chapter 01 Introduction "SD memory card" The SD memory card, SDHC memory card, microSD card and microSDHC card are collectively referred to as iPod. An independent license for the iPod. iPod nano fourth generation: Ver. 1.0.3 !... and is protected by Macrovision Corporation and other rights owners. Map coverage For details about iPod compatibility with a Pioneer USB interface cable for home and other electronic content distribution systems, such as pay-audio or audio-on the ...
... this navigation system, refer to the information on our website. 10 En p iPhone is prohibited. Chapter 01 Introduction "SD memory card" The SD memory card, SDHC memory card, microSD card and microSDHC card are collectively referred to as iPod. An independent license for the iPod. iPod nano fourth generation: Ver. 1.0.3 !... and is protected by Macrovision Corporation and other rights owners. Map coverage For details about iPod compatibility with a Pioneer USB interface cable for home and other electronic content distribution systems, such as pay-audio or audio-on the ...
Owner's Manual
Page 13
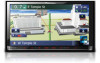
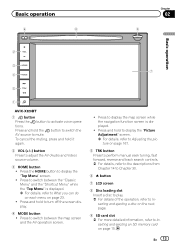
... switch between the map screen and the AV operation screen. ! Press to activate voice operations. Basic operation 6 8 Chapter 02 9 Basic operation 2 3 7 4 5 1 AVIC-X920BT 1 button Press the button to switch between the "Classic Menu" and the "Shortcut Menu" while the "Top Menu" is displayed. ! Press and hold to... the AV (Audio and Video) source volume. 3 HOME button ! To cancel the muting, press and hold to Inserting and ejecting an SD memory card on the next page. 9 SD card slot = For more detailed information, refer to turn off the screen display. 4 MODE button !
... switch between the map screen and the AV operation screen. ! Press to activate voice operations. Basic operation 6 8 Chapter 02 9 Basic operation 2 3 7 4 5 1 AVIC-X920BT 1 button Press the button to switch between the "Classic Menu" and the "Shortcut Menu" while the "Top Menu" is displayed. ! Press and hold to... the AV (Audio and Video) source volume. 3 HOME button ! To cancel the muting, press and hold to Inserting and ejecting an SD memory card on the next page. 9 SD card slot = For more detailed information, refer to turn off the screen display. 4 MODE button !
Owner's Manual
Page 15
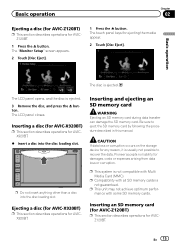
... not guaranteed. p This unit may not achieve optimum performance with Multi Media Card (MMC). Inserting and ejecting an SD memory card WARNING Ejecting an SD memory card during data transfer can damage the SD memory card. Pioneer accepts no liability for AVICZ120BT. Inserting an SD memory card (for AVIC-Z120BT) p This section describes operations for damages, costs or expenses arising from data...
... not guaranteed. p This unit may not achieve optimum performance with Multi Media Card (MMC). Inserting and ejecting an SD memory card WARNING Ejecting an SD memory card during data transfer can damage the SD memory card. Pioneer accepts no liability for AVICZ120BT. Inserting an SD memory card (for AVIC-Z120BT) p This section describes operations for damages, costs or expenses arising from data...
Owner's Manual
Page 16
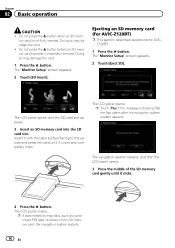
.... Ejecting an SD memory card (for AVIC-Z120BT) p This section describes operations for AVICZ120BT. 1 Press the h button. The navigation system restarts, and then the LCD panel opens. 3 Press the middle of the SD memory card gently until it clicks and completely locks. The LCD panel opens, and the SD card slot appears. 3 Insert an SD memory card into the SD card slot...
.... Ejecting an SD memory card (for AVIC-Z120BT) p This section describes operations for AVICZ120BT. 1 Press the h button. The navigation system restarts, and then the LCD panel opens. 3 Press the middle of the SD memory card gently until it clicks and completely locks. The LCD panel opens, and the SD card slot appears. 3 Insert an SD memory card into the SD card slot...
Owner's Manual
Page 17
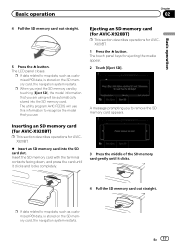
... clicks and locks completely. 3 Press the middle of the SD memory card gently until it clicks. 4 Pull the SD memory card out straight. The utility program AVIC FEEDS will be automatically stored into the SD card slot. The touch panel keys for AVICX920BT. % Insert an SD memory card into the SD memory card. p If data related to map data, such as...
... clicks and locks completely. 3 Press the middle of the SD memory card gently until it clicks. 4 Pull the SD memory card out straight. The utility program AVIC FEEDS will be automatically stored into the SD card slot. The touch panel keys for AVICX920BT. % Insert an SD memory card into the SD memory card. p If data related to map data, such as...
Owner's Manual
Page 39
..." screen appears. 4 Touch the item you want. 5 Touch the POI you want . 1 Insert an SD memory card into the SD card slot. = For details of the operation, refer to Inserting and ejecting an SD memory card on page 15. 2 Display the "Destination Menu" screen. = For details of the operations, refer to ...to Setting a route to your destination on page 41. Searching for POIs by using the data on the SD memory card Creating a customized POI is possible by using the utility program AVIC FEEDS which is available separately, on your PC. (AVIC FEEDS will be available on page 22. 2 Touch [History].
..." screen appears. 4 Touch the item you want. 5 Touch the POI you want . 1 Insert an SD memory card into the SD card slot. = For details of the operation, refer to Inserting and ejecting an SD memory card on page 15. 2 Display the "Destination Menu" screen. = For details of the operations, refer to ...to Setting a route to your destination on page 41. Searching for POIs by using the data on the SD memory card Creating a customized POI is possible by using the utility program AVIC FEEDS which is available separately, on your PC. (AVIC FEEDS will be available on page 22. 2 Touch [History].
Owner's Manual
Page 48
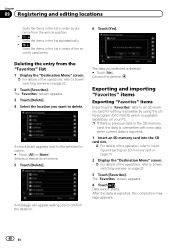
... switching overview on page 22. 3 Touch [Favorites]. After the data is exported. 1 Insert an SD memory card into the SD card slot. = For details of the operation, refer to Inserting and ejecting an SD memory card on page 15. 2 Display the "Destination Menu" screen. = For details of the re- Data... card for editing is possible by dis- Exporting and importing "Favorites" items Exporting "Favorites" items Exporting the "Favorites" data to confirm the deletion. Chapter 09 Registering and editing locations Sorts the items in the list in order by using the utility program AVIC FEEDS which is ...
... switching overview on page 22. 3 Touch [Favorites]. After the data is exported. 1 Insert an SD memory card into the SD card slot. = For details of the operation, refer to Inserting and ejecting an SD memory card on page 15. 2 Display the "Destination Menu" screen. = For details of the re- Data... card for editing is possible by dis- Exporting and importing "Favorites" items Exporting "Favorites" items Exporting the "Favorites" data to confirm the deletion. Chapter 09 Registering and editing locations Sorts the items in the list in order by using the utility program AVIC FEEDS which is ...
Owner's Manual
Page 49
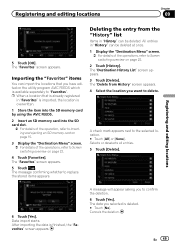
... the locations that is overwritten. 1 Store the item into the SD memory card by using the AVIC FEEDS. 2 Insert an SD memory card into the SD card slot. = For details of the operation, refer to Inserting and ejecting an SD memory card on page 15. 3 Display the "Destination Menu" screen. =... editing locations 5 Touch [OK]. Deleting the entry from History" screen appears. 4 Select the location you have edited on the utility program AVIC FEEDS which is available separately to Screen switching overview on page 22. 4 Touch [Favorites]. The message confirming whether to confirm the deletion. ...
... the locations that is overwritten. 1 Store the item into the SD memory card by using the AVIC FEEDS. 2 Insert an SD memory card into the SD card slot. = For details of the operation, refer to Inserting and ejecting an SD memory card on page 15. 3 Display the "Destination Menu" screen. =... editing locations 5 Touch [OK]. Deleting the entry from History" screen appears. 4 Select the location you have edited on the utility program AVIC FEEDS which is available separately to Screen switching overview on page 22. 4 Touch [Favorites]. The message confirming whether to confirm the deletion. ...
Owner's Manual
Page 75
... General notes ! Follow the instructions on the website for steps until [Firmware update] becomes active. 1 Insert an SD memory card into the SD card slot. = For details of the operation, refer to Inserting and ejecting an SD memory card on page 15. 2 Display the "Settings Menu" screen. = For details of the operations, refer to Screen switching...
... General notes ! Follow the instructions on the website for steps until [Firmware update] becomes active. 1 Insert an SD memory card into the SD card slot. = For details of the operation, refer to Inserting and ejecting an SD memory card on page 15. 2 Display the "Settings Menu" screen. = For details of the operations, refer to Screen switching...
Owner's Manual
Page 111
...files stored in a USB storage device on page 18. = For details, refer to Using the touch panel keys (Music) on page 77. 2 Insert the SD memory card into the SD card slot or plug the USB storage device into the USB connector. = For details, refer to Plugging in the external storage device (USB.... 4 Use the touch panel keys on the screen to control the external storage device (USB, SD). = For details, refer to Inserting and ejecting an SD memory card on a USB storage device compliant with some external storage devices. Plays all audio files in the current repeat play range in the current ...
...files stored in a USB storage device on page 18. = For details, refer to Using the touch panel keys (Music) on page 77. 2 Insert the SD memory card into the SD card slot or plug the USB storage device into the USB connector. = For details, refer to Plugging in the external storage device (USB.... 4 Use the touch panel keys on the screen to control the external storage device (USB, SD). = For details, refer to Inserting and ejecting an SD memory card on a USB storage device compliant with some external storage devices. Plays all audio files in the current repeat play range in the current ...
Owner's Manual
Page 115
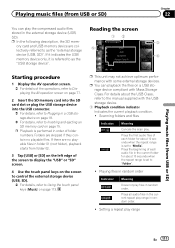
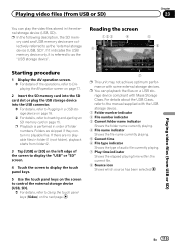
...is performed in order of folder numbers. If there are no playable files. Reading the screen 123 4 8 5 6 Playing video files (from USB or SD) Starting procedure 1 Display the AV operation screen. = For details of audio file currently playing. 7 Play time indicator Shows the elapsed playing time within the ...5 Current time 6 File type indicator Shows the type of the operations, refer to Displaying the AV operation screen on page 77. 2 Insert the SD memory card into the SD card slot or plug the USB storage device into the USB connector. = For details, refer to Inserting and ejecting an...
...is performed in order of folder numbers. If there are no playable files. Reading the screen 123 4 8 5 6 Playing video files (from USB or SD) Starting procedure 1 Display the AV operation screen. = For details of audio file currently playing. 7 Play time indicator Shows the elapsed playing time within the ...5 Current time 6 File type indicator Shows the type of the operations, refer to Displaying the AV operation screen on page 77. 2 Insert the SD memory card into the SD card slot or plug the USB storage device into the USB connector. = For details, refer to Inserting and ejecting an...
Owner's Manual
Page 151
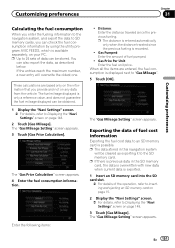
...Inserting and ejecting an SD memory card on page 15. 2 Display the "Navi Settings" screen. = For details, refer to Displaying the "Navi Settings" screen on any data from the vehicle. You can check the fuel consumption information by using the utility program AVIC FEEDS, which is ...possible. The fuel mileage displayed is only a reference value, and does not guarantee the fuel mileage displayed can be obtained. 1 Display the "Navi Settings" screen. = For details, refer to an SD memory card is available separately, on page...
...Inserting and ejecting an SD memory card on page 15. 2 Display the "Navi Settings" screen. = For details, refer to Displaying the "Navi Settings" screen on any data from the vehicle. You can check the fuel consumption information by using the utility program AVIC FEEDS, which is ...possible. The fuel mileage displayed is only a reference value, and does not guarantee the fuel mileage displayed can be obtained. 1 Display the "Navi Settings" screen. = For details, refer to an SD memory card is available separately, on page...
Owner's Manual
Page 152
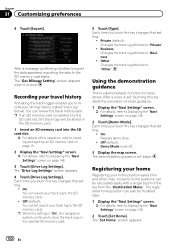
...Display the "Navi Settings" screen. = For details, refer to store the track logs in the SD memory card. 1 Insert an SD memory card into the SD card slot, the track logs will begin. p If an SD memory card is "On", the navigation system continues to Displaying the "Navi Settings" screen on page 148. ... appears. 4 Touch [Drive Log Settings]. p While the setting is inserted into the SD card slot. = For details of route guidance. 1 Display the "Navi Settings" screen. = For details, refer to the SD memory card. ! Each time you to record your track log to Displaying the "Navi Settings" ...
...Display the "Navi Settings" screen. = For details, refer to store the track logs in the SD memory card. 1 Insert an SD memory card into the SD card slot, the track logs will begin. p If an SD memory card is "On", the navigation system continues to Displaying the "Navi Settings" screen on page 148. ... appears. 4 Touch [Drive Log Settings]. p While the setting is inserted into the SD card slot. = For details of route guidance. 1 Display the "Navi Settings" screen. = For details, refer to the SD memory card. ! Each time you to record your track log to Displaying the "Navi Settings" ...
Owner's Manual
Page 158
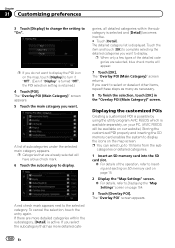
... [Detail]. p You can select up to "On". categories or detailed categories. 1 Insert an SD memory card into the SD card slot. = For details of the operation, refer to Inserting and ejecting an SD memory card on page 15. 2 Display the "Map Settings" screen. = For details, refer to complete ...is turned "Off", the POI selection setting is available separately, on your PC. (AVIC FEEDS will be available on our website.) Storing the customized POI properly and inserting the SD memory card enables the system to the selected category. p Categories that has more detailed categories within ...
... [Detail]. p You can select up to "On". categories or detailed categories. 1 Insert an SD memory card into the SD card slot. = For details of the operation, refer to Inserting and ejecting an SD memory card on page 15. 2 Display the "Map Settings" screen. = For details, refer to complete ...is turned "Off", the POI selection setting is available separately, on your PC. (AVIC FEEDS will be available on our website.) Storing the customized POI properly and inserting the SD memory card enables the system to the selected category. p Categories that has more detailed categories within ...
Owner's Manual
Page 164
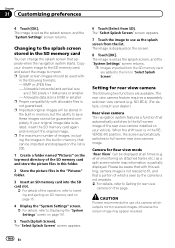
... position, the screen automatically switches to the list on the screen. 8 Touch [OK]. Camera for rear view camera The following formats; - CAUTION Pioneer recommends the use as the splash screen, and the "System Settings" screen returns. The image is not viewable. = For details, refer to save ...the screen image may appear reversed. 164 En If your chosen image to the SD memory card, and select the image to the splash screen stored in the "Pictures" folder. 3 Insert an SD memory card into the SD card slot. = For details of the rear view camera installed on this setting, ...
... position, the screen automatically switches to the list on the screen. 8 Touch [OK]. Camera for rear view camera The following formats; - CAUTION Pioneer recommends the use as the splash screen, and the "System Settings" screen returns. The image is not viewable. = For details, refer to save ...the screen image may appear reversed. 164 En If your chosen image to the SD memory card, and select the image to the splash screen stored in the "Pictures" folder. 3 Insert an SD memory card into the SD card slot. = For details of the rear view camera installed on this setting, ...
Owner's Manual
Page 176
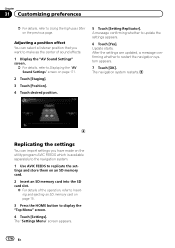
...En Adjusting a position effect You can import settings you want to make as the center of the operation, refer to Inserting and ejecting an SD memory card on page 15. 3 Press the HOME button to display the "Top Menu" screen. 4 Touch [Settings]. Replicating the settings You can ... a listener position that you have made on the utility program AVIC FEEDS which is available separately to the navigation system. 1 Use AVIC FEEDS to replicate the settings and store them on an SD memory card. 2 Insert an SD memory card into the SD card slot. = For details of sound effects. 1 Display the ...
...En Adjusting a position effect You can import settings you want to make as the center of the operation, refer to Inserting and ejecting an SD memory card on page 15. 3 Press the HOME button to display the "Top Menu" screen. 4 Touch [Settings]. Replicating the settings You can ... a listener position that you have made on the utility program AVIC FEEDS which is available separately to the navigation system. 1 Use AVIC FEEDS to replicate the settings and store them on an SD memory card. 2 Insert an SD memory card into the SD card slot. = For details of sound effects. 1 Display the ...


