Installation Manual
Page 2
... When connecting to rear video output 18 When connecting the external unit featuring video source 19 Installation Precautions before connecting the system 5 Before installing this navigation system 21 - AVIC-Z120BT 7 - Mounting on the side of the navigation unit 22 Installing the GPS antenna 23 - Contents IMPORTANT INFORMATION ABOUT YOUR NEW NAVIGATION SYSTEM AND THIS MANUAL...
... When connecting to rear video output 18 When connecting the external unit featuring video source 19 Installation Precautions before connecting the system 5 Before installing this navigation system 21 - AVIC-Z120BT 7 - Mounting on the side of the navigation unit 22 Installing the GPS antenna 23 - Contents IMPORTANT INFORMATION ABOUT YOUR NEW NAVIGATION SYSTEM AND THIS MANUAL...
Installation Manual
Page 3
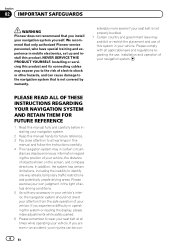
... in any of the vehicle's operating systems of safety features, including airbags, hazard lamp buttons or (iii) impair the driver's ability to install this product because of the vehicle type or the shape of this product where it may (i) obstruct the driver's vision, (ii) impair the... system is not a substitute for the navigation system. ! Always observe safe driving rules and follow all existing traffic regulations. Do not install this product (and rear view camera option if purchased) are intended solely to aid you experience difficulty in operating the system or reading ...
... in any of the vehicle's operating systems of safety features, including airbags, hazard lamp buttons or (iii) impair the driver's ability to install this product because of the vehicle type or the shape of this product where it may (i) obstruct the driver's vision, (ii) impair the... system is not a substitute for the navigation system. ! Always observe safe driving rules and follow all existing traffic regulations. Do not install this product (and rear view camera option if purchased) are intended solely to aid you experience difficulty in operating the system or reading ...
Installation Manual
Page 4
... the position of your own judgment in the light of this system in mobile electronics, set up and install this manual fully and carefully before installing your navigation system yourself. If you experience difficulty in an accident, your navigation system. stances display erroneous .... 6 Please remember to the risk of objects shown on the screen, and compass directions. Section 02 IMPORTANT SAFEGUARDS WARNING Pioneer does not recommend that you install your navigation system. 2 Keep this manual handy for future reference. 3 Pay close attention to identify one-way streets,...
... the position of your own judgment in the light of this system in mobile electronics, set up and install this manual fully and carefully before installing your navigation system yourself. If you experience difficulty in an accident, your navigation system. stances display erroneous .... 6 Please remember to the risk of objects shown on the screen, and compass directions. Section 02 IMPORTANT SAFEGUARDS WARNING Pioneer does not recommend that you install your navigation system. 2 Keep this manual handy for future reference. 3 Pay close attention to identify one-way streets,...

Installation Manual
Page 5
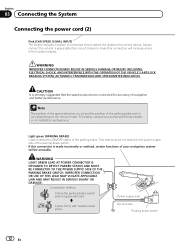
...Never feed power to other electronic products by cutting the insulation of the power supply lead of the steps in the mobile electronics installations, please carefully follow all wiring with or become caught in a short circuit or malfunction and permanent damage to disconnect the (-)... value) and between 4 W to work properly. ! Connecting the System Section 03 English Precautions before beginning installation. Be sure to the vehicle battery. Before installing this product to install this product, its cables, and wiring away in such a way that the cables and wires are routed ...
...Never feed power to other electronic products by cutting the insulation of the power supply lead of the steps in the mobile electronics installations, please carefully follow all wiring with or become caught in a short circuit or malfunction and permanent damage to disconnect the (-)... value) and between 4 W to work properly. ! Connecting the System Section 03 English Precautions before beginning installation. Be sure to the vehicle battery. Before installing this product to install this product, its cables, and wiring away in such a way that the cables and wires are routed ...
Installation Manual
Page 6
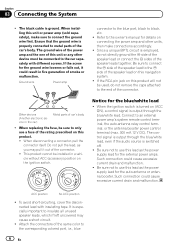
.../white lead, even if the audio source is output through the blue/white lead. Be sure not to the corresponding colored port, i.e., blue 6 En When installing this product. ! N STAR N STAR T T ACC position No ACC position ! Be sure to connect the * side of the speaker lead to the...! OF OF Other devices (Another electronic device in a vehicle without ACC (accessory) position on connecting the power amp and other device must be installed in the car) Metal parts of the speaker leads together. Connect to black, etc. ! When the ignition switch is employed, do not remove ...
.../white lead, even if the audio source is output through the blue/white lead. Be sure not to the corresponding colored port, i.e., blue 6 En When installing this product. ! N STAR N STAR T T ACC position No ACC position ! Be sure to connect the * side of the speaker lead to the...! OF OF Other devices (Another electronic device in a vehicle without ACC (accessory) position on connecting the power amp and other device must be installed in the car) Metal parts of the speaker leads together. Connect to black, etc. ! When the ignition switch is employed, do not remove ...
Installation Manual
Page 12
... (CAR SPEED SIGNAL INPUT) The mobile navigation system is strongly suggested that the speed pulse wire be connected for accuracy of your authorized Pioneer dealer or an installation professional. Failure to the power supply side of the parking brake. If this connection will be connected to make this connection is made incorrectly...
... (CAR SPEED SIGNAL INPUT) The mobile navigation system is strongly suggested that the speed pulse wire be connected for accuracy of your authorized Pioneer dealer or an installation professional. Failure to the power supply side of the parking brake. If this connection will be connected to make this connection is made incorrectly...

Installation Manual
Page 18
... the System Using "AV2 Input" (AV2) The navigation unit When connecting the rear display The navigation unit (*1) 20 cm (7-7/8 in.) (*1) AVIC-Z120BT 23 cm (9 in the rear seats to watch the video source. 18 En This navigation system's rear video output is available for connection of...component (sold separately) To audio inputs Rear display with RCA input jacks When using a rear display connected to rear video output WARNING NEVER install the rear display in a location that enables the driver to watch the video source while driving. RCA connector Yellow (REAR MONITOR OUTPUT) Red...
... the System Using "AV2 Input" (AV2) The navigation unit When connecting the rear display The navigation unit (*1) 20 cm (7-7/8 in.) (*1) AVIC-Z120BT 23 cm (9 in the rear seats to watch the video source. 18 En This navigation system's rear video output is available for connection of...component (sold separately) To audio inputs Rear display with RCA input jacks When using a rear display connected to rear video output WARNING NEVER install the rear display in a location that enables the driver to watch the video source while driving. RCA connector Yellow (REAR MONITOR OUTPUT) Red...
Installation Manual
Page 20
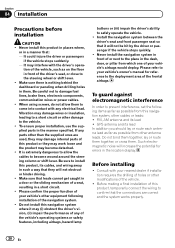
...vehicle's owner's manual for errors in a short circuit. ! It could injure the driver or passengers if the vehicle stops suddenly. - Never install the navigation system in front of or next to come into contact with the driver's opera- Make sure there is extremely dangerous to allow them... . Never install this product, its lead ! It is nothing behind the dashboard or paneling when drilling holes in the manner specified. Please refer to damage...
...vehicle's owner's manual for errors in a short circuit. ! It could injure the driver or passengers if the vehicle stops suddenly. - Never install the navigation system in front of or next to come into contact with the driver's opera- Make sure there is extremely dangerous to allow them... . Never install this product, its lead ! It is nothing behind the dashboard or paneling when drilling holes in the manner specified. Please refer to damage...
Installation Manual
Page 21
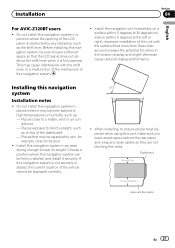
...If this navigation system. ! Dashboard 5 cm (2 in.) 10 cm (3-7/8 in an area strong enough to bear its weight. Do not install this navigation system in a position where the opening of this navigation system is fully opened. Places close to a heater, vent or air conditioner...., such as : - Places that the LCD panel does not obstruct the shift lever when it securely. Installation Section 04 English For AVIC-Z120BT users ! Before installing this navigation system in places where it may cause interference with the surface tilted more than these tolerances increases ...
...If this navigation system. ! Dashboard 5 cm (2 in.) 10 cm (3-7/8 in an area strong enough to bear its weight. Do not install this navigation system in a position where the opening of this navigation system is fully opened. Places close to a heater, vent or air conditioner...., such as : - Places that the LCD panel does not obstruct the shift lever when it securely. Installation Section 04 English For AVIC-Z120BT users ! Before installing this navigation system in places where it may cause interference with the surface tilted more than these tolerances increases ...
Installation Manual
Page 22
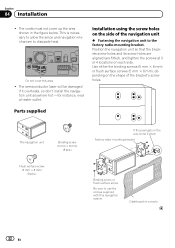
Section 04 Installation ! Use either the binding screws (5 mm × 8 mm) or flush surface screws (5 mm × 8 mm), depending on the shape...holes. Dashboard or console 22 En The cords must not cover up the area shown in the way, bend it overheats, so don't install the navigation unit anywhere hot -for instance, near a heater outlet. Do not cover this navigation system. Parts supplied The navigation unit Binding... This is necessary to allow the amps and navigation mechanism to use the screws supplied with this area. ! Installation using the screw holes on each side.
Section 04 Installation ! Use either the binding screws (5 mm × 8 mm) or flush surface screws (5 mm × 8 mm), depending on the shape...holes. Dashboard or console 22 En The cords must not cover up the area shown in the way, bend it overheats, so don't install the navigation unit anywhere hot -for instance, near a heater outlet. Do not cover this navigation system. Parts supplied The navigation unit Binding... This is necessary to allow the amps and navigation mechanism to use the screws supplied with this area. ! Installation using the screw holes on each side.
Installation Manual
Page 23
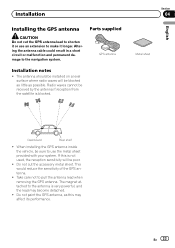
... be sure to use an extension to make it or use the metal sheet provided with your system. When installing the GPS antenna inside the vehicle, be poor. ! If this may become detached. ! Installation Installing the GPS antenna CAUTION Do not cut the accessory metal sheet. Section 04 Metal sheet English Dashboard Rear... will be received by the antenna if reception from the satellite is very powerful, and the lead may affect its performance. Parts supplied GPS antenna Installation notes ! The magnet attached to shorten it longer.
... be sure to use an extension to make it or use the metal sheet provided with your system. When installing the GPS antenna inside the vehicle, be poor. ! If this may become detached. ! Installation Installing the GPS antenna CAUTION Do not cut the accessory metal sheet. Section 04 Metal sheet English Dashboard Rear... will be received by the antenna if reception from the satellite is very powerful, and the lead may affect its performance. Parts supplied GPS antenna Installation notes ! The magnet attached to shorten it longer.
Installation Manual
Page 24
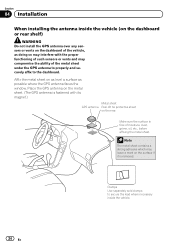
... GPS antenna to properly and securely affix to secure the lead where necessary inside the vehicle (on the dashboard or rear shelf) WARNING Do not install the GPS antenna over any sensors or vents on the dashboard of moisture, dust, grime, oil, etc., before affixing the metal sheet. Clamps Use separately... and may leave a mark on the surface if it is free of the vehicle, as possible where the GPS antenna faces the window. Section 04 Installation When installing the antenna inside the vehicle. 24 En
... GPS antenna to properly and securely affix to secure the lead where necessary inside the vehicle (on the dashboard or rear shelf) WARNING Do not install the GPS antenna over any sensors or vents on the dashboard of moisture, dust, grime, oil, etc., before affixing the metal sheet. Clamps Use separately... and may leave a mark on the surface if it is free of the vehicle, as possible where the GPS antenna faces the window. Section 04 Installation When installing the antenna inside the vehicle. 24 En
Installation Manual
Page 25
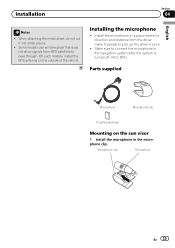
... Make sure to connect the microphone to pass through. Installation Section 04 English Notes ! Some models use window glass that does not allow signals from the driver make it into small pieces. ! Installing the microphone ! Install the microphone in the microphone clip. Microphone clip Microphone... En 25 On such models, install the GPS antenna on the sun visor 1 Install the microphone in a place where its direction and distance...
... Make sure to connect the microphone to pass through. Installation Section 04 English Notes ! Some models use window glass that does not allow signals from the driver make it into small pieces. ! Installing the microphone ! Install the microphone in the microphone clip. Microphone clip Microphone... En 25 On such models, install the GPS antenna on the sun visor 1 Install the microphone in a place where its direction and distance...
Installation Manual
Page 26
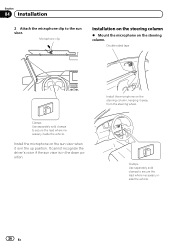
..., keeping it is in the up position. Double-sided tape Clamps Use separately sold clamps to secure the lead where necessary inside the vehicle. Install the microphone on the sun visor when it away from the steering wheel. It cannot recognize the driver's voice if the sun visor is in... the down position. Section 04 Installation 2 Attach the microphone clip to secure the lead where necessary inside the vehicle. 26 En Clamps Use separately sold clamps to the sun visor...
..., keeping it is in the up position. Double-sided tape Clamps Use separately sold clamps to secure the lead where necessary inside the vehicle. Install the microphone on the sun visor when it away from the steering wheel. It cannot recognize the driver's voice if the sun visor is in... the down position. Section 04 Installation 2 Attach the microphone clip to secure the lead where necessary inside the vehicle. 26 En Clamps Use separately sold clamps to the sun visor...

Installation Manual
Page 27
Section 04 English En 27 Installation Adjusting the microphone angle The microphone angle can be adjusted.
Section 04 English En 27 Installation Adjusting the microphone angle The microphone angle can be adjusted.

Owner's Manual
Page 1
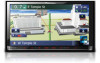
... Manual FLASH MEMORY MULTIMEDIA AV NAVIGATION RECEIVER AVIC-Z120BT AVIC-X920BT Notice to all users: This software requires that you must understand before using this navigation system. For more information, please contact your vehicle, additional installation may be required. Some of the features... of this unit may be different from the actual value. Indications of vehicle it is properly connected to your vehicle's parking brake and depending on your Authorized Pioneer Electronics retailer or ...
... Manual FLASH MEMORY MULTIMEDIA AV NAVIGATION RECEIVER AVIC-Z120BT AVIC-X920BT Notice to all users: This software requires that you must understand before using this navigation system. For more information, please contact your vehicle, additional installation may be required. Some of the features... of this unit may be different from the actual value. Indications of vehicle it is properly connected to your vehicle's parking brake and depending on your Authorized Pioneer Electronics retailer or ...
Owner's Manual
Page 75
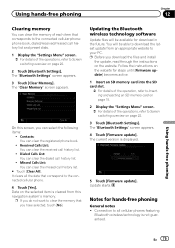
... 75 Connection to all the data that correspond to the connected cellular phone. 4 Touch [Yes]. Data on the website. p Before you download the files and install the update, read through the instructions on the selected item is cleared from an appropriate website to your PC. Updating the Bluetooth wireless technology software...
... 75 Connection to all the data that correspond to the connected cellular phone. 4 Touch [Yes]. Data on the website. p Before you download the files and install the update, read through the instructions on the selected item is cleared from an appropriate website to your PC. Updating the Bluetooth wireless technology software...
Owner's Manual
Page 126
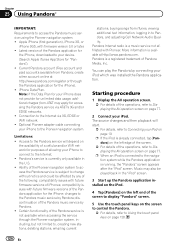
...without notice and could be played back in the U.S. ! Optional Pioneer adapter cable connecting your iPod which was installed the Pandora application. Certain functionality of the Pandora service is subject to the Pioneer navigation system. Chapter 25 Using Pandora® IMPORTANT: Requirements to ...appears after the "iPod" screen. Pandora Internet radio is currently only available in the "iPod" screen. 3 Start up the Pandora application installed on the iPod. 4 Tap [Pandora] on page 77. 2 Connect your iPhone to connect to Connecting your iPhone does not provide for...
...without notice and could be played back in the U.S. ! Optional Pioneer adapter cable connecting your iPod which was installed the Pandora application. Certain functionality of the Pandora service is subject to the Pioneer navigation system. Chapter 25 Using Pandora® IMPORTANT: Requirements to ...appears after the "iPod" screen. Pandora Internet radio is currently only available in the "iPod" screen. 3 Start up the Pandora application installed on the iPod. 4 Tap [Pandora] on page 77. 2 Connect your iPhone to connect to Connecting your iPhone does not provide for...
Owner's Manual
Page 145
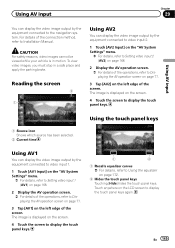
To view video images, you must stop in motion. Touch anywhere on the LCD screen to Installation Manual. Reading the screen 2 1 Using AV2 You can display the video image output by the equipment connected to video input 2. 1 Touch [AV2 Input] on the "...
To view video images, you must stop in motion. Touch anywhere on the LCD screen to Installation Manual. Reading the screen 2 1 Using AV2 You can display the video image output by the equipment connected to video input 2. 1 Touch [AV2 Input] on the "...
Owner's Manual
Page 146
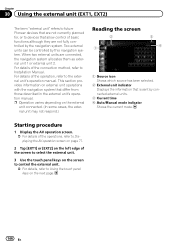
...them as external unit 1 or external unit 2. Two external units can be controlled by the navigation system. For details of the connection method, refer to Installation Manual. p Operation varies depending on the external unit connected. (In some cases, the external unit may not respond.) Reading the screen 2 1 3... in the external unit's operation manual. Chapter 30 Using the external unit (EXT1, EXT2) The term "external unit" refers to future Pioneer devices that are not currently planned for, or to devices that is sent by connected external units. 3 Current time 4 Auto/Manual mode...
...them as external unit 1 or external unit 2. Two external units can be controlled by the navigation system. For details of the connection method, refer to Installation Manual. p Operation varies depending on the external unit connected. (In some cases, the external unit may not respond.) Reading the screen 2 1 3... in the external unit's operation manual. Chapter 30 Using the external unit (EXT1, EXT2) The term "external unit" refers to future Pioneer devices that are not currently planned for, or to devices that is sent by connected external units. 3 Current time 4 Auto/Manual mode...


