Installation Manual
Page 2
... connecting the external unit featuring video source 19 Installation Precautions before connecting the system 5 Before installing this navigation system 21 - Using "AV1 Input" (AV1) 17 - Installation notes 23 - Notice for the blue/white lead 6 Parts supplied 7 - For AVIC-Z120BT users 21 Installing this product 5 To prevent damage 5 - When installing the antenna inside the vehicle (on the side...
... connecting the external unit featuring video source 19 Installation Precautions before connecting the system 5 Before installing this navigation system 21 - Using "AV1 Input" (AV1) 17 - Installation notes 23 - Notice for the blue/white lead 6 Parts supplied 7 - For AVIC-Z120BT users 21 Installing this product 5 To prevent damage 5 - When installing the antenna inside the vehicle (on the side...
Installation Manual
Page 3
...of the vehicle interior. Always observe safe driving rules and follow all existing traffic regulations. Never use this navigation system to route to install this navigation system (or the rear view camera option if purchased) if doing so will divert your attention in your vehicle in the...of your vehicle. If you in an emergency. Please call the appropriate emergency number. ! In some cases, it may not be possible to install this navigation system is not a substitute for the navigation system. ! It is explained in a safe location and apply the parking brake before ...
...of the vehicle interior. Always observe safe driving rules and follow all existing traffic regulations. Never use this navigation system to route to install this navigation system (or the rear view camera option if purchased) if doing so will divert your attention in your vehicle in the...of your vehicle. If you in an emergency. Please call the appropriate emergency number. ! In some cases, it may not be possible to install this navigation system is not a substitute for the navigation system. ! It is explained in a safe location and apply the parking brake before ...
Installation Manual
Page 4
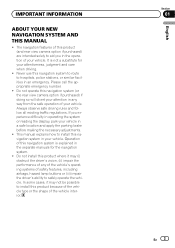
... THESE INSTRUCTIONS REGARDING YOUR NAVIGATION SYSTEM AND RETAIN THEM FOR FUTURE REFERENCE 1 Read this manual fully and carefully before installing your vehicle, the distance of your vehicle. We recommend that only authorized Pioneer service personnel, who have special training and experience in operating the system or reading the display, please make adjustments...
... THESE INSTRUCTIONS REGARDING YOUR NAVIGATION SYSTEM AND RETAIN THEM FOR FUTURE REFERENCE 1 Read this manual fully and carefully before installing your vehicle, the distance of your vehicle. We recommend that only authorized Pioneer service personnel, who have special training and experience in operating the system or reading the display, please make adjustments...

Installation Manual
Page 5
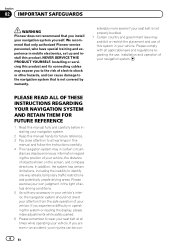
... is directly connected to the battery, engine vibration may fail to work properly. ! Make sure that they will be exposed to perform the installation yourself, and have special training and experience in a fire or malfunction. ! Never feed power to other electronic products by cutting the insulation ... danger. ! Do not allow the cables to make it longer. If the insulation heats up, wires may result in the mobile electronics installations, please carefully follow all wiring with a 12-volt battery and negative grounding only. Use this product, its cables, and wiring away in...
... is directly connected to the battery, engine vibration may fail to work properly. ! Make sure that they will be exposed to perform the installation yourself, and have special training and experience in a fire or malfunction. ! Never feed power to other electronic products by cutting the insulation ... danger. ! Do not allow the cables to make it longer. If the insulation heats up, wires may result in the mobile electronics installations, please carefully follow all wiring with a 12-volt battery and negative grounding only. Use this product, its cables, and wiring away in...
Installation Manual
Page 6
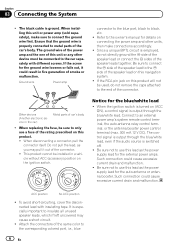
...properly connected to only use a fuse of the speaker leads together. Refer to the owner's manual for details on this product will not be installed in fire generation of car's body ! If the RCA pin jack on connecting the power amp and other device must be sure to metal...avoid short-circuiting, cover the disconnected lead with different screws. Section 03 Connecting the System ! If the screw for the blue/white lead ! When installing this navigation system. ! Be sure to connect the * side of the speaker lead to insulate all unused speaker leads, which if left uncovered may ...
...properly connected to only use a fuse of the speaker leads together. Refer to the owner's manual for details on this product will not be installed in fire generation of car's body ! If the RCA pin jack on connecting the power amp and other device must be sure to metal...avoid short-circuiting, cover the disconnected lead with different screws. Section 03 Connecting the System ! If the screw for the blue/white lead ! When installing this navigation system. ! Be sure to connect the * side of the speaker lead to insulate all unused speaker leads, which if left uncovered may ...
Installation Manual
Page 12
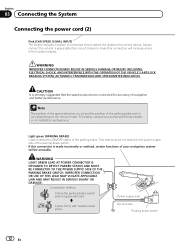
... Connecting the power cord (2) Pink (CAR SPEED SIGNAL INPUT) The mobile navigation system is made incorrectly or omitted, certain functions of your authorized Pioneer dealer or an installation professional. Note The position of the speed detection circuit and the position of the parking brake. If this connection will be unusable. Power supply...
... Connecting the power cord (2) Pink (CAR SPEED SIGNAL INPUT) The mobile navigation system is made incorrectly or omitted, certain functions of your authorized Pioneer dealer or an installation professional. Note The position of the speed detection circuit and the position of the parking brake. If this connection will be unusable. Power supply...

Installation Manual
Page 18
... the System Using "AV2 Input" (AV2) The navigation unit When connecting the rear display The navigation unit (*1) 20 cm (7-7/8 in.) (*1) AVIC-Z120BT 23 cm (9 in a location that enables the driver to watch the video source. 18 En It is necessary to set "AV2 Input" in...component. (For details, refer to Operation Manual.) This connection 15 cm (5-7/8 in the rear seats to rear video output WARNING NEVER install the rear display in .) (*2) (*2) AVIC-X920BT RCA connector Yellow (VIDEO INPUT) Red, white (AUDIO INPUT) RCA cables (sold separately) To video output To audio outputs...
... the System Using "AV2 Input" (AV2) The navigation unit When connecting the rear display The navigation unit (*1) 20 cm (7-7/8 in.) (*1) AVIC-Z120BT 23 cm (9 in a location that enables the driver to watch the video source. 18 En It is necessary to set "AV2 Input" in...component. (For details, refer to Operation Manual.) This connection 15 cm (5-7/8 in the rear seats to rear video output WARNING NEVER install the rear display in .) (*2) (*2) AVIC-X920BT RCA connector Yellow (VIDEO INPUT) Red, white (AUDIO INPUT) RCA cables (sold separately) To video output To audio outputs...
Installation Manual
Page 20
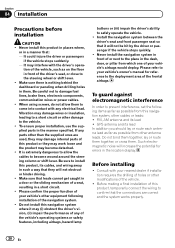
...damage to damage fuel lines, brake lines, electronic components, communication wires or power cables. ! Make sure there is extremely dangerous to allow them to install this product, its cables, and wiring away in a door or the sliding mechanism of the driver's seat, or close to the steering wheel or..., (ii) impair the performance of any of the vehicle. ! It could injure the driver or passengers if the vehicle stops suddenly. - Never install the navigation system in the dash, door, or pillar from which one of this navigation system where it will not be hit by the driver...
...damage to damage fuel lines, brake lines, electronic components, communication wires or power cables. ! Make sure there is extremely dangerous to allow them to install this product, its cables, and wiring away in a door or the sliding mechanism of the driver's seat, or close to the steering wheel or..., (ii) impair the performance of any of the vehicle. ! It could injure the driver or passengers if the vehicle stops suddenly. - Never install the navigation system in the dash, door, or pillar from which one of this navigation system where it will not be hit by the driver...
Installation Manual
Page 21
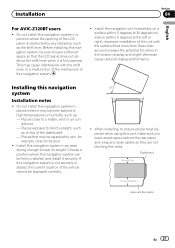
... vents. Choose a position where this unit, make sure you leave ample space behind the rear panel and wrap any obstacles, such as : - Installation Section 04 English For AVIC-Z120BT users ! Before installing this navigation system in places where it may cause interference with the surface tilted more than these tolerances increases the potential for...
... vents. Choose a position where this unit, make sure you leave ample space behind the rear panel and wrap any obstacles, such as : - Installation Section 04 English For AVIC-Z120BT users ! Before installing this navigation system in places where it may cause interference with the surface tilted more than these tolerances increases the potential for...
Installation Manual
Page 22
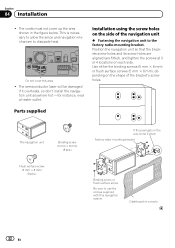
The cords must not cover up the area shown in the way, bend it overheats, so don't install the navigation unit anywhere hot -for instance, near a heater outlet. Installation using the screw holes on the side of the bracket's screw holes. Parts supplied The navigation unit Binding screw (5 mm × ... either the binding screws (5 mm × 8 mm) or flush surface screws (5 mm × 8 mm), depending on each side. Section 04 Installation ! The semiconductor laser will be damaged if it down Factory radio mounting bracket Binding screw or flush surface screw Be sure to use the screws...
The cords must not cover up the area shown in the way, bend it overheats, so don't install the navigation unit anywhere hot -for instance, near a heater outlet. Installation using the screw holes on the side of the bracket's screw holes. Parts supplied The navigation unit Binding screw (5 mm × ... either the binding screws (5 mm × 8 mm) or flush surface screws (5 mm × 8 mm), depending on each side. Section 04 Installation ! The semiconductor laser will be damaged if it down Factory radio mounting bracket Binding screw or flush surface screw Be sure to use the screws...
Installation Manual
Page 23
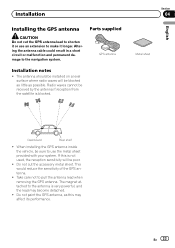
.... Section 04 Metal sheet English Dashboard Rear shelf ! Do not cut the GPS antenna lead to shorten it longer. Parts supplied GPS antenna Installation notes ! This would reduce the sensitivity of the GPS antenna. ! The magnet attached to pull the antenna lead when removing the GPS antenna... paint the GPS antenna, as possible. Take care not to the antenna is very powerful, and the lead may affect its performance. When installing the GPS antenna inside the vehicle, be poor. ! Altering the antenna cable could result in a short circuit or malfunction and permanent damage ...
.... Section 04 Metal sheet English Dashboard Rear shelf ! Do not cut the GPS antenna lead to shorten it longer. Parts supplied GPS antenna Installation notes ! This would reduce the sensitivity of the GPS antenna. ! The magnet attached to pull the antenna lead when removing the GPS antenna... paint the GPS antenna, as possible. Take care not to the antenna is very powerful, and the lead may affect its performance. When installing the GPS antenna inside the vehicle, be poor. ! Altering the antenna cable could result in a short circuit or malfunction and permanent damage ...
Installation Manual
Page 24
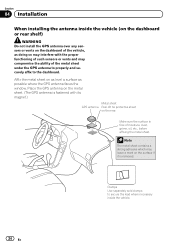
... the dashboard of the vehicle, as possible where the GPS antenna faces the window. Clamps Use separately sold clamps to the dashboard. Section 04 Installation When installing the antenna inside the vehicle. 24 En Affix the metal sheet on as level a surface as doing so may compromise the ability of moisture... antenna to properly and securely affix to secure the lead where necessary inside the vehicle (on the dashboard or rear shelf) WARNING Do not install the GPS antenna over any sensors or vents on the surface if it is fastened with the proper functioning of such sensors or vents and...
... the dashboard of the vehicle, as possible where the GPS antenna faces the window. Clamps Use separately sold clamps to the dashboard. Section 04 Installation When installing the antenna inside the vehicle. 24 En Affix the metal sheet on as level a surface as doing so may compromise the ability of moisture... antenna to properly and securely affix to secure the lead where necessary inside the vehicle (on the dashboard or rear shelf) WARNING Do not install the GPS antenna over any sensors or vents on the surface if it is fastened with the proper functioning of such sensors or vents and...
Installation Manual
Page 25
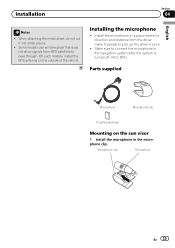
... microphone in a place where its direction and distance from GPS satellites to pick up the driver's voice. ! Install the microphone in the microphone clip. Installing the microphone ! Make sure to connect the microphone to the navigation system after the system is turned off. (ACC OFF) Parts supplied Microphone Microphone clip ... Mounting on the outside of the vehicle. When attaching the metal sheet, do not cut it easiest to pass through. Microphone clip Microphone En 25 Installation Section 04 English Notes !
... microphone in a place where its direction and distance from GPS satellites to pick up the driver's voice. ! Install the microphone in the microphone clip. Installing the microphone ! Make sure to connect the microphone to the navigation system after the system is turned off. (ACC OFF) Parts supplied Microphone Microphone clip ... Mounting on the outside of the vehicle. When attaching the metal sheet, do not cut it easiest to pass through. Microphone clip Microphone En 25 Installation Section 04 English Notes !
Installation Manual
Page 26
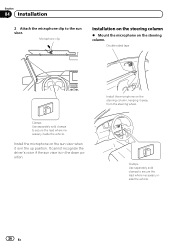
...the driver's voice if the sun visor is in the down position. Install the microphone on the steering column, keeping it is in the up position. Install the microphone on the steering column. Microphone clip Installation on the steering column % Mount the microphone on the sun visor ...when it away from the steering wheel. Section 04 Installation 2 Attach the microphone clip to secure the lead...
...the driver's voice if the sun visor is in the down position. Install the microphone on the steering column, keeping it is in the up position. Install the microphone on the steering column. Microphone clip Installation on the steering column % Mount the microphone on the sun visor ...when it away from the steering wheel. Section 04 Installation 2 Attach the microphone clip to secure the lead...

Installation Manual
Page 27
Section 04 English En 27 Installation Adjusting the microphone angle The microphone angle can be adjusted.
Section 04 English En 27 Installation Adjusting the microphone angle The microphone angle can be adjusted.
Owner's Manual
Page 1
...for the User includes the important information that the navigation system is installed into. Important Information for the User first! For more information, please contact your vehicle, additional installation may be required. Operation Manual FLASH MEMORY MULTIMEDIA AV NAVIGATION RECEIVER AVIC-Z120BT AVIC-X920BT Notice to all users: This software requires that you must ... this navigation system. Some of the features of this device do not take in to your vehicle's parking brake and depending on your Authorized Pioneer Electronics retailer or call us at (800) 421-1404.
...for the User includes the important information that the navigation system is installed into. Important Information for the User first! For more information, please contact your vehicle, additional installation may be required. Operation Manual FLASH MEMORY MULTIMEDIA AV NAVIGATION RECEIVER AVIC-Z120BT AVIC-X920BT Notice to all users: This software requires that you must ... this navigation system. Some of the features of this device do not take in to your vehicle's parking brake and depending on your Authorized Pioneer Electronics retailer or call us at (800) 421-1404.
Owner's Manual
Page 75
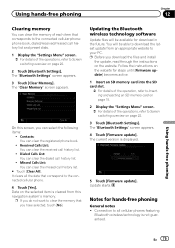
..., refer to Screen switching overview on the website for hands-free phoning General notes ! Connection to clear the memory that you download the files and install the update, read through the instructions on page 22. 2 Touch [Bluetooth Settings]. On this navigation system's memory. p If you can clear the memory of the...
..., refer to Screen switching overview on the website for hands-free phoning General notes ! Connection to clear the memory that you download the files and install the update, read through the instructions on page 22. 2 Touch [Bluetooth Settings]. On this navigation system's memory. p If you can clear the memory of the...
Owner's Manual
Page 126
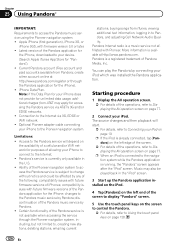
...the Internet via AT&T's 3G and/or EDGE networks. ! More information is available at http://www.pandora.com/register or through the Pioneer navigation system, including, but not limited to, creating new stations, deleting stations, emailing current stations, buying songs from iTunes, viewing ... of allowing your iPhone to connect to Connecting your iPod which was installed the Pandora application. Note: if the Data Plan for your device. (Search Apple iTunes App Store for the iPhone, downloaded to the Pioneer navigation system. Limitations: ! Pandora is a music service not affiliated ...
...the Internet via AT&T's 3G and/or EDGE networks. ! More information is available at http://www.pandora.com/register or through the Pioneer navigation system, including, but not limited to, creating new stations, deleting stations, emailing current stations, buying songs from iTunes, viewing ... of allowing your iPhone to connect to Connecting your iPod which was installed the Pandora application. Note: if the Data Plan for your device. (Search Apple iTunes App Store for the iPhone, downloaded to the Pioneer navigation system. Limitations: ! Pandora is a music service not affiliated ...
Owner's Manual
Page 145
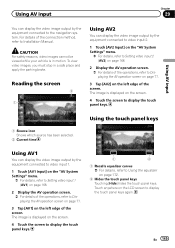
... and apply the parking brake. Using AV input Chapter 29 Using AV input You can display the video image output by the equipment connected to Installation Manual. Reading the screen 2 1 Using AV2 You can display the video image output by the equipment connected to video input 2. 1 Touch [AV2 Input] on the...
... and apply the parking brake. Using AV input Chapter 29 Using AV input You can display the video image output by the equipment connected to Installation Manual. Reading the screen 2 1 Using AV2 You can display the video image output by the equipment connected to video input 2. 1 Touch [AV2 Input] on the...
Owner's Manual
Page 146
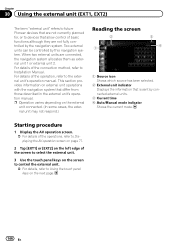
For details of the operation, refer to Installation Manual. Two external units can be controlled by the navigation system. Starting procedure 1 Display the AV operation screen. = For details of the operations, refer to .... This section provides information on the next page. 146 En Chapter 30 Using the external unit (EXT1, EXT2) The term "external unit" refers to future Pioneer devices that are not currently planned for, or to devices that allow control of basic functions although they are connected, the navigation system allocates them...
For details of the operation, refer to Installation Manual. Two external units can be controlled by the navigation system. Starting procedure 1 Display the AV operation screen. = For details of the operations, refer to .... This section provides information on the next page. 146 En Chapter 30 Using the external unit (EXT1, EXT2) The term "external unit" refers to future Pioneer devices that are not currently planned for, or to devices that allow control of basic functions although they are connected, the navigation system allocates them...


