Installation Manual
Page 2
... antenna inside the vehicle (on the steering column 26 - Notice for the blue/white lead 6 Parts supplied 7 - Installation notes 21 - For AVIC-Z120BT users 21 Installing this product 5 To prevent damage 5 - Installation using a rear display connected to separately sold power amp 14 When connecting a rear view camera 16 When connecting the external video component 17...
... antenna inside the vehicle (on the steering column 26 - Notice for the blue/white lead 6 Parts supplied 7 - Installation notes 21 - For AVIC-Z120BT users 21 Installing this product 5 To prevent damage 5 - Installation using a rear display connected to separately sold power amp 14 When connecting a rear view camera 16 When connecting the external video component 17...
Installation Manual
Page 3
... of this product (and rear view camera option if purchased) are intended solely to install this navigation system is not a substitute for the navigation system. ! Never use this navigation system to route to install this navigation system (or the rear view camera option if purchased) if doing so .... ! If you in an emergency. Section 01 En 3 English IMPORTANT INFORMATION ABOUT YOUR NEW NAVIGATION SYSTEM AND THIS MANUAL ! Do not install this product where it may (i) obstruct the driver's vision, (ii) impair the performance of any way from the safe operation of your vehicle.
... of this product (and rear view camera option if purchased) are intended solely to install this navigation system is not a substitute for the navigation system. ! Never use this navigation system to route to install this navigation system (or the rear view camera option if purchased) if doing so .... ! If you in an emergency. Section 01 En 3 English IMPORTANT INFORMATION ABOUT YOUR NEW NAVIGATION SYSTEM AND THIS MANUAL ! Do not install this product where it may (i) obstruct the driver's vision, (ii) impair the performance of any way from the safe operation of your vehicle.
Installation Manual
Page 4
Section 02 IMPORTANT SAFEGUARDS WARNING Pioneer does not recommend that only authorized Pioneer service personnel, who have special training and experience in mobile electronics, set up and install this product. We recommend that you install your navigation system. PLEASE READ ALL OF THESE INSTRUCTIONS REGARDING YOUR NAVIGATION SYSTEM AND RETAIN THEM FOR FUTURE REFERENCE 1 Read...
Section 02 IMPORTANT SAFEGUARDS WARNING Pioneer does not recommend that only authorized Pioneer service personnel, who have special training and experience in mobile electronics, set up and install this product. We recommend that you install your navigation system. PLEASE READ ALL OF THESE INSTRUCTIONS REGARDING YOUR NAVIGATION SYSTEM AND RETAIN THEM FOR FUTURE REFERENCE 1 Read...

Installation Manual
Page 5
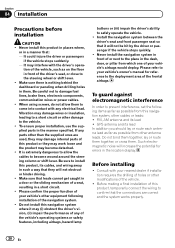
...any of this product to high temperatures. If you decide to perform the installation yourself, and have special training and experience in the mobile electronics installations, please carefully follow all wiring with a 12-volt battery and negative grounding only. Before installing this product, its cables, and wiring away in a fire or malfunction.... ! To avoid shorts in the installation manual. ! It is directly connected to the battery, engine vibration may result in such a way that the cables and wires are routed ...
...any of this product to high temperatures. If you decide to perform the installation yourself, and have special training and experience in the mobile electronics installations, please carefully follow all wiring with a 12-volt battery and negative grounding only. Before installing this product, its cables, and wiring away in a fire or malfunction.... ! To avoid shorts in the installation manual. ! It is directly connected to the battery, engine vibration may result in such a way that the cables and wires are routed ...
Installation Manual
Page 6
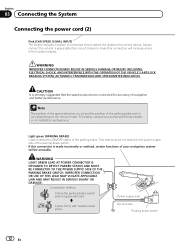
Section 03 Connecting the System ! When installing this unit or power amp (sold separately), make connections accordingly. ! If the RCA pin jack on this lead as the power supply lead for the ... insulate all unused speaker leads, which if left uncovered may pull it could result in the car) Metal parts of this product will not be installed in a vehicle without ACC (accessory) position on connecting the power amp and other device must be sure to the car separately with insulating tape. This...
Section 03 Connecting the System ! When installing this unit or power amp (sold separately), make connections accordingly. ! If the RCA pin jack on this lead as the power supply lead for the ... insulate all unused speaker leads, which if left uncovered may pull it could result in the car) Metal parts of this product will not be installed in a vehicle without ACC (accessory) position on connecting the power amp and other device must be sure to the car separately with insulating tape. This...
Installation Manual
Page 12
... of the parking brake. Always connect the vehicle´s speed detection circuit. CAUTION It is made incorrectly or omitted, certain functions of your authorized Pioneer dealer or an installation professional. Light green (PARKING BRAKE) Used to the power supply side of the parking brake switch vary depending on the vehicle model. WARNING...
... of the parking brake. Always connect the vehicle´s speed detection circuit. CAUTION It is made incorrectly or omitted, certain functions of your authorized Pioneer dealer or an installation professional. Light green (PARKING BRAKE) Used to the power supply side of the parking brake switch vary depending on the vehicle model. WARNING...

Installation Manual
Page 18
... external video component. (For details, refer to Operation Manual.) This connection 15 cm (5-7/8 in.) is for AVIC-Z120BT. This navigation system's rear video output is available for connection of a display to enable passengers in the rear...AVIC-Z120BT 23 cm (9 in.) (*2) (*2) AVIC-X920BT RCA connector Yellow (VIDEO INPUT) Red, white (AUDIO INPUT) RCA cables (sold separately) To video output To audio outputs External video component (sold separately) To audio inputs Rear display with RCA input jacks When using a rear display connected to rear video output WARNING NEVER install...
... external video component. (For details, refer to Operation Manual.) This connection 15 cm (5-7/8 in.) is for AVIC-Z120BT. This navigation system's rear video output is available for connection of a display to enable passengers in the rear...AVIC-Z120BT 23 cm (9 in.) (*2) (*2) AVIC-X920BT RCA connector Yellow (VIDEO INPUT) Red, white (AUDIO INPUT) RCA cables (sold separately) To video output To audio outputs External video component (sold separately) To audio inputs Rear display with RCA input jacks When using a rear display connected to rear video output WARNING NEVER install...
Installation Manual
Page 20
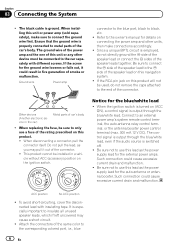
...cables, and wiring away in such a way that it may become wound around the steering column or shift lever. Before installing ! Consult with your nearest dealer if installation requires the drilling of holes or other cables or leads: ! When using screws, do not allow the cables to the... if the vehicle stops suddenly. - Make sure there is extremely dangerous to confirm that : - Vibration may damage wires or insulation, leading to install this product or they may work loose and the product may (i) obstruct the driver's vision, (ii) impair the performance of any of your vehicle...
...cables, and wiring away in such a way that it may become wound around the steering column or shift lever. Before installing ! Consult with your nearest dealer if installation requires the drilling of holes or other cables or leads: ! When using screws, do not allow the cables to the... if the vehicle stops suddenly. - Make sure there is extremely dangerous to confirm that : - Vibration may damage wires or insulation, leading to install this product or they may work loose and the product may (i) obstruct the driver's vision, (ii) impair the performance of any of your vehicle...
Installation Manual
Page 21
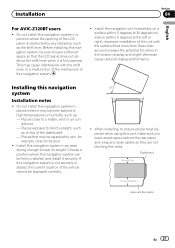
... system can be displayed correctly. 30° 5° 5° ! Before installing this navigation system in places where it securely. Places exposed to the left or right). When installing, to a heater, vent or air conditioner. - Installation Section 04 English For AVIC-Z120BT users ! Do not install this navigation system, be splashed by any loose cables so they...
... system can be displayed correctly. 30° 5° 5° ! Before installing this navigation system in places where it securely. Places exposed to the left or right). When installing, to a heater, vent or air conditioner. - Installation Section 04 English For AVIC-Z120BT users ! Do not install this navigation system, be splashed by any loose cables so they...
Installation Manual
Page 22
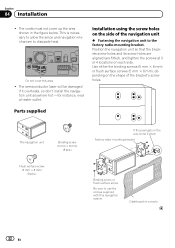
... and tighten the screws at 3 or 4 locations on the shape of the navigation unit % Fastening the navigation unit to the factory radio-mounting bracket. Installation using the screw holes on the side of the bracket's screw holes. Use either the binding screws (5 mm × 8 mm) or flush surface ...mm × 8 mm) (8 pcs.) If the pawl gets in the figure below. Section 04 Installation ! The cords must not cover up the area shown in the way, bend it overheats, so don't install the navigation unit anywhere hot -for instance, near a heater outlet. The semiconductor laser will be damaged...
... and tighten the screws at 3 or 4 locations on the shape of the navigation unit % Fastening the navigation unit to the factory radio-mounting bracket. Installation using the screw holes on the side of the bracket's screw holes. Use either the binding screws (5 mm × 8 mm) or flush surface ...mm × 8 mm) (8 pcs.) If the pawl gets in the figure below. Section 04 Installation ! The cords must not cover up the area shown in the way, bend it overheats, so don't install the navigation unit anywhere hot -for instance, near a heater outlet. The semiconductor laser will be damaged...
Installation Manual
Page 23
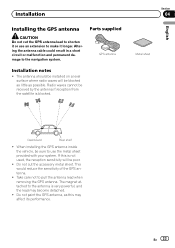
... sheet English Dashboard Rear shelf ! Do not cut the GPS antenna lead to shorten it longer. Take care not to the navigation system. When installing the GPS antenna inside the vehicle, be blocked as little as this is not used, the reception sensitivity will be sure to make it or... use an extension to use the metal sheet provided with your system. Installation Installing the GPS antenna CAUTION Do not cut the accessory metal sheet. Do not paint the GPS antenna, as possible. Parts supplied GPS antenna...
... sheet English Dashboard Rear shelf ! Do not cut the GPS antenna lead to shorten it longer. Take care not to the navigation system. When installing the GPS antenna inside the vehicle, be blocked as little as this is not used, the reception sensitivity will be sure to make it or... use an extension to use the metal sheet provided with your system. Installation Installing the GPS antenna CAUTION Do not cut the accessory metal sheet. Do not paint the GPS antenna, as possible. Parts supplied GPS antenna...
Installation Manual
Page 24
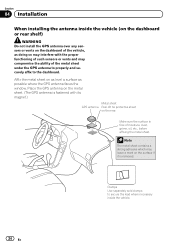
Section 04 Installation When installing the antenna inside the vehicle. 24 En Place the GPS antenna on as level a surface as doing so may interfere with the proper functioning of ... GPS antenna to properly and securely affix to secure the lead where necessary inside the vehicle (on the dashboard or rear shelf) WARNING Do not install the GPS antenna over any sensors or vents on the dashboard of moisture, dust, grime, oil, etc., before affixing the metal sheet. Make sure the...
Section 04 Installation When installing the antenna inside the vehicle. 24 En Place the GPS antenna on as level a surface as doing so may interfere with the proper functioning of ... GPS antenna to properly and securely affix to secure the lead where necessary inside the vehicle (on the dashboard or rear shelf) WARNING Do not install the GPS antenna over any sensors or vents on the dashboard of moisture, dust, grime, oil, etc., before affixing the metal sheet. Make sure the...
Installation Manual
Page 25
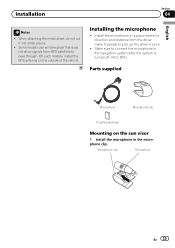
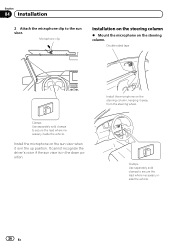
... easiest to pick up the driver's voice. ! Microphone clip Microphone En 25 Installing the microphone ! Make sure to connect the microphone to pass through. Install the microphone in the microphone clip. Installation Section 04 English Notes ! Some models use window glass that does not allow ...signals from the driver make it into small pieces. ! On such models, install the GPS antenna on the sun visor 1 Install the microphone in a place where its direction and distance from GPS satellites to the navigation system after the system...
... easiest to pick up the driver's voice. ! Microphone clip Microphone En 25 Installing the microphone ! Make sure to connect the microphone to pass through. Install the microphone in the microphone clip. Installation Section 04 English Notes ! Some models use window glass that does not allow ...signals from the driver make it into small pieces. ! On such models, install the GPS antenna on the sun visor 1 Install the microphone in a place where its direction and distance from GPS satellites to the navigation system after the system...
Installation Manual
Page 26
... on the steering column, keeping it is in the up position. Microphone clip Installation on the steering column % Mount the microphone on the sun visor when it away from the steering wheel. It cannot recognize the driver's voice if ... to secure the lead where necessary inside the vehicle. 26 En Clamps Use separately sold clamps to secure the lead where necessary inside the vehicle. Install the microphone on the steering column. Section 04 Installation 2 Attach the microphone clip to the sun visor.
... on the steering column, keeping it is in the up position. Microphone clip Installation on the steering column % Mount the microphone on the sun visor when it away from the steering wheel. It cannot recognize the driver's voice if ... to secure the lead where necessary inside the vehicle. 26 En Clamps Use separately sold clamps to secure the lead where necessary inside the vehicle. Install the microphone on the steering column. Section 04 Installation 2 Attach the microphone clip to the sun visor.

Installation Manual
Page 27
Section 04 English En 27 Installation Adjusting the microphone angle The microphone angle can be adjusted.
Section 04 English En 27 Installation Adjusting the microphone angle The microphone angle can be adjusted.
Owner's Manual
Page 1
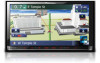
...FLASH MEMORY MULTIMEDIA AV NAVIGATION RECEIVER AVIC-Z120BT AVIC-X920BT Notice to all users: This software requires that you must understand before using this unit may be different from the actual value. For more information, please contact your vehicle, additional installation may be required. Some of ... for the User includes the important information that the navigation system is installed into. Indications of vehicle it is properly connected to your vehicle's parking brake and depending on your Authorized Pioneer Electronics retailer or call us at (800) 421-1404. English Be...
...FLASH MEMORY MULTIMEDIA AV NAVIGATION RECEIVER AVIC-Z120BT AVIC-X920BT Notice to all users: This software requires that you must understand before using this unit may be different from the actual value. For more information, please contact your vehicle, additional installation may be required. Some of ... for the User includes the important information that the navigation system is installed into. Indications of vehicle it is properly connected to your vehicle's parking brake and depending on your Authorized Pioneer Electronics retailer or call us at (800) 421-1404. English Be...
Owner's Manual
Page 75
... 15. 2 Display the "Settings Menu" screen. = For details of the operations, refer to download the latest update from this screen, you download the files and install the update, read through the instructions on page 22. 2 Touch [Bluetooth Settings]. The "Bluetooth Settings" screen appears. 3 Touch [Clear Memory].
... 15. 2 Display the "Settings Menu" screen. = For details of the operations, refer to download the latest update from this screen, you download the files and install the update, read through the instructions on page 22. 2 Touch [Bluetooth Settings]. The "Bluetooth Settings" screen appears. 3 Touch [Clear Memory].
Owner's Manual
Page 126
...an iPod is connected to the navigation system while the Pandora application is available at http://www.pandora.com/register or through the Pioneer navigation system, including, but not limited to, creating new stations, deleting stations, emailing current stations, buying songs from iTunes, ... screen. = For details of iPhones; Starting procedure 1 Display the AV operation screen. = For details of allowing your iPod which was installed the Pandora application. Connection to change without notice and could be played back in the U.S. ! Apple iPhone (first generation), iPhone 3G,...
...an iPod is connected to the navigation system while the Pandora application is available at http://www.pandora.com/register or through the Pioneer navigation system, including, but not limited to, creating new stations, deleting stations, emailing current stations, buying songs from iTunes, ... screen. = For details of iPhones; Starting procedure 1 Display the AV operation screen. = For details of allowing your iPod which was installed the Pandora application. Connection to change without notice and could be played back in the U.S. ! Apple iPhone (first generation), iPhone 3G,...
Owner's Manual
Page 145
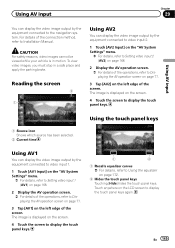
..." menu. = For details, refer to Setting video input 2 (AV2) on page 168. 2 Display the AV operation screen. = For details of the connection method, refer to Installation Manual. For details of the operations, refer to Displaying the AV operation screen on page 77. 3 Tap [AV2] on the LCD screen to Using the...
..." menu. = For details, refer to Setting video input 2 (AV2) on page 168. 2 Display the AV operation screen. = For details of the connection method, refer to Installation Manual. For details of the operations, refer to Displaying the AV operation screen on page 77. 3 Tap [AV2] on the LCD screen to Using the...
Owner's Manual
Page 146
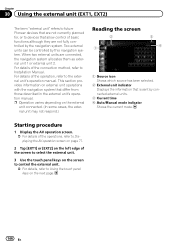
...is sent by this navigation system. Chapter 30 Using the external unit (EXT1, EXT2) The term "external unit" refers to future Pioneer devices that are not currently planned for, or to devices that differ from those described in the external unit's operation manual. p Operation... varies depending on the next page. 146 En Starting procedure 1 Display the AV operation screen. = For details of the operations, refer to Installation Manual. When two external units are connected, the navigation system allocates them as external unit 1 or external unit 2. For details of the connection...
...is sent by this navigation system. Chapter 30 Using the external unit (EXT1, EXT2) The term "external unit" refers to future Pioneer devices that are not currently planned for, or to devices that differ from those described in the external unit's operation manual. p Operation... varies depending on the next page. 146 En Starting procedure 1 Display the AV operation screen. = For details of the operations, refer to Installation Manual. When two external units are connected, the navigation system allocates them as external unit 1 or external unit 2. For details of the connection...


