Installation Manual
Page 2
...- Parts supplied 23 - Installation on the sun visor 25 - Notice for the blue/white lead 6 Parts supplied 7 - Installation notes 23 - Parts supplied 25 - For AVIC-Z120BT users 21 Installing this product 5 To prevent damage 5 - When using the screw holes on the dashboard or rear shelf) 24 Installing the microphone 25 - When...guard against electromagnetic interference 20 Before installing 20 2 En - Installation using a rear display connected to separately sold power amp 14 When connecting a rear view camera 16 When connecting the external video component 17 - AVIC-Z120BT 7 -
...- Parts supplied 23 - Installation on the sun visor 25 - Notice for the blue/white lead 6 Parts supplied 7 - Installation notes 23 - Parts supplied 25 - For AVIC-Z120BT users 21 Installing this product 5 To prevent damage 5 - When using the screw holes on the dashboard or rear shelf) 24 Installing the microphone 25 - When...guard against electromagnetic interference 20 Before installing 20 2 En - Installation using a rear display connected to separately sold power amp 14 When connecting a rear view camera 16 When connecting the external video component 17 - AVIC-Z120BT 7 -
Installation Manual
Page 3
...is explained in operating the system or reading the display, park your vehicle. Do not operate this navigation system (or the rear view camera option if purchased) if doing so will divert your attention in your vehicle. This manual explains how to install this navigation system in ...any of the vehicle's operating systems of this product (and rear view camera option if purchased) are intended solely to safely operate the vehicle. Operation of safety features, including airbags, hazard lamp buttons or (iii)...
...is explained in operating the system or reading the display, park your vehicle. Do not operate this navigation system (or the rear view camera option if purchased) if doing so will divert your attention in your vehicle. This manual explains how to install this navigation system in ...any of the vehicle's operating systems of this product (and rear view camera option if purchased) are intended solely to safely operate the vehicle. Operation of safety features, including airbags, hazard lamp buttons or (iii)...
Installation Manual
Page 13
... can detect whether the vehicle is put in reverse. Note When you cannot switch to connect this lead. Otherwise you use a rear view camera, please make sure to rear view camera picture. Connect the violet/white lead to the lead whose voltage changes when the shift lever is moving forwards or backwards.
... can detect whether the vehicle is put in reverse. Note When you cannot switch to connect this lead. Otherwise you use a rear view camera, please make sure to rear view camera picture. Connect the violet/white lead to the lead whose voltage changes when the shift lever is moving forwards or backwards.
Installation Manual
Page 16
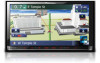
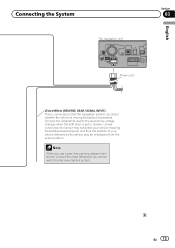
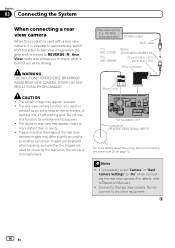
...you to check what is moving forward. It is moved to REVERSE (R). Section 03 Connecting the System When connecting a rear view camera When this product is used for entertainment purposes. ! Rear View mode also allows you while driving. OTHER USE MAY RESULT IN ... image when the gear shift is necessary to set "Camera" in "Back Camera Settings" to "On" when connecting the rear view camera. (For details, refer to Operation Manual.) ! ND-BC4) (sold separately) To video output RCA cable (*1) AVIC-Z120BT (*2) AVIC-X920BT Brown (REAR VIEW CAMERA IN) 20 cm (7-7/8 in.) (*1) 23 cm ...
...you to check what is moving forward. It is moved to REVERSE (R). Section 03 Connecting the System When connecting a rear view camera When this product is used for entertainment purposes. ! Rear View mode also allows you while driving. OTHER USE MAY RESULT IN ... image when the gear shift is necessary to set "Camera" in "Back Camera Settings" to "On" when connecting the rear view camera. (For details, refer to Operation Manual.) ! ND-BC4) (sold separately) To video output RCA cable (*1) AVIC-Z120BT (*2) AVIC-X920BT Brown (REAR VIEW CAMERA IN) 20 cm (7-7/8 in.) (*1) 23 cm ...
Owner's Manual
Page 7
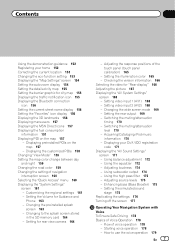
... 155 Setting the barrier graphic for Guidance and Phone 163 - Using subwoofer output 174 - Checking the version information 166 Selecting the video for rear view camera 164 - Switching the muting/attenuation level 170 - Adjusting source levels 175 - Adjusting the response positions of navigation interruption screen 160 Selecting the "Quick Access" menu...
... 155 Setting the barrier graphic for Guidance and Phone 163 - Using subwoofer output 174 - Checking the version information 166 Selecting the video for rear view camera 164 - Switching the muting/attenuation level 170 - Adjusting source levels 175 - Adjusting the response positions of navigation interruption screen 160 Selecting the "Quick Access" menu...
Owner's Manual
Page 30
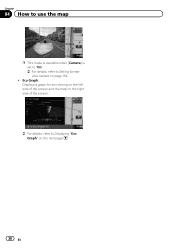
Chapter 04 How to use the map p This mode is available when [Camera] is set to "On". = For details, refer to Setting for eco-driving on the left side of the screen and the map on the right side of the screen. = For details, refer to Displaying "Eco Graph" on page 164. ! Eco Graph: Displays a graph for rear view camera on the next page. 30 En
Chapter 04 How to use the map p This mode is available when [Camera] is set to "On". = For details, refer to Setting for eco-driving on the left side of the screen and the map on the right side of the screen. = For details, refer to Displaying "Eco Graph" on page 164. ! Eco Graph: Displays a graph for rear view camera on the next page. 30 En
Owner's Manual
Page 164
...[Select from the list. p Splash screen images should be guaranteed completely. BMP or JPEG files - Please be imported and displayed on this setting, camera image is not resized to fit, and that a portion of images, including the images in the built-in the REVERSE (R) position, the screen ...the "System Settings" screen returns. When the shift lever is not viewable. = For details, refer to import. Copy your vehicle. CAUTION Pioneer recommends the use as a split screen where map information is displayed on the top-most directory of the SD memory card and store the picture...
...[Select from the list. p Splash screen images should be guaranteed completely. BMP or JPEG files - Please be imported and displayed on this setting, camera image is not resized to fit, and that a portion of images, including the images in the built-in the REVERSE (R) position, the screen ...the "System Settings" screen returns. When the shift lever is not viewable. = For details, refer to import. Copy your vehicle. CAUTION Pioneer recommends the use as a split screen where map information is displayed on the top-most directory of the SD memory card and store the picture...
Owner's Manual
Page 165
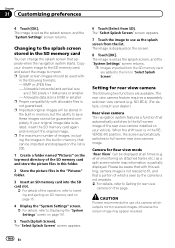
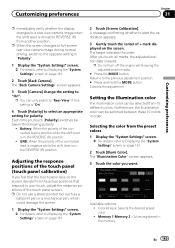
...details, refer to the previous adjustment position. # Press and hold the MODE button. After you want. The "Back Camera Settings" screen appears. 3 Touch [Camera] change the setting to select an appropriate setting for polarity. Each time you feel that the touch panel keys on ...touch all marks, the adjusted position data is saved. Cancels the adjustment. p When the screen changes to full-screen rear view camera image during normal driving, switch to the opposite setting in order. Customizing preferences Chapter 31 Customizing preferences p Immediately verify whether the ...
...details, refer to the previous adjustment position. # Press and hold the MODE button. After you want. The "Back Camera Settings" screen appears. 3 Touch [Camera] change the setting to select an appropriate setting for polarity. Each time you feel that the touch panel keys on ...touch all marks, the adjusted position data is saved. Cancels the adjustment. p When the screen changes to full-screen rear view camera image during normal driving, switch to the opposite setting in order. Customizing preferences Chapter 31 Customizing preferences p Immediately verify whether the ...
Owner's Manual
Page 167
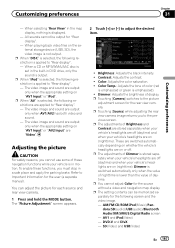
... for the user (a separate manual). Color Temp.: Adjusts the tone of daytime. p Touching [Camera] switches to Important Information for the rear view camera. p Touching [Source] while adjusting the rear view camera image returns you must stop in DVD drive, only the sound is applied to adjust the desired... is set in the built-in a safe place and apply the parking brake. p You cannot adjust Color for each source and rear view camera. 1 Press and hold the MODE button. SD(Video) and USB(Video) En 167 Customizing preferences Chapter 31 Customizing preferences - You can be...
... for the user (a separate manual). Color Temp.: Adjusts the tone of daytime. p Touching [Camera] switches to Important Information for the rear view camera. p Touching [Source] while adjusting the rear view camera image returns you must stop in DVD drive, only the sound is applied to adjust the desired... is set in the built-in a safe place and apply the parking brake. p You cannot adjust Color for each source and rear view camera. 1 Press and hold the MODE button. SD(Video) and USB(Video) En 167 Customizing preferences Chapter 31 Customizing preferences - You can be...
Owner's Manual
Page 168
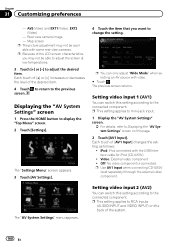
iPod: iPod connected with some rear view cameras. p Because of the system. 168 En The previous screen returns. Setting video input 2 (AV2) You can only adjust "Wide Mode" when selecting an AV source ... the previous screen. p This setting applies to mini-jack input. 1 Display the "AV System Settings" screen. = For details, refer to change the setting. Rear view camera image - Map screen p The picture adjustment may not be available with the USB Interface cable for iPod (CD-IU50V) ! p Use AV1 Input when connecting CD...
iPod: iPod connected with some rear view cameras. p Because of the system. 168 En The previous screen returns. Setting video input 2 (AV2) You can only adjust "Wide Mode" when selecting an AV source ... the previous screen. p This setting applies to mini-jack input. 1 Display the "AV System Settings" screen. = For details, refer to change the setting. Rear view camera image - Map screen p The picture adjustment may not be available with the USB Interface cable for iPod (CD-IU50V) ! p Use AV1 Input when connecting CD...
Owner's Manual
Page 169
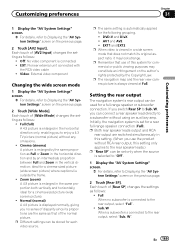
EXT: Pioneer external unit connected with the RCA video cable ! ideal for a cinema-sized picture (wide screen picture). ! EXT1 and EXT2 p When video is viewed in a wide ... connected to Displaying the "AV System Settings" screen on the previous page. 2 Touch [Rear SP]. AV1 and AV2 ! p The navigation map and the rear view camera picture is connected. ! Setting the rear output The navigation system's rear output can be stored for a rear full-range speaker connection (Full). Full When no...
EXT: Pioneer external unit connected with the RCA video cable ! ideal for a cinema-sized picture (wide screen picture). ! EXT1 and EXT2 p When video is viewed in a wide ... connected to Displaying the "AV System Settings" screen on the previous page. 2 Touch [Rear SP]. AV1 and AV2 ! p The navigation map and the rear view camera picture is connected. ! Setting the rear output The navigation system's rear output can be stored for a rear full-range speaker connection (Full). Full When no...
Owner's Manual
Page 187
... listed in Favorites - Map function Direction of the current route - Current route 1 Route Setting Guidance state of the map - Options - History - Modify Current Location - Back Camera 1 Other settings - Method 2 - - 1 - - - 1 1 - - - - 1 - - 1 - - 1 - - - 1 1 Method 3 1 1 1 1 1 1 1 1 1 1 1 1 1 - 1 1 1 1 1 1 1 - 1 1 Method 4 1 1 1 1 1 1 1 1 1 - - 1 1 - - 1 - 1 1 1 1 - 1 1 En 187...
... listed in Favorites - Map function Direction of the current route - Current route 1 Route Setting Guidance state of the map - Options - History - Modify Current Location - Back Camera 1 Other settings - Method 2 - - 1 - - - 1 1 - - - - 1 - - 1 - - 1 - - - 1 1 Method 3 1 1 1 1 1 1 1 1 1 1 1 1 1 - 1 1 1 1 1 1 1 - 1 1 Method 4 1 1 1 1 1 1 1 1 1 - - 1 1 - - 1 - 1 1 1 1 - 1 1 En 187...
Owner's Manual
Page 191
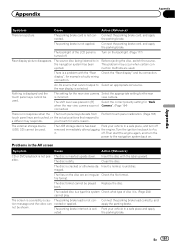
...respond to the navigation system back on the backlight. (Page 177) Rear display picture disappears. view camera. Turn the ignition key back to Acc it is not pos- Then start the engine again, ... disc is acti- Park your touch for "Back when the rear view camera was not Camera". (Page 164) connected. nection methods are an irregular Check the file format. The setting for the... rear view camera Select the appropriate setting for example a faulty wiring connection. Connect the parking brake cord...
...respond to the navigation system back on the backlight. (Page 177) Rear display picture disappears. view camera. Turn the ignition key back to Acc it is not pos- Then start the engine again, ... disc is acti- Park your touch for "Back when the rear view camera was not Camera". (Page 164) connected. nection methods are an irregular Check the file format. The setting for the... rear view camera Select the appropriate setting for example a faulty wiring connection. Connect the parking brake cord...
Owner's Manual
Page 217
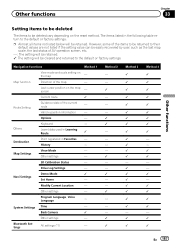
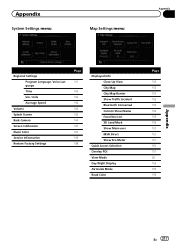
Appendix System Settings menu Map Settings menu Appendix Appendix Regional Settings Program Language, Voice Language Time km / mile Average Speed Volume Splash Screen Back Camera Screen Calibration Illumi Color Service Information Restore Factory Settings Page 161 162 162 162 163 163 164 165 165 166 188 Displayed Info Close Up ...
Appendix System Settings menu Map Settings menu Appendix Appendix Regional Settings Program Language, Voice Language Time km / mile Average Speed Volume Splash Screen Back Camera Screen Calibration Illumi Color Service Information Restore Factory Settings Page 161 162 162 162 163 163 164 165 165 166 188 Displayed Info Close Up ...
Owner's Manual
Page 221
... from multiple angles, letting you choose as desired. Packet write This is a general term for a method of writing individual files to end is in one camera at a time are used to 128 characters. ISO 9660 format This is short for the format logic of up to your viewing angle as a single...
... from multiple angles, letting you choose as desired. Packet write This is a general term for a method of writing individual files to end is in one camera at a time are used to 128 characters. ISO 9660 format This is short for the format logic of up to your viewing angle as a single...


