
Owner's Manual
Page 2
... card 15 - Connecting your iPod 19 Flow from actual screens. Switching the map orientation 27 - Conventions used in this Pioneer product. Ejecting a disc (for AVIC-Z120BT) 15 - Display during freeway driving 27 Roads without notice for a location by -turn instructions 27 Operating the map screen 27 - Setting the "Quick Access" menu 28 Switching the view...
... card 15 - Connecting your iPod 19 Flow from actual screens. Switching the map orientation 27 - Conventions used in this Pioneer product. Ejecting a disc (for AVIC-Z120BT) 15 - Display during freeway driving 27 Roads without notice for a location by -turn instructions 27 Operating the map screen 27 - Setting the "Quick Access" menu 28 Switching the view...
Owner's Manual
Page 3
... name of Interest (POI) 36 - Checking your destination 41 - Searching for POIs by scroll mode 46 Editing registered locations 46 - Checking traffic information on the map 54 Using traffic information 55 - Adding a waypoint 44 - Checking worldwide weather conditions 54 - Finding the location by selecting a theater 53 Browsing weather information 54 - Searching...
... name of Interest (POI) 36 - Checking your destination 41 - Searching for POIs by scroll mode 46 Editing registered locations 46 - Checking traffic information on the map 54 Using traffic information 55 - Adding a waypoint 44 - Checking worldwide weather conditions 54 - Finding the location by selecting a theater 53 Browsing weather information 54 - Searching...
Owner's Manual
Page 4
... Echo canceling and noise reduction 74 - Clearing memory 75 - iPod list screen) 77 - Setting an alternative route to read traffic information on the map 56 - Pairing from your Bluetooth devices 63 - Deleting a registered device 66 Connecting a registered Bluetooth device 66 - Dialing GOOG-411 70 - Stopping... devices 63 - Setting for hands-free phoning 75 Basic operations of the AV source Displaying the AV operation screen 77 - Dialing from the map 71 4 En Receiving a phone call 71 - Dialing from the history 69 - Answering an incoming call 68 - Deleting registered contacts 73...
... Echo canceling and noise reduction 74 - Clearing memory 75 - iPod list screen) 77 - Setting an alternative route to read traffic information on the map 56 - Pairing from your Bluetooth devices 63 - Deleting a registered device 66 Connecting a registered Bluetooth device 66 - Dialing GOOG-411 70 - Stopping... devices 63 - Setting for hands-free phoning 75 Basic operations of the AV source Displaying the AV operation screen 77 - Dialing from the map 71 4 En Receiving a phone call 71 - Dialing from the history 69 - Answering an incoming call 68 - Deleting registered contacts 73...
Owner's Manual
Page 7
... the 3D landmarks 156 Displaying maneuvers 157 Displaying the MSN Direct icons 157 Displaying the fuel consumption information 157 Displaying POI on the map 157 - Switching the muting/attenuation level 170 - Setting the simulated sound stage 175 Replicating the settings 176 Turning off the screen...Quick Access" menu 160 Displaying the "System Settings" screen 161 - Displaying preinstalled POIs on the map 157 - Displaying the customized POIs 158 Changing "View Mode" 159 Setting the map color change between day and night 159 Changing the road color 159 Changing the setting of voice ...
... the 3D landmarks 156 Displaying maneuvers 157 Displaying the MSN Direct icons 157 Displaying the fuel consumption information 157 Displaying POI on the map 157 - Switching the muting/attenuation level 170 - Setting the simulated sound stage 175 Replicating the settings 176 Turning off the screen...Quick Access" menu 160 Displaying the "System Settings" screen 161 - Displaying preinstalled POIs on the map 157 - Displaying the customized POIs 158 Changing "View Mode" 159 Setting the map color change between day and night 159 Changing the road color 159 Changing the setting of voice ...

Owner's Manual
Page 9
... on the screen are described in this manual indicates moving on the screen, you should note. Terms used in ALL CAPITAL, BOLD lettering: e.g.) MENU button, MAP button. ! Descriptions of DVD-Video, DivX®, iPod, and any equipment that are available on the same screen are collectively referred to as general-purpose...
... on the screen are described in this manual indicates moving on the screen, you should note. Terms used in ALL CAPITAL, BOLD lettering: e.g.) MENU button, MAP button. ! Descriptions of DVD-Video, DivX®, iPod, and any equipment that are available on the same screen are collectively referred to as general-purpose...
Owner's Manual
Page 10
...Introduction "SD memory card" The SD memory card, SDHC memory card, microSD card and microSDHC card are collectively referred to as iPod. Map coverage For details about iPod compatibility with this navigation system, refer to the information on -demand applications. Notice regarding DVDVideo viewing This ... with this navigation system, refer to the information on the iPod models and the software version of this navigation system with a Pioneer USB interface cable for commercial or public viewing purposes may not work correctly. ! An independent license for such use this system ...
...Introduction "SD memory card" The SD memory card, SDHC memory card, microSD card and microSDHC card are collectively referred to as iPod. Map coverage For details about iPod compatibility with this navigation system, refer to the information on -demand applications. Notice regarding DVDVideo viewing This ... with this navigation system, refer to the information on the iPod models and the software version of this navigation system with a Pioneer USB interface cable for commercial or public viewing purposes may not work correctly. ! An independent license for such use this system ...
Owner's Manual
Page 13
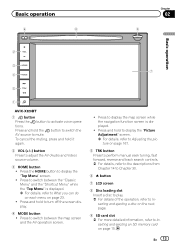
... to mute. To cancel the muting, press and hold the button to switch the AV source to switch between the map screen and the AV operation screen. ! Press to display the map screen while the navigation function screen is displayed. = For details, refer to turn off the screen display. 4 MODE button ! En... Menu" and the "Shortcut Menu" while the "Top Menu" is displayed. ! Press the HOME button to activate voice operations. Basic operation 6 8 Chapter 02 9 Basic operation 2 3 7 4 5 1 AVIC-X920BT 1 button Press the button to display the "Top Menu" screen. !
... to mute. To cancel the muting, press and hold the button to switch the AV source to switch between the map screen and the AV operation screen. ! Press to display the map screen while the navigation function screen is displayed. = For details, refer to turn off the screen display. 4 MODE button ! En... Menu" and the "Shortcut Menu" while the "Top Menu" is displayed. ! Press the HOME button to activate voice operations. Basic operation 6 8 Chapter 02 9 Basic operation 2 3 7 4 5 1 AVIC-X920BT 1 button Press the button to display the "Top Menu" screen. !
Owner's Manual
Page 16
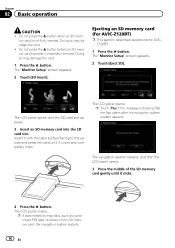
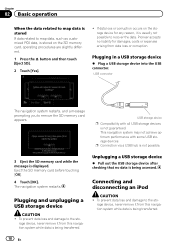
... LCD panel opens, and the SD card slot appears. 3 Insert an SD memory card into the SD card slot. Ejecting an SD memory card (for AVIC-Z120BT) p This section describes operations for AVICZ120BT. 1 Press the h button. Insert it clicks. 4 Press the h button. p If data related to the upside and press the ...card until it with the label surface facing to map data, such as customized POI data, is not fully inserted. Doing so may damage the card. ! Do not press the h button when an SD mem...
... LCD panel opens, and the SD card slot appears. 3 Insert an SD memory card into the SD card slot. Ejecting an SD memory card (for AVIC-Z120BT) p This section describes operations for AVICZ120BT. 1 Press the h button. Insert it clicks. 4 Press the h button. p If data related to the upside and press the ...card until it with the label surface facing to map data, such as customized POI data, is not fully inserted. Doing so may damage the card. ! Do not press the h button when an SD mem...
Owner's Manual
Page 17
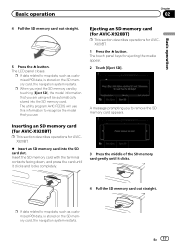
... the SD memory card gently until it clicks. 4 Pull the SD memory card out straight. The LCD panel closes. Ejecting an SD memory card (for AVIC-X920BT) p This section describes operations for AVICX920BT. % Insert an SD memory card into the SD memory card. The utility program... into the SD card slot. Inserting an SD memory card (for AVIC-X920BT) p This section describes operations for AVICX920BT. 1 Press the h button. En 17 p When you eject the SD memory card by touching [Eject SD], the model information that you to map data, such as customized POI data, is stored on the...
... the SD memory card gently until it clicks. 4 Pull the SD memory card out straight. The LCD panel closes. Ejecting an SD memory card (for AVIC-X920BT) p This section describes operations for AVICX920BT. % Insert an SD memory card into the SD memory card. The utility program... into the SD card slot. Inserting an SD memory card (for AVIC-X920BT) p This section describes operations for AVICX920BT. 1 Press the h button. En 17 p When you eject the SD memory card by touching [Eject SD], the model information that you to map data, such as customized POI data, is stored on the...
Owner's Manual
Page 18
Chapter 02 Basic operation When the data related to map data is stored If data related to map data, such as customized POI data, is stored on the storage device for damages, costs or expenses arising from data loss or corruption. This navigation ... any reason, it is usually not possible to recover the data. rage device, never remove it from this navigation system while data is being transferred. Pioneer accepts no data is being accessed.
Chapter 02 Basic operation When the data related to map data is stored If data related to map data, such as customized POI data, is stored on the storage device for damages, costs or expenses arising from data loss or corruption. This navigation ... any reason, it is usually not possible to recover the data. rage device, never remove it from this navigation system while data is being transferred. Pioneer accepts no data is being accessed.
Owner's Manual
Page 20
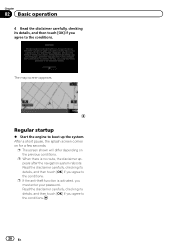
... details, and then touch [OK] if you agree to the conditions. 20 En After a short pause, the splash screen comes on the previous conditions. The map screen appears. Read the disclaimer carefully, checking its details, and then touch [OK] if you agree to the conditions. p When there is activated, you must...
... details, and then touch [OK] if you agree to the conditions. 20 En After a short pause, the splash screen comes on the previous conditions. The map screen appears. Read the disclaimer carefully, checking its details, and then touch [OK] if you agree to the conditions. p When there is activated, you must...
Owner's Manual
Page 23
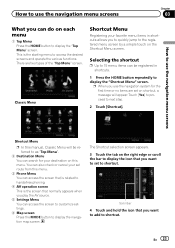
...navigation menu screens Chapter 03 What you want to set route from this menu. 3 Phone Menu You can access the screen to customize settings. 6 Map screen Press the MODE button to display the "Shortcut Menu" screen. Selecting the shortcut p Up to 15 menu items can search for the first..."Top Menu" screen. You can also check or cancel your favorite menu items in shortcuts. 1 Press the HOME button repeatedly to display the navigation map screen. Shortcut Menu p In this menu. En 23 Classic Menu Shortcut Menu Registering your set to shortcut. Touch [Yes] to proceed to access the...
...navigation menu screens Chapter 03 What you want to set route from this menu. 3 Phone Menu You can access the screen to customize settings. 6 Map screen Press the MODE button to display the "Shortcut Menu" screen. Selecting the shortcut p Up to 15 menu items can search for the first..."Top Menu" screen. You can also check or cancel your favorite menu items in shortcuts. 1 Press the HOME button repeatedly to display the navigation map screen. Shortcut Menu p In this menu. En 23 Classic Menu Shortcut Menu Registering your set to shortcut. Touch [Yes] to proceed to access the...
Owner's Manual
Page 25
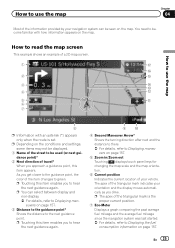
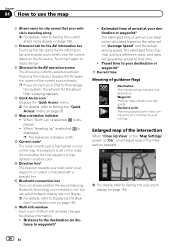
... = For details, refer to Displaying maneuvers on page 157. 5 Zoom in/Zoom out Touching displays touch panel keys for changing the map scale and the map orientation. 6 Current position Indicates the current location of your vehicle. The apex of the triangular mark indicates your navigation system can select ... fuel mileage since the navigation system was last started. = For details, refer to hear the next guidance again. How to use the map Chapter 04 Most of the information provided by your orientation and the display moves automatically as you get closer to the guidance point, the...
... = For details, refer to Displaying maneuvers on page 157. 5 Zoom in/Zoom out Touching displays touch panel keys for changing the map scale and the map orientation. 6 Current position Indicates the current location of your vehicle. The apex of the triangular mark indicates your navigation system can select ... fuel mileage since the navigation system was last started. = For details, refer to hear the next guidance again. How to use the map Chapter 04 Most of the information provided by your orientation and the display moves automatically as you get closer to the guidance point, the...
Owner's Manual
Page 26
...AV information bar Touching this tab opens the AV information bar and enables you to briefly view the current status on the map. p The red arrow indicates north. Enlarged map of [Multi-Info window] changes the display information. ! d Current route* The route currently set on the route, ... displays the AV operation screen of guidance flags Destination The checkered flag indicates your waypoints. If a waypoint is set is highlighted in the "Map Settings" screen is playing appears. g Multi-Info window Each touch of the intersection When "Close Up View" in another color. You can...
...AV information bar Touching this tab opens the AV information bar and enables you to briefly view the current status on the map. p The red arrow indicates north. Enlarged map of [Multi-Info window] changes the display information. ! d Current route* The route currently set on the route, ... displays the AV operation screen of guidance flags Destination The checkered flag indicates your waypoints. If a waypoint is set is highlighted in the "Map Settings" screen is playing appears. g Multi-Info window Each touch of the intersection When "Close Up View" in another color. You can...
Owner's Manual
Page 27
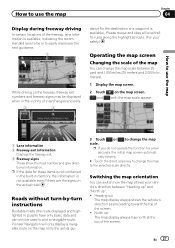
... exit numbers and freeway signs may be used to plot a navigable route. Pioneer Navigation will only display a navigable route on the map (only the arrival gui- 3 Touch or to change the map to the selected scale directly. North up : The map display always shows the vehicle's direction as proceeding toward the top of interchanges...
... exit numbers and freeway signs may be used to plot a navigable route. Pioneer Navigation will only display a navigable route on the map (only the arrival gui- 3 Touch or to change the map to the selected scale directly. North up : The map display always shows the vehicle's direction as proceeding toward the top of interchanges...
Owner's Manual
Page 28
... the default setting. = For details, refer to Selecting the "Quick Ac- p The map orientation is fixed at "North up " when the 3D map screen is displayed. 1 Display the map screen. 2 Touch on the map screen. or appears. You can modify the conditions for the location indicated by the cursor or... the current position. 3 Touch or to the current position. This item can be removed from the Quick Access menu. % When the map is displayed, touch . 1 2 1 Cursor 2 Distance from the current position Positioning the cursor to the desired location results in a brief informational overview...
... the default setting. = For details, refer to Selecting the "Quick Ac- p The map orientation is fixed at "North up " when the 3D map screen is displayed. 1 Display the map screen. 2 Touch on the map screen. or appears. You can modify the conditions for the location indicated by the cursor or... the current position. 3 Touch or to the current position. This item can be removed from the Quick Access menu. % When the map is displayed, touch . 1 2 1 Cursor 2 Distance from the current position Positioning the cursor to the desired location results in a brief informational overview...
Owner's Manual
Page 29
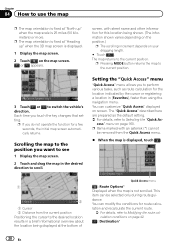
... set . ! En 29 Street View: Information on the next four guidance points closest to the current location appear in order from top to Displaying the "Map Settings" screen on page 69. The "View Mode" screen appears. 3 Touch the type that you want to Calling a number in the vicinity of the ...the next route to be selected for Guidance and Phone on the right side of the screen. The following types: ! 2D View (default): Displays a normal map (2D map). - You can be taken by scroll mode on page 46. : Vicinity Search Find POIs (Points Of Interest) in the "Contacts List" on page 154...
... set . ! En 29 Street View: Information on the next four guidance points closest to the current location appear in order from top to Displaying the "Map Settings" screen on page 69. The "View Mode" screen appears. 3 Touch the type that you want to Calling a number in the vicinity of the ...the next route to be selected for Guidance and Phone on the right side of the screen. The following types: ! 2D View (default): Displays a normal map (2D map). - You can be taken by scroll mode on page 46. : Vicinity Search Find POIs (Points Of Interest) in the "Contacts List" on page 154...
Owner's Manual
Page 30
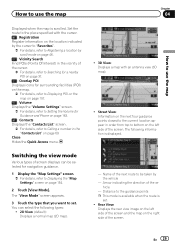
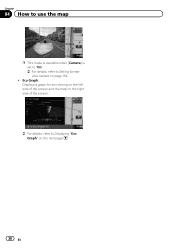
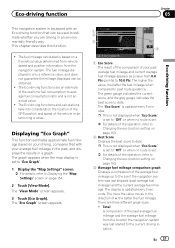
Chapter 04 How to use the map p This mode is available when [Camera] is set to "On". = For details, refer to Displaying "Eco Graph" on page 164. ! Eco Graph: Displays a graph for eco-driving on the left side of the screen and the map on the right side of the screen. = For details, refer to Setting for rear view camera on the next page. 30 En
Chapter 04 How to use the map p This mode is available when [Camera] is set to "On". = For details, refer to Displaying "Eco Graph" on page 164. ! Eco Graph: Displays a graph for eco-driving on the left side of the screen and the map on the right side of the screen. = For details, refer to Setting for rear view camera on the next page. 30 En
Owner's Manual
Page 31
...displayed when "Eco Score" is set to "Off" or when no route is set to "Eco Graph". 1 Display the "Map Settings" screen. = For details, refer to Displaying the "Map Settings" screen on page 153. 3 Average fuel mileage comparison graph Displays a comparison of the past , and displays the results ... vehicle speed and position information from 0.0 Pts (points) to past average fuel mileage) and the current average fuel mileage. The graph appears when the map display is updated every 3 seconds. The higher the value, the better the fuel mileage when compared to 10.0 Pts. The "Eco Score" is ...
...displayed when "Eco Score" is set to "Off" or when no route is set to "Eco Graph". 1 Display the "Map Settings" screen. = For details, refer to Displaying the "Map Settings" screen on page 153. 3 Average fuel mileage comparison graph Displays a comparison of the past , and displays the results ... vehicle speed and position information from 0.0 Pts (points) to past average fuel mileage) and the current average fuel mileage. The graph appears when the map display is updated every 3 seconds. The higher the value, the better the fuel mileage when compared to 10.0 Pts. The "Eco Score" is ...
Owner's Manual
Page 33
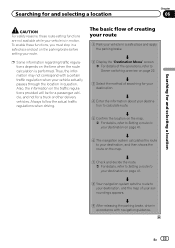
... passenger vehicle, and not for and selecting a location CAUTION For safety reasons, these functions, you must stop in a safe place and put on the map. Always follow the actual traffic regulations when driving. j 2 Display the "Destination Menu" screen. = For details of creating your route 1 Park your ...in a safe place and apply the parking brake. En 33 j 5 Confirm the location on the map. = For details, refer to Setting a route to your destination, and the map of searching for your route. p Some information regarding traffic regulations depends on page 41. To enable ...
... passenger vehicle, and not for and selecting a location CAUTION For safety reasons, these functions, you must stop in a safe place and put on the map. Always follow the actual traffic regulations when driving. j 2 Display the "Destination Menu" screen. = For details of creating your route 1 Park your ...in a safe place and apply the parking brake. En 33 j 5 Confirm the location on the map. = For details, refer to Setting a route to your destination, and the map of searching for your route. p Some information regarding traffic regulations depends on page 41. To enable ...


