
Camera Operations Guide
Page 5
...Handycam 26 Adjusting the exposure 27 Adjusting the exposure for a longer time 23 Using zoom ...23 Using the built-in light 23 Recording in mirror mode 24 Superimposing the date and time on pictures ( TRV138/338 25 Recording still images - FADER 30 ,continued 5 Tape photo recording ( TRV280... Recording for backlit subjects 27 Adjusting the exposure manually 28 Recording in and out of Contents CCD-TRV138: TRV138 CCD-TRV338: DCR-TRV280: TRV280 TRV338 Read this first 2 Quick Start Guide Recording movies 8 Recording/Playing back with ease - NightShot plus 28 Adjusting the...
...Handycam 26 Adjusting the exposure 27 Adjusting the exposure for a longer time 23 Using zoom ...23 Using the built-in light 23 Recording in mirror mode 24 Superimposing the date and time on pictures ( TRV138/338 25 Recording still images - FADER 30 ,continued 5 Tape photo recording ( TRV280... Recording for backlit subjects 27 Adjusting the exposure manually 28 Recording in and out of Contents CCD-TRV138: TRV138 CCD-TRV338: DCR-TRV280: TRV280 TRV338 Read this first 2 Quick Start Guide Recording movies 8 Recording/Playing back with ease - NightShot plus 28 Adjusting the...
Camera Operations Guide
Page 6
Superimposing a title 31 Searching for the last scene of the most recent recording - Easy Handycam 36 Various playback functions 37 Displaying the screen indicators 37 Displaying the date/time and camera settings data - Data code ( TRV280) ...37 Playing the picture on a tape 34 Playing back in various modes 35 Playing back with ease - END SEARCH 33 Playback Viewing pictures recorded on a TV 39 6
Superimposing a title 31 Searching for the last scene of the most recent recording - Easy Handycam 36 Various playback functions 37 Displaying the screen indicators 37 Displaying the date/time and camera settings data - Data code ( TRV280) ...37 Playing the picture on a tape 34 Playing back in various modes 35 Playing back with ease - END SEARCH 33 Playback Viewing pictures recorded on a TV 39 6
Camera Operations Guide
Page 10
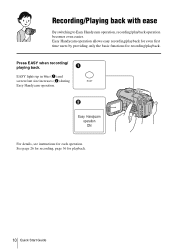
Easy Handycam operation allows easy recording/playback for even first time users by providing only the basic functions for playback. 10 Quick Start Guide See page 26 for recording, page 36 for recording/playback. Easy Handycam operation ON For details, see instructions for each operation. Press EASY when recording/ playing back. EASY lights up in blue (1) and screen font size increases (2) during Easy Handycam operation. Recording/Playing back with ease By switching to Easy Handycam operation, recording/playback operation becomes even easier.
Easy Handycam operation allows easy recording/playback for even first time users by providing only the basic functions for playback. 10 Quick Start Guide See page 26 for recording, page 36 for recording/playback. Easy Handycam operation ON For details, see instructions for each operation. Press EASY when recording/ playing back. EASY lights up in blue (1) and screen font size increases (2) during Easy Handycam operation. Recording/Playing back with ease By switching to Easy Handycam operation, recording/playback operation becomes even easier.
Camera Operations Guide
Page 21
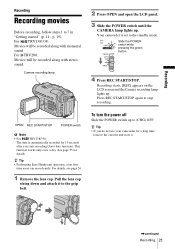
... recorded for 10 seconds after you do not use your camcorder for details. Slide the POWER switch while pressing the green... Note • For TRV138/338: The date is set to stop recording. z Tip • Performing Easy Handycam operation, even first time users can record easily. z Tip • If you start recording (Auto date function)....screen and the Camera recording lamp lights up . For details, see page 26. 1 Remove the lens cap. For TRV280: Movies will be recorded along with stereo sound. Recording Recording Recording movies Before recording, follow steps 1 to 7 in ...
... recorded for 10 seconds after you do not use your camcorder for details. Slide the POWER switch while pressing the green... Note • For TRV138/338: The date is set to stop recording. z Tip • Performing Easy Handycam operation, even first time users can record easily. z Tip • If you start recording (Auto date function)....screen and the Camera recording lamp lights up . For details, see page 26. 1 Remove the lens cap. For TRV280: Movies will be recorded along with stereo sound. Recording Recording Recording movies Before recording, follow steps 1 to 7 in ...
Camera Operations Guide
Page 26
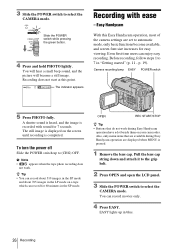
...Slide the POWER switch up in the SP mode. OPEN REC START/STOP z Tip • Buttons that are available during Easy Handycam operation have a dot beside them on your camcorder. Pull the lens cap string down and attach it to the grip belt. 2 Press OPEN and open the LCD panel. 3...enjoy easy recording. EASY lights up to select the CAMERA mode. b Note • appears when the tape photo recording does not work during Easy Handycam operation are set to automatic mode, only basic functions become a still image. Slide the POWER switch while pressing the green button. 4 Press and ...
...Slide the POWER switch up in the SP mode. OPEN REC START/STOP z Tip • Buttons that are available during Easy Handycam operation have a dot beside them on your camcorder. Pull the lens cap string down and attach it to the grip belt. 2 Press OPEN and open the LCD panel. 3...enjoy easy recording. EASY lights up to select the CAMERA mode. b Note • appears when the tape photo recording does not work during Easy Handycam operation are set to automatic mode, only basic functions become a still image. Slide the POWER switch while pressing the green button. 4 Press and ...
Camera Operations Guide
Page 27
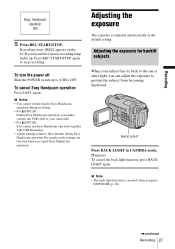
...CAMERA mode. . Adjusting the exposure for backlit subjects When your camcorder. • For TRV280: You cannot use Easy Handycam operation together with USB Streaming. • All the settings return to (CHG) OFF. Recording Easy Handycam operation ON 5 Press REC START/STOP. To cancel the back...on the LCD screen and the Camera recording lamp lights up to their defaults during recording. • For TRV280: During Easy Handycam operation, you cancel Easy Handycam operation. Previously made settings are restored when you cannot connect the USB cable to your subject has its back...
...CAMERA mode. . Adjusting the exposure for backlit subjects When your camcorder. • For TRV280: You cannot use Easy Handycam operation together with USB Streaming. • All the settings return to (CHG) OFF. Recording Easy Handycam operation ON 5 Press REC START/STOP. To cancel the back...on the LCD screen and the Camera recording lamp lights up to their defaults during recording. • For TRV280: During Easy Handycam operation, you cancel Easy Handycam operation. Previously made settings are restored when you cannot connect the USB cable to your subject has its back...
Camera Operations Guide
Page 34
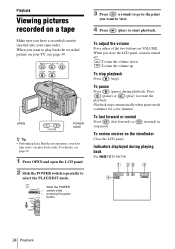
...; Performing Easy Handycam operation, even first time users can play back easily. To adjust the volume Press either of the two buttons on the viewfinder Close the LCD panel. Press (pause) or (play) to select the PLAY/EDIT mode. When you want to play back the recorded picture on your camcorder. Indicators...
...; Performing Easy Handycam operation, even first time users can play back easily. To adjust the volume Press either of the two buttons on the viewfinder Close the LCD panel. Press (pause) or (play) to select the PLAY/EDIT mode. When you want to play back the recorded picture on your camcorder. Indicators...
Camera Operations Guide
Page 36
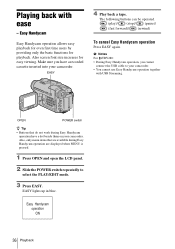
.../EDIT mode. 3 Press EASY. OPEN POWER switch z Tip • Buttons that are available during Easy Handycam operation have a recorded cassette inserted into your camcorder. EASY 4 Play back a tape. The following buttons can be operated. (play)/ (stop)/ (pause)/... cancel Easy Handycam operation Press EASY again. b Notes For TRV280: • During Easy Handycam operation, you have a dot beside them on your camcorder. • You cannot use Easy Handycam operation together with ease - Easy Handycam operation ON 36 Playback Easy Handycam Easy Handycam operation allows easy...
.../EDIT mode. 3 Press EASY. OPEN POWER switch z Tip • Buttons that are available during Easy Handycam operation have a recorded cassette inserted into your camcorder. EASY 4 Play back a tape. The following buttons can be operated. (play)/ (stop)/ (pause)/... cancel Easy Handycam operation Press EASY again. b Notes For TRV280: • During Easy Handycam operation, you have a dot beside them on your camcorder. • You cannot use Easy Handycam operation together with ease - Easy Handycam operation ON 36 Playback Easy Handycam Easy Handycam operation allows easy...
Camera Operations Guide
Page 90
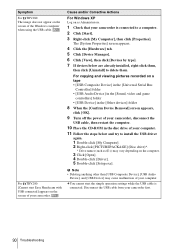
...[Driver]. 5 Double-click [Setup.exe]. Cause and/or Corrective Actions For Windows XP Log on the screen of your camcorder. cYou cannot start Easy Handycam with USB connected] appears on as (E:)) may cause malfunction of the Windows computer when using the USB cable. Disconnect the ... your camcorder is connected. The [System Properties] screen appears. 4 Click the [Hardware] tab. 5 Click [Device Manager]. 6 Click [View], then click [Devices by type]. 7 If devices below and try to a computer. 2 Click [Start]. 3 Right-click [My Computer], then click [Properties]. For TRV280: [...
...[Driver]. 5 Double-click [Setup.exe]. Cause and/or Corrective Actions For Windows XP Log on the screen of your camcorder. cYou cannot start Easy Handycam with USB connected] appears on as (E:)) may cause malfunction of the Windows computer when using the USB cable. Disconnect the ... your camcorder is connected. The [System Properties] screen appears. 4 Click the [Hardware] tab. 5 Click [Device Manager]. 6 Click [View], then click [Devices by type]. 7 If devices below and try to a computer. 2 Click [Start]. 3 Right-click [My Computer], then click [Properties]. For TRV280: [...

Camera Operations Guide
Page 91
... 98. cChange the settings as described in the following procedures: 1 Select [Start], [Programs] ([All Programs] for Windows XP), [Picture Package], [Handycam Tools], and [USB Streaming Tool], then start up [USB Streaming Tool]. 2 Adjust the slider in the (-) direction on [Select video quality]. 3... Follow the on your camcorder to another device on the [Select audio device] screen. 3 Follow the on-screen instructions, click [Next], then click [Done]. For TRV280: The CD-R drive is connected to "First Step Guide" in PDF. Symptom...
... 98. cChange the settings as described in the following procedures: 1 Select [Start], [Programs] ([All Programs] for Windows XP), [Picture Package], [Handycam Tools], and [USB Streaming Tool], then start up [USB Streaming Tool]. 2 Adjust the slider in the (-) direction on [Select video quality]. 3... Follow the on your camcorder to another device on the [Select audio device] screen. 3 Follow the on-screen instructions, click [Next], then click [Done]. For TRV280: The CD-R drive is connected to "First Step Guide" in PDF. Symptom...
Camera Operations Guide
Page 93
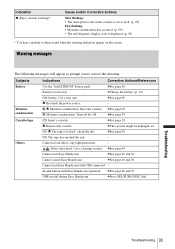
... - Troubleshooting Troubleshooting 93 cSee page 96 - % Z Moisture condensation. Dirty video head. Cannot start Easy Handycam with Easy Handycam operation cSee page 26 and 36. Cannot start Easy Handycam cSee page 26 and 36. Turn off for 1H. Q Insert a cassette. Use a cleaning cassette. ... to copyright protection. - cThe cassette might be damaged, etc. Cannot record due to correct the situation. USB invalid during Easy Handycam cPress SEL/PUSH EXEC dial. Indication Z (Eject cassette warning)* Cause and/or Corrective Actions Slow flashing: • The write-...
... - Troubleshooting Troubleshooting 93 cSee page 96 - % Z Moisture condensation. Dirty video head. Cannot start Easy Handycam with Easy Handycam operation cSee page 26 and 36. Cannot start Easy Handycam cSee page 26 and 36. Turn off for 1H. Q Insert a cassette. Use a cleaning cassette. ... to copyright protection. - cThe cassette might be damaged, etc. Cannot record due to correct the situation. USB invalid during Easy Handycam cPress SEL/PUSH EXEC dial. Indication Z (Eject cassette warning)* Cause and/or Corrective Actions Slow flashing: • The write-...
Camera Operations Guide
Page 109
..., 55 D Data code (DATA CODE) .....37, 57 Date/time 37 DEMO MODE 56 Digital program editing (VIDEO EDIT 67 Digital zoom (D ZOOM)... 45 Digital8 system 95 Direct Access to "Click to DVD 79 DirectX 9.0c 76 Display DISPLAY 58 Display indicator....... 108 DNR 50 Dual sound track tape ........ 49... Dubbing 59 DV Interface 79 E Easy Dubbing 62 Easy Handycam 26, 36 EDIT 49 END SEARCH 33 Exposure 27 F FADER 30 First Step Guide........... 73, 74 Focus 29 Frame recording (FRAME REC 53 Full...
..., 55 D Data code (DATA CODE) .....37, 57 Date/time 37 DEMO MODE 56 Digital program editing (VIDEO EDIT 67 Digital zoom (D ZOOM)... 45 Digital8 system 95 Direct Access to "Click to DVD 79 DirectX 9.0c 76 Display DISPLAY 58 Display indicator....... 108 DNR 50 Dual sound track tape ........ 49... Dubbing 59 DV Interface 79 E Easy Dubbing 62 Easy Handycam 26, 36 EDIT 49 END SEARCH 33 Exposure 27 F FADER 30 First Step Guide........... 73, 74 Focus 29 Frame recording (FRAME REC 53 Full...
Marketing Specifications
Page 1
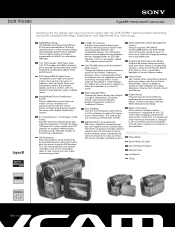
...time left when using the USB interface. Fader Effect(s) Enhance your home videos. NightShot® Plus Infrared System With Sony's NightShot Infrared System you can continuously record for camera "shake" without the overall monochrome color common with earlier low-...Picture stabilization system that extreme digital zooming is clearer, with an IEEE1394 interface, such as camcorders, digital VTRs, capture cards and PCs. DCR-TRV280 Digital8® Handycam® Camcorder Stepping into the Digital age has never been easier with significantly less video noise providing stunning...
...time left when using the USB interface. Fader Effect(s) Enhance your home videos. NightShot® Plus Infrared System With Sony's NightShot Infrared System you can continuously record for camera "shake" without the overall monochrome color common with earlier low-...Picture stabilization system that extreme digital zooming is clearer, with an IEEE1394 interface, such as camcorders, digital VTRs, capture cards and PCs. DCR-TRV280 Digital8® Handycam® Camcorder Stepping into the Digital age has never been easier with significantly less video noise providing stunning...
Marketing Specifications
Page 2
...Mode: N/A Shutter Speed: 1/60-1/4000 (AE Mode) Optical Zoom: 20X Digital Zoom: 990X Resolution: N/A USB Streaming: Yes Lens Type: Sony Lens SteadyShot® Image Stabilization: Yes (Electronic) Accessory Shoe: N/A White Balance: Auto Memory Stick PRO™ Media Compatibility: N/A Still ... Sepia, Slim, Solarize and Stretch Weight: 1 lb 11 oz (780g) main unit only; 2 lbs (890g) inc. DCR-TRV280 Digital8® Handycam® Camcorder Specifications Hardware General Viewfinder: Black and White (90K Pixels) Imaging Device: 1/6" CCD Pixel Gross: 460K Recording Media: Standard 8mm, Hi8...
...Mode: N/A Shutter Speed: 1/60-1/4000 (AE Mode) Optical Zoom: 20X Digital Zoom: 990X Resolution: N/A USB Streaming: Yes Lens Type: Sony Lens SteadyShot® Image Stabilization: Yes (Electronic) Accessory Shoe: N/A White Balance: Auto Memory Stick PRO™ Media Compatibility: N/A Still ... Sepia, Slim, Solarize and Stretch Weight: 1 lb 11 oz (780g) main unit only; 2 lbs (890g) inc. DCR-TRV280 Digital8® Handycam® Camcorder Specifications Hardware General Viewfinder: Black and White (90K Pixels) Imaging Device: 1/6" CCD Pixel Gross: 460K Recording Media: Standard 8mm, Hi8...


