
Camera Operations Guide
Page 2
...Information Declaration of the FCC Rules. Telephone No.: 858-942-2230 This device complies with Part 15 of Conformity Trade Name: SONY Model No.: DCR-TRV280 Responsible Party: Sony Electronics Inc. WARNING To prevent fire or shock hazard, do not expose the unit to persons. If you have any ... user to these numbers whenever you may call upon your used rechargeable batteries to discontinue midway (fail), restart the application or disconnect and connect the communication cable (USB, etc.) again. Refer to the presence of electric shock to rain or moisture. Model No.AC- The...
...Information Declaration of the FCC Rules. Telephone No.: 858-942-2230 This device complies with Part 15 of Conformity Trade Name: SONY Model No.: DCR-TRV280 Responsible Party: Sony Electronics Inc. WARNING To prevent fire or shock hazard, do not expose the unit to persons. If you have any ... user to these numbers whenever you may call upon your used rechargeable batteries to discontinue midway (fail), restart the application or disconnect and connect the communication cable (USB, etc.) again. Refer to the presence of electric shock to rain or moisture. Model No.AC- The...
Camera Operations Guide
Page 3
...8226; Television programs, films, video tapes, and other device Before connecting your camcorder. • The on , the user is no specific model names...DCR-TRV280: TRV280 Instructions with specific model names are for the contents of time may be contrary to provide reasonable protection against harmful interference in a residential installation. CAUTION You are cautioned that any changes or modifications not expressly approved in this manual could void your camcorder... the limits for effective use standard 8 mm and Hi8 , Digital8 video cassettes on a TV, you see. • In ...
...8226; Television programs, films, video tapes, and other device Before connecting your camcorder. • The on , the user is no specific model names...DCR-TRV280: TRV280 Instructions with specific model names are for the contents of time may be contrary to provide reasonable protection against harmful interference in a residential installation. CAUTION You are cautioned that any changes or modifications not expressly approved in this manual could void your camcorder... the limits for effective use standard 8 mm and Hi8 , Digital8 video cassettes on a TV, you see. • In ...
Camera Operations Guide
Page 7
... settings 41 Using the (MANUAL SET) menu - WORLD TIME/VIDEO EDIT, etc 57 Dubbing/Editing Connecting to a VCR 59 Dubbing to DVD") ( TRV280 79 Troubleshooting Troubleshooting 82 Warning indicators and messages .....92 Additional Information Using your camcorder abroad 94 Usable cassette tapes 95 About the "InfoLITHIUM" battery pack 96 About i.LINK 97 Maintenance...
... settings 41 Using the (MANUAL SET) menu - WORLD TIME/VIDEO EDIT, etc 57 Dubbing/Editing Connecting to a VCR 59 Dubbing to DVD") ( TRV280 79 Troubleshooting Troubleshooting 82 Warning indicators and messages .....92 Additional Information Using your camcorder abroad 94 Usable cassette tapes 95 About the "InfoLITHIUM" battery pack 96 About i.LINK 97 Maintenance...
Camera Operations Guide
Page 11
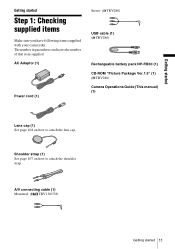
A/V connecting cable (1) Monaural: ( TRV138/338) Getting started Step 1: Checking supplied items Make sure you have following items supplied with your camcorder. Getting started Getting started 11 The number in parentheses indicates the number of that item supplied. ...Shoulder strap (1) See page 107 on how to attach the shoulder strap. AC Adaptor (1) Power cord (1) Stereo: ( TRV280) USB cable (1) ( TRV280) Rechargeable battery pack...
A/V connecting cable (1) Monaural: ( TRV138/338) Getting started Step 1: Checking supplied items Make sure you have following items supplied with your camcorder. Getting started Getting started 11 The number in parentheses indicates the number of that item supplied. ...Shoulder strap (1) See page 107 on how to attach the shoulder strap. AC Adaptor (1) Power cord (1) Stereo: ( TRV280) USB cable (1) ( TRV280) Rechargeable battery pack...
Camera Operations Guide
Page 12
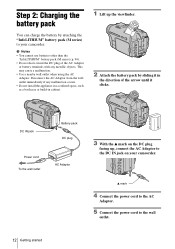
... Adaptor 3 With the v mark on the DC plug facing up the viewfinder. 2 Attach the battery pack by attaching the "InfoLITHIUM" battery pack (M series) to your camcorder. This may cause a malfunction. • Use a nearby wall outlet when using the AC Adaptor. Step 2: Charging the battery pack You can charge the battery by... the appliance in a confined space, such as a bookcase or build-in the direction of the AC Adaptor or battery terminals with any metallic objects. v mark 4 Connect the power cord to the AC Adaptor. 5 Connect the power cord to the DC IN jack on your camcorder.
... Adaptor 3 With the v mark on the DC plug facing up the viewfinder. 2 Attach the battery pack by attaching the "InfoLITHIUM" battery pack (M series) to your camcorder. This may cause a malfunction. • Use a nearby wall outlet when using the AC Adaptor. Step 2: Charging the battery pack You can charge the battery by... the appliance in a confined space, such as a bookcase or build-in the direction of the AC Adaptor or battery terminals with any metallic objects. v mark 4 Connect the power cord to the AC Adaptor. 5 Connect the power cord to the DC IN jack on your camcorder.
Camera Operations Guide
Page 15
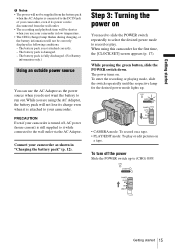
.... When using the AC Adaptor, the battery pack will not lose its power cord is attached to record or play or edit pictures on . Connect your camcorder in following conditions. - Getting started b Notes • The power will not be correctly displayed in low temperature. • The CHG (charge...will be shorter when you use the AC Adaptor as shown in "Charging the battery pack" (p. 12). PRECAUTION Even if your camcorder. The battery pack is connected to run out. The power turns on a tape. While pressing the green button, slide the POWER switch down. The battery ...
.... When using the AC Adaptor, the battery pack will not lose its power cord is attached to record or play or edit pictures on . Connect your camcorder in following conditions. - Getting started b Notes • The power will not be correctly displayed in low temperature. • The CHG (charge...will be shorter when you use the AC Adaptor as shown in "Charging the battery pack" (p. 12). PRECAUTION Even if your camcorder. The battery pack is connected to run out. The power turns on a tape. While pressing the green button, slide the POWER switch down. The battery ...
Camera Operations Guide
Page 27
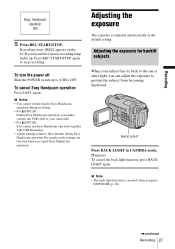
... or other light, you can adjust the exposure to prevent the subject from /to Easy Handycam operation during recording. • For TRV280: During Easy Handycam operation, you cannot connect the USB cable to your camcorder. • For TRV280: You cannot use Easy Handycam operation together with USB Streaming. • All the settings return to their defaults during...
... or other light, you can adjust the exposure to prevent the subject from /to Easy Handycam operation during recording. • For TRV280: During Easy Handycam operation, you cannot connect the USB cable to your camcorder. • For TRV280: You cannot use Easy Handycam operation together with USB Streaming. • All the settings return to their defaults during...
Camera Operations Guide
Page 36
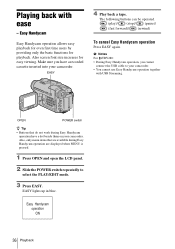
... screen font size increases for playback. Easy Handycam operation ON 36 Playback Make sure you cannot connect the USB cable to select the PLAY/EDIT mode. 3 Press EASY. b Notes For TRV280: • During Easy Handycam operation, you have a dot beside them on your camcorder. • You cannot use Easy Handycam operation together with ease - Playing back...
... screen font size increases for playback. Easy Handycam operation ON 36 Playback Make sure you cannot connect the USB cable to select the PLAY/EDIT mode. 3 Press EASY. b Notes For TRV280: • During Easy Handycam operation, you have a dot beside them on your camcorder. • You cannot use Easy Handycam operation together with ease - Playing back...
Camera Operations Guide
Page 39
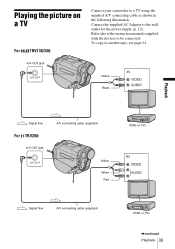
To copy to be connected. Refer also to the instruction manuals supplied with the devices to another tape, see page 61. A/V OUT jack Yellow Black Playback Signal flow For TRV280: A/V OUT jack A/V connecting cable (supplied) Yellow White Red VCRs or TVs Signal flow A/V connecting cable (supplied) VCRs or TVs ,continued Playback 39 Connect the supplied AC Adaptor to a TV using the supplied A/V connecting cable as shown in the following illustration. Playing the picture on a TV For TRV138/338: Connect your camcorder to the wall outlet for the power supply (p. 12).
To copy to be connected. Refer also to the instruction manuals supplied with the devices to another tape, see page 61. A/V OUT jack Yellow Black Playback Signal flow For TRV280: A/V OUT jack A/V connecting cable (supplied) Yellow White Red VCRs or TVs Signal flow A/V connecting cable (supplied) VCRs or TVs ,continued Playback 39 Connect the supplied AC Adaptor to a TV using the supplied A/V connecting cable as shown in the following illustration. Playing the picture on a TV For TRV138/338: Connect your camcorder to the wall outlet for the power supply (p. 12).
Camera Operations Guide
Page 40
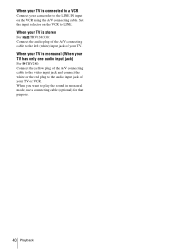
When your TV is connected to a VCR Connect your camcorder to the LINE IN input on the VCR to LINE. When your TV is stereo For TRV138/338: Connect the audio plug of the A/V connecting cable to play the sound in monaural mode, use a connecting cable (optional) for that purpose. 40 Playback When you want to the... jack of your TV. When your TV is monaural (When your TV has only one audio input jack) For TRV280: Connect the yellow plug of the A/V connecting cable to the video input jack and connect the white or the red plug to the audio input jack of your TV or VCR. Set the input...
When your TV is connected to a VCR Connect your camcorder to the LINE IN input on the VCR to LINE. When your TV is stereo For TRV138/338: Connect the audio plug of the A/V connecting cable to play the sound in monaural mode, use a connecting cable (optional) for that purpose. 40 Playback When you want to the... jack of your TV. When your TV is monaural (When your TV has only one audio input jack) For TRV280: Connect the yellow plug of the A/V connecting cable to the video input jack and connect the white or the red plug to the audio input jack of your TV or VCR. Set the input...
Camera Operations Guide
Page 47
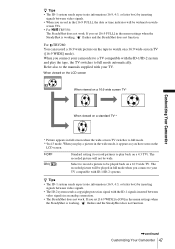
For TRV280: You can record a 16:9 wide picture on a 16:9 wide-screen TV... and the SteadyShot does not function. screen TVs. • For TRV338: The SteadyShot does not work . When you connect your TV compatible with ID-1/ID-2 systems. z Tips • The ID-1 system sends aspect ratio information (16:9, ...in the menu settings when the SteadyShot is working , flashes and the SteadyShot does not function. ,continued Customizing Your Camcorder 47 Customizing Your Camcorder z Tips • The ID-1 system sends aspect ratio information (16:9, 4:3, or letter box) by inserting ...
For TRV280: You can record a 16:9 wide picture on a 16:9 wide-screen TV... and the SteadyShot does not function. screen TVs. • For TRV338: The SteadyShot does not work . When you connect your TV compatible with ID-1/ID-2 systems. z Tips • The ID-1 system sends aspect ratio information (16:9, ...in the menu settings when the SteadyShot is working , flashes and the SteadyShot does not function. ,continued Customizing Your Camcorder 47 Customizing Your Camcorder z Tips • The ID-1 system sends aspect ratio information (16:9, 4:3, or letter box) by inserting ...

Camera Operations Guide
Page 51
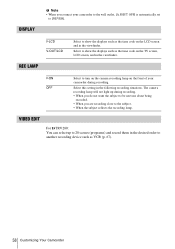
... the items listed below in the LCD SET menu. Low intensity High intensity Customizing Your Camcorder Customizing Your Camcorder 51 LCD COLOR [MENU] : END LCD BRIGHT See page 16 for the setting. • When you connect your camcorder. b Notes • When you select [BRIGHT], battery life is reduced by this setting... dial to adjust the color on the power mode of the LCD screen's backlight. You can adjust the brightness of your camcorder to brighten the LCD screen. The settings you can adjust vary depending on the LCD screen. Using the (LCD SET) menu -
... the items listed below in the LCD SET menu. Low intensity High intensity Customizing Your Camcorder Customizing Your Camcorder 51 LCD COLOR [MENU] : END LCD BRIGHT See page 16 for the setting. • When you connect your camcorder. b Notes • When you select [BRIGHT], battery life is reduced by this setting... dial to adjust the color on the power mode of the LCD screen's backlight. You can adjust the brightness of your camcorder to brighten the LCD screen. The settings you can adjust vary depending on the LCD screen. Using the (LCD SET) menu -
Camera Operations Guide
Page 54
.... z Tips • If you adjust the focus manually, you may be able to hide the menu settings. flashes. 9 Press REC START/STOP. Connect your camcorder to the wall outlet using the supplied AC Adaptor during the operation. [a] [a] [a] [b] [b] a. [REC TIME] b. [INTERVAL] 1 Turn the SEL...clear pictures even if the light changes (p. 29). • You can achieve excellent recordings of up during recording (p. 57). 54 Customizing Your Camcorder To cancel recording, set to ± 6 frames from the selected time. b Note • There may be a discrepancy in recording time...
.... z Tips • If you adjust the focus manually, you may be able to hide the menu settings. flashes. 9 Press REC START/STOP. Connect your camcorder to the wall outlet using the supplied AC Adaptor during the operation. [a] [a] [a] [b] [b] a. [REC TIME] b. [INTERVAL] 1 Turn the SEL...clear pictures even if the light changes (p. 29). • You can achieve excellent recordings of up during recording (p. 57). 54 Customizing Your Camcorder To cancel recording, set to ± 6 frames from the selected time. b Note • There may be a discrepancy in recording time...
Camera Operations Guide
Page 55
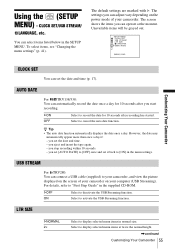
...out. SETUP MENU CLOCK SET USB STREAM LTR SIZE LANGUAGE DEMO MODE [MENU] : END Customizing Your Camcorder CLOCK SET You can automatically record the date once a day for 10 seconds after you can connect a USB cable (supplied) to [ON] in the supplied CD-ROM. Select to "First Step.... You can adjust vary depending on the power mode of your camcorder on the screen of your computer (USB Streaming). USB STREAM For TRV280: You can operate at twice the normal height. ,continued Customizing Your Camcorder 55 The screen shows the items you start recording. Select to ...
...out. SETUP MENU CLOCK SET USB STREAM LTR SIZE LANGUAGE DEMO MODE [MENU] : END Customizing Your Camcorder CLOCK SET You can automatically record the date once a day for 10 seconds after you can connect a USB cable (supplied) to [ON] in the supplied CD-ROM. Select to "First Step.... You can adjust vary depending on the power mode of your camcorder on the screen of your computer (USB Streaming). USB STREAM For TRV280: You can operate at twice the normal height. ,continued Customizing Your Camcorder 55 The screen shows the items you start recording. Select to ...
Camera Operations Guide
Page 58
... up to another recording device such as the time code on the TV screen, LCD screen, and in the following recording situations. VIDEO EDIT For TRV280: You can select up during recording. Select to turn on the camera recording lamp on the LCD screen and in the desired order to 20... Select to show the displays such as the time code on the front of your camcorder during recording. • When you do not want the subject to be nervous about being recorded. • When you connect your camcorder to the wall outlet, [A.SHUT OFF] is automatically set to the subject. • When the...
... up to another recording device such as the time code on the TV screen, LCD screen, and in the following recording situations. VIDEO EDIT For TRV280: You can select up during recording. Select to turn on the camera recording lamp on the LCD screen and in the desired order to 20... Select to show the displays such as the time code on the front of your camcorder during recording. • When you do not want the subject to be nervous about being recorded. • When you connect your camcorder to the wall outlet, [A.SHUT OFF] is automatically set to the subject. • When the...

Camera Operations Guide
Page 59
Dubbing/Editing Connecting to a VCR For TRV138/338: A/V OUT jack You can also record the picture from a VCR to a VCR as shown in the following illustration. Connect your camcorder (p. 66). For TRV280, you can create a copy of the picture recorded on your camcorder on your camcorder to a tape on other recording devices (p. 61). A/V connecting cable (supplied) Signal flow Yellow Black VCRs Dubbing/Editing ,continued Dubbing/Editing 59
Dubbing/Editing Connecting to a VCR For TRV138/338: A/V OUT jack You can also record the picture from a VCR to a VCR as shown in the following illustration. Connect your camcorder (p. 66). For TRV280, you can create a copy of the picture recorded on your camcorder on your camcorder to a tape on other recording devices (p. 61). A/V connecting cable (supplied) Signal flow Yellow Black VCRs Dubbing/Editing ,continued Dubbing/Editing 59
Camera Operations Guide
Page 60
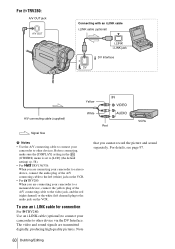
..., see page 97. 60 Dubbing/Editing For TRV280: A/V OUT jack Connecting with an i.LINK cable i.LINK cable (optional) i.LINK jack DV Interface Yellow A/V connecting cable (supplied) Signal flow White Red VCRs b Notes • Use the A/V connecting cable to connect your camcorder to a monaural device, connect the yellow plug of the A/V connecting cable to the left channel) plug to...
..., see page 97. 60 Dubbing/Editing For TRV280: A/V OUT jack Connecting with an i.LINK cable i.LINK cable (optional) i.LINK jack DV Interface Yellow A/V connecting cable (supplied) Signal flow White Red VCRs b Notes • Use the A/V connecting cable to connect your camcorder to a monaural device, connect the yellow plug of the A/V connecting cable to the left channel) plug to...
Camera Operations Guide
Page 61
... be output via the DV Interface. • For TRV280: When connected using the i.LINK cable, the recorded picture becomes rough when a picture is paused on your camcorder while recording to a VCR. b Notes • When dubbing using the A/V connecting cable, to record the date/time and camera settings...To prevent deterioration of pictures, set it to the input mode. 3 Prepare your camcorder for details. 5 When the dubbing is finished, stop your camcorder and the VCR. • For TRV280: When your camcorder is connected to the VCR via the DV Interface, you cannot record the title or indicators....
... be output via the DV Interface. • For TRV280: When connected using the i.LINK cable, the recorded picture becomes rough when a picture is paused on your camcorder while recording to a VCR. b Notes • When dubbing using the A/V connecting cable, to record the date/time and camera settings...To prevent deterioration of pictures, set it to the input mode. 3 Prepare your camcorder for details. 5 When the dubbing is finished, stop your camcorder and the VCR. • For TRV280: When your camcorder is connected to the VCR via the DV Interface, you cannot record the title or indicators....
Camera Operations Guide
Page 62
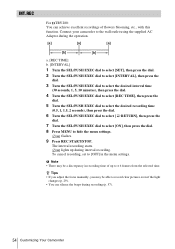
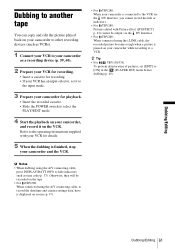
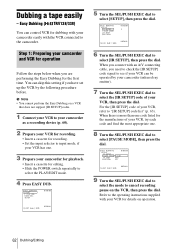
... playback. • Insert a cassette for recording. • Set the input selector to input mode, if your VCR has one. 3 Prepare your camcorder easily with the VCR connected to select [SETUP], then press the dial. EASY DUBBING START T I T LE SEL MODE SEL SETUP 0 : 0 0 : 0 0 [ EASY DUB ] : END NORMAL 5 Turn the SEL...9 Turn the SEL/PUSH EXEC dial to select the mode to the operating instructions supplied with an A/V connecting cable, you need to check the [IR SETUP] code signal to see if your camcorder and VCR for the first time. When there is more than one . 8 Turn the SEL/PUSH ...
... playback. • Insert a cassette for recording. • Set the input selector to input mode, if your VCR has one. 3 Prepare your camcorder easily with the VCR connected to select [SETUP], then press the dial. EASY DUBBING START T I T LE SEL MODE SEL SETUP 0 : 0 0 : 0 0 [ EASY DUB ] : END NORMAL 5 Turn the SEL...9 Turn the SEL/PUSH EXEC dial to select the mode to the operating instructions supplied with an A/V connecting cable, you need to check the [IR SETUP] code signal to see if your camcorder and VCR for the first time. When there is more than one . 8 Turn the SEL/PUSH ...
Camera Operations Guide
Page 65
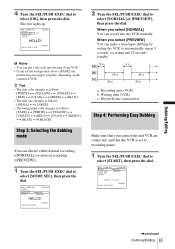
... time (VCR) c. When you set to recording pause. 1 Turn the SEL/PUSH EXEC dial to [FADE], the picture may not appear properly, depending on the connected VCR. EASY DUBBING START T I T LE SEL ON MODE SEL SETUP 0 : 0 0 : 0 0 HELLO! [ EASY DUB ] : END NORMAL b Notes • You can put a ... the SEL/PUSH EXEC dial to select [NORMAL] or [PREVIEW], then press the dial. The title lights up. Playback time (camcorder) Step 4: Performing Easy Dubbing Make sure that your camcorder and VCR are connected, and that the VCR is set the background color to select [START], then press the dial.
... time (VCR) c. When you set to recording pause. 1 Turn the SEL/PUSH EXEC dial to [FADE], the picture may not appear properly, depending on the connected VCR. EASY DUBBING START T I T LE SEL ON MODE SEL SETUP 0 : 0 0 : 0 0 HELLO! [ EASY DUB ] : END NORMAL b Notes • You can put a ... the SEL/PUSH EXEC dial to select [NORMAL] or [PREVIEW], then press the dial. The title lights up. Playback time (camcorder) Step 4: Performing Easy Dubbing Make sure that your camcorder and VCR are connected, and that the VCR is set the background color to select [START], then press the dial.


