
Camera Operations Guide
Page 3
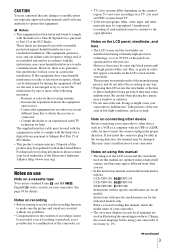
... These limits are operational for effective use standard 8 mm and Hi8 , Digital8 video cassettes on this manual, check the model name of the FCC Rules.... using your camcorder. • The on , the user is encouraged to try to the copyright laws. Be careful when placing the camera near a window or outdoors....camcorder to radio communications. CAUTION You are for all models. If this product may cause harmful interference to malfunction. Disposal of FCC Rules. • This product contains mercury. CCD-TRV138: TRV138 CCD-TRV338: TRV338 DCR-TRV280: TRV280...
... These limits are operational for effective use standard 8 mm and Hi8 , Digital8 video cassettes on this manual, check the model name of the FCC Rules.... using your camcorder. • The on , the user is encouraged to try to the copyright laws. Be careful when placing the camera near a window or outdoors....camcorder to radio communications. CAUTION You are for all models. If this product may cause harmful interference to malfunction. Disposal of FCC Rules. • This product contains mercury. CCD-TRV138: TRV138 CCD-TRV338: TRV338 DCR-TRV280: TRV280...
Camera Operations Guide
Page 4
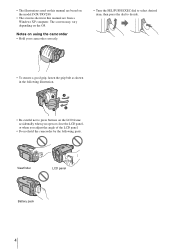
...To ensure a good grip, fasten the grip belt as shown in this manual are from a Windows XP computer. Viewfinder LCD panel Battery pack 4 • The illustrations used on this manual are based on the model DCR-TRV280. • The screens shown in the following illustration. • Be careful not to press ...buttons on the LCD frame accidentally when you open or close the LCD panel, or when you adjust the angle of the LCD panel. • Do not hold the camcorder by the ...
...To ensure a good grip, fasten the grip belt as shown in this manual are from a Windows XP computer. Viewfinder LCD panel Battery pack 4 • The illustrations used on this manual are based on the model DCR-TRV280. • The screens shown in the following illustration. • Be careful not to press ...buttons on the LCD frame accidentally when you open or close the LCD panel, or when you adjust the angle of the LCD panel. • Do not hold the camcorder by the ...
Camera Operations Guide
Page 8
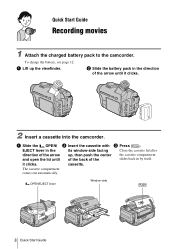
...Lift up , then push the center the cassette compartment and open the lid until it clicks. EJECT lever in the its window-side facing Close the cassette lid after direction of the slides back in the direction of the arrow until of the back ... Slide the OPEN/ b Insert the cassette with c Press . b Slide the battery pack in by itself. it clicks. 2 Insert a cassette into the camcorder. OPEN/EJECT lever Window-side 8 Quick Start Guide To charge the battery, see page 12. The cassette compartment comes out automatically. Quick Start Guide Recording movies 1 Attach the...
...Lift up , then push the center the cassette compartment and open the lid until it clicks. EJECT lever in the its window-side facing Close the cassette lid after direction of the slides back in the direction of the arrow until of the back ... Slide the OPEN/ b Insert the cassette with c Press . b Slide the battery pack in by itself. it clicks. 2 Insert a cassette into the camcorder. OPEN/EJECT lever Window-side 8 Quick Start Guide To charge the battery, see page 12. The cassette compartment comes out automatically. Quick Start Guide Recording movies 1 Attach the...
Camera Operations Guide
Page 19
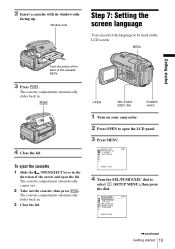
2 Insert a cassette with its window-side facing up. The cassette compartment automatically slides back in . 3 Close the lid. OPEN SEL/PUSH EXEC dial POWER switch 1 Turn on your camcorder. 2 Press OPEN to be used on the LCD screen. SETUP MENU CLOCK SET USB STREAM LTR SIZE LANGUAGE DEMO MODE RETURN STBY --:--:-- [MENU] : END...
2 Insert a cassette with its window-side facing up. The cassette compartment automatically slides back in . 3 Close the lid. OPEN SEL/PUSH EXEC dial POWER switch 1 Turn on your camcorder. 2 Press OPEN to be used on the LCD screen. SETUP MENU CLOCK SET USB STREAM LTR SIZE LANGUAGE DEMO MODE RETURN STBY --:--:-- [MENU] : END...

Camera Operations Guide
Page 28
... PLUS switch to that of the wall side of the screen. Adjusting the exposure manually You can avoid backlight shadows on people next to the window by manually fixing the exposure to OFF. Recording in CAMERA mode.
... PLUS switch to that of the wall side of the screen. Adjusting the exposure manually You can avoid backlight shadows on people next to the window by manually fixing the exposure to OFF. Recording in CAMERA mode.

Camera Operations Guide
Page 29
... using the NightShot Light is adjusted automatically in the menu settings. z Tip • If you record subjects in complete darkness, set [N.S. To record a subject behind a window covered with little contrast between the subject and its background. - Recording FOCUS SEL/PUSH EXEC dial 1 Press FOCUS in CAMERA mode. 9 appears. 2 Turn the SEL...
... using the NightShot Light is adjusted automatically in the menu settings. z Tip • If you record subjects in complete darkness, set [N.S. To record a subject behind a window covered with little contrast between the subject and its background. - Recording FOCUS SEL/PUSH EXEC dial 1 Press FOCUS in CAMERA mode. 9 appears. 2 Turn the SEL...

Camera Operations Guide
Page 42
... when not using PROGRAM AE. PORTRAIT (soft Select to bring out the subject such as in between the camcorder and the subject. * Your camcorder is adjusted to maintain the atmosphere of your camcorder from appearing excessively white when subjects are marked with G. PROGRAM AE/P EFFECT, etc. To select these items...Select to minimize shake when shooting fast- SPORTS* (sports Select to prevent people's faces from focusing on glass or metal mesh in windows that requires various techniques by strong light, such as at a beach in midsummer or on subjects in a theater or at the moment.
... when not using PROGRAM AE. PORTRAIT (soft Select to bring out the subject such as in between the camcorder and the subject. * Your camcorder is adjusted to maintain the atmosphere of your camcorder from appearing excessively white when subjects are marked with G. PROGRAM AE/P EFFECT, etc. To select these items...Select to minimize shake when shooting fast- SPORTS* (sports Select to prevent people's faces from focusing on glass or metal mesh in windows that requires various techniques by strong light, such as at a beach in midsummer or on subjects in a theater or at the moment.
Camera Operations Guide
Page 72
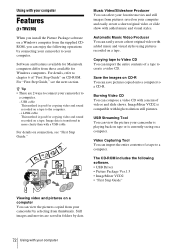
... CDROM, you can easily create a short original video with a menu of a tape to your camcorder is playing back on tape or is good for copying video and sound recorded on a Windows computer from thumbnails. Copying tape to Video CD You can save pictures copied onto a computer to ... on a tape. z Tip • There are saved in more clarity than with your computer Features ( TRV280) When you install the Picture Package software on a tape to a computer. ImageMixer VCD2 is good for Windows computers. i.LINK cable This method is compatible with high resolution still pictures.
... CDROM, you can easily create a short original video with a menu of a tape to your camcorder is playing back on tape or is good for copying video and sound recorded on a Windows computer from thumbnails. Copying tape to Video CD You can save pictures copied onto a computer to ... on a tape. z Tip • There are saved in more clarity than with your computer Features ( TRV280) When you install the Picture Package software on a tape to a computer. ImageMixer VCD2 is good for Windows computers. i.LINK cable This method is compatible with high resolution still pictures.
Camera Operations Guide
Page 73
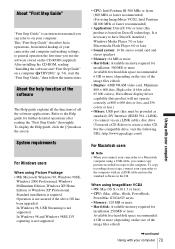
...Windows 98SE, Windows 2000 Professional, Windows Millennium Edition, Windows XP Home Edition or Windows XP Professional Standard installation is necessary to the computer. Operation is not supported. For the compatible drive, visit the following URL: http://www.ppackage.com/) For Macintosh users b Note • When you connect your camcorder...recommended: 4 GB or more (depending on your computer To display the Help guide, click the [?] mark on a computer ( TRV280)" (p. 74), start the "First Step Guide," then follow the instructions. About the help function of the software The Help ...
...Windows 98SE, Windows 2000 Professional, Windows Millennium Edition, Windows XP Home Edition or Windows XP Professional Standard installation is necessary to the computer. Operation is not supported. For the compatible drive, visit the following URL: http://www.ppackage.com/) For Macintosh users b Note • When you connect your camcorder...recommended: 4 GB or more (depending on your computer To display the Help guide, click the [?] mark on a computer ( TRV280)" (p. 74), start the "First Step Guide," then follow the instructions. About the help function of the software The Help ...
Camera Operations Guide
Page 74
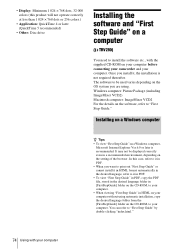
...Application: QuickTime 4 or later (QuickTime 5 recommended) • Other: Disc drive Installing the software and "First Step Guide" on a computer ( TRV280) You need to install the software etc., with your computer. You can refer to your computer. • When viewing "First Step Guide" in..." or cannot install it in HTML format automatically in a recommended environment, depending on your computer before connecting your camcorder and your computer Windows computer: Picture Package (including ImageMixer VCD2) Macintosh computer: ImageMixer VCD2 For the details on the software, refer to...
...Application: QuickTime 4 or later (QuickTime 5 recommended) • Other: Disc drive Installing the software and "First Step Guide" on a computer ( TRV280) You need to install the software etc., with your computer. You can refer to your computer. • When viewing "First Step Guide" in..." or cannot install it in HTML format automatically in a recommended environment, depending on your computer before connecting your camcorder and your computer Windows computer: Picture Package (including ImageMixer VCD2) Macintosh computer: ImageMixer VCD2 For the details on the software, refer to...
Camera Operations Guide
Page 75
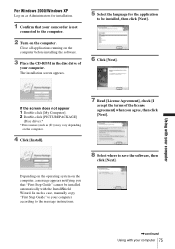
...).* *Drive names (such as Administrators for the application to be installed automatically with your camcorder is not connected to the computer. 2 Turn on the computer. Using with your computer ,continued Using with the InstallShield Wizard. For Windows 2000/Windows XP Log on as (E:)) may vary depending on the computer, a message appears notifying you...
...).* *Drive names (such as Administrators for the application to be installed automatically with your camcorder is not connected to the computer. 2 Turn on the computer. Using with your computer ,continued Using with the InstallShield Wizard. For Windows 2000/Windows XP Log on as (E:)) may vary depending on the computer, a message appears notifying you...
Camera Operations Guide
Page 78
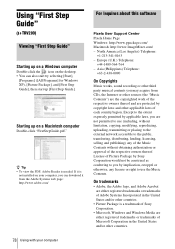
License of the respective owners thereof. Using "First Step Guide" ( TRV280) Viewing "First Step Guide" Starting up on a Windows computer Double-click the icon on the desktop. • You can download it is not installed on a Macintosh computer Double-... use the Music Contents. z Tip • To view the PDF, Adobe Reader is a trademark of Sony Corporation. • Microsoft, Windows and Windows Media are protected by selecting [Start], [Programs] ([All Programs] for Windows XP), [Picture Package], and [First Step Guide], then start up on your computer Europe (U.K.) Telephone: ...
License of the respective owners thereof. Using "First Step Guide" ( TRV280) Viewing "First Step Guide" Starting up on a Windows computer Double-click the icon on the desktop. • You can download it is not installed on a Macintosh computer Double-... use the Music Contents. z Tip • To view the PDF, Adobe Reader is a trademark of Sony Corporation. • Microsoft, Windows and Windows Media are protected by selecting [Start], [Programs] ([All Programs] for Windows XP), [Picture Package], and [First Step Guide], then start up on your computer Europe (U.K.) Telephone: ...
Camera Operations Guide
Page 80
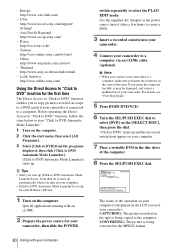
... starts up and the on-screen instructions appear on your camcorder. Asia Pacific Regional http://www.css.ap.sony.com/ - Quit all applications running with your camcorder, then slide the POWER switch repeatedly to a DVD easily if your camcorder. CONVERTING: The picture is being converted to the MPEG2 ... as the power source since it starts up for each Windows XP user. 1 Turn on your camcorder to the computer. Korea http://scs.sony.co.kr/ - China http://www.sonystyle.com.cn/vaio/ - Latin America http://vaio-online.sony.com/ Using the Direct Access to "Click to DVD]...
... starts up and the on-screen instructions appear on your camcorder. Asia Pacific Regional http://www.css.ap.sony.com/ - Quit all applications running with your camcorder, then slide the POWER switch repeatedly to a DVD easily if your camcorder. CONVERTING: The picture is being converted to the MPEG2 ... as the power source since it starts up for each Windows XP user. 1 Turn on your camcorder to the computer. Korea http://scs.sony.co.kr/ - China http://www.sonystyle.com.cn/vaio/ - Latin America http://vaio-online.sony.com/ Using the Direct Access to "Click to DVD]...
Camera Operations Guide
Page 87
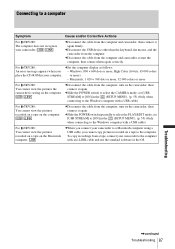
cDisconnect the cable from the computer. or more For TRV280: You cannot view the pictures the camcorder is seeing on the camcorder, then connect it again. cWhen you connect your camcorder to the Windows computer with an i.LINK cable and use the standard software in the (SETUP MENU). (p. 55) (Only when connecting to the computer. cSlide...
cDisconnect the cable from the computer. or more For TRV280: You cannot view the pictures the camcorder is seeing on the camcorder, then connect it again. cWhen you connect your camcorder to the Windows computer with an i.LINK cable and use the standard software in the (SETUP MENU). (p. 55) (Only when connecting to the computer. cSlide...
Camera Operations Guide
Page 88
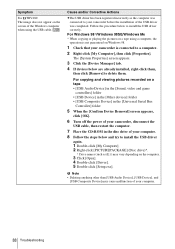
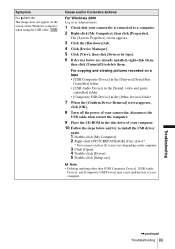
... operation is connected to a computer. 2 Right-click [My Computer], then click [Properties]. Symptom For TRV280: The image does not appear on Windows 98. 1 Check that your camcorder is not guaranteed on the screen of the USB driver was connected to your computer. 88 Troubleshooting Cause ...and/or Corrective Actions cThe USB driver has been registered incorrectly as (E:)) may cause malfunction of your camcorder before the installation of the Windows computer when using the USB cable. The [System Properties] screen appears. 3 Click the [Device Manager] tab. ...
... operation is connected to a computer. 2 Right-click [My Computer], then click [Properties]. Symptom For TRV280: The image does not appear on Windows 98. 1 Check that your camcorder is not guaranteed on the screen of the USB driver was connected to your computer. 88 Troubleshooting Cause ...and/or Corrective Actions cThe USB driver has been registered incorrectly as (E:)) may cause malfunction of your camcorder before the installation of the Windows computer when using the USB cable. The [System Properties] screen appears. 3 Click the [Device Manager] tab. ...
Camera Operations Guide
Page 89
.... 10 Follow the steps below are already installed, right-click them . Symptom For TRV280: The image does not appear on the screen of your computer. The [System Properties...2 Right-click [PICTUREPACKAGE] (Disc drive)*. * Drive names (such as Administrators. 1 Check that your camcorder is connected to a computer. 2 Right-click [My Computer], then click [Properties]. b Note •...as (E:)) may cause malfunction of the Windows computer when using the USB cable. Troubleshooting ,continued Troubleshooting 89 Cause and/or Corrective Actions For Windows 2000 Log on the computer. 3 ...
.... 10 Follow the steps below are already installed, right-click them . Symptom For TRV280: The image does not appear on the screen of your computer. The [System Properties...2 Right-click [PICTUREPACKAGE] (Disc drive)*. * Drive names (such as Administrators. 1 Check that your camcorder is connected to a computer. 2 Right-click [My Computer], then click [Properties]. b Note •...as (E:)) may cause malfunction of the Windows computer when using the USB cable. Troubleshooting ,continued Troubleshooting 89 Cause and/or Corrective Actions For Windows 2000 Log on the computer. 3 ...
Camera Operations Guide
Page 90
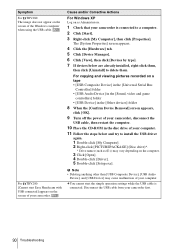
Cause and/or Corrective Actions For Windows XP Log on the screen of the Windows computer when using the USB cable. The [System Properties] screen appears. 4 Click the [Hardware] tab. 5 Click [Device Manager]. 6 Click [View], then click [Devices by type]....Device], [USB Audio Device], and [USB Device] may vary depending on the screen of your camcorder. cYou cannot start Easy Handycam with USB connected] appears on the computer. 3 Click [Open]. 4 Double-click [Driver]. 5 Double-click [Setup.exe]. Symptom For TRV280: The image does not appear on as (E:)) may cause malfunction of your...
Cause and/or Corrective Actions For Windows XP Log on the screen of the Windows computer when using the USB cable. The [System Properties] screen appears. 4 Click the [Hardware] tab. 5 Click [Device Manager]. 6 Click [View], then click [Devices by type]....Device], [USB Audio Device], and [USB Device] may vary depending on the screen of your camcorder. cYou cannot start Easy Handycam with USB connected] appears on the computer. 3 Click [Open]. 4 Double-click [Driver]. 5 Double-click [Setup.exe]. Symptom For TRV280: The image does not appear on as (E:)) may cause malfunction of your...

Camera Operations Guide
Page 91
... on [Select video quality]. 3 Follow the on -screen instructions, click [Next], then click [Done]. cChange the settings for Windows XP), [Picture Package], [Handycam Tools], and [USB Streaming Tool], then start up [USB Streaming Tool]. 2 Adjust the slider in the following procedures: 1 ...Select [Start], [Programs] ([All Programs] for your camcorder to "First Step Guide" in Picture Package Auto Video, Producer, CD Backup or VCD Maker. For TRV280...
... on [Select video quality]. 3 Follow the on -screen instructions, click [Next], then click [Done]. cChange the settings for Windows XP), [Picture Package], [Handycam Tools], and [USB Streaming Tool], then start up [USB Streaming Tool]. 2 Adjust the slider in the following procedures: 1 ...Select [Start], [Programs] ([All Programs] for your camcorder to "First Step Guide" in Picture Package Auto Video, Producer, CD Backup or VCD Maker. For TRV280...
Camera Operations Guide
Page 98
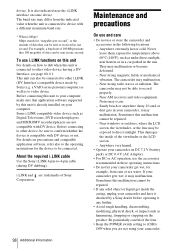
...This unit can be sent in these operating instructions. • Do not let your camcorder get inside of the viewfinder or the LCD screen. - Near strong radio waves or radiation. Near windows or outdoors, where the LCD screen, the viewfinder, or the lens may malfunction. The... a VAIO series personal computer) as well as Digital Televisions, DVD recorders/players, and MICROMV recorders/players are not using your camcorder and have it checked by a Sony dealer before operating it any further. • Avoid rough handling, disassembling, modifying, physical shock, or impact such as under...
...This unit can be sent in these operating instructions. • Do not let your camcorder get inside of the viewfinder or the LCD screen. - Near strong radio waves or radiation. Near windows or outdoors, where the LCD screen, the viewfinder, or the lens may malfunction. The... a VAIO series personal computer) as well as Digital Televisions, DVD recorders/players, and MICROMV recorders/players are not using your camcorder and have it checked by a Sony dealer before operating it any further. • Avoid rough handling, disassembling, modifying, physical shock, or impact such as under...
Camera Operations Guide
Page 110
... STREAM) .........55 Using abroad 94 V Video head 99 Viewfinder 16 Volume 34 W Warning indicators 92 Warning messages 93 WHITE FADER 30 Wide angle See Zoom Windows 73, 74 WORLD TIME 57 Write-protect tab 95 Z Zoom 23 110 Quick Reference
... STREAM) .........55 Using abroad 94 V Video head 99 Viewfinder 16 Volume 34 W Warning indicators 92 Warning messages 93 WHITE FADER 30 Wide angle See Zoom Windows 73, 74 WORLD TIME 57 Write-protect tab 95 Z Zoom 23 110 Quick Reference


