
Camera Operations Guide
Page 1
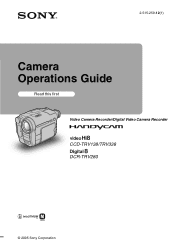
2-515-259-12(1) Camera Operations Guide Read this first Video Camera Recorder/Digital Video Camera Recorder CCD-TRV138/TRV338 DCR-TRV280 © 2005 Sony Corporation
2-515-259-12(1) Camera Operations Guide Read this first Video Camera Recorder/Digital Video Camera Recorder CCD-TRV138/TRV338 DCR-TRV280 © 2005 Sony Corporation
Camera Operations Guide
Page 2
... presence of important operating and maintenance (servicing) instructions in the space provided below is intended to alert the user to these numbers whenever you may cause undesired operation. Model No.AC- Regulatory Information Declaration of the FCC Rules. Telephone No.: 858-942-2230 This device complies with Part 15 of Conformity Trade Name: SONY Model No.: DCR-TRV280 Responsible Party: Sony Electronics Inc. Operation is intended...
... presence of important operating and maintenance (servicing) instructions in the space provided below is intended to alert the user to these numbers whenever you may cause undesired operation. Model No.AC- Regulatory Information Declaration of the FCC Rules. Telephone No.: 858-942-2230 This device complies with Part 15 of Conformity Trade Name: SONY Model No.: DCR-TRV280 Responsible Party: Sony Electronics Inc. Operation is intended...
Camera Operations Guide
Page 3
... , Digital8 video cassettes on using extremely high-precision technology, so over 99.99% of the LCD screen and the viewfinder used with the limits for long periods of the sun only in accordance with no guarantee that interference will not occur in color) that appear constantly on -screen displays in each model is connected. - Take pictures of time may be damaged. To view your recordings on connecting...
... , Digital8 video cassettes on using extremely high-precision technology, so over 99.99% of the LCD screen and the viewfinder used with the limits for long periods of the sun only in accordance with no guarantee that interference will not occur in color) that appear constantly on -screen displays in each model is connected. - Take pictures of time may be damaged. To view your recordings on connecting...
Camera Operations Guide
Page 7
... a tape - Advanced operations Customizing Your Camcorder Changing the menu settings 41 Using the (MANUAL SET) menu - HiFi SOUND/EDIT, etc 49 Using the (LCD SET) menu - WORLD TIME/VIDEO EDIT, etc 57 Dubbing/Editing Connecting to a VCR 59 Dubbing to DVD") ( TRV280 79 Troubleshooting Troubleshooting 82 Warning indicators and messages .....92 Additional Information Using your camcorder abroad 94 Usable cassette tapes 95 About the "InfoLITHIUM" battery pack 96 About i.LINK 97 Maintenance and precautions 98 Specification 101 Quick Reference Identifying parts and controls...
... a tape - Advanced operations Customizing Your Camcorder Changing the menu settings 41 Using the (MANUAL SET) menu - HiFi SOUND/EDIT, etc 49 Using the (LCD SET) menu - WORLD TIME/VIDEO EDIT, etc 57 Dubbing/Editing Connecting to a VCR 59 Dubbing to DVD") ( TRV280 79 Troubleshooting Troubleshooting 82 Warning indicators and messages .....92 Additional Information Using your camcorder abroad 94 Usable cassette tapes 95 About the "InfoLITHIUM" battery pack 96 About i.LINK 97 Maintenance and precautions 98 Specification 101 Quick Reference Identifying parts and controls...
Camera Operations Guide
Page 13
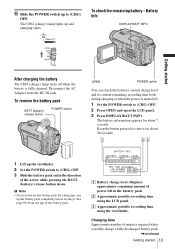
... recording time using the LCD panel. To remove the battery pack BATT (battery) release button POWER switch OPEN POWER switch You can check the battery's current charge level and its current remaining recording time both during charging or when the power is fully charged. BATTERY INFO BATTERY CHARGE LEVEL 0% 50% 100% REC TIME AVAILABLE LCD SCREEN: 81 min VIEWFINDER: 112 min A Battery charge level: Displays approximate remaining amount of power left in the direction of minutes required when you do not use up the viewfinder. 2 Set the POWER switch to view...
... recording time using the LCD panel. To remove the battery pack BATT (battery) release button POWER switch OPEN POWER switch You can check the battery's current charge level and its current remaining recording time both during charging or when the power is fully charged. BATTERY INFO BATTERY CHARGE LEVEL 0% 50% 100% REC TIME AVAILABLE LCD SCREEN: 81 min VIEWFINDER: 112 min A Battery charge level: Displays approximate remaining amount of power left in the direction of minutes required when you do not use up the viewfinder. 2 Set the POWER switch to view...

Camera Operations Guide
Page 22
... screen. It is useful when you opened or closed the LCD panel, it takes about 5 minutes, the power will be recorded continuously without being displayed on LCD frame to display the correct remaining battery time. Avoid stopping then recording a movie in the LP mode. • For TRV280: The recording time, date, and the camera settings data are recorded automatically on the tape without a break even when you set the counter to CAMERA and insert a cassette. Do not record pictures...
... screen. It is useful when you opened or closed the LCD panel, it takes about 5 minutes, the power will be recorded continuously without being displayed on LCD frame to display the correct remaining battery time. Avoid stopping then recording a movie in the LP mode. • For TRV280: The recording time, date, and the camera settings data are recorded automatically on the tape without a break even when you set the counter to CAMERA and insert a cassette. Do not record pictures...
Camera Operations Guide
Page 23
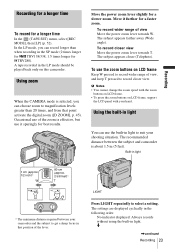
... the zoom buttons on LCD frame Keep W pressed to magnification levels greater than when recording in light You can record longer than 20 times, and from that position of view Move the power zoom lever towards T. The settings are displayed cyclically in light. Using zoom When the CAMERA mode is effective, but use the built-in the LP mode should be played back only on this camcorder. A tape recorded in light to select a setting. Move the power zoom...
... the zoom buttons on LCD frame Keep W pressed to magnification levels greater than when recording in light You can record longer than 20 times, and from that position of view Move the power zoom lever towards T. The settings are displayed cyclically in light. Using zoom When the CAMERA mode is effective, but use the built-in the LP mode should be played back only on this camcorder. A tape recorded in light to select a setting. Move the power zoom...
Camera Operations Guide
Page 49
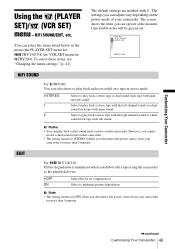
Customizing Your Camcorder Using the (PLAYER SET)/ (VCR SET) menu - Select to play back audio recorded on the power mode of your camcorder. You can select the items listed below in stereo mode. VCR SET H i F i SOUND AUDIO MIX [MENU] : END HiFi SOUND For TRV280: You can operate at the moment. Select to [STEREO] when you can select how to play back a stereo tape with the left channel sound or a dual sound track tape with sub sound. The default...
Customizing Your Camcorder Using the (PLAYER SET)/ (VCR SET) menu - Select to play back audio recorded on the power mode of your camcorder. You can select the items listed below in stereo mode. VCR SET H i F i SOUND AUDIO MIX [MENU] : END HiFi SOUND For TRV280: You can operate at the moment. Select to [STEREO] when you can select how to play back a stereo tape with the left channel sound or a dual sound track tape with sub sound. The default...
Camera Operations Guide
Page 55
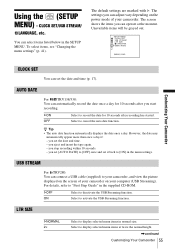
... Guide" in the SETUP MENU. The default settings are marked with G. GON OFF Select to your camcorder, and view the picture displayed on your camcorder. For details, refer to deactivate the USB Streaming function. Select to [OFF] once and set the date and time. - you eject and insert the tape again. - you can connect a USB cable (supplied) to record the date for 10 seconds after recording has started. USB STREAM For TRV280: You can operate...
... Guide" in the SETUP MENU. The default settings are marked with G. GON OFF Select to your camcorder, and view the picture displayed on your camcorder. For details, refer to deactivate the USB Streaming function. Select to [OFF] once and set the date and time. - you eject and insert the tape again. - you can connect a USB cable (supplied) to record the date for 10 seconds after recording has started. USB STREAM For TRV280: You can operate...
Camera Operations Guide
Page 73
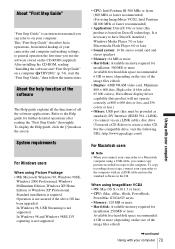
...) (to connect via an i.LINK cable), disc drive (You need a CD-R drive to the Help guide for installation: 500 MB or more Available free hard disk space recommended: 6 GB or more (depending on DirectX technology. To copy recordings from initial hookup of the image files edited) ,continued Using with your computer 73 Using with an i.LINK cable and use the software stored on the screen. In Windows 98 and Windows 98SE, DV capturing is not supported...
...) (to connect via an i.LINK cable), disc drive (You need a CD-R drive to the Help guide for installation: 500 MB or more Available free hard disk space recommended: 6 GB or more (depending on DirectX technology. To copy recordings from initial hookup of the image files edited) ,continued Using with your computer 73 Using with an i.LINK cable and use the software stored on the screen. In Windows 98 and Windows 98SE, DV capturing is not supported...
Camera Operations Guide
Page 85
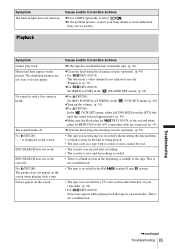
... recorded in the (VCR SET) menu. (p. 49) cTurn up the volume. (p. 34) cFor TRV280: In the (VCR SET) menu, adjust [AUDIO MIX] from the [ST2] side until the sound is heard appropriately. (p. 50) cMake sure the black plug for TRV138/338, or the red and white plugs for TRV280 of the A/V connecting cable are connected. (p. 39) cClean the head using the cleaning cassette (optional). (p. 99) • For TRV138/338: The television's video channel is displayed on the screen...
... recorded in the (VCR SET) menu. (p. 49) cTurn up the volume. (p. 34) cFor TRV280: In the (VCR SET) menu, adjust [AUDIO MIX] from the [ST2] side until the sound is heard appropriately. (p. 50) cMake sure the black plug for TRV138/338, or the red and white plugs for TRV280 of the A/V connecting cable are connected. (p. 39) cClean the head using the cleaning cassette (optional). (p. 99) • For TRV138/338: The television's video channel is displayed on the screen...
Camera Operations Guide
Page 86
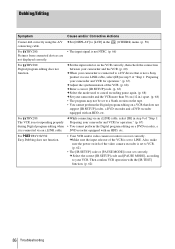
... camcorder is connected to a DV device that does not support [IR SETUP] codes, a DVD recorder and a DVD recorder equipped with an HDD, etc. cSet the input selector on a VCR that is not NTSC. (p. 66) For TRV280: Digital program editing does not function. Dubbing/Editing Symptom Cause and/or Corrective Actions Cannot dub correctly using the A/V cSet [DISPLAY] to [LCD] in the connecting cable. (OTHERS) menu. (p. 58) For TRV280: Pictures from connected devices are not displayed correctly. • The input...
... camcorder is connected to a DV device that does not support [IR SETUP] codes, a DVD recorder and a DVD recorder equipped with an HDD, etc. cSet the input selector on a VCR that is not NTSC. (p. 66) For TRV280: Digital program editing does not function. Dubbing/Editing Symptom Cause and/or Corrective Actions Cannot dub correctly using the A/V cSet [DISPLAY] to [LCD] in the connecting cable. (OTHERS) menu. (p. 58) For TRV280: Pictures from connected devices are not displayed correctly. • The input...
Camera Operations Guide
Page 88
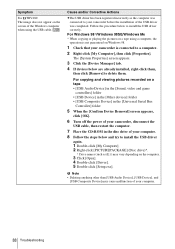
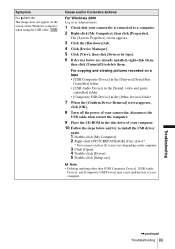
...*/Windows 98SE/Windows Me * When copying or playing the pictures on a tape using the USB cable. For copying and viewing pictures recorded on Windows 98. 1 Check that your camcorder, disconnect the USB cable, then restart the computer. 7 Place the CD-ROM in the disc drive of the USB driver was completed. The [System Properties] screen appears. 3 Click the [Device Manager] tab. 4 If devices below to a computer. 2 Right-click [My Computer], then click [Properties]. Symptom For TRV280: The image...
...*/Windows 98SE/Windows Me * When copying or playing the pictures on a tape using the USB cable. For copying and viewing pictures recorded on Windows 98. 1 Check that your camcorder, disconnect the USB cable, then restart the computer. 7 Place the CD-ROM in the disc drive of the USB driver was completed. The [System Properties] screen appears. 3 Click the [Device Manager] tab. 4 If devices below to a computer. 2 Right-click [My Computer], then click [Properties]. Symptom For TRV280: The image...
Camera Operations Guide
Page 89
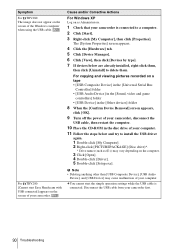
... Serial Bus Controller] folder • [USB Audio Device] in the [Sound, video and game controller] folder • [Composite USB Device] in the [Other devices] folder 7 When the [Confirm Device Removal] screen appears, click [OK]. 8 Turn off the power of your camcorder, disconnect the USB cable, then restart the computer. 9 Place the CD-ROM in the disc drive of your computer. 10 Follow the steps below are already installed, right-click them . For copying and viewing pictures recorded...
... Serial Bus Controller] folder • [USB Audio Device] in the [Sound, video and game controller] folder • [Composite USB Device] in the [Other devices] folder 7 When the [Confirm Device Removal] screen appears, click [OK]. 8 Turn off the power of your camcorder, disconnect the USB cable, then restart the computer. 9 Place the CD-ROM in the disc drive of your computer. 10 Follow the steps below are already installed, right-click them . For copying and viewing pictures recorded...
Camera Operations Guide
Page 90
...] (Disc drive)*. * Drive names (such as Administrators. 1 Check that your computer. For copying and viewing pictures recorded on the computer. 3 Click [Open]. 4 Double-click [Driver]. 5 Double-click [Setup.exe]. For TRV280: [Cannot start the simple operation settings while the USB cable is connected to delete them. b Note • Deleting anything other than [USB Composite Device], [USB Audio Device], and [USB Device] may vary depending on a tape • [USB Composite Device] in the [Universal Serial Bus Controller] folder • [USB Audio Device] in the [Sound, video and...
...] (Disc drive)*. * Drive names (such as Administrators. 1 Check that your computer. For copying and viewing pictures recorded on the computer. 3 Click [Open]. 4 Double-click [Driver]. 5 Double-click [Setup.exe]. For TRV280: [Cannot start the simple operation settings while the USB cable is connected to delete them. b Note • Deleting anything other than [USB Composite Device], [USB Audio Device], and [USB Device] may vary depending on a tape • [USB Composite Device] in the [Universal Serial Bus Controller] folder • [USB Audio Device] in the [Sound, video and...
Camera Operations Guide
Page 100
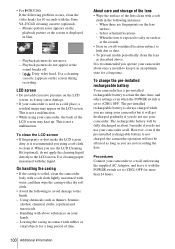
... the date, time, and other settings even when the POWER switch is soiled, clean the camcorder body with a soft cloth lightly moistened with water, and then wipe the casing with above . The rechargeable battery will not be fully discharged in about once a month to the finish. - Use a cleaning cassette.] appears on the playback picture or the screen is recommended you are using your camcorder is not charged, the camcorder operation...
... the date, time, and other settings even when the POWER switch is soiled, clean the camcorder body with a soft cloth lightly moistened with water, and then wipe the casing with above . The rechargeable battery will not be fully discharged in about once a month to the finish. - Use a cleaning cassette.] appears on the playback picture or the screen is recommended you are using your camcorder is not charged, the camcorder operation...
Camera Operations Guide
Page 101
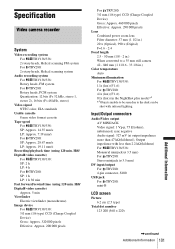
... (ø 3.5 mm) DV input/output For TRV280: 4-pin connector, S100 USB jack For TRV280: mini-B LCD screen Picture 6.2 cm (2.5 type) Total dot number 123 200 (560 × 220) ,continued Additional Information 101 Additional Information Specification Video camera recorder System Video recording system For TRV138/338: 2 rotary heads, Helical scanning FM system For TRV280: 2 rotary heads, Helical scanning system Audio recording system For TRV138/338: Rotary heads, FM system For TRV280: Rotary heads, PCM system Quantization...
... (ø 3.5 mm) DV input/output For TRV280: 4-pin connector, S100 USB jack For TRV280: mini-B LCD screen Picture 6.2 cm (2.5 type) Total dot number 123 200 (560 × 220) ,continued Additional Information 101 Additional Information Specification Video camera recorder System Video recording system For TRV138/338: 2 rotary heads, Helical scanning FM system For TRV280: 2 rotary heads, Helical scanning system Audio recording system For TRV138/338: Rotary heads, FM system For TRV280: Rotary heads, PCM system Quantization...
Camera Operations Guide
Page 109
... function (A.SHUT OFF 57 B BACK LIGHT 27 Battery Battery Info 13 Battery pack 12 Remaining battery time 22, 96 BEEP 57 BLACK FADER 30 Built-in light 23 BURN DVD/VCD .....79, 106 C Camera settings data display 37 Cassette 18, 95 CD-ROM 72 Charging the battery Battery Pack 12 Pre-installed rechargeable battery 100 Cleaning cassette 100 Clock set (CLOCK SET) ......17, 55 D Data code (DATA CODE) .....37, 57 Date/time 37 DEMO MODE 56 Digital program editing (VIDEO EDIT 67 Digital zoom (D ZOOM)... 45 Digital8 system 95 Direct Access...
... function (A.SHUT OFF 57 B BACK LIGHT 27 Battery Battery Info 13 Battery pack 12 Remaining battery time 22, 96 BEEP 57 BLACK FADER 30 Built-in light 23 BURN DVD/VCD .....79, 106 C Camera settings data display 37 Cassette 18, 95 CD-ROM 72 Charging the battery Battery Pack 12 Pre-installed rechargeable battery 100 Cleaning cassette 100 Clock set (CLOCK SET) ......17, 55 D Data code (DATA CODE) .....37, 57 Date/time 37 DEMO MODE 56 Digital program editing (VIDEO EDIT 67 Digital zoom (D ZOOM)... 45 Digital8 system 95 Direct Access...
Marketing Specifications
Page 1
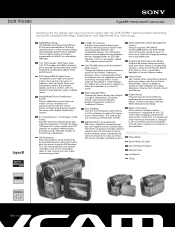
... internet using the USB interface. Digital8 records digital audio and video comparable to 12 hours on the camcorder's tape. The high resolution 123K pixel LCD screen rotates up to 270 degrees for multiple viewing angles providing sharp, detailed images for up from English to detect and compensate for pure digital transfer between two compatible devices. Program AE (Auto Exposure) Modes Program AE modes make VHS copies of digital zooms. SteadyShot® Picture Stabilization System Picture stabilization...
... internet using the USB interface. Digital8 records digital audio and video comparable to 12 hours on the camcorder's tape. The high resolution 123K pixel LCD screen rotates up to 270 degrees for multiple viewing angles providing sharp, detailed images for up from English to detect and compensate for pure digital transfer between two compatible devices. Program AE (Auto Exposure) Modes Program AE modes make VHS copies of digital zooms. SteadyShot® Picture Stabilization System Picture stabilization...
Marketing Specifications
Page 2
... Focus: Full Range Auto, Manual (Dial) Audio Dolby® Digital Output: PCM Recording Format: Stereo Convenience Progressive Shutter Mode: N/A Shutter Speed: 1/60-1/4000 (AE Mode) Optical Zoom: 20X Digital Zoom: 990X Resolution: N/A USB Streaming: Yes Lens Type: Sony Lens SteadyShot® Image Stabilization: Yes (Electronic) Accessory Shoe: N/A White Balance: Auto Memory Stick PRO™ Media Compatibility: N/A Still Image Mode(s): Yes (Tape) Minimum Illumination: 4 Lux (0 Lux with NightShot® Infrared System) Power Power Consumption: 2.5W/3.4W/3.6W (VF/LCD/VF+LCD) Battery Type...
... Focus: Full Range Auto, Manual (Dial) Audio Dolby® Digital Output: PCM Recording Format: Stereo Convenience Progressive Shutter Mode: N/A Shutter Speed: 1/60-1/4000 (AE Mode) Optical Zoom: 20X Digital Zoom: 990X Resolution: N/A USB Streaming: Yes Lens Type: Sony Lens SteadyShot® Image Stabilization: Yes (Electronic) Accessory Shoe: N/A White Balance: Auto Memory Stick PRO™ Media Compatibility: N/A Still Image Mode(s): Yes (Tape) Minimum Illumination: 4 Lux (0 Lux with NightShot® Infrared System) Power Power Consumption: 2.5W/3.4W/3.6W (VF/LCD/VF+LCD) Battery Type...


