
Camera Operations Guide
Page 4
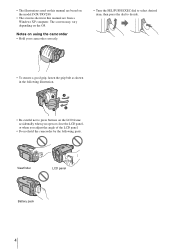
... the camcorder • Hold your camcorder correctly. • Turn the SEL/PUSH EXEC dial to select desired item, then press the dial to decide. • To ensure a good grip, fasten the grip belt as shown in the following illustration. • Be careful not to press buttons on the model DCR-TRV280. &#...8226; The screens shown in this manual are from a Windows XP computer. • The illustrations used on this manual are based on the LCD frame accidentally when you open or close the LCD panel, or when you adjust the angle of the LCD panel. • Do not hold the camcorder...
... the camcorder • Hold your camcorder correctly. • Turn the SEL/PUSH EXEC dial to select desired item, then press the dial to decide. • To ensure a good grip, fasten the grip belt as shown in the following illustration. • Be careful not to press buttons on the model DCR-TRV280. &#...8226; The screens shown in this manual are from a Windows XP computer. • The illustrations used on this manual are based on the LCD frame accidentally when you open or close the LCD panel, or when you adjust the angle of the LCD panel. • Do not hold the camcorder...
Camera Operations Guide
Page 7
...menu - FRAME REC/INT.REC, etc. ......52 Using the (SETUP MENU) - WORLD TIME/VIDEO EDIT, etc 57 Dubbing/Editing Connecting to a VCR 59 Dubbing to DVD") ( TRV280 79 Troubleshooting Troubleshooting 82 Warning indicators and messages .....92 Additional Information Using your camcorder abroad ...LINK 97 Maintenance and precautions 98 Specification 101 Quick Reference Identifying parts and controls ...........104 Index 109 For TRV280: Two operating instructions are supplied with your camcorder: • Camera Operations Guide (This manual) • "First Step Guide" for using the supplied...
...menu - FRAME REC/INT.REC, etc. ......52 Using the (SETUP MENU) - WORLD TIME/VIDEO EDIT, etc 57 Dubbing/Editing Connecting to a VCR 59 Dubbing to DVD") ( TRV280 79 Troubleshooting Troubleshooting 82 Warning indicators and messages .....92 Additional Information Using your camcorder abroad ...LINK 97 Maintenance and precautions 98 Specification 101 Quick Reference Identifying parts and controls ...........104 Index 109 For TRV280: Two operating instructions are supplied with your camcorder: • Camera Operations Guide (This manual) • "First Step Guide" for using the supplied...

Camera Operations Guide
Page 22
... battery power ([A.SHUT OFF], p. 57). Do not record pictures in SP mode and LP mode on the same tape. - When you do not operate the camcorder for a while. z Tips • You can view this information during recording. 1 23 7 60min SP REC 0:00:00 5 A Remaining battery time The indicated ...time may not be correct depending on the environment of use REC START/STOP on LCD frame to record moving pictures. You can also use . For TRV280: This appears after you insert a cassette and record for more than about 1 minute to select CAMERA, and then press...
... battery power ([A.SHUT OFF], p. 57). Do not record pictures in SP mode and LP mode on the same tape. - When you do not operate the camcorder for a while. z Tips • You can view this information during recording. 1 23 7 60min SP REC 0:00:00 5 A Remaining battery time The indicated ...time may not be correct depending on the environment of use REC START/STOP on LCD frame to record moving pictures. You can also use . For TRV280: This appears after you insert a cassette and record for more than about 1 minute to select CAMERA, and then press...
Camera Operations Guide
Page 23
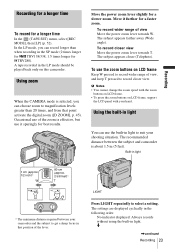
...], p. 45). m ,continued Recording 23 A tape recorded in light to get a sharp focus in the SP mode (2 times longer for TRV138/338, 1.5 times longer for TRV280). Using zoom When the CAMERA mode is selected, you can record longer than 20 times, and from that position of view Move the power zoom... appears farther away (Wide angle). In the LP mode, you can use the zoom buttons on LCD frame, support the LCD panel with your shooting situation. The recommended distance between your camcorder and the subject to suit your hand. To use the built-in the LP mode should be played ...
...], p. 45). m ,continued Recording 23 A tape recorded in light to get a sharp focus in the SP mode (2 times longer for TRV138/338, 1.5 times longer for TRV280). Using zoom When the CAMERA mode is selected, you can record longer than 20 times, and from that position of view Move the power zoom... appears farther away (Wide angle). In the LP mode, you can use the zoom buttons on LCD frame, support the LCD panel with your shooting situation. The recommended distance between your camcorder and the subject to suit your hand. To use the built-in the LP mode should be played ...
Camera Operations Guide
Page 31
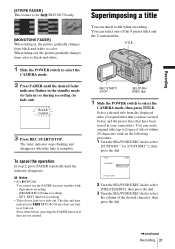
Tape photo recording - [FRAME REC] (Frame recording) - [INT. TITLE STBY CUSTOM1"" OK CREATE / EDIT [TITLE] : END 2 Turn ...or fade out. The date and time indicator for TRV138/338 only. [MONOTONE FADER] When fading in your camcorder). Erase them before and the preset titles that you have been stored in , the picture gradually changes from... desired title from color to black-and-white. 1 Slide the POWER switch to fade out). b Notes • For TRV280: You cannot use the FADER function together with: - You can select one of the desired character, then press the dial...
Tape photo recording - [FRAME REC] (Frame recording) - [INT. TITLE STBY CUSTOM1"" OK CREATE / EDIT [TITLE] : END 2 Turn ...or fade out. The date and time indicator for TRV138/338 only. [MONOTONE FADER] When fading in your camcorder). Erase them before and the preset titles that you have been stored in , the picture gradually changes from... desired title from color to black-and-white. 1 Slide the POWER switch to fade out). b Notes • For TRV280: You cannot use the FADER function together with: - You can select one of the desired character, then press the dial...
Camera Operations Guide
Page 35
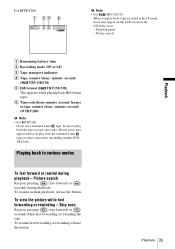
... cases: - To view the picture while fast forwarding or rewinding - F Time code (hour: minute: second: frame) or tape counter (hour: minute: second) ( TRV280) b Note • For TRV280: If you play back the tape on pressing (fast forward) or (rewind) during playback - To resume normal playback..., release the button. Picture search Keep on your camcorder. For TRV280: 60min 0:00:00:00 b Note • For TRV138/338: When you play back a tape recorded in the LP mode, noise...
... cases: - To view the picture while fast forwarding or rewinding - F Time code (hour: minute: second: frame) or tape counter (hour: minute: second) ( TRV280) b Note • For TRV280: If you play back the tape on pressing (fast forward) or (rewind) during playback - To resume normal playback..., release the button. Picture search Keep on your camcorder. For TRV280: 60min 0:00:00:00 b Note • For TRV138/338: When you play back a tape recorded in the LP mode, noise...
Camera Operations Guide
Page 41
... the dial. TAPE SET REC MODE AUDIO MODE REMAIN AUTO FRAME REC ON I N T. Customizing Your Camcorder 41 MENU OTHERS (p. 57) TAPE SET REC MODE SP AUDIO MODE REMAIN FRAME REC I N T. MANUAL SET (p. 42) CAMERA SET (p. 45) PLAYER SET (p. 49) ( TRV138/ 338) VCR SET (p. 49) ( TRV280) LCD SET (p. 51) TAPE SET (p. 52) SETUP MENU (p. 55...
... the dial. TAPE SET REC MODE AUDIO MODE REMAIN AUTO FRAME REC ON I N T. Customizing Your Camcorder 41 MENU OTHERS (p. 57) TAPE SET REC MODE SP AUDIO MODE REMAIN FRAME REC I N T. MANUAL SET (p. 42) CAMERA SET (p. 45) PLAYER SET (p. 49) ( TRV138/ 338) VCR SET (p. 49) ( TRV280) LCD SET (p. 51) TAPE SET (p. 52) SETUP MENU (p. 55...
Camera Operations Guide
Page 52
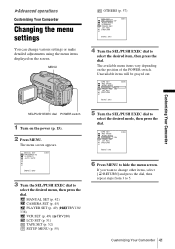
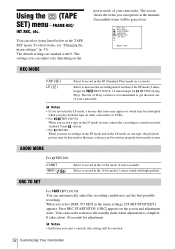
... "Changing the menu settings" (p. 41). The use of your camcorder. When you can adjust vary depending on the REC MODE power mode of Sony cassettes is complete. b Notes • Each time you can operate at the moment. FRAME REC/ INT.REC, etc. The settings you eject a cassette..., this setting will be written properly between the scenes. Select to record in the LP mode on your camcorder. AUDIO MODE For TRV280: ...
... "Changing the menu settings" (p. 41). The use of your camcorder. When you can adjust vary depending on the REC MODE power mode of Sony cassettes is complete. b Notes • Each time you can operate at the moment. FRAME REC/ INT.REC, etc. The settings you eject a cassette..., this setting will be written properly between the scenes. Select to record in the LP mode on your camcorder. AUDIO MODE For TRV280: ...

Camera Operations Guide
Page 53
...SET] in the standard recording mode. FRAME REC For TRV280: You can record pictures with the cassette inserted, and your camcorder enters the standby mode. 4 Move the subject and repeat step 3. A picture (approximately 6 frames) is recorded, and your camcorder calculates the remaining amount of tape....section of about 0.1 second appears on your camcorder with a stop-motion animated effect by alternately frame recording and then moving the subject a little. Select to hide the menu settings. Select to record pictures using the frame recording function. 1 Turn the SEL/PUSH ...
...SET] in the standard recording mode. FRAME REC For TRV280: You can record pictures with the cassette inserted, and your camcorder enters the standby mode. 4 Move the subject and repeat step 3. A picture (approximately 6 frames) is recorded, and your camcorder calculates the remaining amount of tape....section of about 0.1 second appears on your camcorder with a stop-motion animated effect by alternately frame recording and then moving the subject a little. Select to hide the menu settings. Select to record pictures using the frame recording function. 1 Turn the SEL/PUSH ...
Camera Operations Guide
Page 54
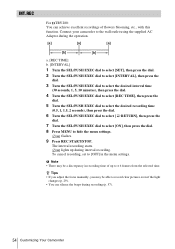
..., set to hide the menu settings. z Tips • If you adjust the focus manually, you may be able to ± 6 frames from the selected time. Connect your camcorder to the wall outlet using the supplied AC Adaptor during the operation. [a] [a] [a] [b] [b] a. [REC TIME] b. [INTERVAL] 1 ... MENU to [OFF] in recording time of flowers blooming, etc., with this function. INT.REC For TRV280: You can silence the beeps during recording (p. 57). 54 Customizing Your Camcorder The interval recording starts. lights up to record clear pictures even if the light changes (p. 29). &#...
..., set to hide the menu settings. z Tips • If you adjust the focus manually, you may be able to ± 6 frames from the selected time. Connect your camcorder to the wall outlet using the supplied AC Adaptor during the operation. [a] [a] [a] [b] [b] a. [REC TIME] b. [INTERVAL] 1 ... MENU to [OFF] in recording time of flowers blooming, etc., with this function. INT.REC For TRV280: You can silence the beeps during recording (p. 57). 54 Customizing Your Camcorder The interval recording starts. lights up to record clear pictures even if the light changes (p. 29). &#...

Camera Operations Guide
Page 104
...(p. 41) * This button has a tactile dot. Quick Reference Identifying parts and controls Camcorder A Lens cap (p. 21, 25) B LCD screen (p. 3, 16) C OPEN button (p. 16) D REC START/STOP button on LCD frame (p. 21) E Zoom buttons on LCD frame (p. 23) F VOLUME -/+* button (p. 34) G END SEARCH button (p. 33)... H Speaker I Viewfinder (p. 3, 16) If you attach the large capacity battery pack NP-QM71D/QM91D (optional) to the camcorder, extend and lift up the viewfinder...
...(p. 41) * This button has a tactile dot. Quick Reference Identifying parts and controls Camcorder A Lens cap (p. 21, 25) B LCD screen (p. 3, 16) C OPEN button (p. 16) D REC START/STOP button on LCD frame (p. 21) E Zoom buttons on LCD frame (p. 23) F VOLUME -/+* button (p. 34) G END SEARCH button (p. 33)... H Speaker I Viewfinder (p. 3, 16) If you attach the large capacity battery pack NP-QM71D/QM91D (optional) to the camcorder, extend and lift up the viewfinder...

Camera Operations Guide
Page 108
...Recording standby/ recording mode Mirror mode (p. 24) Tape photo recording (p. 25) Format indicator Audio mode (p. 52) Remaining tape (p. 22) Interval recording (p. 54) Frame recording (p. 53) DV input (p. 66) Built-in light (p. 23) NightShot plus (p. 28) Warning (p. 92) 108 Quick Reference Indicators for the LCD screen... and viewfinder Following indicators will appear on your camcorder. Indicators and their on-screen/viewfinder positions vary depending on the LCD screen and viewfinder to indicate the state of your...
...Recording standby/ recording mode Mirror mode (p. 24) Tape photo recording (p. 25) Format indicator Audio mode (p. 52) Remaining tape (p. 22) Interval recording (p. 54) Frame recording (p. 53) DV input (p. 66) Built-in light (p. 23) NightShot plus (p. 28) Warning (p. 92) 108 Quick Reference Indicators for the LCD screen... and viewfinder Following indicators will appear on your camcorder. Indicators and their on-screen/viewfinder positions vary depending on the LCD screen and viewfinder to indicate the state of your...
Camera Operations Guide
Page 109
..., 55 D Data code (DATA CODE) .....37, 57 Date/time 37 DEMO MODE 56 Digital program editing (VIDEO EDIT 67 Digital zoom (D ZOOM)... 45 Digital8 system 95 Direct Access to "Click to DVD 79 DirectX 9.0c 76 Display DISPLAY 58 Display indicator....... 108 DNR 50 Dual sound track tape ........ 49... Dubbing 59 DV Interface 79 E Easy Dubbing 62 Easy Handycam 26, 36 EDIT 49 END SEARCH 33 Exposure 27 F FADER 30 First Step Guide........... 73, 74 Focus 29 Frame recording (FRAME REC 53 Full charge 12 G Grip belt 4 H Hi8/standard 8 mm system 95 HiFi...
..., 55 D Data code (DATA CODE) .....37, 57 Date/time 37 DEMO MODE 56 Digital program editing (VIDEO EDIT 67 Digital zoom (D ZOOM)... 45 Digital8 system 95 Direct Access to "Click to DVD 79 DirectX 9.0c 76 Display DISPLAY 58 Display indicator....... 108 DNR 50 Dual sound track tape ........ 49... Dubbing 59 DV Interface 79 E Easy Dubbing 62 Easy Handycam 26, 36 EDIT 49 END SEARCH 33 Exposure 27 F FADER 30 First Step Guide........... 73, 74 Focus 29 Frame recording (FRAME REC 53 Full charge 12 G Grip belt 4 H Hi8/standard 8 mm system 95 HiFi...


