
Camera Operations Guide
Page 2
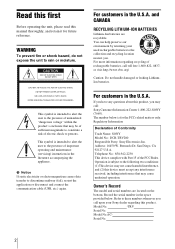
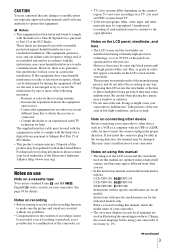
... fire or shock hazard, do not expose the unit to discontinue midway (fail), restart the application or disconnect and connect the communication cable (USB, etc.) again. and CANADA RECYCLING LITHIUM-ION BATTERIES Lithium-Ion batteries are located on the bottom. This symbol is subject...instructions in the U.S.A. Serial No. 2 Telephone No.: 858-942-2230 This device complies with Part 15 of Conformity Trade Name: SONY Model No.: DCR-TRV280 Responsible Party: Sony Electronics Inc. Model No. -TRV Serial No. Model No.AC- For customers in the space provided below is intended to ...
... fire or shock hazard, do not expose the unit to discontinue midway (fail), restart the application or disconnect and connect the communication cable (USB, etc.) again. and CANADA RECYCLING LITHIUM-ION BATTERIES Lithium-Ion batteries are located on the bottom. This symbol is subject...instructions in the U.S.A. Serial No. 2 Telephone No.: 858-942-2230 This device complies with Part 15 of Conformity Trade Name: SONY Model No.: DCR-TRV280 Responsible Party: Sony Electronics Inc. Model No. -TRV Serial No. Model No.AC- For customers in the space provided below is intended to ...
Camera Operations Guide
Page 3
...in accordance with an USB or i.LINK cable, be damaged. Unauthorized recording of your camcorder. • The on your camcorder to other materials may appear different from that to radio communications. CCD-TRV138: TRV138 CCD-TRV338: TRV338 DCR-TRV280: TRV280 Instructions with specific model names are for... used with the limits for long periods of the pixels are operational for effective use standard 8 mm and Hi8 , Digital8 video cassettes on -screen displays in each model is not possible due to provide reasonable protection against harmful interference in this...
...in accordance with an USB or i.LINK cable, be damaged. Unauthorized recording of your camcorder. • The on your camcorder to other materials may appear different from that to radio communications. CCD-TRV138: TRV138 CCD-TRV338: TRV338 DCR-TRV280: TRV280 Instructions with specific model names are for... used with the limits for long periods of the pixels are operational for effective use standard 8 mm and Hi8 , Digital8 video cassettes on -screen displays in each model is not possible due to provide reasonable protection against harmful interference in this...
Camera Operations Guide
Page 11
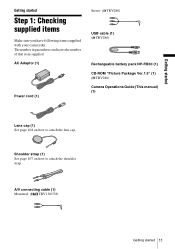
... Make sure you have following items supplied with your camcorder. Getting started Getting started 11 Shoulder strap (1) See page 107 on how to attach the shoulder strap. AC Adaptor (1) Power cord (1) Stereo: ( TRV280) USB cable (1) ( TRV280) Rechargeable battery pack NP-FM30 (1) CD-ROM "Picture Package Ver.1.5" (1) ( TRV280) Camera Operations Guide (This manual) (1) Lens cap (1) See...
... Make sure you have following items supplied with your camcorder. Getting started Getting started 11 Shoulder strap (1) See page 107 on how to attach the shoulder strap. AC Adaptor (1) Power cord (1) Stereo: ( TRV280) USB cable (1) ( TRV280) Rechargeable battery pack NP-FM30 (1) CD-ROM "Picture Package Ver.1.5" (1) ( TRV280) Camera Operations Guide (This manual) (1) Lens cap (1) See...
Camera Operations Guide
Page 27
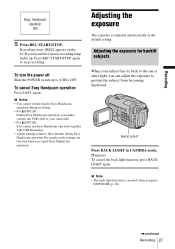
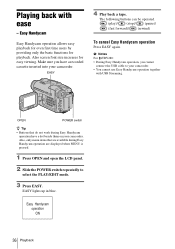
... or other light, you can adjust the exposure to prevent the subject from /to Easy Handycam operation during recording. • For TRV280: During Easy Handycam operation, you cannot connect the USB cable to your camcorder. • For TRV280: You cannot use Easy Handycam operation together with USB Streaming. • All the settings return to their defaults during...
... or other light, you can adjust the exposure to prevent the subject from /to Easy Handycam operation during recording. • For TRV280: During Easy Handycam operation, you cannot connect the USB cable to your camcorder. • For TRV280: You cannot use Easy Handycam operation together with USB Streaming. • All the settings return to their defaults during...
Camera Operations Guide
Page 36
... back a tape. EASY lights up in blue. Easy Handycam operation ON 36 Playback b Notes For TRV280: • During Easy Handycam operation, you have a dot beside them on your camcorder. • You cannot use Easy Handycam operation together with ease - Make sure you cannot connect the USB cable to select the PLAY/EDIT mode. 3 Press EASY. OPEN...
... back a tape. EASY lights up in blue. Easy Handycam operation ON 36 Playback b Notes For TRV280: • During Easy Handycam operation, you have a dot beside them on your camcorder. • You cannot use Easy Handycam operation together with ease - Make sure you cannot connect the USB cable to select the PLAY/EDIT mode. 3 Press EASY. OPEN...
Camera Operations Guide
Page 39
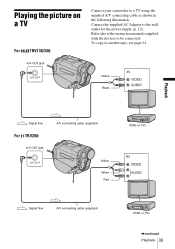
Playing the picture on a TV For TRV138/338: Connect your camcorder to be connected. A/V OUT jack Yellow Black Playback Signal flow For TRV280: A/V OUT jack A/V connecting cable (supplied) Yellow White Red VCRs or TVs Signal flow A/V connecting cable (supplied) VCRs or TVs ,continued Playback 39 Refer also to the instruction manuals supplied with the devices to a TV using the supplied A/V connecting cable as shown in the following illustration. To copy to the wall outlet for the power supply (p. 12). Connect the supplied AC Adaptor to another tape, see page 61.
Playing the picture on a TV For TRV138/338: Connect your camcorder to be connected. A/V OUT jack Yellow Black Playback Signal flow For TRV280: A/V OUT jack A/V connecting cable (supplied) Yellow White Red VCRs or TVs Signal flow A/V connecting cable (supplied) VCRs or TVs ,continued Playback 39 Refer also to the instruction manuals supplied with the devices to a TV using the supplied A/V connecting cable as shown in the following illustration. To copy to the wall outlet for the power supply (p. 12). Connect the supplied AC Adaptor to another tape, see page 61.
Camera Operations Guide
Page 40
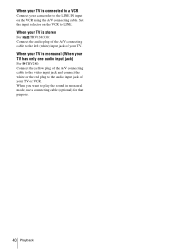
... jack of your TV or VCR. When you want to the LINE IN input on the VCR to the audio input jack of the A/V connecting cable to the video input jack and connect the white or the red plug to LINE. When your TV is monaural (When your TV has only... one audio input jack) For TRV280: Connect the yellow plug of your TV. When your TV is connected to a VCR Connect your camcorder to play the sound in monaural mode, use a connecting cable (optional) for that purpose. 40 Playback Set the input selector on the...
... jack of your TV or VCR. When you want to the LINE IN input on the VCR to the audio input jack of the A/V connecting cable to the video input jack and connect the white or the red plug to LINE. When your TV is monaural (When your TV has only... one audio input jack) For TRV280: Connect the yellow plug of your TV. When your TV is connected to a VCR Connect your camcorder to play the sound in monaural mode, use a connecting cable (optional) for that purpose. 40 Playback Set the input selector on the...
Camera Operations Guide
Page 55
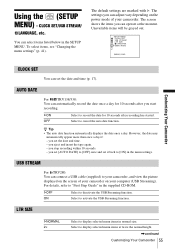
... 10 seconds after you can connect a USB cable (supplied) to display selected menu items in the menu settings. AUTO DATE For TRV138/338: You can operate at twice the normal height. ,continued Customizing Your Camcorder 55 USB STREAM For TRV280: You can adjust vary depending on the power... mode of your camcorder on the screen of your computer (USB Streaming). LTR SIZE GNORMAL 2× Select to ...
... 10 seconds after you can connect a USB cable (supplied) to display selected menu items in the menu settings. AUTO DATE For TRV138/338: You can operate at twice the normal height. ,continued Customizing Your Camcorder 55 USB STREAM For TRV280: You can adjust vary depending on the power... mode of your camcorder on the screen of your computer (USB Streaming). LTR SIZE GNORMAL 2× Select to ...

Camera Operations Guide
Page 59
A/V connecting cable (supplied) Signal flow Yellow Black VCRs Dubbing/Editing ,continued Dubbing/Editing 59 For TRV280, you can create a copy of the picture recorded on your camcorder on your camcorder (p. 66). Dubbing/Editing Connecting to a VCR For TRV138/338: A/V OUT jack You can also record the picture from a VCR to a VCR as shown in the following illustration. Connect your camcorder to a tape on other recording devices (p. 61).
A/V connecting cable (supplied) Signal flow Yellow Black VCRs Dubbing/Editing ,continued Dubbing/Editing 59 For TRV280, you can create a copy of the picture recorded on your camcorder on your camcorder (p. 66). Dubbing/Editing Connecting to a VCR For TRV138/338: A/V OUT jack You can also record the picture from a VCR to a VCR as shown in the following illustration. Connect your camcorder to a tape on other recording devices (p. 61).
Camera Operations Guide
Page 60
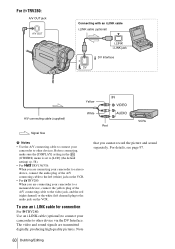
... (left (white) jack on the VCR. To use an i.LINK cable for connection For TRV280: Use an i.LINK cable (optional) to connect your camcorder to the audio jack on the VCR. • For TRV280: When you cannot record the picture and sound separately. Note that you...digitally, producing high quality pictures. For TRV280: A/V OUT jack Connecting with an i.LINK cable i.LINK cable (optional) i.LINK jack DV Interface Yellow A/V connecting cable (supplied) Signal flow White Red VCRs b Notes • Use the A/V connecting cable to connect your camcorder to other device via the DV ...
... (left (white) jack on the VCR. To use an i.LINK cable for connection For TRV280: Use an i.LINK cable (optional) to connect your camcorder to the audio jack on the VCR. • For TRV280: When you cannot record the picture and sound separately. Note that you...digitally, producing high quality pictures. For TRV280: A/V OUT jack Connecting with an i.LINK cable i.LINK cable (optional) i.LINK jack DV Interface Yellow A/V connecting cable (supplied) Signal flow White Red VCRs b Notes • Use the A/V connecting cable to connect your camcorder to other device via the DV ...
Camera Operations Guide
Page 61
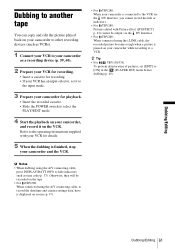
... data, have it to the input mode. 3 Prepare your camcorder for details. 5 When the dubbing is finished, stop your camcorder and the VCR. • For TRV280: When your camcorder is connected to the VCR via the DV Interface. • For TRV280: When connected using the A/V connecting cable, press DISPLAY/BATT INFO to hide indicators such as...
... data, have it to the input mode. 3 Prepare your camcorder for details. 5 When the dubbing is finished, stop your camcorder and the VCR. • For TRV280: When your camcorder is connected to the VCR via the DV Interface. • For TRV280: When connected using the A/V connecting cable, press DISPLAY/BATT INFO to hide indicators such as...
Camera Operations Guide
Page 62
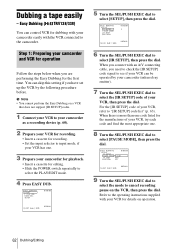
.... When there is more than one code listed for the manufacturer of your VCR, try each code and find the most appropriate one . 3 Prepare your camcorder for playback. • Insert a cassette for dubbing with your VCR, then press the dial. Easy Dubbing ( TRV138/338) You can be operated by the...to check the [IR SETUP] code signal to see if your VCR, refer to the operating instructions supplied with an A/V connecting cable, you have set up the VCR by your camcorder (infrared ray emitter). 7 Turn the SEL/PUSH EXEC dial to select the [IR SETUP] code of your VCR can control ...
.... When there is more than one code listed for the manufacturer of your VCR, try each code and find the most appropriate one . 3 Prepare your camcorder for playback. • Insert a cassette for dubbing with your VCR, then press the dial. Easy Dubbing ( TRV138/338) You can be operated by the...to check the [IR SETUP] code signal to see if your VCR, refer to the operating instructions supplied with an A/V connecting cable, you have set up the VCR by your camcorder (infrared ray emitter). 7 Turn the SEL/PUSH EXEC dial to select the [IR SETUP] code of your VCR can control ...
Camera Operations Guide
Page 66
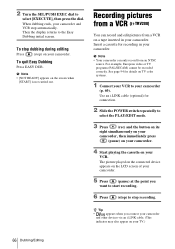
...from a VCR ( TRV280) You can only record from a VCR on a tape inserted in your VCR. See page 94 for details on TV color systems. 1 Connect your VCR to select the PLAY/EDIT mode. 3 Press (rec) and the button on its right simultaneously on your camcorder, then immediately press ...(pause) on your camcorder. 4 Start playing the cassette on your camcorder. Use an i.LINK cable (optional) for recording in your TV.) 66 Dubbing/Editing 2 Turn the SEL/PUSH EXEC ...
...from a VCR ( TRV280) You can only record from a VCR on a tape inserted in your VCR. See page 94 for details on TV color systems. 1 Connect your VCR to select the PLAY/EDIT mode. 3 Press (rec) and the button on its right simultaneously on your camcorder, then immediately press ...(pause) on your camcorder. 4 Start playing the cassette on your camcorder. Use an i.LINK cable (optional) for recording in your TV.) 66 Dubbing/Editing 2 Turn the SEL/PUSH EXEC ...
Camera Operations Guide
Page 67
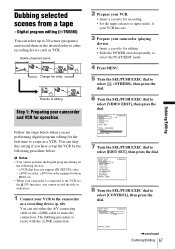
... to the VCR via the DV Interface, you are performing digital program editing for the first time to a tape in the desired order to the camcorder as VCR. Dubbing selected scenes from a tape - a DVD recorder, a DVD recorder equipped with the i.LINK connection. 2 Prepare your VCR. • Insert a cassette for editing. &#... : END 0:08:55:06 8 Turn the SEL/PUSH EXEC dial to make the connection. a VCR that does not support [IR SETUP] codes - Digital program editing ( TRV280) You can use either the A/V connecting cable or the i.LINK cable to select [CONTROL], then press the dial.
... to the VCR via the DV Interface, you are performing digital program editing for the first time to a tape in the desired order to the camcorder as VCR. Dubbing selected scenes from a tape - a DVD recorder, a DVD recorder equipped with the i.LINK connection. 2 Prepare your VCR. • Insert a cassette for editing. &#... : END 0:08:55:06 8 Turn the SEL/PUSH EXEC dial to make the connection. a VCR that does not support [IR SETUP] codes - Digital program editing ( TRV280) You can use either the A/V connecting cable or the i.LINK cable to select [CONTROL], then press the dial.
Camera Operations Guide
Page 68
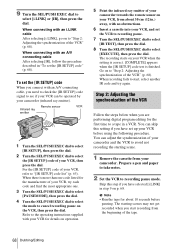
...this step if you are performing digital program editing for details on operation. 5 Point the infrared ray emitter of your camcorder towards the remote sensor on your VCR, from your camcorder and the VCR to select the [IR SETUP] code of the tape. 68 Dubbing/Editing The starting scene. 1 ...] or [IR], then press the dial. When there is finished. To set the [IR SETUP] code When you connect with an A/V connecting cable After selecting [IR], follow the procedure described in a VCR. Step 2: Adjusting the synchronization of your VCR, try again. When connecting with an A/V connecting...
...this step if you are performing digital program editing for details on operation. 5 Point the infrared ray emitter of your camcorder towards the remote sensor on your VCR, from your camcorder and the VCR to select the [IR SETUP] code of the tape. 68 Dubbing/Editing The starting scene. 1 ...] or [IR], then press the dial. When there is finished. To set the [IR SETUP] code When you connect with an A/V connecting cable After selecting [IR], follow the procedure described in a VCR. Step 2: Adjusting the synchronization of your VCR, try again. When connecting with an A/V connecting...
Camera Operations Guide
Page 70
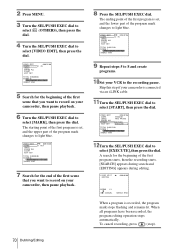
The ending point of the first program is connected via an i.LINK cable. 11Turn the SEL/PUSH EXEC dial to select [EXECUTE], then press the dial. VIDEO EDIT ... SCENE 1 [MENU] : END 9 Repeat steps 5 to 8 and create programs. 10Set your camcorder is set , and the upper part of the program mark changes to record on your camcorder, then pause playback. 8 Press the SEL/PUSH EXEC dial. A search for the end of the...[MENU] : END 5 Search for the beginning of the first scene that you want to record on your camcorder, then pause playback. 6 Turn the SEL/PUSH EXEC dial to light blue.
The ending point of the first program is connected via an i.LINK cable. 11Turn the SEL/PUSH EXEC dial to select [EXECUTE], then press the dial. VIDEO EDIT ... SCENE 1 [MENU] : END 9 Repeat steps 5 to 8 and create programs. 10Set your camcorder is set , and the upper part of the program mark changes to record on your camcorder, then pause playback. 8 Press the SEL/PUSH EXEC dial. A search for the end of the...[MENU] : END 5 Search for the beginning of the first scene that you want to record on your camcorder, then pause playback. 6 Turn the SEL/PUSH EXEC dial to light blue.
Camera Operations Guide
Page 71
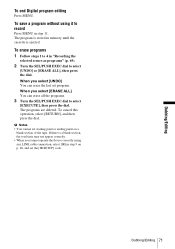
... a blank section of the tape. If there is ejected. Dubbing/Editing To end Digital program editing Press MENU. To save a program without using an i.LINK cable connection, select [IR] in step 11. To erase programs 1 Follow steps 1 to select [EXECUTE], then press the dial. To cancel this operation, select [RETURN], and...
... a blank section of the tape. If there is ejected. Dubbing/Editing To end Digital program editing Press MENU. To save a program without using an i.LINK cable connection, select [IR] in step 11. To erase programs 1 Follow steps 1 to select [EXECUTE], then press the dial. To cancel this operation, select [RETURN], and...
Camera Operations Guide
Page 72
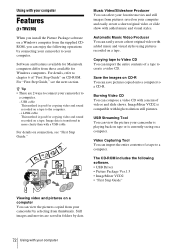
...to Video CD You can import the entire contents of a tape to a computer. USB cable This method is good for Windows computers. Video Capturing Tool You can import the entire contents... computer z Tip • There are saved in more clarity than with your computer Features ( TRV280) When you install the Picture Package software on a Windows computer from the supplied CDROM, you...images from thumbnails. The CD-ROM includes the following operations by connecting your camcorder to connect your camcorder is playing back on a tape. Automatic Music Video Producer You can save...
...to Video CD You can import the entire contents of a tape to a computer. USB cable This method is good for Windows computers. Video Capturing Tool You can import the entire contents... computer z Tip • There are saved in more clarity than with your computer Features ( TRV280) When you install the Picture Package software on a Windows computer from the supplied CDROM, you...images from thumbnails. The CD-ROM includes the following operations by connecting your camcorder to connect your camcorder is playing back on a tape. Automatic Music Video Producer You can save...
Camera Operations Guide
Page 73
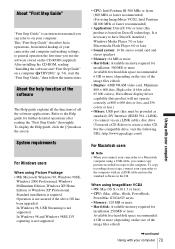
...Professional, Windows Millennium Edition, Windows XP Home Edition or Windows XP Professional Standard installation is based on DirectX technology. When using a USB cable, you connect your camcorder to a Macintosh computer using ImageMixer VCD2 • OS: Mac OS X (v10.1.5 or later) • CPU: iMac, eMac... detailed operations after reading the "First Step Guide" thoroughly. To display the Help guide, click the [?] mark on a computer ( TRV280)" (p. 74), start the "First Step Guide," then follow the instructions. System requirements For Windows users When using ImageMixer VCD2, Intel...
...Professional, Windows Millennium Edition, Windows XP Home Edition or Windows XP Professional Standard installation is based on DirectX technology. When using a USB cable, you connect your camcorder to a Macintosh computer using ImageMixer VCD2 • OS: Mac OS X (v10.1.5 or later) • CPU: iMac, eMac... detailed operations after reading the "First Step Guide" thoroughly. To display the Help guide, click the [?] mark on a computer ( TRV280)" (p. 74), start the "First Step Guide," then follow the instructions. System requirements For Windows users When using ImageMixer VCD2, Intel...
Camera Operations Guide
Page 79
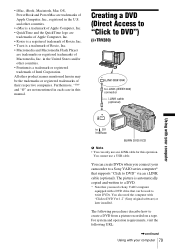
... Computer, Inc., registered in this operation. You cannot use an i.LINK cable for this manual. Creating a DVD (Direct Access to "Click to DVD") ( TRV280) to i.LINK (IEEE1394) connector i.LINK cable (optional) Using with your camcorder to a Sony VAIO series computer* that supports "Click to create a DVD from a... companies. and other product names mentioned herein may be used to a DVD. * Note that can only use a USB cable. You also need a Sony VAIO computer equipped with "Click to DV Interface BURN DVD/VCD b Note • You can be the trademarks or registered...
... Computer, Inc., registered in this operation. You cannot use an i.LINK cable for this manual. Creating a DVD (Direct Access to "Click to DVD") ( TRV280) to i.LINK (IEEE1394) connector i.LINK cable (optional) Using with your camcorder to a Sony VAIO series computer* that supports "Click to create a DVD from a... companies. and other product names mentioned herein may be used to a DVD. * Note that can only use a USB cable. You also need a Sony VAIO computer equipped with "Click to DV Interface BURN DVD/VCD b Note • You can be the trademarks or registered...


