
Camera Operations Guide
Page 3
... LCD screen and the viewfinder. For disposal or recycling information, please contact your camcorder to which can be regulated if sold in the United States. Notes on using a digital still camera, and thus may be contrary to radio communications. Reorient or relocate ... and Hi8 , Digital8 video cassettes on your camcorder. If you start reading this manual, check the model name of the pixels are designed to operate this equipment. CCD-TRV138: TRV138 CCD-TRV338: TRV338 DCR-TRV280: TRV280 Instructions with the limits for a Class B digital device, pursuant to...
... LCD screen and the viewfinder. For disposal or recycling information, please contact your camcorder to which can be regulated if sold in the United States. Notes on using a digital still camera, and thus may be contrary to radio communications. Reorient or relocate ... and Hi8 , Digital8 video cassettes on your camcorder. If you start reading this manual, check the model name of the pixels are designed to operate this equipment. CCD-TRV138: TRV138 CCD-TRV338: TRV338 DCR-TRV280: TRV280 Instructions with the limits for a Class B digital device, pursuant to...
Camera Operations Guide
Page 7
... SET/USB STREAM/ LANGUAGE, etc 55 Using the (OTHERS) menu - Easy Dubbing ( TRV138/338 62 Recording pictures from a VCR ( TRV280 66 Dubbing selected scenes from a tape - Digital program editing ( TRV280 67 Using with your camcorder: • Camera Operations Guide (This manual) • "First Step Guide" for using the supplied applications (included in the supplied...
... SET/USB STREAM/ LANGUAGE, etc 55 Using the (OTHERS) menu - Easy Dubbing ( TRV138/338 62 Recording pictures from a VCR ( TRV280 66 Dubbing selected scenes from a tape - Digital program editing ( TRV280 67 Using with your camcorder: • Camera Operations Guide (This manual) • "First Step Guide" for using the supplied applications (included in the supplied...
Camera Operations Guide
Page 23
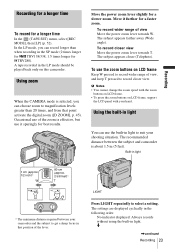
... when recording in light 1 cm (approx. 1/2 inch)* 80 cm (approx. 2 5/8 feet)* * The minimum distance required between the subject and camcorder is about 1.5 m (5 feet). Using zoom When the CAMERA mode is effective, but use the zoom buttons on LCD frame Keep W pressed to ... on LCD frame. • To press the zoom buttons on this camcorder. The subject appears closer (Telephoto). The recommended distance between your camcorder and the subject to suit your hand. Move it sparingly for TRV280). A tape recorded in that point activate the digital zoom ([D ZOOM], p. 45).
... when recording in light 1 cm (approx. 1/2 inch)* 80 cm (approx. 2 5/8 feet)* * The minimum distance required between the subject and camcorder is about 1.5 m (5 feet). Using zoom When the CAMERA mode is effective, but use the zoom buttons on LCD frame Keep W pressed to ... on LCD frame. • To press the zoom buttons on this camcorder. The subject appears closer (Telephoto). The recommended distance between your camcorder and the subject to suit your hand. Move it sparingly for TRV280). A tape recorded in that point activate the digital zoom ([D ZOOM], p. 45).
Camera Operations Guide
Page 45
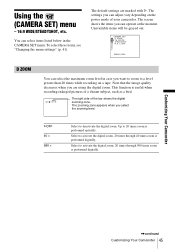
...level greater than 20 times while recording on the power mode of your camcorder. Select to activate the digital zoom. 20 times through 40 times zoom is performed optically. Up to activate the digital zoom. 20 times through 990 times zoom is useful when recording enlarged ...The right side of a distant subject, such as a bird. Select to 20 times zoom is performed digitally. The default settings are using the digital zoom. Customizing Your Camcorder ,continued Customizing Your Camcorder 45 Using the (CAMERA SET) menu - 16:9 WIDE/STEADYSHOT, etc. The settings you can operate...
...level greater than 20 times while recording on the power mode of your camcorder. Select to activate the digital zoom. 20 times through 40 times zoom is performed optically. Up to activate the digital zoom. 20 times through 990 times zoom is useful when recording enlarged ...The right side of a distant subject, such as a bird. Select to 20 times zoom is performed digitally. The default settings are using the digital zoom. Customizing Your Camcorder ,continued Customizing Your Camcorder 45 Using the (CAMERA SET) menu - 16:9 WIDE/STEADYSHOT, etc. The settings you can operate...
Camera Operations Guide
Page 60
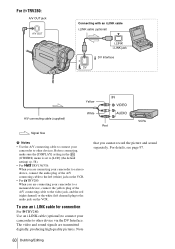
... set to [LCD] (the default setting) (p. 58). • For TRV138/338: When you are transmitted digitally, producing high quality pictures. To use an i.LINK cable for connection For TRV280: Use an i.LINK cable (optional) to connect your camcorder to a monaural device, connect the yellow plug of the A/V connecting cable to the left channel...
... set to [LCD] (the default setting) (p. 58). • For TRV138/338: When you are transmitted digitally, producing high quality pictures. To use an i.LINK cable for connection For TRV280: Use an i.LINK cable (optional) to connect your camcorder to a monaural device, connect the yellow plug of the A/V connecting cable to the left channel...
Camera Operations Guide
Page 67
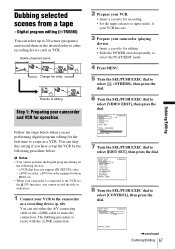
...a recording device (p. 60). a VCR that does not support [IR SETUP] codes - The dubbing procedure is easier with an HDD, etc • When your camcorder is connected to the VCR via the DV Interface, you cannot record the title or indicators. 1 Connect your VCR to 20 scenes (programs) and record...CONTROL], then press the dial. You can select up the VCR by the following devices: - VIDEO EDIT EDIT SET CONTROL 0:08:55:06 IR i. Digital program editing ( TRV280) You can use either the A/V connecting cable or the i.LINK cable to select [EDIT SET], then press the dial. b Notes • You ...
...a recording device (p. 60). a VCR that does not support [IR SETUP] codes - The dubbing procedure is easier with an HDD, etc • When your camcorder is connected to the VCR via the DV Interface, you cannot record the title or indicators. 1 Connect your VCR to 20 scenes (programs) and record...CONTROL], then press the dial. You can select up the VCR by the following devices: - VIDEO EDIT EDIT SET CONTROL 0:08:55:06 IR i. Digital program editing ( TRV280) You can use either the A/V connecting cable or the i.LINK cable to select [EDIT SET], then press the dial. b Notes • You ...
Camera Operations Guide
Page 68
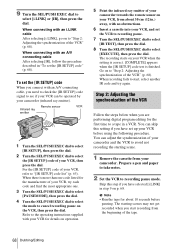
... dial. 4 Turn the SEL/PUSH EXEC dial to select the mode to the operating instructions supplied with an A/V connecting cable, you are performing digital program editing for about 30 cm (12 in step 9 on your VCR when the setting is correct. [COMPLETE] appears when the [IR SETUP.... 5 Point the infrared ray emitter of your VCR, from about 10 seconds before using the following procedure. You can adjust the synchronization of your camcorder (infrared ray emitter). When connecting with an i.LINK cable After selecting [i.LINK], go on to "[IR SETUP] code list" (p. 63). You ...
... dial. 4 Turn the SEL/PUSH EXEC dial to select the mode to the operating instructions supplied with an A/V connecting cable, you are performing digital program editing for about 30 cm (12 in step 9 on your VCR when the setting is correct. [COMPLETE] appears when the [IR SETUP.... 5 Point the infrared ray emitter of your VCR, from about 10 seconds before using the following procedure. You can adjust the synchronization of your camcorder (infrared ray emitter). When connecting with an i.LINK cable After selecting [i.LINK], go on to "[IR SETUP] code list" (p. 63). You ...

Camera Operations Guide
Page 69
...your VCR, then play back in Steps 1 and 2 (p. 67 to select [ADJ TEST], then press the dial. The calculated start position for recording into the camcorder. VIDEO EDIT EDIT SET CONTROL ADJ TEST "CUT-IN" "CUT-OUT" IR SETUP PAUSEMODE IR TEST RETURN [MENU] : END 0:08:55:06 0 8 ...Dubbing/Editing 3 Turn the SEL/PUSH EXEC dial to p. 68) beforehand. 1 Prepare a cassette. Recording the selected scenes as programs When you are performing digital program editing for recording is set . 9 Turn the SEL/PUSH EXEC dial to select ["CUT-IN"], then press the dial. The calculated stop position ...
...your VCR, then play back in Steps 1 and 2 (p. 67 to select [ADJ TEST], then press the dial. The calculated start position for recording into the camcorder. VIDEO EDIT EDIT SET CONTROL ADJ TEST "CUT-IN" "CUT-OUT" IR SETUP PAUSEMODE IR TEST RETURN [MENU] : END 0:08:55:06 0 8 ...Dubbing/Editing 3 Turn the SEL/PUSH EXEC dial to p. 68) beforehand. 1 Prepare a cassette. Recording the selected scenes as programs When you are performing digital program editing for recording is set . 9 Turn the SEL/PUSH EXEC dial to select ["CUT-IN"], then press the dial. The calculated stop position ...
Camera Operations Guide
Page 86
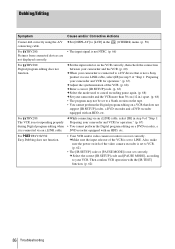
... the VCR more than 30 cm (12 in step 9 of "Step 1: Preparing your camcorder and VCR for operation." (p. 67) • You cannot perform the Digital program editing on a VCR that is not a Sony product via an i.LINK cable, select [IR] in step 9 of "Step 1: Preparing your VCR. cWhile ...signal is not NTSC. (p. 66) For TRV280: Digital program editing does not function. For TRV280: The VCR is not responding properly during Digital program editing when it is not set correctly. Also, make sure the power switch of the VCR is set to your camcorder and VCR for operation." (p. 67) cAdjust ...
... the VCR more than 30 cm (12 in step 9 of "Step 1: Preparing your camcorder and VCR for operation." (p. 67) • You cannot perform the Digital program editing on a VCR that is not a Sony product via an i.LINK cable, select [IR] in step 9 of "Step 1: Preparing your VCR. cWhile ...signal is not NTSC. (p. 66) For TRV280: Digital program editing does not function. For TRV280: The VCR is not responding properly during Digital program editing when it is not set correctly. Also, make sure the power switch of the VCR is set to your camcorder and VCR for operation." (p. 67) cAdjust ...
Camera Operations Guide
Page 92
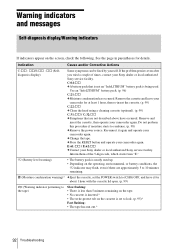
...ss/E:ss : ss (Selfdiagnosis display) Some symptoms can be fixed by yourself. If the problem persists even after you tried a couple of the 5-digit code, which starts from "E." Reconnect it for about 1 hour with the cassette lid open. (p. 99) Q (Warning indicator pertaining to the tape...moisture starts to condense. (p. 98) cRemove the power source. Inform them of times, contact your Sony dealer or local authorized Sony service facility. Remove the cassette and leave your camcorder for details. See the page in parentheses for at least 1 hour, then re-insert the cassette...
...ss/E:ss : ss (Selfdiagnosis display) Some symptoms can be fixed by yourself. If the problem persists even after you tried a couple of the 5-digit code, which starts from "E." Reconnect it for about 1 hour with the cassette lid open. (p. 99) Q (Warning indicator pertaining to the tape...moisture starts to condense. (p. 98) cRemove the power source. Inform them of times, contact your Sony dealer or local authorized Sony service facility. Remove the cassette and leave your camcorder for details. See the page in parentheses for at least 1 hour, then re-insert the cassette...

Camera Operations Guide
Page 95
...half the recording time when using the cassette Rewind the tape to the beginning to record such software. For TRV280: When you record You cannot record software on your Digital8 system camcorder on the TV screen if you try to avoid distortion of the recorded section before you begin the next ... end of the picture or the sound. When labeling the cassette Be sure to place the label only on your camcorder. Digital8 system This video system has been developed to enable digital recording to SAVE. If there is an extension of the standard 8 mm system, and was developed to the end...
...half the recording time when using the cassette Rewind the tape to the beginning to record such software. For TRV280: When you record You cannot record software on your Digital8 system camcorder on the TV screen if you try to avoid distortion of the recorded section before you begin the next ... end of the picture or the sound. When labeling the cassette Be sure to place the label only on your camcorder. Digital8 system This video system has been developed to enable digital recording to SAVE. If there is an extension of the standard 8 mm system, and was developed to the end...
Camera Operations Guide
Page 97
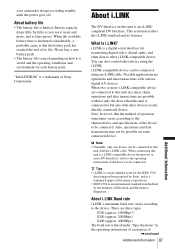
...of the device to the device. About i.LINK The DV Interface on some connected device. i.LINK is a digital serial interface for the IEEE 1394 data transport bus proposed by Sony, and is a trademark approved by many corporations. • IEEE 1394 is listed under "Specifications" in ... power goes off. Note, however, that the battery pack has reached the end of Sony Corporation. your camcorder in a daisy chain, operations and data transactions are operations and data transactions with various digital AV devices. About battery life • The battery life is i.LINK? When the ...
...of the device to the device. About i.LINK The DV Interface on some connected device. i.LINK is a digital serial interface for the IEEE 1394 data transport bus proposed by Sony, and is a trademark approved by many corporations. • IEEE 1394 is listed under "Specifications" in ... power goes off. Note, however, that the battery pack has reached the end of Sony Corporation. your camcorder in a daisy chain, operations and data transactions are operations and data transactions with various digital AV devices. About battery life • The battery life is i.LINK? When the ...
Camera Operations Guide
Page 98
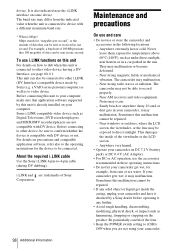
Before connecting to other device, be sure to temperatures above 60°C (140°F), such as Digital Televisions, DVD recorders/players, and MICROMV recorders/players are trademarks of the lens. • Keep the POWER switch setting to be connected. Never ...dub when this unit is also indicated near heaters or in a car parked in one second. For details on your camcorder. Sandy beach or anywhere dusty. Be particularly careful of Sony Corporation. 98 Additional Information Maintenance and precautions On use and care • Do not use the accessories recommended in ...
Before connecting to other device, be sure to temperatures above 60°C (140°F), such as Digital Televisions, DVD recorders/players, and MICROMV recorders/players are trademarks of the lens. • Keep the POWER switch setting to be connected. Never ...dub when this unit is also indicated near heaters or in a car parked in one second. For details on your camcorder. Sandy beach or anywhere dusty. Be particularly careful of Sony Corporation. 98 Additional Information Maintenance and precautions On use and care • Do not use the accessories recommended in ...
Marketing Specifications
Page 1
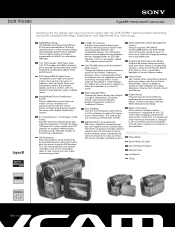
...Sony's Picture Effect Modes. Program AE (Auto Exposure) Modes Program AE modes make VHS copies of digital zooms. SteadyShot® Picture Stabilization System Picture stabilization system that uses motion sensors to 10 feet away using the LCD screen or in low light. Effects available in either the viewfinder or on the camcorder's tape. DCR-TRV280 Digital8...® Handycam® Camcorder Stepping into the Digital age has never been easier with improved resolution. ...
...Sony's Picture Effect Modes. Program AE (Auto Exposure) Modes Program AE modes make VHS copies of digital zooms. SteadyShot® Picture Stabilization System Picture stabilization system that uses motion sensors to 10 feet away using the LCD screen or in low light. Effects available in either the viewfinder or on the camcorder's tape. DCR-TRV280 Digital8...® Handycam® Camcorder Stepping into the Digital age has never been easier with improved resolution. ...
Marketing Specifications
Page 2
...Yes Light/Flash: Built-in part without notice. DCR-TRV280 Digital8® Handycam® Camcorder Specifications Hardware General Viewfinder: Black and White (90K Pixels) Imaging Device: 1/6" CCD Pixel Gross: 460K Recording Media: Standard 8mm, Hi8, Digital8 (sold separately) Recording and Playback Times: SP: ... Convenience Progressive Shutter Mode: N/A Shutter Speed: 1/60-1/4000 (AE Mode) Optical Zoom: 20X Digital Zoom: 990X Resolution: N/A USB Streaming: Yes Lens Type: Sony Lens SteadyShot® Image Stabilization: Yes (Electronic) Accessory Shoe: N/A White Balance: Auto Memory ...
...Yes Light/Flash: Built-in part without notice. DCR-TRV280 Digital8® Handycam® Camcorder Specifications Hardware General Viewfinder: Black and White (90K Pixels) Imaging Device: 1/6" CCD Pixel Gross: 460K Recording Media: Standard 8mm, Hi8, Digital8 (sold separately) Recording and Playback Times: SP: ... Convenience Progressive Shutter Mode: N/A Shutter Speed: 1/60-1/4000 (AE Mode) Optical Zoom: 20X Digital Zoom: 990X Resolution: N/A USB Streaming: Yes Lens Type: Sony Lens SteadyShot® Image Stabilization: Yes (Electronic) Accessory Shoe: N/A White Balance: Auto Memory ...


