User Guide
Page 1
For safe and correct use this machine and keep it handy for future reference. Read this manual carefully before using the machine. User Guide What You Can Do with This Machine Getting Started Copy Fax Print Scan Document Server Web Image Monitor Adding Paper and Toner Troubleshooting Appendix For information not in "Read This First" before you use , be sure to read the Safety Information in this manual, refer to the HTML/PDF files on the supplied CD-ROM.
For safe and correct use this machine and keep it handy for future reference. Read this manual carefully before using the machine. User Guide What You Can Do with This Machine Getting Started Copy Fax Print Scan Document Server Web Image Monitor Adding Paper and Toner Troubleshooting Appendix For information not in "Read This First" before you use , be sure to read the Safety Information in this manual, refer to the HTML/PDF files on the supplied CD-ROM.

User Guide
Page 3
... 21 You Can Use the Facsimile and the Scanner in a Program...45 Example of Major Features...8 1. TABLE OF CONTENTS How to Read the Manuals...6 Symbols Used in the Manuals...6 Model-Specific Information...7 Names of Programs...47 Turning On/Off the Power...51 1 Getting Started Guide to Names and Functions of Components 27...
... 21 You Can Use the Facsimile and the Scanner in a Program...45 Example of Major Features...8 1. TABLE OF CONTENTS How to Read the Manuals...6 Symbols Used in the Manuals...6 Model-Specific Information...7 Names of Programs...47 Turning On/Off the Power...51 1 Getting Started Guide to Names and Functions of Components 27...

User Guide
Page 5
.../Confirming a Computer's Information...104 Registering an SMB Folder...106 Deleting an SMB Registered Folder...109 Entering the Path to the Destination Manually 110 Basic Procedure for Sending Scan Files by E-mail 111 Registering an E-mail Destination...112 Deleting an E-mail Destination...113 Entering an ...E-mail Address Manually...114 Basic Procedure for Storing Scan Files...115 Checking a Stored File Selected from the List 116 Specifying the File Type...117 3...
.../Confirming a Computer's Information...104 Registering an SMB Folder...106 Deleting an SMB Registered Folder...109 Entering the Path to the Destination Manually 110 Basic Procedure for Sending Scan Files by E-mail 111 Registering an E-mail Destination...112 Deleting an E-mail Destination...113 Entering an ...E-mail Address Manually...114 Basic Procedure for Storing Scan Files...115 Checking a Stored File Selected from the List 116 Specifying the File Type...117 3...
User Guide
Page 8
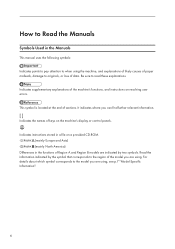
...Indicates instructions stored in a file on a provided CD-ROM. (mainly Europe and Asia) (mainly North America) Differences in the Manuals This manual uses the following symbols: Indicates points to pay attention to when using the machine, and explanations of likely causes of paper misfeeds,...loss of the machine's functions, and instructions on the machine's display or control panels. Indicates supplementary explanations of data. How to Read the Manuals Symbols Used in the functions of Region A and Region B models are indicated by the symbol that corresponds to the region of the model ...
...Indicates instructions stored in a file on a provided CD-ROM. (mainly Europe and Asia) (mainly North America) Differences in the Manuals This manual uses the following symbols: Indicates points to pay attention to when using the machine, and explanations of likely causes of paper misfeeds,...loss of the machine's functions, and instructions on the machine's display or control panels. Indicates supplementary explanations of data. How to Read the Manuals Symbols Used in the functions of Region A and Region B models are indicated by the symbol that corresponds to the region of the model ...
User Guide
Page 9
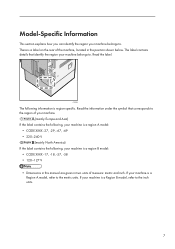
..., refer to the inch units. 7 If your machine is a region B model: • CODE XXXX -17, -18, -57, -58 • 120-127 V • Dimensions in this manual are given in two units of the machine, located in the position shown below. The label contains details that corresponds to the region of your...
..., refer to the inch units. 7 If your machine is a region B model: • CODE XXXX -17, -18, -57, -58 • 120-127 V • Dimensions in this manual are given in two units of the machine, located in the position shown below. The label contains details that corresponds to the region of your...

User Guide
Page 10
Names of Major Features In this manual, major features of the machine are referred to as follows: • Auto Document Feeder ADF • Large capacity tray LCT 8
Names of Major Features In this manual, major features of the machine are referred to as follows: • Auto Document Feeder ADF • Large capacity tray LCT 8

User Guide
Page 13
Using Web Image Monitor to the Address Book", Fax . See "Entering an E-mail Address Manually", Scan . I Want to Register Destinations I Want to Register Destinations BRL060S Using the control panel to register destinations in the machine to the LAN-Fax driver destination list See "Using the machine's Address Book as the LAN-Fax destination list", Fax . 11 Downloading destinations registered in the Address Book See "Registering Entered Destinations to register destinations from a computer See "Registering Internet Fax Destination Information Using Web Image Monitor", Fax .
Using Web Image Monitor to the Address Book", Fax . See "Entering an E-mail Address Manually", Scan . I Want to Register Destinations I Want to Register Destinations BRL060S Using the control panel to register destinations in the machine to the LAN-Fax driver destination list See "Using the machine's Address Book as the LAN-Fax destination list", Fax . 11 Downloading destinations registered in the Address Book See "Registering Entered Destinations to register destinations from a computer See "Registering Internet Fax Destination Information Using Web Image Monitor", Fax .
User Guide
Page 37
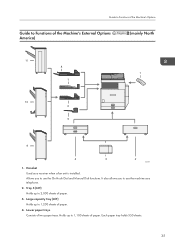
Allows you to use the On Hook Dial and Manual Dial functions. It also allows you to use the machine as a receiver when a fax unit is installed. Lower paper trays Consists of paper. Tray 3 (LCT) ...
Allows you to use the On Hook Dial and Manual Dial functions. It also allows you to use the machine as a receiver when a fax unit is installed. Lower paper trays Consists of paper. Tray 3 (LCT) ...
User Guide
Page 91
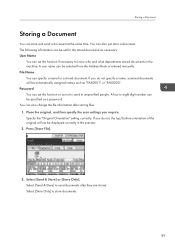
... specify a name, scanned documents will not be automatically assigned names such as necessary: User Name You can be selected from the Address Book or entered manually. Select [Store Only] to unspecified people. Place the original, and then specify the scan settings you require. File Name You can specify a name for the...
... specify a name, scanned documents will not be automatically assigned names such as necessary: User Name You can be selected from the Address Book or entered manually. Select [Store Only] to unspecified people. Place the original, and then specify the scan settings you require. File Name You can specify a name for the...
User Guide
Page 92
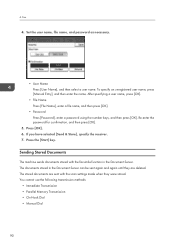
To specify an unregistered user name, press [Manual Entry], and then enter the name. Press [OK]. 6. The documents stored in the Document Server. Fax 4. After specifying a user name, press [OK]. • File Name ... the receiver. 7. Press the [Start] key. You cannot use the following transmission methods: • Immediate Transmission • Parallel Memory Transmission • On Hook Dial • Manual Dial 90 4. The stored documents are deleted. Set the user name, file name, and password as necessary. • User Name Press [User Name], and then...
To specify an unregistered user name, press [Manual Entry], and then enter the name. Press [OK]. 6. The documents stored in the Document Server. Fax 4. After specifying a user name, press [OK]. • File Name ... the receiver. 7. Press the [Start] key. You cannot use the following transmission methods: • Immediate Transmission • Parallel Memory Transmission • On Hook Dial • Manual Dial 90 4. The stored documents are deleted. Set the user name, file name, and password as necessary. • User Name Press [User Name], and then...
User Guide
Page 94
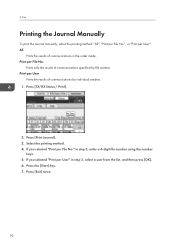
... the results of communications by file number. Press [Print Journal]. 3. Press [TX/RX Status / Print]. 2. Press the [Start] key. 7. Fax Printing the Journal Manually To print the Journal manually, select the printing method: "All", "Print per File No.", or "Print per File No." If you selected "Print per User". Select the printing...
... the results of communications by file number. Press [Print Journal]. 3. Press [TX/RX Status / Print]. 2. Press the [Start] key. 7. Fax Printing the Journal Manually To print the Journal manually, select the printing method: "All", "Print per File No.", or "Print per File No." If you selected "Print per User". Select the printing...
User Guide
Page 95
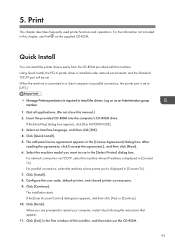
... installer, and then take out the CD-ROM. 93 Quick Install You can install the printer drivers easily from the CD-ROM provided with this manual.) 2. Using Quick Install, the PCL 6 printer driver is installed under network environment, and the Standard TCP/IP port will be set to a client computer via...
... installer, and then take out the CD-ROM. 93 Quick Install You can install the printer drivers easily from the CD-ROM provided with this manual.) 2. Using Quick Install, the PCL 6 printer driver is installed under network environment, and the Standard TCP/IP port will be set to a client computer via...
User Guide
Page 109
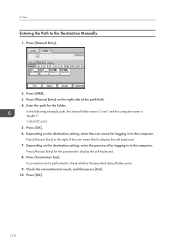
... Enter the password of "Folder Authentication". Press [Folder]. 16. Press [Change] or [Browse Network], and then specify the folder. You can either enter the path manually or locate the folder by browsing the network. 18. Info] on the right side of the destination computer, and then press [OK]. 14. Enter the...
... Enter the password of "Folder Authentication". Press [Folder]. 16. Press [Change] or [Browse Network], and then specify the folder. You can either enter the path manually or locate the folder by browsing the network. 18. Info] on the right side of the destination computer, and then press [OK]. 14. Enter the...
User Guide
Page 110
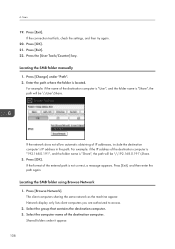
... as the machine appear. If the connection test fails, check the settings, and then try again. 20. Shared folders under "Path". 2. Locating the SMB folder manually 1. Enter the path where the folder is "Share", the path will be \\192.168.0.191\Share. 3. 6. Scan 19. Press [Exit]. 22. Press [Browse Network]. Select...
... as the machine appear. If the connection test fails, check the settings, and then try again. 20. Shared folders under "Path". 2. Locating the SMB folder manually 1. Enter the path where the folder is "Share", the path will be \\192.168.0.191\Share. 3. 6. Scan 19. Press [Exit]. 22. Press [Browse Network]. Select...
User Guide
Page 112
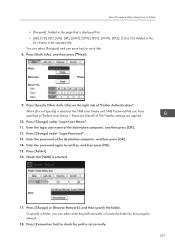
...[OK]. 110 Scan Entering the Path to display the soft keyboard. 7. Press [Manual Entry] to the right of the path field. 4. Check the connection test result, and then press [Exit]. 10. Press [SMB]. 3. Press [Manual Entry] for logging in to the computer. A connection test is "desk01": \\desk01...\user 5. 6. Press [Manual Entry] on the destination setting, enter the user name for the password to check whether the ...
...[OK]. 110 Scan Entering the Path to display the soft keyboard. 7. Press [Manual Entry] to the right of the path field. 4. Check the connection test result, and then press [Exit]. 10. Press [SMB]. 3. Press [Manual Entry] for logging in to the computer. A connection test is "desk01": \\desk01...\user 5. 6. Press [Manual Entry] on the destination setting, enter the user name for the password to check whether the ...
User Guide
Page 116
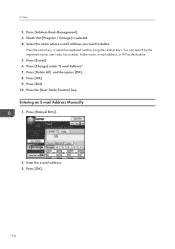
... selected. 4. Press [E-mail]. 6. Press [Exit]. 10. Press the [User Tools/Counter] key. Entering an E-mail Address Manually 1. 6. Select the name whose e-mail address you want to delete. Press [Delete All], and then press [OK]. 8. Press [Manual Entry]. 2. Press [Address Book Management]. 3. Press the name key, or enter the registered number using the...
... selected. 4. Press [E-mail]. 6. Press [Exit]. 10. Press the [User Tools/Counter] key. Entering an E-mail Address Manually 1. 6. Select the name whose e-mail address you want to delete. Press [Delete All], and then press [OK]. 8. Press [Manual Entry]. 2. Press [Address Book Management]. 3. Press the name key, or enter the registered number using the...
User Guide
Page 118
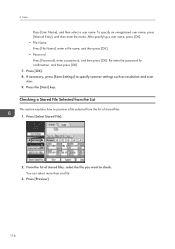
...-enter the password for confirmation, and then press [OK]. 7. You can select more than one file. 3. Press [OK]. 8. 6. To specify an unregistered user name, press [Manual Entry], and then enter the name. After specifying a user name, press [OK]. • File Name Press [File Name], enter a file name, and then press [OK...
...-enter the password for confirmation, and then press [OK]. 7. You can select more than one file. 3. Press [OK]. 8. 6. To specify an unregistered user name, press [Manual Entry], and then enter the name. After specifying a user name, press [OK]. • File Name Press [File Name], enter a file name, and then press [OK...
User Guide
Page 122
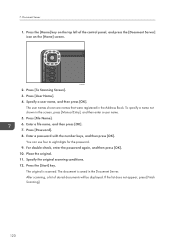
... for the password. 9. 7. Document Server 1. Press the [Home] key on the [Home] screen. Press [User Name]. 4. To specify a name not shown in the screen, press [Manual Entry], and then enter a user name. 5. Press [Password]. 8. Enter a password with the number keys, and then press [OK]. For double-check, enter the password again...
... for the password. 9. 7. Document Server 1. Press the [Home] key on the [Home] screen. Press [User Name]. 4. To specify a name not shown in the screen, press [Manual Entry], and then enter a user name. 5. Press [Password]. 8. Enter a password with the number keys, and then press [OK]. For double-check, enter the password again...
User Guide
Page 164
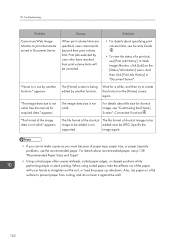
... size for required data." Print jobs selected by users who have reached their print volume limit. "The image data size is not valid. See the manual for shortcut image, see p.138 "Recommended Paper Sizes and Types". • Using curled paper often causes misfeeds, soiled paper edges, or slipped positions while performing...
... size for required data." Print jobs selected by users who have reached their print volume limit. "The image data size is not valid. See the manual for shortcut image, see p.138 "Recommended Paper Sizes and Types". • Using curled paper often causes misfeeds, soiled paper edges, or slipped positions while performing...
User Guide
Page 165
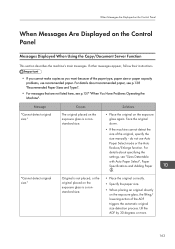
... on the exposure glass is not placed, or the original placed on the exposure glass, the lifting/ lowering action of the original, specify the size manually - If other messages appear, follow their instructions. • If you cannot make copies as you want because of the paper type, paper size or paper...
... on the exposure glass is not placed, or the original placed on the exposure glass, the lifting/ lowering action of the original, specify the size manually - If other messages appear, follow their instructions. • If you cannot make copies as you want because of the paper type, paper size or paper...


