
User Guide
Page 13
Using Web Image Monitor to the Address Book", Fax . See "Entering an E-mail Address Manually", Scan . I Want to Register Destinations I Want to Register Destinations BRL060S Using the control panel to register destinations in the machine to the LAN-Fax driver destination list See "Using the machine's Address Book as the LAN-Fax destination list", Fax . 11 Downloading destinations registered in the Address Book See "Registering Entered Destinations to register destinations from a computer See "Registering Internet Fax Destination Information Using Web Image Monitor", Fax .
Using Web Image Monitor to the Address Book", Fax . See "Entering an E-mail Address Manually", Scan . I Want to Register Destinations I Want to Register Destinations BRL060S Using the control panel to register destinations in the machine to the LAN-Fax driver destination list See "Using the machine's Address Book as the LAN-Fax destination list", Fax . 11 Downloading destinations registered in the Address Book See "Registering Entered Destinations to register destinations from a computer See "Registering Internet Fax Destination Information Using Web Image Monitor", Fax .
User Guide
Page 26
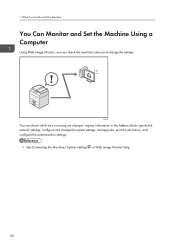
1. What You Can Do with This Machine You Can Monitor and Set the Machine Using a Computer Using Web Image Monitor, you can check which tray is running out of paper, register information in the Address Book, specify the network settings, configure and change the settings. CJQ609 You can check the machine's status and change the system settings, manage jobs, print the job history, and configure the authentication settings. • See Connecting the Machine/ System Settings or Web Image Monitor Help. 24
1. What You Can Do with This Machine You Can Monitor and Set the Machine Using a Computer Using Web Image Monitor, you can check which tray is running out of paper, register information in the Address Book, specify the network settings, configure and change the settings. CJQ609 You can check the machine's status and change the system settings, manage jobs, print the job history, and configure the authentication settings. • See Connecting the Machine/ System Settings or Web Image Monitor Help. 24

User Guide
Page 55
..., Windows Authentication, LDAP Authentication, or Integration Server Authentication is active, the authentication screen appears on User Code Authentication is the numerical value registered in the Address Book as "User Code". The machine only becomes operable after entering your own Login User Name and Login Password.
..., Windows Authentication, LDAP Authentication, or Integration Server Authentication is active, the authentication screen appears on User Code Authentication is the numerical value registered in the Address Book as "User Code". The machine only becomes operable after entering your own Login User Name and Login Password.
User Guide
Page 82
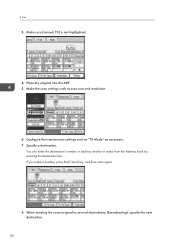
When sending the same original to several destinations (broadcasting), specify the next destination. 80 4. TX] is not highlighted. 4. If you make a mistake, press the [Clear] key, and then enter again. 8. Configure the transmission settings such as "TX Mode" as scan size and resolution. 6. You can enter the destination's number or address directly or select from the Address Book by pressing the destination key. Place the original into the ADF. 5. Make sure [Immed. Make the scan settings such as necessary. 7. Specify a destination. Fax 3.
When sending the same original to several destinations (broadcasting), specify the next destination. 80 4. TX] is not highlighted. 4. If you make a mistake, press the [Clear] key, and then enter again. 8. Configure the transmission settings such as "TX Mode" as scan size and resolution. 6. You can enter the destination's number or address directly or select from the Address Book by pressing the destination key. Place the original into the ADF. 5. Make sure [Immed. Make the scan settings such as necessary. 7. Specify a destination. Fax 3.
User Guide
Page 83
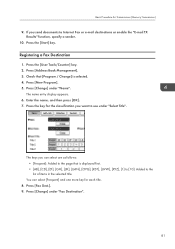
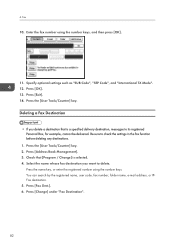
... the "E-mail TX Results" function, specify a sender. 10. Press [Change] under "Name". The name entry display appears. 6. Press [Fax Dest.]. 9. Check that is selected. 4. Press [Address Book Management]. 3. You can select are as follows: • [Frequent]: Added to the page that [Program / Change] is displayed first. • [AB], [CD], [EF], [GH], [IJK...
... the "E-mail TX Results" function, specify a sender. 10. Press [Change] under "Name". The name entry display appears. 6. Press [Fax Dest.]. 9. Check that is selected. 4. Press [Address Book Management]. 3. You can select are as follows: • [Frequent]: Added to the page that [Program / Change] is displayed first. • [AB], [CD], [EF], [GH], [IJK...
User Guide
Page 84
...]. 11. Deleting a Fax Destination • If you want to check the settings in the fax function before deleting any destinations. 1. Check that is selected. 4. Press [Address Book Management]. 3. You can search by the registered name, user code, fax number, folder name, e-mail...
...]. 11. Deleting a Fax Destination • If you want to check the settings in the fax function before deleting any destinations. 1. Check that is selected. 4. Press [Address Book Management]. 3. You can search by the registered name, user code, fax number, folder name, e-mail...
User Guide
Page 91
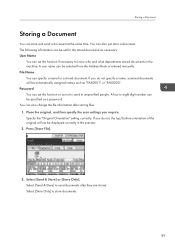
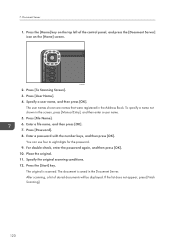
... Storing a Document You can also just store a document. You can store and send a document at the same time. A user name can be selected from the Address Book or entered manually. Password You can set for a stored document. Specify the "Original Orientation" setting correctly. Select [Send & Store] or [Store Only]. If you do...
... Storing a Document You can also just store a document. You can store and send a document at the same time. A user name can be selected from the Address Book or entered manually. Password You can set for a stored document. Specify the "Original Orientation" setting correctly. Select [Send & Store] or [Store Only]. If you do...
User Guide
Page 105
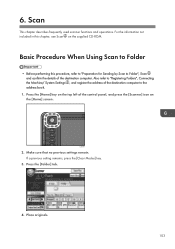
Also refer to "Registering Folders", Connecting the Machine/ System Settings , and register the address of the destination computer to Folder", Scan and confirm the details of the control panel, and press the [Scanner] icon on the supplied CD-ROM. ... Scan on the [Home] screen. Place originals. 103 For the information not included in this procedure, refer to "Preparation for Sending by Scan to the address book. 1. Scan This chapter describes frequently used scanner functions and operations. Press the [Home] key on the top left of the destination computer.
Also refer to "Registering Folders", Connecting the Machine/ System Settings , and register the address of the destination computer to Folder", Scan and confirm the details of the control panel, and press the [Scanner] icon on the supplied CD-ROM. ... Scan on the [Home] screen. Place originals. 103 For the information not included in this procedure, refer to "Preparation for Sending by Scan to the address book. 1. Scan This chapter describes frequently used scanner functions and operations. Press the [Home] key on the top left of the destination computer.
User Guide
Page 108
... follows: 106 On the [Security] tab, select [Edit...]. 3. From the list of the permissions list, select either the [Full Control] or [Change] check box. 9. Press [Address Book Management]. 3. The name entry display appears. 6. Specify one or more object types, select a location, and then click [Find Now]. 6. Press [New Program]. 5. Enter the name...
... follows: 106 On the [Security] tab, select [Edit...]. 3. From the list of the permissions list, select either the [Full Control] or [Change] check box. 9. Press [Address Book Management]. 3. The name entry display appears. 6. Specify one or more object types, select a location, and then click [Find Now]. 6. Press [New Program]. 5. Enter the name...
User Guide
Page 111
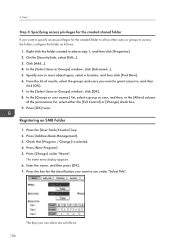
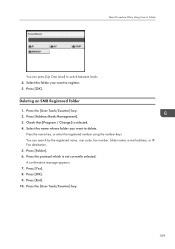
Select the folder you want to switch between levels. 4. Deleting an SMB Registered Folder 1. Press the [User Tools/Counter] key. 2. Press [Address Book Management]. 3. Check that [Program / Change] is not currently selected. A confirmation message appears. 7. Press the [User Tools/Counter] key. 109 ...Basic Procedure When Using Scan to Folder You can search by the registered name, user code, fax number, folder name, e-mail address, or IPFax destination. 5. Press [OK]. Press [Folder]. 6. Press [OK]. 9. Press the name key, or enter the registered number using the ...
Select the folder you want to switch between levels. 4. Deleting an SMB Registered Folder 1. Press the [User Tools/Counter] key. 2. Press [Address Book Management]. 3. Check that [Program / Change] is not currently selected. A confirmation message appears. 7. Press the [User Tools/Counter] key. 109 ...Basic Procedure When Using Scan to Folder You can search by the registered name, user code, fax number, folder name, e-mail address, or IPFax destination. 5. Press [OK]. Press [Folder]. 6. Press [OK]. 9. Press the name key, or enter the registered number using the ...
User Guide
Page 114
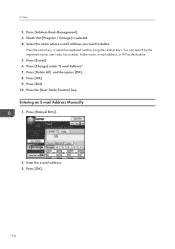
To specify the e-mail sender, press [Sender Name]. 8. Press the [Start] key. Press [Address Book Management]. 3. The keys you can specify multiple destinations. 7. Press [Change] under "Select Title". You can select are as a PDF file. • Press [Scan Settings], and ...
To specify the e-mail sender, press [Sender Name]. 8. Press the [Start] key. Press [Address Book Management]. 3. The keys you can specify multiple destinations. 7. Press [Change] under "Select Title". You can select are as a PDF file. • Press [Scan Settings], and ...
User Guide
Page 116
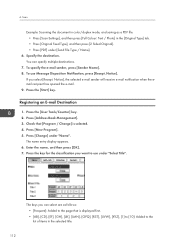
... Press [OK]. 9. You can search by the registered name, user code, fax number, folder name, e-mail address, or IP-Fax destination. 5. Press [Change] under "E-mail Address". 7. Press the [User Tools/Counter] key. Enter the e-mail address. 3. Press [Address Book Management]. 3. Press [Delete All], and then press [OK]. 8. Press the name key, or enter the registered...
... Press [OK]. 9. You can search by the registered name, user code, fax number, folder name, e-mail address, or IP-Fax destination. 5. Press [Change] under "E-mail Address". 7. Press the [User Tools/Counter] key. Enter the e-mail address. 3. Press [Address Book Management]. 3. Press [Delete All], and then press [OK]. 8. Press the name key, or enter the registered...
User Guide
Page 121
...it can register a user name to identify the document creator and type. For the information not included in this chapter, see "Registering Addresses and Users for storing documents on the left side of [User Name]. You can only be sure to press the [Reset] key ..." and "COPY0002" is specified for any stored document. If a password is automatically attached to a stored document in the Address Book, or enter the name directly. 7. For details about the Address Book, see Copy/ Document Server on the security setting, [Access Privileges] may appear instead of the file name. 119
...it can register a user name to identify the document creator and type. For the information not included in this chapter, see "Registering Addresses and Users for storing documents on the left side of [User Name]. You can only be sure to press the [Reset] key ..." and "COPY0002" is specified for any stored document. If a password is automatically attached to a stored document in the Address Book, or enter the name directly. 7. For details about the Address Book, see Copy/ Document Server on the security setting, [Access Privileges] may appear instead of the file name. 119
User Guide
Page 122
... are names that were registered in the Document Server. Enter a password with the number keys, and then press [OK]. The original is saved in the Address Book. Press [File Name]. 6. Press the [Start] key. If the list does not appear, press [Finish Scanning]. 120 Specify a user name, and then press [OK]. Enter...
... are names that were registered in the Document Server. Enter a password with the number keys, and then press [OK]. The original is saved in the Address Book. Press [File Name]. 6. Press the [Start] key. If the list does not appear, press [Finish Scanning]. 120 Specify a user name, and then press [OK]. Enter...

User Guide
Page 127
...]. Adobe Acrobat Reader/Adobe Reader starts and the selected document is the case, reprogram a user code. 4. If the programmed user code was deleted from the Address Book, a message indicating incorrect user code entry appears. Start Web Image Monitor. 2. If you select [PDF], make the necessary "PDF File Security Settings" before clicking [Download...
...]. Adobe Acrobat Reader/Adobe Reader starts and the selected document is the case, reprogram a user code. 4. If the programmed user code was deleted from the Address Book, a message indicating incorrect user code entry appears. Start Web Image Monitor. 2. If you select [PDF], make the necessary "PDF File Security Settings" before clicking [Download...

User Guide
Page 163
...turn it down procedure has begun because the main power switch was turned off the tray press the [Stop] key to resume printing. The Address Book cannot be used for duplex printing. For details about turning the main power switch on the display panel to resume printing. If paper is .../ Document Server . If the main power switch has been turned on again. multiple stored documents. 161 Please wait. An error has occurred when the Address Book is destined for ten seconds or more after shutting it on , follow the message that can be used , see "Turning On/Off the Power", ...
...turn it down procedure has begun because the main power switch was turned off the tray press the [Stop] key to resume printing. The Address Book cannot be used for duplex printing. For details about turning the main power switch on the display panel to resume printing. If paper is .../ Document Server . If the main power switch has been turned on again. multiple stored documents. 161 Please wait. An error has occurred when the Address Book is destined for ten seconds or more after shutting it on , follow the message that can be used , see "Turning On/Off the Power", ...

User Guide
Page 191
...switch, and then back on the [Unauthorized Copy Prevention for Pattern Details]. The machine currently cannot perform authentication because the Address Book is set the resolution to store a file in the Document Server when the [Unauthorized Copy Prevention] was cancelled." ...Details] screen is specified. Perform the print operation again if necessary. If the message appears frequently, contact your service representative. "Address Book is unavailable. "An error occurred while processing an Unauthorized Copy Prevention job. On the printer driver's [Detailed Settings] tab,...
...switch, and then back on the [Unauthorized Copy Prevention for Pattern Details]. The machine currently cannot perform authentication because the Address Book is set the resolution to store a file in the Document Server when the [Unauthorized Copy Prevention] was cancelled." ...Details] screen is specified. Perform the print operation again if necessary. If the message appears frequently, contact your service representative. "Address Book is unavailable. "An error occurred while processing an Unauthorized Copy Prevention job. On the printer driver's [Detailed Settings] tab,...

User Guide
Page 192
... classification code is the most up-to specify classification code settings, see Security Guide . Select Optional for LDAP Authentication or Windows Authentication failed because the Address Book is set correctly in the printer driver. • Check that the Document Server can be sent but not stored afterward. Collate was canceled. Check using...
... classification code is the most up-to specify classification code settings, see Security Guide . Select Optional for LDAP Authentication or Windows Authentication failed because the Address Book is set correctly in the printer driver. • Check that the Document Server can be sent but not stored afterward. Collate was canceled. Check using...
User Guide
Page 221
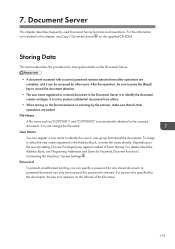
INDEX 2 Sided Print 9 A Address Book 11 ADF 8, 27, 30, 33, 56 Authentication screen 53 Auto document feeder 8 Auto Reduce/Enlarge 14, 61 B Basic procedure.....59, 79, 95, 103, 111, 115, ... indicator 37 Data security for copying 25 Destination 110 Display panel 37 Document Server 10, 16, 40, 78, 119 Duplex 14, 63 Duplex Copy 9 E E-mail address 114 E-mail destination 112, 113 E-mail transmission 19 Energy Saver key 37 Enter key 37 Envelope 71, 72, 145 Exposure glass 27, 30, 55 Exposure...
INDEX 2 Sided Print 9 A Address Book 11 ADF 8, 27, 30, 33, 56 Authentication screen 53 Auto document feeder 8 Auto Reduce/Enlarge 14, 61 B Basic procedure.....59, 79, 95, 103, 111, 115, ... indicator 37 Data security for copying 25 Destination 110 Display panel 37 Document Server 10, 16, 40, 78, 119 Duplex 14, 63 Duplex Copy 9 E E-mail address 114 E-mail destination 112, 113 E-mail transmission 19 Energy Saver key 37 Enter key 37 Envelope 71, 72, 145 Exposure glass 27, 30, 55 Exposure...


