User Guide
Page 1
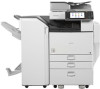
For safe and correct use this manual, refer to read the Safety Information in this machine and keep it handy for future reference. User Guide What You Can Do with This Machine Getting Started Copy Fax Print Scan Document Server Web Image Monitor Adding Paper and Toner Troubleshooting Appendix For information not in "Read This First" before you use , be sure to the HTML/PDF files on the supplied CD-ROM. Read this manual carefully before using the machine.
For safe and correct use this manual, refer to read the Safety Information in this machine and keep it handy for future reference. User Guide What You Can Do with This Machine Getting Started Copy Fax Print Scan Document Server Web Image Monitor Adding Paper and Toner Troubleshooting Appendix For information not in "Read This First" before you use , be sure to the HTML/PDF files on the supplied CD-ROM. Read this manual carefully before using the machine.

User Guide
Page 3
... Read the Manuals...6 Symbols Used in the Manuals...6 Model-Specific Information...7 Names of the Machine's Control Panel 37 How to Use the [Home] Screen...40 Adding Icons to the [Home] Screen...41 Registering Functions in a Network Environment 22 You Can Prevent Information Leakage (Security Functions 23 You Can Monitor and Set...
... Read the Manuals...6 Symbols Used in the Manuals...6 Model-Specific Information...7 Names of the Machine's Control Panel 37 How to Use the [Home] Screen...40 Adding Icons to the [Home] Screen...41 Registering Functions in a Network Environment 22 You Can Prevent Information Leakage (Security Functions 23 You Can Monitor and Set...
User Guide
Page 6
... Screen 211 Messages Displayed When Using the Scanner Function 211 11. Document Server Storing Data...119 Printing Stored Documents...121 8. Specifying Scan Settings...118 7. Adding Paper and Toner Loading Paper into Paper Trays...127 Loading Paper into the Bypass Tray...129 Settings to Use the Bypass Tray under the Printer... into Tray 3 (LCT)...134 Loading Paper into the Large Capacity Tray (LCT 136 Recommended Paper Sizes and Types...138 Thick Paper...144 Envelopes...145 Adding Toner...149 Sending Faxes or Scanned Documents When Toner Has Run Out 150 Disposing of Used Toner...151 10.
... Screen 211 Messages Displayed When Using the Scanner Function 211 11. Document Server Storing Data...119 Printing Stored Documents...121 8. Specifying Scan Settings...118 7. Adding Paper and Toner Loading Paper into Paper Trays...127 Loading Paper into the Bypass Tray...129 Settings to Use the Bypass Tray under the Printer... into Tray 3 (LCT)...134 Loading Paper into the Large Capacity Tray (LCT 136 Recommended Paper Sizes and Types...138 Thick Paper...144 Envelopes...145 Adding Toner...149 Sending Faxes or Scanned Documents When Toner Has Run Out 150 Disposing of Used Toner...151 10.

User Guide
Page 14
... Functions . 1. Changing the order of the function and shortcut icons See "Changing the Order of the Initial Screen", Convenient Functions . Adding shortcuts to frequently used programs or Web pages See "Adding Icons to frequently-used settings as initial settings (Program as Defaults (Copier/Document Server/Fax/Scanner)) See "Changing the Default Functions...
... Functions . 1. Changing the order of the function and shortcut icons See "Changing the Order of the Initial Screen", Convenient Functions . Adding shortcuts to frequently used programs or Web pages See "Adding Icons to frequently-used settings as initial settings (Program as Defaults (Copier/Document Server/Fax/Scanner)) See "Changing the Default Functions...
User Guide
Page 42
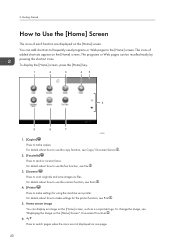
... [Home] screen. The programs or Web pages can add shortcuts to frequently used programs or Web pages to Use the [Home] Screen The icons of added shortcuts appear on one page. 40
... [Home] screen. The programs or Web pages can add shortcuts to frequently used programs or Web pages to Use the [Home] Screen The icons of added shortcuts appear on one page. 40
User Guide
Page 43
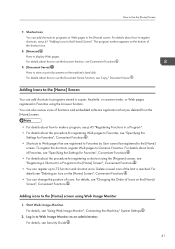
... to display Web pages. To register the shortcuts, register Web pages to the [Home] screen. Log in Favorites using the browser function. Adding icons to Web Image Monitor as an administrator. The program number appears on the bottom of the shortcut icon. 8. [Browser] Press to ...be registered to store or print documents on the machine's hard disk. Delete unused icons if the limit is reached. Start Web Image Monitor. Adding Icons to the [Home] Screen You can also review icons of Favorites, see "Specifying the Settings for registering a shortcut using Web Image ...
... to display Web pages. To register the shortcuts, register Web pages to the [Home] screen. Log in Favorites using the browser function. Adding icons to Web Image Monitor as an administrator. The program number appears on the bottom of the shortcut icon. 8. [Browser] Press to ...be registered to store or print documents on the machine's hard disk. Delete unused icons if the limit is reached. Start Web Image Monitor. Adding Icons to the [Home] Screen You can also review icons of Favorites, see "Specifying the Settings for registering a shortcut using Web Image ...
User Guide
Page 44
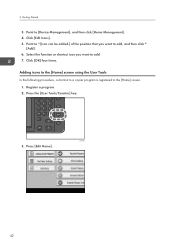
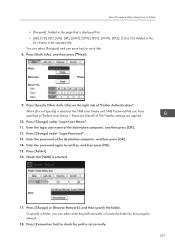
2. Point to [Icon can be added.] of the position that you want to [Device Management], and then click [Home Management]. 4. Press the [User Tools/Counter] key. Press [Edit Home]. 42 Click [Edit Icons]. 5. Register a program. 2. Click [OK] four times. Getting Started 3. Point to add, and then click [Add]. 6. Select the function or shortcut icon you want to the [Home] screen. 1. CJS039 3. Adding icons to the [Home] screen using the User Tools In the following procedure, a shortcut to a copier program is registered to add. 7.
2. Point to [Icon can be added.] of the position that you want to [Device Management], and then click [Home Management]. 4. Press the [User Tools/Counter] key. Press [Edit Home]. 42 Click [Edit Icons]. 5. Register a program. 2. Click [OK] four times. Getting Started 3. Point to add, and then click [Add]. 6. Select the function or shortcut icon you want to the [Home] screen. 1. CJS039 3. Adding icons to the [Home] screen using the User Tools In the following procedure, a shortcut to a copier program is registered to add. 7.
User Guide
Page 49
... off or by printing "Secret" and the date on copies. For details, see "Registering a Shortcut to a Program to the [Home] Screen", Convenient Functions and p.41 "Adding Icons to the [Home] screen, and can increase security awareness by pressing the [Reset] key unless the program is deleted or overwritten. • Program numbers...
... off or by printing "Secret" and the date on copies. For details, see "Registering a Shortcut to a Program to the [Home] Screen", Convenient Functions and p.41 "Adding Icons to the [Home] screen, and can increase security awareness by pressing the [Reset] key unless the program is deleted or overwritten. • Program numbers...
User Guide
Page 83
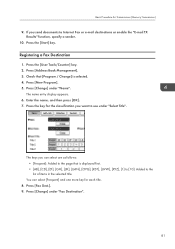
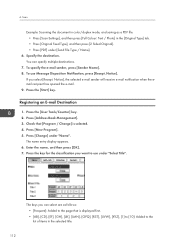
...Counter] key. 2. Enter the name, and then press [OK]. 7. Basic Procedure for each title. 8. You can select are as follows: • [Frequent]: Added to the page that [Program / Change] is displayed first. • [AB], [CD], [EF], [GH], [IJK], [LMN], [OPQ], [RST], [UVW], [XYZ], [1] to ...[10]: Added to use under "Select Title". Press [Fax Dest.]. 9. Press [Address Book Management]. 3. Press [Change] under "Fax Destination". 81 If you can select [Frequent] and ...
...Counter] key. 2. Enter the name, and then press [OK]. 7. Basic Procedure for each title. 8. You can select are as follows: • [Frequent]: Added to the page that [Program / Change] is displayed first. • [AB], [CD], [EF], [GH], [IJK], [LMN], [OPQ], [RST], [UVW], [XYZ], [1] to ...[10]: Added to use under "Select Title". Press [Fax Dest.]. 9. Press [Address Book Management]. 3. Press [Change] under "Fax Destination". 81 If you can select [Frequent] and ...
User Guide
Page 109
...] under "Login Password". 13. Check that is displayed first. • [AB], [CD], [EF], [GH], [IJK], [LMN], [OPQ], [RST], [UVW], [XYZ], [1] to [10]: Added to the list of items in "Default User Name / Password (Send)" of the destination computer, and then press [OK]. 12. To specify a folder, you have ...[Specify Other Auth. Enter the password again to check the path is set correctly. 107 Basic Procedure When Using Scan to Folder • [Frequent]: Added to the page that [SMB] is selected. 17. You can either enter the path manually or locate the folder by browsing the network. 18. ...
...] under "Login Password". 13. Check that is displayed first. • [AB], [CD], [EF], [GH], [IJK], [LMN], [OPQ], [RST], [UVW], [XYZ], [1] to [10]: Added to the list of items in "Default User Name / Password (Send)" of the destination computer, and then press [OK]. 12. To specify a folder, you have ...[Specify Other Auth. Enter the password again to check the path is set correctly. 107 Basic Procedure When Using Scan to Folder • [Frequent]: Added to the page that [SMB] is selected. 17. You can either enter the path manually or locate the folder by browsing the network. 18. ...
User Guide
Page 114
... Book Management]. 3. Press the [User Tools/Counter] key. 2. Scan Example: Scanning the document in color/duplex mode, and saving as follows: • [Frequent]: Added to the page that [Program / Change] is displayed first. • [AB], [CD], [EF], [GH], [IJK], [LMN], [OPQ], [RST], [UVW], [XYZ], [1] ...to [10]: Added to use Message Disposition Notification, press [Recept. If you want to the list of items in the [Original Type] tab. • Press [Original Feed Type], ...
... Book Management]. 3. Press the [User Tools/Counter] key. 2. Scan Example: Scanning the document in color/duplex mode, and saving as follows: • [Frequent]: Added to the page that [Program / Change] is displayed first. • [AB], [CD], [EF], [GH], [IJK], [LMN], [OPQ], [RST], [UVW], [XYZ], [1] ...to [10]: Added to use Message Disposition Notification, press [Recept. If you want to the list of items in the [Original Type] tab. • Press [Original Feed Type], ...
User Guide
Page 129
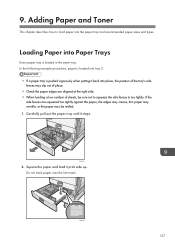
..., or the paper may be misfed. 1. 9. In the following example procedure, paper is loaded into tray 2. • If a paper tray is loaded in too tightly. Adding Paper and Toner This chapter describes how to squeeze the side fences in the same way. CJW302 127 Loading Paper into Paper Trays Every paper...
..., or the paper may be misfed. 1. 9. In the following example procedure, paper is loaded into tray 2. • If a paper tray is loaded in too tightly. Adding Paper and Toner This chapter describes how to squeeze the side fences in the same way. CJW302 127 Loading Paper into Paper Trays Every paper...
User Guide
Page 130
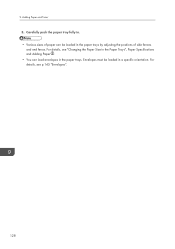
For details, see p.145 "Envelopes". 128 Envelopes must be loaded in the paper trays by adjusting the positions of paper can load envelopes in a specific orientation. For details, see "Changing the Paper Size in the Paper Trays", Paper Specifications and Adding Paper . • You can be loaded in the paper trays. 9. Adding Paper and Toner 3. Carefully push the paper tray fully in. • Various sizes of side fences and end fence.
For details, see p.145 "Envelopes". 128 Envelopes must be loaded in the paper trays by adjusting the positions of paper can load envelopes in a specific orientation. For details, see "Changing the Paper Size in the Paper Trays", Paper Specifications and Adding Paper . • You can be loaded in the paper trays. 9. Adding Paper and Toner 3. Carefully push the paper tray fully in. • Various sizes of side fences and end fence.
User Guide
Page 132
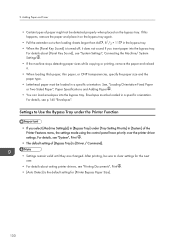
... it does not sound if you select [Machine Setting(s)] in [Bypass Tray] under the Printer Function • If you insert paper into the bypass tray. Adding Paper and Toner • Certain types of [Bypass Tray] is the default setting for the next user. • For details about [Panel Key Sound], see... sure to Use the Bypass Tray under [Tray Setting Priority] in a specific orientation. See, "Loading Orientation-Fixed Paper or Two-Sided Paper", Paper Specifications and Adding Paper . • You can load envelopes into the bypass tray. 9.
... it does not sound if you select [Machine Setting(s)] in [Bypass Tray] under the Printer Function • If you insert paper into the bypass tray. Adding Paper and Toner • Certain types of [Bypass Tray] is the default setting for the next user. • For details about [Panel Key Sound], see... sure to Use the Bypass Tray under [Tray Setting Priority] in a specific orientation. See, "Loading Orientation-Fixed Paper or Two-Sided Paper", Paper Specifications and Adding Paper . • You can load envelopes into the bypass tray. 9.

User Guide
Page 134
.... Press [Vertical], enter the size of the sheets, and place them correctly. • When printing onto OHP transparencies, remove printed sheets one by one. 132 Adding Paper and Toner Setting custom size paper using the number keys, and then press [ ]. 6. Press [Tray Paper Settings]. 3. 9. Press [OK] twice. 8.
.... Press [Vertical], enter the size of the sheets, and place them correctly. • When printing onto OHP transparencies, remove printed sheets one by one. 132 Adding Paper and Toner Setting custom size paper using the number keys, and then press [ ]. 6. Press [Tray Paper Settings]. 3. 9. Press [OK] twice. 8.
User Guide
Page 136
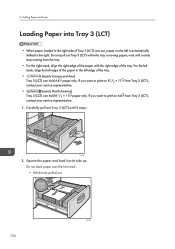
.... 1. Square the paper and load it stops. wait until it print side up. If you want to print on the left edge of the tray. Adding Paper and Toner Loading Paper into Tray 3 (LCT) • When paper loaded in the right side of Tray 3 (LCT) runs out, paper on A4 from...
.... 1. Square the paper and load it stops. wait until it print side up. If you want to print on the left edge of the tray. Adding Paper and Toner Loading Paper into Tray 3 (LCT) • When paper loaded in the right side of Tray 3 (LCT) runs out, paper on A4 from...
User Guide
Page 138
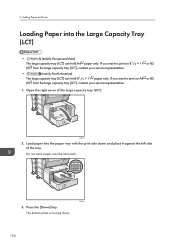
... to print on A4 or B5 JIS from the large capacity tray (LCT), contact your service representative. 1. Open the right cover of the tray. CJW018 2. Adding Paper and Toner Loading Paper into the paper tray with the print side down . 136 CJW019 3. Load paper into the Large Capacity Tray (LCT) •...
... to print on A4 or B5 JIS from the large capacity tray (LCT), contact your service representative. 1. Open the right cover of the tray. CJW018 2. Adding Paper and Toner Loading Paper into the paper tray with the print side down . 136 CJW019 3. Load paper into the Large Capacity Tray (LCT) •...
User Guide
Page 140
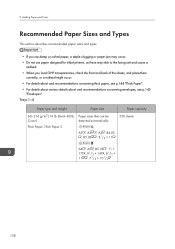
... , 81/2 × 14 , 81/2 × 11 , 71/4 × 101/2 138 Bond-80 lb. Trays 1-4 Paper type and weight Paper size 60-216 g/m2 (16 lb. 9. Adding Paper and Toner Recommended Paper Sizes and Types This section describes recommended paper sizes and types. • If you use damp or curled paper, a staple...
... , 81/2 × 14 , 81/2 × 11 , 71/4 × 101/2 138 Bond-80 lb. Trays 1-4 Paper type and weight Paper size 60-216 g/m2 (16 lb. 9. Adding Paper and Toner Recommended Paper Sizes and Types This section describes recommended paper sizes and types. • If you use damp or curled paper, a staple...
User Guide
Page 142
Adding Paper and Toner *1 When loading paper with their flaps fully open. Cover) Thin Paper-Thick Paper 2 *1 B4 JIS , B5 JIS , B6 JIS , 11 × 17 , ...
Adding Paper and Toner *1 When loading paper with their flaps fully open. Cover) Thin Paper-Thick Paper 2 *1 B4 JIS , B5 JIS , B6 JIS , 11 × 17 , ...

User Guide
Page 144
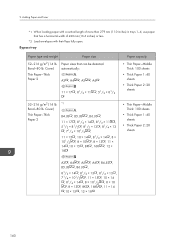
.... Bond-60 lb. Cover) 161-216 g/m2 (60-80 lb. Large capacity tray (LCT) Paper type and weight Paper size 60-216 g/m2 (16 lb. Adding Paper and Toner Paper type and weight Paper size 60-216 g/m2 (16 lb. Paper Thickness Paper Thickness *1 Thin Paper *2 Plain Paper Middle Thick Thick...
.... Bond-60 lb. Cover) 161-216 g/m2 (60-80 lb. Large capacity tray (LCT) Paper type and weight Paper size 60-216 g/m2 (16 lb. Adding Paper and Toner Paper type and weight Paper size 60-216 g/m2 (16 lb. Paper Thickness Paper Thickness *1 Thin Paper *2 Plain Paper Middle Thick Thick...


