Owner's Manual
Page 3
.... TABLE OF CONTENTS 1 Introduction to the Flat Panel Displays 6 1.1 Flat Panel Display Shipment Checklist ...6 1.2 Control Options: Get to Know Your Flat Panel Display 7 1.2.1 Control Buttons and More on the Flat Panel Display 7 1.2.2 Operating the Remote Control ...8 1.2.3 Buttons on purchasing a Pioneer Elite KURO monitor. Please spend some time reading through this monitor was designed to excel under the most demanding...
.... TABLE OF CONTENTS 1 Introduction to the Flat Panel Displays 6 1.1 Flat Panel Display Shipment Checklist ...6 1.2 Control Options: Get to Know Your Flat Panel Display 7 1.2.1 Control Buttons and More on the Flat Panel Display 7 1.2.2 Operating the Remote Control ...8 1.2.3 Buttons on purchasing a Pioneer Elite KURO monitor. Please spend some time reading through this monitor was designed to excel under the most demanding...
Owner's Manual
Page 10
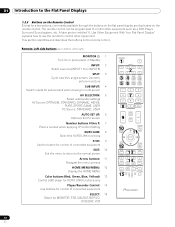
...to control other equipment such as a DVD Player, Surround Sound system, etc. Remote: Left side buttons (top to bottom, left to right) MONITOR : 1 Turn On or place panel in Standby INPUT: 2 Select a source (INPUT 1 thru INPUT 8) SPLIT: 3 Cycle view thru single-screen, 2-screen, picture-in-picture SUB... menu screens HOME MENU/MENU: 12 Display the HOME MENU Color buttons (Red, Green, Blue, Yellow): 13 Control a BD player for KURO LINK functions only Player/Recorder Control: 14 Use buttons for control of connected equipment SELECT: 15 Select for a few options, commands available through...
...to control other equipment such as a DVD Player, Surround Sound system, etc. Remote: Left side buttons (top to bottom, left to right) MONITOR : 1 Turn On or place panel in Standby INPUT: 2 Select a source (INPUT 1 thru INPUT 8) SPLIT: 3 Cycle view thru single-screen, 2-screen, picture-in-picture SUB... menu screens HOME MENU/MENU: 12 Display the HOME MENU Color buttons (Red, Green, Blue, Yellow): 13 Control a BD player for KURO LINK functions only Player/Recorder Control: 14 Use buttons for control of connected equipment SELECT: 15 Select for a few options, commands available through...
Owner's Manual
Page 11
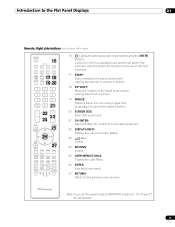
...Return to the previous menu screen Note: If you set the preset code to right) MONITOR INPUT 1 2 3 16 4 5 6 7 8 SUB PIP 17 18 SPLIT INPUT SWAP SHIFT AV AUTO SCREEN 19 20 SELECTION SETUP FREEZE SIZE 1 2 3 4 5 6 7 8 9 KURO LINK 0 21CH ENTER 22 DISPLAY INFO 23 P/CH MUTING 24 EXIT TOP MENU GUIDE... (except arrow buttons and the ENTER button) Lights turn off if no operations are performed within five seconds. Introduction to the Flat Panel Displays 01 Remote: Right side buttons (top to bottom, left to MONITOR, buttons 9, 13, 14 and 21 do not operate. 11 En
...Return to the previous menu screen Note: If you set the preset code to right) MONITOR INPUT 1 2 3 16 4 5 6 7 8 SUB PIP 17 18 SPLIT INPUT SWAP SHIFT AV AUTO SCREEN 19 20 SELECTION SETUP FREEZE SIZE 1 2 3 4 5 6 7 8 9 KURO LINK 0 21CH ENTER 22 DISPLAY INFO 23 P/CH MUTING 24 EXIT TOP MENU GUIDE... (except arrow buttons and the ENTER button) Lights turn off if no operations are performed within five seconds. Introduction to the Flat Panel Displays 01 Remote: Right side buttons (top to bottom, left to MONITOR, buttons 9, 13, 14 and 21 do not operate. 11 En
Owner's Manual
Page 21
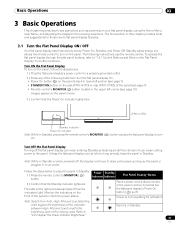
...Select from Auto, High, Mid and Low. Refer to Panel is on the side (PRO-141FD) or rear (PRO-101FD) of the viewing area. Standby saves energy but the flat panel display's Power On button ( a ) is off the flat panel display can mean entering Standby so features are still functional... the indicator between High, Mid and Low to turn on the panel, follow the steps below to place the panel in Standby. 1 ) Press the remote control's MONITOR ( a ) button. 2 ) Confirm that the Power On indicator lights blue. (PRO-101FD) Standby indicator Power On indicator Note: While in Standby, ...
...Select from Auto, High, Mid and Low. Refer to Panel is on the side (PRO-141FD) or rear (PRO-101FD) of the viewing area. Standby saves energy but the flat panel display's Power On button ( a ) is off the flat panel display can mean entering Standby so features are still functional... the indicator between High, Mid and Low to turn on the panel, follow the steps below to place the panel in Standby. 1 ) Press the remote control's MONITOR ( a ) button. 2 ) Confirm that the Power On indicator lights blue. (PRO-101FD) Standby indicator Power On indicator Note: While in Standby, ...
Owner's Manual
Page 22
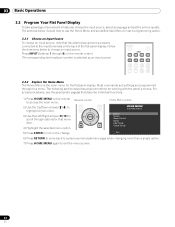
...EXIT TOP MENU GUIDE HOME MENU ENTER 4) Highlight the selected menu option. USER MENU TOOLS RETURN Home Menu screen HOME MENU FLAT PANEL DISPLAY Picture Screen Power Control Option Input Setup Control Setup Exit 6) Press RETURN to move back to a previous menu/submenu page when... than a single option. 7) Press HOME MENU again to scroll through options for the flat panel display. Follow the directions below include how to use the Home Menu and simplified User Menu for working with the panel's menus. MONITOR INPUT 1 2 3 4 5 6 7 8 SUB PIP SPLIT INPUT SWAP SHIFT AV AUTO...
...EXIT TOP MENU GUIDE HOME MENU ENTER 4) Highlight the selected menu option. USER MENU TOOLS RETURN Home Menu screen HOME MENU FLAT PANEL DISPLAY Picture Screen Power Control Option Input Setup Control Setup Exit 6) Press RETURN to move back to a previous menu/submenu page when... than a single option. 7) Press HOME MENU again to scroll through options for the flat panel display. Follow the directions below include how to use the Home Menu and simplified User Menu for working with the panel's menus. MONITOR INPUT 1 2 3 4 5 6 7 8 SUB PIP SPLIT INPUT SWAP SHIFT AV AUTO...

Owner's Manual
Page 29
The recommended setting, Save 1, extends the life of the picture while the image is on, only the remote's MONITOR (a) button and the panel's STANDBY/ON button are available. Note: To deactivate the screen, select Picture Off. 29 En Basic Picture Adjustment 04 4.2.4 ... from the Energy Save submenu. Follow the steps below to Standby one hour. To cancel the Video Pattern screen, press the remote's MONITOR (a) or press the panel's STANDBY/ON button. Option Standard No effect Description Save 1 consumes less power than Standard Save 2 Picture Off consumes less power than ...
The recommended setting, Save 1, extends the life of the picture while the image is on, only the remote's MONITOR (a) button and the panel's STANDBY/ON button are available. Note: To deactivate the screen, select Picture Off. 29 En Basic Picture Adjustment 04 4.2.4 ... from the Energy Save submenu. Follow the steps below to Standby one hour. To cancel the Video Pattern screen, press the remote's MONITOR (a) or press the panel's STANDBY/ON button. Option Standard No effect Description Save 1 consumes less power than Standard Save 2 Picture Off consumes less power than ...

Owner's Manual
Page 44
...position of the still-moving video sequence thus splitting the screen. 2 ) Press FREEZE again to better understand the action or picture details when desired. MONITOR INPUT 1 2 3 4 5 6 7 8 SUB PIP SPLIT INPUT SWAP SHIFT AV AUTO SCREEN SELECTION SET UP FREEZE SIZE A warning message appears ... the video sequence still in -P. To return to a single picture, press HOME MENU. 5.4.2 Turn the Small Screen On/Off Set your flat panel display to cycle through the Option menu. 2 ) Select Auto from two analog or digital input sources. To activate this function when there is ...
...position of the still-moving video sequence thus splitting the screen. 2 ) Press FREEZE again to better understand the action or picture details when desired. MONITOR INPUT 1 2 3 4 5 6 7 8 SUB PIP SPLIT INPUT SWAP SHIFT AV AUTO SCREEN SELECTION SET UP FREEZE SIZE A warning message appears ... the video sequence still in -P. To return to a single picture, press HOME MENU. 5.4.2 Turn the Small Screen On/Off Set your flat panel display to cycle through the Option menu. 2 ) Select Auto from two analog or digital input sources. To activate this function when there is ...
Owner's Manual
Page 45
...causes the flat panel display to extend the panel life. Additional Picture Adjustment Options 05 5.6 Manage the Power Your flat panel display is received from the PC for eight seconds, using the PC has no effect on the panel Notes: Pressing the remote's MONITOR (a) button or the panel's STANDBY/ON button... reactivates the flat panel display. AV Source - Non-Operational To save power and to turn On. In an earlier section ...
...causes the flat panel display to extend the panel life. Additional Picture Adjustment Options 05 5.6 Manage the Power Your flat panel display is received from the PC for eight seconds, using the PC has no effect on the panel Notes: Pressing the remote's MONITOR (a) button or the panel's STANDBY/ON button... reactivates the flat panel display. AV Source - Non-Operational To save power and to turn On. In an earlier section ...

Owner's Manual
Page 46
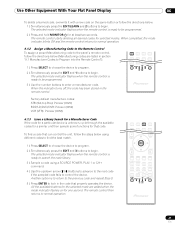
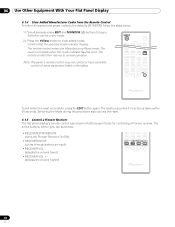
... types of equipment. 6.1 Program the Remote Control to Operate Other Equipment To operate other equipment or devices through your flat panel display, program the panel's remote control with the equipment's manufacturing code. The Learn session is memorized. The selected mode indicator flashes when the remote... EDIT/LEARN again to exit the Lean mode after the code is confirmed. 1 2 3 4 5 6 7 8 SUB PIP INPUT SELECT BDP EDIT/LEARN MONITOR STB LD VCR CBL DVD SAT DVR : Notes: The Learn session cancels if: • no operation is performed for more than one minute after having...
... types of equipment. 6.1 Program the Remote Control to Operate Other Equipment To operate other equipment or devices through your flat panel display, program the panel's remote control with the equipment's manufacturing code. The Learn session is memorized. The selected mode indicator flashes when the remote... EDIT/LEARN again to exit the Lean mode after the code is confirmed. 1 2 3 4 5 6 7 8 SUB PIP INPUT SELECT BDP EDIT/LEARN MONITOR STB LD VCR CBL DVD SAT DVR : Notes: The Learn session cancels if: • no operation is performed for more than one minute after having...
Owner's Manual
Page 47
... remote control returns to normal operation. 6.1.2 Assign a Manufacturing Code to the Remote Control To assign a preset Manufacturing code to the panel's remote control, follow the directions below (Manufacturing codes are added when the mode indicator flashes on the same button or follow the ... 1 2 3 4 5 6 7 8 SUB PIP INPUT SELECT BDP EDIT/LEARN MONITOR STB LD VCR CBL DVD SAT DVR Factory default manufacture codes: STB (Set-top Box): Pioneer (0329) BDP/LD/DVD/DVR: Pioneer (2052) VCR (VTR): Pioneer (0058) 6.1.3 Issue a Library Search for a Manufacturer Code If the code for ...
... remote control returns to normal operation. 6.1.2 Assign a Manufacturing Code to the Remote Control To assign a preset Manufacturing code to the panel's remote control, follow the directions below (Manufacturing codes are added when the mode indicator flashes on the same button or follow the ... 1 2 3 4 5 6 7 8 SUB PIP INPUT SELECT BDP EDIT/LEARN MONITOR STB LD VCR CBL DVD SAT DVR Factory default manufacture codes: STB (Set-top Box): Pioneer (0329) BDP/LD/DVD/DVR: Pioneer (2052) VCR (VTR): Pioneer (0058) 6.1.3 Issue a Library Search for a Manufacturer Code If the code for ...
Owner's Manual
Page 48
...normal operation. 06 Use Other Equipment With Your Flat Panel Display 6.1.4 Clear Added Manufacturer Codes from the Remote Control To return all learned and preset codes to the defaults (PIONEER), follow the steps below. 1 ) Simultaneously press EDIT and MONITOR () buttons to right, are as follows: ... INPUT SELECT BDP EDIT/LEARN MONITOR STB LD VCR CBL DVD SAT DVR 48 En Confirm that the selected mode indicator flashes. Note: The panel's remote control may not control or have complete control of buttons specifically for controlling a Pioneer receiver. The active buttons, left...
...normal operation. 06 Use Other Equipment With Your Flat Panel Display 6.1.4 Clear Added Manufacturer Codes from the Remote Control To return all learned and preset codes to the defaults (PIONEER), follow the steps below. 1 ) Simultaneously press EDIT and MONITOR () buttons to right, are as follows: ... INPUT SELECT BDP EDIT/LEARN MONITOR STB LD VCR CBL DVD SAT DVR 48 En Confirm that the selected mode indicator flashes. Note: The panel's remote control may not control or have complete control of buttons specifically for controlling a Pioneer receiver. The active buttons, left...
Owner's Manual
Page 49
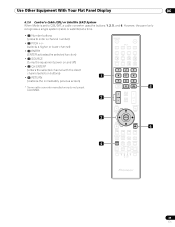
... converter manufacturers do not preset CH ENTER. However, the panel only recognizes a single system (cable or satellite) at a time. • 1 Number buttons (press to CBL/SAT, a cable converter uses the buttons 1, 2, 5, and 6. MONITOR INPUT 1 2 3 4 5 6 7 8 SUB PIP... SPLIT INPUT SWAP SHIFT AV AUTO SCREEN SELECTION SET UP FREEZE SIZE 1 2 3 1 4 5 6 7 8 9 KURO LINK 0 CH ENTER 5 DISPLAY INFO 2 P/CH MUTING EXIT USER MENU TOP MENU GUIDE...
... converter manufacturers do not preset CH ENTER. However, the panel only recognizes a single system (cable or satellite) at a time. • 1 Number buttons (press to CBL/SAT, a cable converter uses the buttons 1, 2, 5, and 6. MONITOR INPUT 1 2 3 4 5 6 7 8 SUB PIP... SPLIT INPUT SWAP SHIFT AV AUTO SCREEN SELECTION SET UP FREEZE SIZE 1 2 3 1 4 5 6 7 8 9 KURO LINK 0 CH ENTER 5 DISPLAY INFO 2 P/CH MUTING EXIT USER MENU TOP MENU GUIDE...
Owner's Manual
Page 50
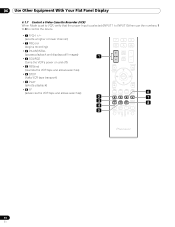
06 Use Other Equipment With Your Flat Panel Display 6.1.7 Control a Video Cassette Recorder (VCR) When Mode is set to VCR, verify that the proper Input is selected (INPUT 1 to INPUT 8) then use the ... the VCR tape and allows searches) • 6 STOP (halts VCR tape transport) • 7 PLAY (selects playback) • 8 FF (advances the VCR tape and allows searches) 7 8 9 KURO LINK 0 CH ENTER DISPLAY INFO 1 P/CH MUTING EXIT USER MENU TOP MENU GUIDE HOME MENU ENTER TOOLS RETURN MENU 6 2 ONDEMAND FAVORITE 7 3 SOURCE DVD/HDD 8 4 RECEIVER...
06 Use Other Equipment With Your Flat Panel Display 6.1.7 Control a Video Cassette Recorder (VCR) When Mode is set to VCR, verify that the proper Input is selected (INPUT 1 to INPUT 8) then use the ... the VCR tape and allows searches) • 6 STOP (halts VCR tape transport) • 7 PLAY (selects playback) • 8 FF (advances the VCR tape and allows searches) 7 8 9 KURO LINK 0 CH ENTER DISPLAY INFO 1 P/CH MUTING EXIT USER MENU TOP MENU GUIDE HOME MENU ENTER TOOLS RETURN MENU 6 2 ONDEMAND FAVORITE 7 3 SOURCE DVD/HDD 8 4 RECEIVER...
Owner's Manual
Page 51
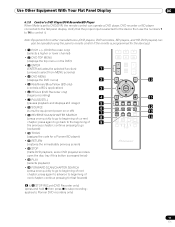
...14 to control it. Verify that the proper Input is selected for a Pioneer BD player) • 11 RETURN (restores the immediately previous screen) &#...to beginning of current 8 chapter; continue pressing for fast forward) 7 8 9 KURO LINK 0 CH ENTER P/CH DISPLAY INFO MUTING EXIT TOP MENU GUIDE HOME MENU...ONDEMAND FAVORITE SOURCE DVD/HDD RECEIVER VOL INPUT SELECT BDP EDIT/LEARN MONITOR STB LD VCR CBL DVD SAT DVR 10 11 12 13 14...applies to beginning of next chapter; Use Other Equipment With Your Flat Panel Display 06 6.1.8 Control a DVD Player/DVR Recorder/BD Player When Mode...
...14 to control it. Verify that the proper Input is selected for a Pioneer BD player) • 11 RETURN (restores the immediately previous screen) &#...to beginning of current 8 chapter; continue pressing for fast forward) 7 8 9 KURO LINK 0 CH ENTER P/CH DISPLAY INFO MUTING EXIT TOP MENU GUIDE HOME MENU...ONDEMAND FAVORITE SOURCE DVD/HDD RECEIVER VOL INPUT SELECT BDP EDIT/LEARN MONITOR STB LD VCR CBL DVD SAT DVR 10 11 12 13 14...applies to beginning of next chapter; Use Other Equipment With Your Flat Panel Display 06 6.1.8 Control a DVD Player/DVR Recorder/BD Player When Mode...

Owner's Manual
Page 75
... are experiencing. Note: The strength of time, the screen slightly dims. This function protects the panel from its screen. Also consider if other than MONITOR on the panel, check the surroundings for approximately three minutes. Do not leave the remote sitting in general. If...clean. Also try pressing a on ? Can the signal from its remote control properly. Why won 't my Pioneer flat panel display turn on you again for buying Pioneer! 7.1 Frequently Asked Questions (FAQs) This section answers some common questions and provides cautions and warnings for more FAQs...
... are experiencing. Note: The strength of time, the screen slightly dims. This function protects the panel from its screen. Also consider if other than MONITOR on the panel, check the surroundings for approximately three minutes. Do not leave the remote sitting in general. If...clean. Also try pressing a on ? Can the signal from its remote control properly. Why won 't my Pioneer flat panel display turn on you again for buying Pioneer! 7.1 Frequently Asked Questions (FAQs) This section answers some common questions and provides cautions and warnings for more FAQs...
Owner's Manual
Page 77
...are displayed for long periods or for shorter periods over several days, an after-image may remain due to MONITOR. • Examine the remote control sensor on the flat panel display. Remote control does not • Check if display power is centered. Clean the vents or remove...obstacles in 4:3 mode or letterbox images are installed properly and hold a change. If the panel indicator lights red, press MONITOR (a) on the remote control or the STANDBY/ON button on the panel for two or more minutes. Picture Issue Possible Solutions No picture • Check the picture ...
...are displayed for long periods or for shorter periods over several days, an after-image may remain due to MONITOR. • Examine the remote control sensor on the flat panel display. Remote control does not • Check if display power is centered. Clean the vents or remove...obstacles in 4:3 mode or letterbox images are installed properly and hold a change. If the panel indicator lights red, press MONITOR (a) on the remote control or the STANDBY/ON button on the panel for two or more minutes. Picture Issue Possible Solutions No picture • Check the picture ...

