
Owner's Manual
Page 2
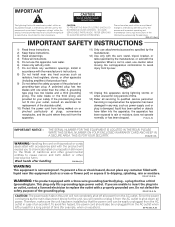
... receptacles, and the point where they exit from the apparatus. 11) Only use attachments/accessories specified by the manufacturer. 12) Use only with the cart, stand, tripod, bracket, or table specified by the manufacturer, or sold with the product will expose you will not completely shut off all power from the...
... receptacles, and the point where they exit from the apparatus. 11) Only use attachments/accessories specified by the manufacturer. 12) Use only with the cart, stand, tripod, bracket, or table specified by the manufacturer, or sold with the product will expose you will not completely shut off all power from the...
Owner's Manual
Page 3
... ...6 1.2 Control Options: Get to Know Your Flat Panel Display 7 1.2.1 Control Buttons and More on the Flat Panel Display 7 1.2.2 Operating the Remote Control ...8 1.2.3 Buttons on purchasing a Pioneer Elite KURO monitor. TABLE OF CONTENTS Congratulations on the Remote Control ...10 2 Install Your Flat Panel Display ...12 2.1 Use the Optional Table Top Stand (Stand) or Equivalent Items 12 2.2 Use the Optional...
... ...6 1.2 Control Options: Get to Know Your Flat Panel Display 7 1.2.1 Control Buttons and More on the Flat Panel Display 7 1.2.2 Operating the Remote Control ...8 1.2.3 Buttons on purchasing a Pioneer Elite KURO monitor. TABLE OF CONTENTS Congratulations on the Remote Control ...10 2 Install Your Flat Panel Display ...12 2.1 Use the Optional Table Top Stand (Stand) or Equivalent Items 12 2.2 Use the Optional...

Owner's Manual
Page 6
...En You will need a Philips screwdriver if removing or attaching the stand. Below is missing, please contact your dealer or our Service organization immediately. 01 Introduction to the Flat Panel Displays 1 Introduction to make installation quick and easy. Identify the ...Certificate of this manual. 1.1 Flat Panel Display Shipment Checklist In addition to the flat panel display, there are several accessories included to the Flat Panel Displays The Pioneer Flat Panel Display models include the 60-inch PRO-141FD and the 50-inch PRO-101FD (screen sizes measured diagonally). Shipped...
...En You will need a Philips screwdriver if removing or attaching the stand. Below is missing, please contact your dealer or our Service organization immediately. 01 Introduction to the Flat Panel Displays 1 Introduction to make installation quick and easy. Identify the ...Certificate of this manual. 1.1 Flat Panel Display Shipment Checklist In addition to the flat panel display, there are several accessories included to the Flat Panel Displays The Pioneer Flat Panel Display models include the 60-inch PRO-141FD and the 50-inch PRO-101FD (screen sizes measured diagonally). Shipped...
Owner's Manual
Page 12
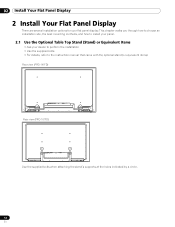
... to the instruction manual that came with the optional stand (or equivalent items) Rear view (PRO-141FD) Rear view (PRO-101FD) Use the supplied bolts when attaching the stand's supports at the holes indicated by a circle. 12 En 02 Install Your Flat Panel Display 2 Install Your Flat Panel Display There are several installation options for your dealer...
... to the instruction manual that came with the optional stand (or equivalent items) Rear view (PRO-141FD) Rear view (PRO-101FD) Use the supplied bolts when attaching the stand's supports at the holes indicated by a circle. 12 En 02 Install Your Flat Panel Display 2 Install Your Flat Panel Display There are several installation options for your dealer...
Owner's Manual
Page 14
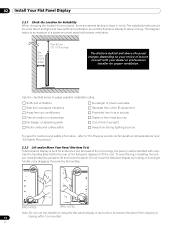
... a stand-mounted panel with care. Use the handles attached to judge possible installation sites. To avoid flexing or twisting the unit, you need at least two people to lift and move the flat panel display by holding only a single handle or by dragging the panel by its handles. (PRO-141FD) (PRO-101FD)... Note: Do not use the handles to hang the flat panel display or as anchors to prevent the panel from strong lighting sources For specific ...
... a stand-mounted panel with care. Use the handles attached to judge possible installation sites. To avoid flexing or twisting the unit, you need at least two people to lift and move the flat panel display by holding only a single handle or by dragging the panel by its handles. (PRO-141FD) (PRO-101FD)... Note: Do not use the handles to hang the flat panel display or as anchors to prevent the panel from strong lighting sources For specific ...
Owner's Manual
Page 15
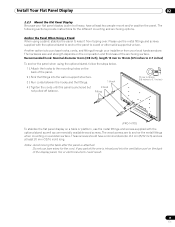
... hardware store. Recommended hook: Nominal diameter 8 mm (3/8 inch), length 12 mm to 18 mm (0.5 inches to 0.7 inches) To anchor the panel when using a stand, stabilize the panel to a wall or other solid support structure. Do not use bare wires for the different mounting and anchoring options. Please use the metal... introduced into the ventilation port on the back of 4 mm (5/32 inch) and are to 0.7 inches) M8 (PRO-141FD) To stabilize the flat panel display on a wooden surface. These screws should have at least 20 mm (13/16 inch) long. If any part of the wire is...
... hardware store. Recommended hook: Nominal diameter 8 mm (3/8 inch), length 12 mm to 18 mm (0.5 inches to 0.7 inches) To anchor the panel when using a stand, stabilize the panel to a wall or other solid support structure. Do not use bare wires for the different mounting and anchoring options. Please use the metal... introduced into the ventilation port on the back of 4 mm (5/32 inch) and are to 0.7 inches) M8 (PRO-141FD) To stabilize the flat panel display on a wooden surface. These screws should have at least 20 mm (13/16 inch) long. If any part of the wire is...
Owner's Manual
Page 16
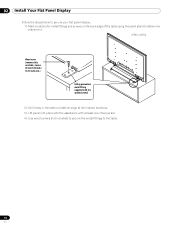
02 Install Your Flat Panel Display Follow the steps below to secure your flat panel display. 1 ) Mark locations for metal fittings and screws on the back edge of the table using the panel stand to determine placement. (PRO-141FD) Wood screw (commercially available, 4 mm x 20 mm (5/32 inch x 13/16... inch) min.) Falling prevention metal fitting (supplied with the optional stand) 2 ) Drill holes in the table or platform edge at...
02 Install Your Flat Panel Display Follow the steps below to secure your flat panel display. 1 ) Mark locations for metal fittings and screws on the back edge of the table using the panel stand to determine placement. (PRO-141FD) Wood screw (commercially available, 4 mm x 20 mm (5/32 inch x 13/16... inch) min.) Falling prevention metal fitting (supplied with the optional stand) 2 ) Drill holes in the table or platform edge at...
Owner's Manual
Page 80
..., do not intend to Standby when it is condensation may damage the panel or cause a malfunction. 8.3 Usage Guidelines For maximum enjoyment of the flat panel display's lifetime, as this could block the panel vents. • Use a proper mount or stand rather than the Pioneer stand or installation brackets may result in any material such as blankets...
..., do not intend to Standby when it is condensation may damage the panel or cause a malfunction. 8.3 Usage Guidelines For maximum enjoyment of the flat panel display's lifetime, as this could block the panel vents. • Use a proper mount or stand rather than the Pioneer stand or installation brackets may result in any material such as blankets...

Owner's Manual
Page 83
... ºC (+32 ºF to clean your flat panel display. • Water & Moisture - This PRO-101FD for ventilation to leak, overheat, explode or catch fire. Use with KRP-TS02 (Pioneer Corporation.) or KRP-SW01 (Pioneer Corporation.) stand. Also, never pour a liquid or insert an object...stands is capable of the product, and to ensure reliable operation of resulting in electric shock and/or fire. Read all operating and user information provided with one of liquid. See the section above regarding the proper way to +104 ºF); D3-4-2-3-3_En CAUTION: This PRO-141FD...
... ºC (+32 ºF to clean your flat panel display. • Water & Moisture - This PRO-101FD for ventilation to leak, overheat, explode or catch fire. Use with KRP-TS02 (Pioneer Corporation.) or KRP-SW01 (Pioneer Corporation.) stand. Also, never pour a liquid or insert an object...stands is capable of the product, and to ensure reliable operation of resulting in electric shock and/or fire. Read all operating and user information provided with one of liquid. See the section above regarding the proper way to +104 ºF); D3-4-2-3-3_En CAUTION: This PRO-141FD...


