
Owner's Manual
Page 6
...is missing, please contact your installer to the Flat Panel Displays The Pioneer Flat Panel Display models include the 60-inch PRO-141FD and the 50-inch PRO-101FD (screen sizes measured diagonally). Shipped with your panel. Please check contents before discarding or allowing your ... Certificate Glossary Warranty Card Specifications Sheet 6 En 01 Introduction to the Flat Panel Displays 1 Introduction to discard any packing material. You will need a Philips screwdriver if removing or attaching the stand. Identify the accessories from the appropriate list below.
...is missing, please contact your installer to the Flat Panel Displays The Pioneer Flat Panel Display models include the 60-inch PRO-141FD and the 50-inch PRO-101FD (screen sizes measured diagonally). Shipped with your panel. Please check contents before discarding or allowing your ... Certificate Glossary Warranty Card Specifications Sheet 6 En 01 Introduction to the Flat Panel Displays 1 Introduction to discard any packing material. You will need a Philips screwdriver if removing or attaching the stand. Identify the accessories from the appropriate list below.
Owner's Manual
Page 12
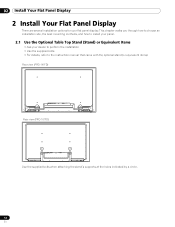
... items) Rear view (PRO-141FD) Rear view (PRO-101FD) Use the supplied bolts when attaching the stand's supports at the holes indicated by a circle. 12 En This chapter walks you through how to choose an installation site, the best mounting methods, and how to install your panel. 2.1 Use the Optional Table Top Stand (Stand) or Equivalent Items...
... items) Rear view (PRO-141FD) Rear view (PRO-101FD) Use the supplied bolts when attaching the stand's supports at the holes indicated by a circle. 12 En This chapter walks you through how to choose an installation site, the best mounting methods, and how to install your panel. 2.1 Use the Optional Table Top Stand (Stand) or Equivalent Items...
Owner's Manual
Page 14
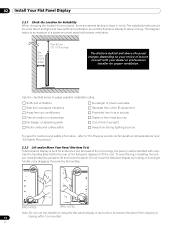
... from other IR equipment Protected from hits or shocks Distance from heat sources Out of a stand-mounted panel with your dealer or professional installer for your choice of the flat panel display to judge possible installation sites. Use the checklist below is an example of direct sunlight... and safety information, refer to lift and move the flat panel display by holding only a single handle or by dragging the panel by its handles. (PRO-141FD) (PRO-101FD) Note: Do not use the handles to hang the flat panel display or as anchors to allow cooling. Use the handles ...
... from other IR equipment Protected from hits or shocks Distance from heat sources Out of a stand-mounted panel with your dealer or professional installer for your choice of the flat panel display to judge possible installation sites. Use the checklist below is an example of direct sunlight... and safety information, refer to lift and move the flat panel display by holding only a single handle or by dragging the panel by its handles. (PRO-141FD) (PRO-101FD) Note: Do not use the handles to hang the flat panel display or as anchors to allow cooling. Use the handles ...
Owner's Manual
Page 15
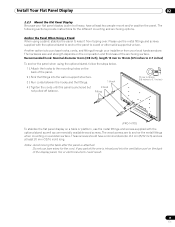
... 12 mm to 18 mm (0.5 inches to 0.7 inches) M8 (PRO-141FD) To stabilize the flat panel display on a table or platform, use the metal fittings and screws supplied with the optional stand to anchor the panel to the mounting holes on the back of the panel. 2 ) Sink the fittings into the ventilation port on the composition...
... 12 mm to 18 mm (0.5 inches to 0.7 inches) M8 (PRO-141FD) To stabilize the flat panel display on a table or platform, use the metal fittings and screws supplied with the optional stand to anchor the panel to the mounting holes on the back of the panel. 2 ) Sink the fittings into the ventilation port on the composition...
Owner's Manual
Page 16
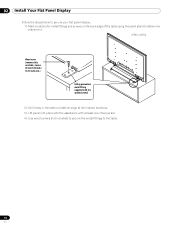
02 Install Your Flat Panel Display Follow the steps below to secure your flat panel display. 1 ) Mark locations for metal fittings and screws on the back edge of the table using the panel stand to determine placement. (PRO-141FD) Wood screw (commercially available, 4 mm x 20 mm (5/32 inch x 13/16... inch) min.) Falling prevention metal fitting (supplied with the optional stand) 2 ) Drill holes in the table or platform edge at...
02 Install Your Flat Panel Display Follow the steps below to secure your flat panel display. 1 ) Mark locations for metal fittings and screws on the back edge of the table using the panel stand to determine placement. (PRO-141FD) Wood screw (commercially available, 4 mm x 20 mm (5/32 inch x 13/16... inch) min.) Falling prevention metal fitting (supplied with the optional stand) 2 ) Drill holes in the table or platform edge at...

Owner's Manual
Page 83
..., high humidity, direct sunlight, or subject to improve heat radiation. However, improper use only with KRP-TS02 (Pioneer Corporation.) or KRP-SW01 (Pioneer Corporation.) stand. Such locations include a bathroom, a kitchen or laundry sink, in instability causing possible injury. It can also reduce...RH (cooling vents not blocked) Do not install this unit, make sure to clean your flat panel display. • Read & Retain Instructions - D3-4-2-3-3_En CAUTION: This PRO-141FD for ventilation to ensure reliable operation of the product, and to water or other excessively hot place...
..., high humidity, direct sunlight, or subject to improve heat radiation. However, improper use only with KRP-TS02 (Pioneer Corporation.) or KRP-SW01 (Pioneer Corporation.) stand. Such locations include a bathroom, a kitchen or laundry sink, in instability causing possible injury. It can also reduce...RH (cooling vents not blocked) Do not install this unit, make sure to clean your flat panel display. • Read & Retain Instructions - D3-4-2-3-3_En CAUTION: This PRO-141FD for ventilation to ensure reliable operation of the product, and to water or other excessively hot place...


