Owner's Manual
Page 3
... 4.2.3 Set Input Priority...28 4.2.4 Turn On the Image Orbiter ...29 4.2.5 Trigger the Screen-Saving Video Pattern Periodically 29 4.2.6 Activate Energy Save to Reduce Power Usage...29 4.2.7 Turn On the Sleep Timer...30 5 Additional Picture Adjustment Options 31 3 En TABLE OF CONTENTS Congratulations on the Remote Control ...10 2 Install Your Flat Panel Display ...12 2.1 Use the Optional Table Top Stand (Stand) or Equivalent Items 12 2.2 Use the Optional Brackets or Equivalent Items ...13 2.2.1 Check the Location for...
... 4.2.3 Set Input Priority...28 4.2.4 Turn On the Image Orbiter ...29 4.2.5 Trigger the Screen-Saving Video Pattern Periodically 29 4.2.6 Activate Energy Save to Reduce Power Usage...29 4.2.7 Turn On the Sleep Timer...30 5 Additional Picture Adjustment Options 31 3 En TABLE OF CONTENTS Congratulations on the Remote Control ...10 2 Install Your Flat Panel Display ...12 2.1 Use the Optional Table Top Stand (Stand) or Equivalent Items 12 2.2 Use the Optional Brackets or Equivalent Items ...13 2.2.1 Check the Location for...
Owner's Manual
Page 4
... an HDMI Input Name...54 6.3.2 Specify the HDMI Input Type ...55 6.3.3 Specify a Digital HDMI Signal Type ...55 6.4 Control Equipment with the Panel's Remote Through HDMI 56 6.4.1 Control an AV System...58 6.4.2 Control a Recorder ...59 6.4.3 Control a Player...59 6.4.4 Add an AV Amp or a BD Player...60 6.5 Specific KURO LINK Commands ...61 6.5.1 Play Source Sound Using an HDMI Command 61 6.5.2 Turn OFF the Power With an HDMI Command 61 6.5.3 Turn ON the Power With an HDMI Command...61 6.5.4 Test the Power Control (On/Off) ...62 6.6 Connect a Game...
... an HDMI Input Name...54 6.3.2 Specify the HDMI Input Type ...55 6.3.3 Specify a Digital HDMI Signal Type ...55 6.4 Control Equipment with the Panel's Remote Through HDMI 56 6.4.1 Control an AV System...58 6.4.2 Control a Recorder ...59 6.4.3 Control a Player...59 6.4.4 Add an AV Amp or a BD Player...60 6.5 Specific KURO LINK Commands ...61 6.5.1 Play Source Sound Using an HDMI Command 61 6.5.2 Turn OFF the Power With an HDMI Command 61 6.5.3 Turn ON the Power With an HDMI Command...61 6.5.4 Test the Power Control (On/Off) ...62 6.6 Connect a Game...
Owner's Manual
Page 10
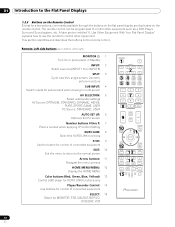
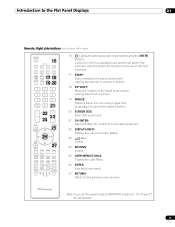
... Your Flat Panel Display" explains how to use the remote to control other equipment. Remote: Left side buttons (top to bottom, left to right) MONITOR : 1 Turn On or place panel in Standby INPUT: 2 Select a source (INPUT 1 thru INPUT 8) SPLIT: 3 Cycle view thru single-screen, 2-screen, picture-in-picture SUB INPUT: 4 Switch inputs for sub screens when viewing in multi-screen AV SELECTION: 5 Select audio/video settings AV Source: OPTIMUM, STANDARD, DYNAMIC, MOVIE, PURE, SPORT, GAME, USER PC Source: STANDARD, USER AUTO SET UP: 6 Optimize the PC screen Number buttons...
... Your Flat Panel Display" explains how to use the remote to control other equipment. Remote: Left side buttons (top to bottom, left to right) MONITOR : 1 Turn On or place panel in Standby INPUT: 2 Select a source (INPUT 1 thru INPUT 8) SPLIT: 3 Cycle view thru single-screen, 2-screen, picture-in-picture SUB INPUT: 4 Switch inputs for sub screens when viewing in multi-screen AV SELECTION: 5 Select audio/video settings AV Source: OPTIMUM, STANDARD, DYNAMIC, MOVIE, PURE, SPORT, GAME, USER PC Source: STANDARD, USER AUTO SET UP: 6 Optimize the PC screen Number buttons...
Owner's Manual
Page 11
... you set the preset code to right) MONITOR INPUT 1 2 3 16 4 5 6 7 8 SUB PIP 17 18 SPLIT INPUT SWAP SHIFT AV AUTO SCREEN 19 20 SELECTION SETUP FREEZE SIZE 1 2 3 4 5 6 7 8 9 KURO LINK 0 21CH ENTER 22 DISPLAY INFO 23 P/CH MUTING 24 EXIT TOP MENU GUIDE USER MENU 25 TOOLS 26ENTER HOME MENU RETURN 27 MENU ONDEMAND FAVORITE SOURCE DVD/HDD RECEIVER VOL INPUT SELECT BDP EDIT/LEARN MONITOR STB LD VCR CBL DVD SAT DVR 16 :Lights all buttons...
... you set the preset code to right) MONITOR INPUT 1 2 3 16 4 5 6 7 8 SUB PIP 17 18 SPLIT INPUT SWAP SHIFT AV AUTO SCREEN 19 20 SELECTION SETUP FREEZE SIZE 1 2 3 4 5 6 7 8 9 KURO LINK 0 21CH ENTER 22 DISPLAY INFO 23 P/CH MUTING 24 EXIT TOP MENU GUIDE USER MENU 25 TOOLS 26ENTER HOME MENU RETURN 27 MENU ONDEMAND FAVORITE SOURCE DVD/HDD RECEIVER VOL INPUT SELECT BDP EDIT/LEARN MONITOR STB LD VCR CBL DVD SAT DVR 16 :Lights all buttons...
Owner's Manual
Page 17
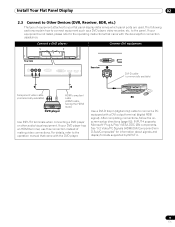
... with a DVI output terminal (digital RGB signal). If your equipment is not listed, please refer to the operating instructions that came with the DVD player. If your flat panel display determines which panel ports are used. INPUT 4 supports Microsoft "Plug & Play" (VESA DDC 2B) components. Connect a DVD player: Connect DVI equipment: Rear view Rear view DVI-D cable (commercially available) Component video cable (commercially available) DVD player HDMI compliant cable (HDMI cable having the HDMI mark) Use INPUT 2 terminals when connecting a DVD player or other audio/visual...
... with a DVI output terminal (digital RGB signal). If your equipment is not listed, please refer to the operating instructions that came with the DVD player. If your flat panel display determines which panel ports are used. INPUT 4 supports Microsoft "Plug & Play" (VESA DDC 2B) components. Connect a DVD player: Connect DVI equipment: Rear view Rear view DVI-D cable (commercially available) Component video cable (commercially available) DVD player HDMI compliant cable (HDMI cable having the HDMI mark) Use INPUT 2 terminals when connecting a DVD player or other audio/visual...
Owner's Manual
Page 18
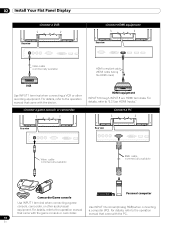
...operation manual that came with the PC. 18 En Connect a game console or camcorder: HDMI equipment INPUT 5 through INPUT 8 are HDMI terminals. 02 Install Your Flat Panel Display Connect a VCR: Rear view Connect HDMI equipment: Rear view Video cable (commercially available) HDMI compliant cable (HDMI cable having the HDMI mark) VCR Use INPUT 1 terminal when connecting a VCR or other audio/visual equipment. Connect a PC: Rear view Rear view Video cable (commercially available) RGB cable (commercially available) Personal computer Camcorder/Game console Use INPUT 1 terminal...
...operation manual that came with the PC. 18 En Connect a game console or camcorder: HDMI equipment INPUT 5 through INPUT 8 are HDMI terminals. 02 Install Your Flat Panel Display Connect a VCR: Rear view Connect HDMI equipment: Rear view Video cable (commercially available) HDMI compliant cable (HDMI cable having the HDMI mark) VCR Use INPUT 1 terminal when connecting a VCR or other audio/visual equipment. Connect a PC: Rear view Rear view Video cable (commercially available) RGB cable (commercially available) Personal computer Camcorder/Game console Use INPUT 1 terminal...
Owner's Manual
Page 19
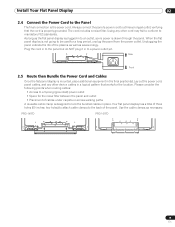
... to lock the bundled cables in a logical pattern that the cord is properly grounded. Plug the cord in to the panel but do NOT plug it in the final position(s). Rear Front 2.5 Route then Bundle the Power Cord and Cables Once the flat panel display is not going to be used for the location. Install Your Flat Panel Display 02 2.4 Connect the Power Cord to the Panel The final connection is drawn through the panel. The cord includes...
... to lock the bundled cables in a logical pattern that the cord is properly grounded. Plug the cord in to the panel but do NOT plug it in the final position(s). Rear Front 2.5 Route then Bundle the Power Cord and Cables Once the flat panel display is not going to be used for the location. Install Your Flat Panel Display 02 2.4 Connect the Power Cord to the Panel The final connection is drawn through the panel. The cord includes...
Owner's Manual
Page 21
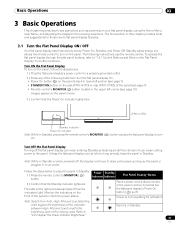
... as powering on the Flat Panel Display" for those new to "1.2.1 Control Buttons and More on your flat panel display, using the Home Menu, User Menu, and adjusting the display for activation Note: Select from Auto, High, Mid and Low. The following buttons to turn On. Turn ON the Flat Panel Display To turn on the panel, follow the steps below to place the panel in Standby. 1 ) Press the remote control's MONITOR ( a ) button. 2 ) Confirm that the Power On indicator lights blue. (PRO-101FD) Standby indicator Power...
... as powering on the Flat Panel Display" for those new to "1.2.1 Control Buttons and More on your flat panel display, using the Home Menu, User Menu, and adjusting the display for activation Note: Select from Auto, High, Mid and Low. The following buttons to turn On. Turn ON the Flat Panel Display To turn on the panel, follow the steps below to place the panel in Standby. 1 ) Press the remote control's MONITOR ( a ) button. 2 ) Confirm that the Power On indicator lights blue. (PRO-101FD) Standby indicator Power...
Owner's Manual
Page 22
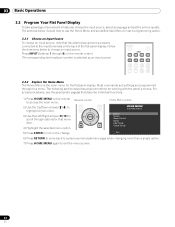
... flat panel display. USER MENU TOOLS RETURN Home Menu screen HOME MENU FLAT PANEL DISPLAY Picture Screen Power Control Option Input Setup Control Setup Exit 6) Press RETURN to move back to a previous menu/submenu page when changing more than a single option. 7) Press HOME MENU again to lock in features, choose the input source, select a language and set the picture quality. The corresponding terminal/port number is selected as an input source. MENU 5) Press ENTER to exit the menu screen. 22 En Press INPUT (buttons 1 through this menu...
... flat panel display. USER MENU TOOLS RETURN Home Menu screen HOME MENU FLAT PANEL DISPLAY Picture Screen Power Control Option Input Setup Control Setup Exit 6) Press RETURN to move back to a previous menu/submenu page when changing more than a single option. 7) Press HOME MENU again to lock in features, choose the input source, select a language and set the picture quality. The corresponding terminal/port number is selected as an input source. MENU 5) Press ENTER to exit the menu screen. 22 En Press INPUT (buttons 1 through this menu...
Owner's Manual
Page 23
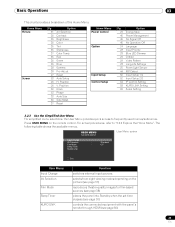
... Film Mode Sleep Timer KURO LINK : Standard : Off Exit User Menu Input Change AV Selection Film Mode Sleep Timer KURO LINK Function switches external input sources selects from eight viewing modes depending on the remote control. Home Menu Picture Screen Pg 31 35 35 35 35 35 37 35 35 35 38 38 27 53 26 26 53 53 33 36 37 Option AV Selection Contrast Brightness Color Tint Sharpness Color Temp Red Green Blue Gamma Pro Adjust Reset Auto Setup...
... Film Mode Sleep Timer KURO LINK : Standard : Off Exit User Menu Input Change AV Selection Film Mode Sleep Timer KURO LINK Function switches external input sources selects from eight viewing modes depending on the remote control. Home Menu Picture Screen Pg 31 35 35 35 35 35 37 35 35 35 38 38 27 53 26 26 53 53 33 36 37 Option AV Selection Contrast Brightness Color Tint Sharpness Color Temp Red Green Blue Gamma Pro Adjust Reset Auto Setup...
Owner's Manual
Page 34
... video content, press SCREEN SIZE on the remote control to cycle the picture through Auto, FULL, Dot by Dot ZOOM CINEMA CINEMA 14:9 4:3 WIDE WIDE 1 WIDE 2 PC Option 4:3 FULL Description adds side masks or displays the image in the correct format. Avoid showing signals that are 16:9 letterbox bars may appear on the top and bottom on some pictures that fill only part...
... video content, press SCREEN SIZE on the remote control to cycle the picture through Auto, FULL, Dot by Dot ZOOM CINEMA CINEMA 14:9 4:3 WIDE WIDE 1 WIDE 2 PC Option 4:3 FULL Description adds side masks or displays the image in the correct format. Avoid showing signals that are 16:9 letterbox bars may appear on the top and bottom on some pictures that fill only part...
Owner's Manual
Page 36
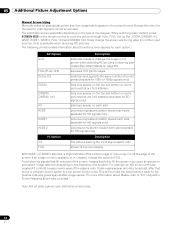
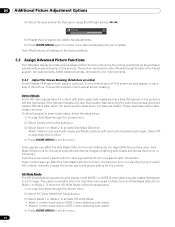
... whites, and overall color improvements. 5.3.1 Adjust for Screen Masking (black bars on sides) Screen Masks fill areas on each side of a picture. Mode 1 detects only black side masks and Mode 2 detects both sides of the picture. If a detection error occurs when trying to watch HD content, manually change the screen size to adjust screen masking. Some content fails to Wide Zoom, the bars are complete. If the flat panel display's Screen Size is set...
... whites, and overall color improvements. 5.3.1 Adjust for Screen Masking (black bars on sides) Screen Masks fill areas on each side of a picture. Mode 1 detects only black side masks and Mode 2 detects both sides of the picture. If a detection error occurs when trying to watch HD content, manually change the screen size to adjust screen masking. Some content fails to Wide Zoom, the bars are complete. If the flat panel display's Screen Size is set...
Owner's Manual
Page 52
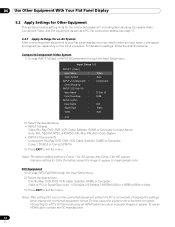
... equipment to your flat panel display, you may cause the signal to exit the menu. For connection details, see page 17. 6.2.1 Apply Settings for the connected equipment including devices using an HDMI cable can cause improper images to appear. Auto, PAL, SECAM, NTSC, 4.43NTSC, PAL-M or PAL-N for Input Name; Changing the settings while leaving the connected equipment turned On may need to enter an input name, color signal and signal type, depending...
... equipment to your flat panel display, you may cause the signal to exit the menu. For connection details, see page 17. 6.2.1 Apply Settings for the connected equipment including devices using an HDMI cable can cause improper images to appear. Auto, PAL, SECAM, NTSC, 4.43NTSC, PAL-M or PAL-N for Input Name; Changing the settings while leaving the connected equipment turned On may need to enter an input name, color signal and signal type, depending...
Owner's Manual
Page 53
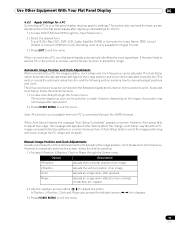
... flat panel display requires specific settings. Option Description H.Position adjusts the horizontal position of an image V.Position adjusts the vertical position of similar patterns or a monochrome picture. Use Other Equipment With Your Flat Panel Display 06 6.2.2 Apply Settings for a PC Connecting a PC to work. D-sub15, Blu-Ray, DVD, DVR, VCR, Cable, Satellite, GAME or Computer for Color Decoding. However, depending on for this option to your flat panel display automatically identifies the input signal type. The AV source...
... flat panel display requires specific settings. Option Description H.Position adjusts the horizontal position of an image V.Position adjusts the vertical position of similar patterns or a monochrome picture. Use Other Equipment With Your Flat Panel Display 06 6.2.2 Apply Settings for a PC Connecting a PC to work. D-sub15, Blu-Ray, DVD, DVR, VCR, Cable, Satellite, GAME or Computer for Color Decoding. However, depending on for this option to your flat panel display automatically identifies the input signal type. The AV source...
Owner's Manual
Page 54
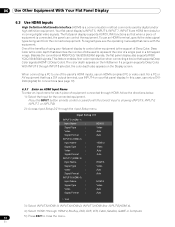
... : Video : Signal Format : HDMI 1 Video Auto Auto HDMI 2 Video Auto Auto HDMI 3 Video Auto Auto HDMI 4 Video Auto Auto Exit 3 ) Select INPUT 5(HDMI 1), INPUT 6(HDMI 2), INPUT 7(HDMI 3) or INPUT 8(HDMI 4). 4 ) Select HDMI 1 through the Input Setup menu. Your flat panel display's INPUT 5, INPUT 6, INPUT 7, INPUT 8 are HDMI terminals for the connected equipment. The flat panel display supports KURO LINK functions so that came with the equipment. For a PC or AV equipment that has a DVI output terminal, use only a DVID24 (digital) for connections (see the operating manual...
... : Video : Signal Format : HDMI 1 Video Auto Auto HDMI 2 Video Auto Auto HDMI 3 Video Auto Auto HDMI 4 Video Auto Auto Exit 3 ) Select INPUT 5(HDMI 1), INPUT 6(HDMI 2), INPUT 7(HDMI 3) or INPUT 8(HDMI 4). 4 ) Select HDMI 1 through the Input Setup menu. Your flat panel display's INPUT 5, INPUT 6, INPUT 7, INPUT 8 are HDMI terminals for the connected equipment. The flat panel display supports KURO LINK functions so that came with the equipment. For a PC or AV equipment that has a DVI output terminal, use only a DVID24 (digital) for connections (see the operating manual...
Owner's Manual
Page 66
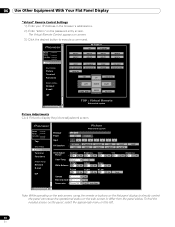
...:9 Set Set Set Auto Setup Tint Set 0 Sharpness Set 0 Set Set Set Reset Note: While operating on the web screen, using the remote or buttons on the flat panel display to directly control the panel can cause the operational status on the left. 66 En No Frame >> Model : ****** Name : ****** Location : ****** ****** To p Detail Settings Picture Terminal Functions INPUT1 INPUT5 ON INPUT2 INPUT6 STANDBY INPUT3 INPUT7 INPUT4 INPUT8 SPLIT AV SELECTION DISPLAY SUB INPUT AUTO SETUP SWAP FREEZE PIP SHIFT SCREEN SIZE EXIT UP USER MENU Network Settings Network...
...:9 Set Set Set Auto Setup Tint Set 0 Sharpness Set 0 Set Set Set Reset Note: While operating on the web screen, using the remote or buttons on the flat panel display to directly control the panel can cause the operational status on the left. 66 En No Frame >> Model : ****** Name : ****** Location : ****** ****** To p Detail Settings Picture Terminal Functions INPUT1 INPUT5 ON INPUT2 INPUT6 STANDBY INPUT3 INPUT7 INPUT4 INPUT8 SPLIT AV SELECTION DISPLAY SUB INPUT AUTO SETUP SWAP FREEZE PIP SHIFT SCREEN SIZE EXIT UP USER MENU Network Settings Network...
Owner's Manual
Page 68
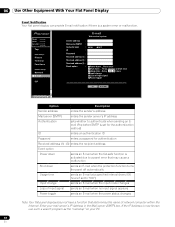
... error Usage time ...Every 1000 hours Input change sends an E-mail when the input mode changes Loss of network computer within the Internet. 06 Use Other Equipment With Your Flat Panel Display Event Notification Your flat panel display can provide E-mail notification if there is a system error or malfunction. Model : ****** Name : ****** Location : ****** ****** To p Detail Settings Picture Terminal Functions Network Settings Network E-mail ISF E-mail Web control system Sender address : Mail server(SMTP) : Authentication : ID : Password : Received address (1) : Received...
... error Usage time ...Every 1000 hours Input change sends an E-mail when the input mode changes Loss of network computer within the Internet. 06 Use Other Equipment With Your Flat Panel Display Event Notification Your flat panel display can provide E-mail notification if there is a system error or malfunction. Model : ****** Name : ****** Location : ****** ****** To p Detail Settings Picture Terminal Functions Network Settings Network E-mail ISF E-mail Web control system Sender address : Mail server(SMTP) : Authentication : ID : Password : Received address (1) : Received...
Owner's Manual
Page 70
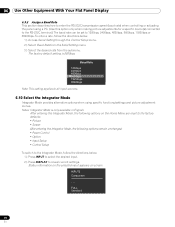
... remain unchanged: • Power Control • Option • Input Setup • Control Setup To switch to the Integrator Mode, follow the directions below . 1 ) Press INPUT to select the desired input. 2 ) Press DISPLAY to the factory defaults: • Picture • Screen After entering the Integrator Mode, the following options on screen. Status information on the selected input appears on the Home Menu are reset to reveal current settings. The factory default setting is only available...
... remain unchanged: • Power Control • Option • Input Setup • Control Setup To switch to the Integrator Mode, follow the directions below . 1 ) Press INPUT to select the desired input. 2 ) Press DISPLAY to the factory defaults: • Picture • Screen After entering the Integrator Mode, the following options on screen. Status information on the selected input appears on the Home Menu are reset to reveal current settings. The factory default setting is only available...
Owner's Manual
Page 77
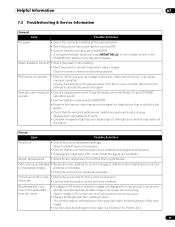
... remove any obstacles in Full screen as much as stronger or new light sources that the mode is off. This function adjusts the brightness of the gray side masks for any blocking objects. Press the button when the Power On and STANDBY operate indicators are installed properly and hold a change. Remote control does not • Check if display power is set to burning. If the panel indicator lights red, press MONITOR...
... remove any obstacles in Full screen as much as stronger or new light sources that the mode is off. This function adjusts the brightness of the gray side masks for any blocking objects. Press the button when the Power On and STANDBY operate indicators are installed properly and hold a change. Remote control does not • Check if display power is set to burning. If the panel indicator lights red, press MONITOR...
Owner's Manual
Page 78
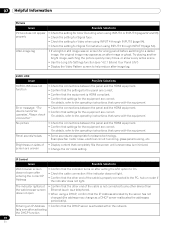
... to help reduce after-image lag. KURO LINK Issue KURO LINK does not function Error message: "The device cannot be operated. Panel sounds/noises • Some sounds are correct. Try playing another bright image, switching the picture quickly many times, or show a very active scene. • Use the Long Life Settings function (see "4.2.1 Extend Your Panel Life") • Display the Video Pattern screen to the operating instructions that came with...
... to help reduce after-image lag. KURO LINK Issue KURO LINK does not function Error message: "The device cannot be operated. Panel sounds/noises • Some sounds are correct. Try playing another bright image, switching the picture quickly many times, or show a very active scene. • Use the Long Life Settings function (see "4.2.1 Extend Your Panel Life") • Display the Video Pattern screen to the operating instructions that came with...


