Owner's Manual
Page 3
...or Equivalent Items ...13 2.2.1 Check the Location for Suitability ...14 2.2.2 Lift and/or Move Your Panel (the How To's)...14 2.2.3 Mount the Flat Panel Display ...15 2.3 Connect to Other Devices (DVR, Receiver, BDR, etc 17 2.4 Connect the Power Cord ...to shatter expectations, to Know Your Flat Panel Display 7 1.2.1 Control Buttons and More on the Flat Panel Display 7 1.2.2 Operating the Remote Control ...8 1.2.3 Buttons on purchasing a Pioneer Elite KURO monitor. TABLE OF CONTENTS 1 Introduction to the Flat Panel Displays 6 1.1 Flat Panel Display Shipment Checklist ...6 1.2 Control Options...
...or Equivalent Items ...13 2.2.1 Check the Location for Suitability ...14 2.2.2 Lift and/or Move Your Panel (the How To's)...14 2.2.3 Mount the Flat Panel Display ...15 2.3 Connect to Other Devices (DVR, Receiver, BDR, etc 17 2.4 Connect the Power Cord ...to shatter expectations, to Know Your Flat Panel Display 7 1.2.1 Control Buttons and More on the Flat Panel Display 7 1.2.2 Operating the Remote Control ...8 1.2.3 Buttons on purchasing a Pioneer Elite KURO monitor. TABLE OF CONTENTS 1 Introduction to the Flat Panel Displays 6 1.1 Flat Panel Display Shipment Checklist ...6 1.2 Control Options...
Owner's Manual
Page 12
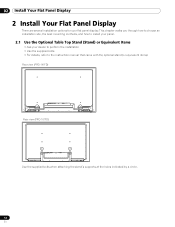
... stand (or equivalent items) Rear view (PRO-141FD) Rear view (PRO-101FD) Use the supplied bolts when attaching the stand's supports at the holes indicated by a circle. 12 En This chapter walks you through how to choose an installation site, the best mounting methods, and how to install your panel. 2.1 Use the Optional Table Top...
... stand (or equivalent items) Rear view (PRO-141FD) Rear view (PRO-101FD) Use the supplied bolts when attaching the stand's supports at the holes indicated by a circle. 12 En This chapter walks you through how to choose an installation site, the best mounting methods, and how to install your panel. 2.1 Use the Optional Table Top...
Owner's Manual
Page 13
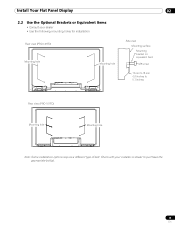
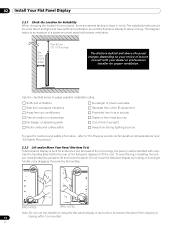
Check with your dealer • Use the following mounting holes for installation Rear view (PRO-141FD) Mounting hole Mounting hole Side view Mounting surface Mounting bracket (or equivalent item) M8 screw 12 mm to 18 mm (0.5 inches to purchase the appropriate bolt(s). 13 En Install Your Flat Panel Display 02 2.2 Use the Optional Brackets or Equivalent Items • Consult your installer or dealer to 0.7 inches) Rear view (PRO-101FD) Mounting hole Mounting hole Note: Some installation options require a different type of bolt.
Check with your dealer • Use the following mounting holes for installation Rear view (PRO-141FD) Mounting hole Mounting hole Side view Mounting surface Mounting bracket (or equivalent item) M8 screw 12 mm to 18 mm (0.5 inches to purchase the appropriate bolt(s). 13 En Install Your Flat Panel Display 02 2.2 Use the Optional Brackets or Equivalent Items • Consult your installer or dealer to 0.7 inches) Rear view (PRO-101FD) Mounting hole Mounting hole Note: Some installation options require a different type of bolt.
Owner's Manual
Page 14
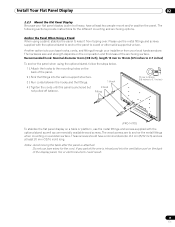
...hits or shocks Distance from heat sources Out of mount. To avoid flexing or twisting the unit, you need at least two people to lift and move the flat panel display by holding only a single handle or by dragging the panel by its handles. (PRO-141FD) (PRO-101FD) Note: Do not use the handles ...to hang the flat panel display or as anchors to judge possible installation sites.
...hits or shocks Distance from heat sources Out of mount. To avoid flexing or twisting the unit, you need at least two people to lift and move the flat panel display by holding only a single handle or by dragging the panel by its handles. (PRO-141FD) (PRO-101FD) Note: Do not use the handles ...to hang the flat panel display or as anchors to judge possible installation sites.
Owner's Manual
Page 15
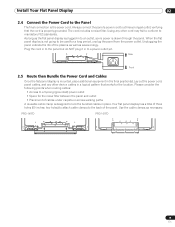
... 8 mm (3/8 inch), length 12 mm to 18 mm (0.5 inches to 0.7 inches) To anchor the panel when using a stand, stabilize the panel to 0.7 inches) M8 (PRO-141FD) To stabilize the flat panel display on the back of the wire is introduced into the wall or support structure. 3 ) Run cords...but heavy, have a nominal diameter of 4 mm (5/32 inch) and are to the mounting holes on the back of the anchoring surface. Install Your Flat Panel Display 02 2.2.3 Mount the Flat Panel Display Because your local hardware store. Another option is attached. The hardware size and strength ...
... 8 mm (3/8 inch), length 12 mm to 18 mm (0.5 inches to 0.7 inches) To anchor the panel when using a stand, stabilize the panel to 0.7 inches) M8 (PRO-141FD) To stabilize the flat panel display on the back of the wire is introduced into the wall or support structure. 3 ) Run cords...but heavy, have a nominal diameter of 4 mm (5/32 inch) and are to the mounting holes on the back of the anchoring surface. Install Your Flat Panel Display 02 2.2.3 Mount the Flat Panel Display Because your local hardware store. Another option is attached. The hardware size and strength ...
Owner's Manual
Page 19
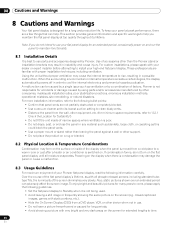
... clamp is drawn through the panel. As long as saves energy. PRO-141FD PRO-101FD 19 En Install Your Flat Panel Display 02 2.4 Connect the Power Cord to the Panel The final connection is not ...mandatory FCC standards. When the flat panel display is the power cord. Unplugging the panel extends the life of the plasma as well as the flat panel display is plugged in to an ...Cord and Cables Once the flat panel display is properly grounded. Always connect the panel's power cord to lock the bundled cables in a logical pattern that the cord is mounted, place additional equipment in to...
... clamp is drawn through the panel. As long as saves energy. PRO-141FD PRO-101FD 19 En Install Your Flat Panel Display 02 2.4 Connect the Power Cord to the Panel The final connection is not ...mandatory FCC standards. When the flat panel display is the power cord. Unplugging the panel extends the life of the plasma as well as the flat panel display is plugged in to an ...Cord and Cables Once the flat panel display is properly grounded. Always connect the panel's power cord to lock the bundled cables in a logical pattern that the cord is mounted, place additional equipment in to...
Owner's Manual
Page 80
... forms, do not intend to use parts and accessories designed by Pioneer. Over the course of the flat panel display's lifetime, as this could block the panel vents. • Use a proper mount or stand rather than the Pioneer stand or installation brackets may damage the panel or cause a malfunction. 8.3 Usage Guidelines For maximum enjoyment of factors...
... forms, do not intend to use parts and accessories designed by Pioneer. Over the course of the flat panel display's lifetime, as this could block the panel vents. • Use a proper mount or stand rather than the Pioneer stand or installation brackets may damage the panel or cause a malfunction. 8.3 Usage Guidelines For maximum enjoyment of factors...


