Owner's Manual
Page 23
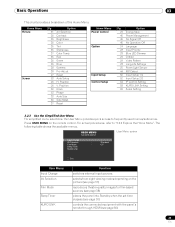
... Detect Input Setup 1/2 Input Setup 2/2 IP Control Setting KURO LINK Setting Serial Setting 3.2.3 Use the Simplified User Menu ...panel into Standby when the set time elapses (see page 30...panel's remote through HDMI (see page 56) 23 En USER MENU FLAT PANEL DISPLAY User Menu screen Input Change AV Selection Film Mode Sleep Timer KURO... LINK : Standard : Off Exit User Menu Input Change AV Selection Film Mode Sleep Timer KURO...Contrast Brightness Color Tint Sharpness Color Temp Red Green Blue Gamma...
... Detect Input Setup 1/2 Input Setup 2/2 IP Control Setting KURO LINK Setting Serial Setting 3.2.3 Use the Simplified User Menu ...panel into Standby when the set time elapses (see page 30...panel's remote through HDMI (see page 56) 23 En USER MENU FLAT PANEL DISPLAY User Menu screen Input Change AV Selection Film Mode Sleep Timer KURO... LINK : Standard : Off Exit User Menu Input Change AV Selection Film Mode Sleep Timer KURO...Contrast Brightness Color Tint Sharpness Color Temp Red Green Blue Gamma...

Owner's Manual
Page 26
... is available in the example below. Picture Image Position Each input source stores the picture adjustment settings for that view. Contrast 32 5 ) Press HOME MENU again to be adjusted. 04 Basic Picture Adjustment For standard picture adjustments, follow the ...the picture's horizontal and vertical position, follow the steps below . 1 ) Access H.Position or V.Position through the Screen menu. AV Selection Contrast Brightness Color Tint Sharpness Color Temp Red Green Blue Gamma Pro Adjust Reset Picture : STANDARD : 40 : 0 : 0 : 0 : 0 : Mid : 0 : 0 : 0 : 3 ...
... is available in the example below. Picture Image Position Each input source stores the picture adjustment settings for that view. Contrast 32 5 ) Press HOME MENU again to be adjusted. 04 Basic Picture Adjustment For standard picture adjustments, follow the ...the picture's horizontal and vertical position, follow the steps below . 1 ) Access H.Position or V.Position through the Screen menu. AV Selection Contrast Brightness Color Tint Sharpness Color Temp Red Green Blue Gamma Pro Adjust Reset Picture : STANDARD : 40 : 0 : 0 : 0 : 0 : Mid : 0 : 0 : 0 : 3 ...
Owner's Manual
Page 31
... of the environment and the movie on the remote control. Choose from a PC. When the menu screen disappears, the panel locks in the order shown below. Most sections deal with maximum contrast but manual image quality adjustment unavailable for movies reflects input signals as faithfully as possible for checking image materials, for...
... of the environment and the movie on the remote control. Choose from a PC. When the menu screen disappears, the panel locks in the order shown below. Most sections deal with maximum contrast but manual image quality adjustment unavailable for movies reflects input signals as faithfully as possible for checking image materials, for...
Owner's Manual
Page 32
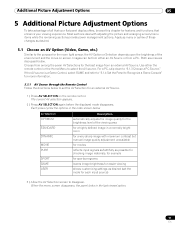
... Sensor. 5.1.3 Choose a PC Source From a PC, choose between two AV Selections for operability. from a PC). The DYNAMIC setting blocks Contrast, Brightness, Color, Tint, Sharpness, and Reset. When OPTIMUM is coming from the submenu. 4 ) Select On (operability preferred) or Off...panel display, use an external input (unless the sourse is selected, images are dimmed on screen, the Game Control Pref. option is on the menu. To choose an AV source through the Home Menu, follow the steps below . 1 ) Access AV Selection through the Picture menu. 2 ) Select an option from the Pro...
... Sensor. 5.1.3 Choose a PC Source From a PC, choose between two AV Selections for operability. from a PC). The DYNAMIC setting blocks Contrast, Brightness, Color, Tint, Sharpness, and Reset. When OPTIMUM is coming from the submenu. 4 ) Select On (operability preferred) or Off...panel display, use an external input (unless the sourse is selected, images are dimmed on screen, the Game Control Pref. option is on the menu. To choose an AV source through the Home Menu, follow the steps below . 1 ) Access AV Selection through the Picture menu. 2 ) Select an option from the Pro...
Owner's Manual
Page 35
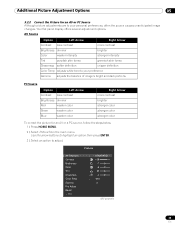
... for an AV or a PC source, follow the steps below. 1 ) Press HOME MENU. 2 ) Select Picture from the main menu. Picture AV Selection Contrast Brightness Color Tint Sharpness Color Temp Gamma Pro Adjust Reset Exit : STANDARD : +38 : -7 : -6 : 5 : 4 : Mid : 5 (AV source) 35 En Additional Picture Adjustment Options 05 5.2.2 Correct the Picture for an AV..., often the source causes unanticipated image changes. Use the arrow buttons to highlight an option then press ENTER. 3 ) Select an option to adjust. Your flat panel display offers several adjustment options.
... for an AV or a PC source, follow the steps below. 1 ) Press HOME MENU. 2 ) Select Picture from the main menu. Picture AV Selection Contrast Brightness Color Tint Sharpness Color Temp Gamma Pro Adjust Reset Exit : STANDARD : +38 : -7 : -6 : 5 : 4 : Mid : 5 (AV source) 35 En Additional Picture Adjustment Options 05 5.2.2 Correct the Picture for an AV..., often the source causes unanticipated image changes. Use the arrow buttons to highlight an option then press ENTER. 3 ) Select an option to adjust. Your flat panel display offers several adjustment options.
Owner's Manual
Page 36
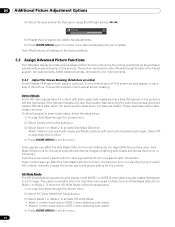
... the Auto Size menu is on the picture's left /right arrows (/). Contrast 32 5 ) Repeat the process for video signals that do not carry aspect ratio...menu after all settings to the factory defaults. 5.3 Assign Advanced Picture Functions Your flat panel display provides various advanced functions for optimizing the picture quality that go beyond basic adjustments explained...fails to detect side masks, follow the steps below . 1 ) Access Side Mask through Pioneer's Pro Adjust support, top quality blacks, better balanced whites, and overall color improvements. 5.3.1 Adjust for...
... the Auto Size menu is on the picture's left /right arrows (/). Contrast 32 5 ) Repeat the process for video signals that do not carry aspect ratio...menu after all settings to the factory defaults. 5.3 Assign Advanced Picture Functions Your flat panel display provides various advanced functions for optimizing the picture quality that go beyond basic adjustments explained...fails to detect side masks, follow the steps below . 1 ) Access Side Mask through Pioneer's Pro Adjust support, top quality blacks, better balanced whites, and overall color improvements. 5.3.1 Adjust for...
Owner's Manual
Page 40
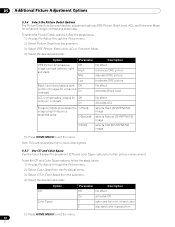
.... 2 ) Select Color Detail from the Pro Adjust menu. 3 ) Select CTI or Color Space from the submenu. 3 ) Select DRE Picture, Black Level, ACL or Enhancer Mode. 4 ) Select the desired parameter. Option CTI Color Space Parameter Description Off No effect On activates CTI 1 optimizes for enhanced image contrast and sharpness. Note: This setting applies...
.... 2 ) Select Color Detail from the Pro Adjust menu. 3 ) Select CTI or Color Space from the submenu. 3 ) Select DRE Picture, Black Level, ACL or Enhancer Mode. 4 ) Select the desired parameter. Option CTI Color Space Parameter Description Off No effect On activates CTI 1 optimizes for enhanced image contrast and sharpness. Note: This setting applies...
Owner's Manual
Page 53
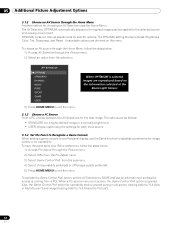
...be adjusted. To activate Auto Setup, follow the directions below . 1 ) Access Auto Setup through the HDMI terminal. However, depending on the flat panel display after adjustment. 2 ) Press HOME MENU to a PC, the image position, clock phase and clock frequency can be adjusted manually too. D-... of an image Clock adjusts an image when jitter appears Phase adjusts an image when jittered or low-contrast characters, etc. When connected to the flat panel display and turned on screen. The Auto Setup option automatically adjusts these settings but the image position and...
...be adjusted. To activate Auto Setup, follow the directions below . 1 ) Access Auto Setup through the HDMI terminal. However, depending on the flat panel display after adjustment. 2 ) Press HOME MENU to a PC, the image position, clock phase and clock frequency can be adjusted manually too. D-... of an image Clock adjusts an image when jitter appears Phase adjusts an image when jittered or low-contrast characters, etc. When connected to the flat panel display and turned on screen. The Auto Setup option automatically adjusts these settings but the image position and...
Owner's Manual
Page 66
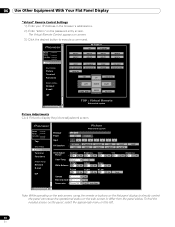
...ON :1 2 OPTIMUM : USER Picture Web control system STANDBY 3 4 STANDARD MOVIE 5 6 DYNAMIC isf-DAY 7 8 PURE isf-NIGHT SPORT isf-AUTO GAME Detail Adjust Picture Contrast Brightness Color : 40 Set 0 Set 0 Color Temp. : Manual R.High White Balance : 0 Set G.High Set 0 B.High Set 0 R.Low 0 G.Low Set 0... or buttons on the flat panel display to directly control the panel can cause the operational status on screen. 3 ) Click the desired button to differ from the panel status. 06 Use Other Equipment With Your Flat Panel Display "Virtual" Remote Control Settings...
...ON :1 2 OPTIMUM : USER Picture Web control system STANDBY 3 4 STANDARD MOVIE 5 6 DYNAMIC isf-DAY 7 8 PURE isf-NIGHT SPORT isf-AUTO GAME Detail Adjust Picture Contrast Brightness Color : 40 Set 0 Set 0 Color Temp. : Manual R.High White Balance : 0 Set G.High Set 0 B.High Set 0 R.Low 0 G.Low Set 0... or buttons on the flat panel display to directly control the panel can cause the operational status on screen. 3 ) Click the desired button to differ from the panel status. 06 Use Other Equipment With Your Flat Panel Display "Virtual" Remote Control Settings...
Owner's Manual
Page 74
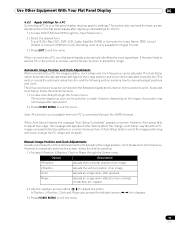
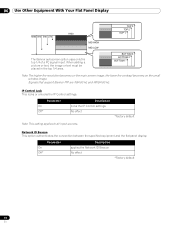
IP Control Lock This locks or unlocks the IP Control settings. 06 Use Other Equipment With Your Flat Panel Display 1080 810 540 270 1920 MID HIGH MID LOW TOP 3 TOP 2 TOP 1 The Banner sub-screen option uses only the top 1/4 of a PC signal ... Note: This setting applies to all input sources. BOTTOM 3 BOTTOM 2 BOTTOM 1 Note: The higher the resolution becomes on the main screen image, the lower the contrast becomes on the small window image. Network ID Beacon This option authenticates the connection between the specified equipment and the flat...
IP Control Lock This locks or unlocks the IP Control settings. 06 Use Other Equipment With Your Flat Panel Display 1080 810 540 270 1920 MID HIGH MID LOW TOP 3 TOP 2 TOP 1 The Banner sub-screen option uses only the top 1/4 of a PC signal ... Note: This setting applies to all input sources. BOTTOM 3 BOTTOM 2 BOTTOM 1 Note: The higher the resolution becomes on the main screen image, the lower the contrast becomes on the small window image. Network ID Beacon This option authenticates the connection between the specified equipment and the flat...

Owner's Manual
Page 105
..., 43 A Auto Size 28, 33, 36 AV Selection 31, 32 B Blue 35 Brightness 35 Brightness Sync 37, 77 C CBL 10, 49 Color 25, 32, 35 Contrast 25, 31, 32, 35 E Energy Save 28, 29, 45 F Film Mode 38 Freeze 44, 80 G GAME 18, 31, 39, 62 Game Control Pref 39 Green... 35, 51 H HD Wide Mode 36 HDMI Input 54 HDMI port 56 HDMI terminal 18, 54 HOME MENU 10 I Input 10 Installation 12, 80 K KURO LINK 54, 56 KURO LINK Setting 58 L Language 24, 56 Long Life Settings 28, 76, 82 M MOVIE 10, 27, 31 multi-screen 43, 44 O OPTIMUM 10, 31...
..., 43 A Auto Size 28, 33, 36 AV Selection 31, 32 B Blue 35 Brightness 35 Brightness Sync 37, 77 C CBL 10, 49 Color 25, 32, 35 Contrast 25, 31, 32, 35 E Energy Save 28, 29, 45 F Film Mode 38 Freeze 44, 80 G GAME 18, 31, 39, 62 Game Control Pref 39 Green... 35, 51 H HD Wide Mode 36 HDMI Input 54 HDMI port 56 HDMI terminal 18, 54 HOME MENU 10 I Input 10 Installation 12, 80 K KURO LINK 54, 56 KURO LINK Setting 58 L Language 24, 56 Long Life Settings 28, 76, 82 M MOVIE 10, 27, 31 multi-screen 43, 44 O OPTIMUM 10, 31...