

Owner's Manual
Page 5
... 8.2 Physical Location & Temperature Considerations ...80 8.3 Usage Guidelines ...80 8.4 Signal Interference or Noise ...81 8.5 Phosphor Properties...81 8.6 Image Information Including Retention & After-Image Lag 81 8.7 Prevent Burning ...82 8.8 Safety Precautions...83 8.9 Legal Notices...83 8.9.1 Safety...83 8.9.2 Radio Interference...84 9 Appendix ...85 9.1 Manufacturer Codes to Program into the Remote Control 85 9.1.1 Cable...85...
... 8.2 Physical Location & Temperature Considerations ...80 8.3 Usage Guidelines ...80 8.4 Signal Interference or Noise ...81 8.5 Phosphor Properties...81 8.6 Image Information Including Retention & After-Image Lag 81 8.7 Prevent Burning ...82 8.8 Safety Precautions...83 8.9 Legal Notices...83 8.9.1 Safety...83 8.9.2 Radio Interference...84 9 Appendix ...85 9.1 Manufacturer Codes to Program into the Remote Control 85 9.1.1 Cable...85...

Owner's Manual
Page 28
... HOME MENU to exit the menu. 4.2.3 Set Input Priority With a priority input assigned, the flat panel display automatically switches to extend the life of your panel and help alleviate after-image ghosts or burn-in. After input changes, the previous input is not restored even when the signal disappears at a ...different input causes the selected input to automatically change to exit the menu. 28 En We suggest applying all of the flat panel display features make ...
... HOME MENU to exit the menu. 4.2.3 Set Input Priority With a priority input assigned, the flat panel display automatically switches to extend the life of your panel and help alleviate after-image ghosts or burn-in. After input changes, the previous input is not restored even when the signal disappears at a ...different input causes the selected input to automatically change to exit the menu. 28 En We suggest applying all of the flat panel display features make ...

Owner's Manual
Page 29
... priority over Sleep Timer, No Signal Off, and No Operation Off (Power Management) settings. 4.2.6 Activate Energy Save to exit the menu. The panel automatically switches to Standby one hour. Follow the steps below . 1 ) Access Video Pattern through the Power Control menu. 2 ) Select an option... Turn On the Image Orbiter A built-in feature to protect against burn-in is on, only the remote's MONITOR (a) button and the panel's STANDBY/ON button are available. The Video Pattern screen appears. 3 ) Leave the panel alone for all available screen modes • PC source Mode 1: to...
... priority over Sleep Timer, No Signal Off, and No Operation Off (Power Management) settings. 4.2.6 Activate Energy Save to exit the menu. The panel automatically switches to Standby one hour. Follow the steps below . 1 ) Access Video Pattern through the Power Control menu. 2 ) Select an option... Turn On the Image Orbiter A built-in feature to protect against burn-in is on, only the remote's MONITOR (a) button and the panel's STANDBY/ON button are available. The Video Pattern screen appears. 3 ) Leave the panel alone for all available screen modes • PC source Mode 1: to...
Owner's Manual
Page 76
...outlet. Continuing to "7.2 Cleaning Methods." 7.2 Cleaning Methods Before cleaning your dealer or Pioneer Customer Support (see back cover). To clean the screen surface, gently wipe it back on the flat panel display. Rubbing hard on the display for the front bezel. What can clear the...example) for a length of plasma technology. Do not use the same type of soft cloth (e.g., cotton, flannel, etc.). Plug in . • Set Long Life Settings to prevent image retention or burn-in the panel again after one (1) or more minutes, then turn the panel's a off for the ...
...outlet. Continuing to "7.2 Cleaning Methods." 7.2 Cleaning Methods Before cleaning your dealer or Pioneer Customer Support (see back cover). To clean the screen surface, gently wipe it back on the flat panel display. Rubbing hard on the display for the front bezel. What can clear the...example) for a length of plasma technology. Do not use the same type of soft cloth (e.g., cotton, flannel, etc.). Plug in . • Set Long Life Settings to prevent image retention or burn-in the panel again after one (1) or more minutes, then turn the panel's a off for the ...
Owner's Manual
Page 77
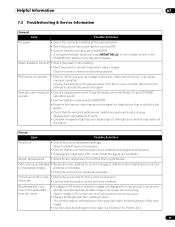
... shorter periods over several days, an after-image may cause improper operation. Watch images in lighting such as possible to burning. Unplug the panel from the center • If images in front of the main image. • Use the Long Life Settings function (...side masks for the brightness of the Room Light Sensor. off screen • Confirm that the position of the picture is compatible. Panel does not operate • External influences such as necessary. Helpful Information 07 7.3 Troubleshooting & Service Information General Issue Possible Solutions No power...
... shorter periods over several days, an after-image may cause improper operation. Watch images in lighting such as possible to burning. Unplug the panel from the center • If images in front of the main image. • Use the Long Life Settings function (...side masks for the brightness of the Room Light Sensor. off screen • Confirm that the position of the picture is compatible. Panel does not operate • External influences such as necessary. Helpful Information 07 7.3 Troubleshooting & Service Information General Issue Possible Solutions No power...
Owner's Manual
Page 82
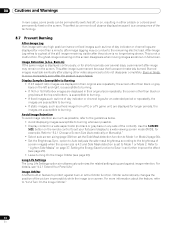
...but do not disappear completely. Refer to "5.2.1 Choose a Screen Size (Automatically or Manually)." • Select auto screen sizing (page 33) then set your flat panel display to a wide-viewing screen mode (WIDE, for more information about the feature, refer to Mode 1 or Mode 2. For details, see page 29). ...; If fixed images such as time of day indicator or channel logs are susceptible to all plasma displays because it is the Orbiter function. Burn-in either a black or colored pixel permanently fixed on the remote control to set the Side Mask detection function to the brightness ...
...but do not disappear completely. Refer to "5.2.1 Choose a Screen Size (Automatically or Manually)." • Select auto screen sizing (page 33) then set your flat panel display to a wide-viewing screen mode (WIDE, for more information about the feature, refer to Mode 1 or Mode 2. For details, see page 29). ...; If fixed images such as time of day indicator or channel logs are susceptible to all plasma displays because it is the Orbiter function. Burn-in either a black or colored pixel permanently fixed on the remote control to set the Side Mask detection function to the brightness ...