
Owner's Manual
Page 23
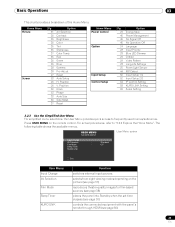
... the set time elapses (see page 30) controls the connected equipment with the panel's remote through HDMI (see page 56) 23 En USER MENU FLAT PANEL DISPLAY User Menu screen Input Change AV Selection Film Mode Sleep Timer KURO LINK : Standard : Off Exit User Menu Input Change AV Selection Film Mode Sleep Timer KURO LINK... 38 38 27 53 26 26 53 53 33 36 37 Option AV Selection Contrast Brightness Color Tint Sharpness Color Temp Red Green Blue Gamma Pro Adjust Reset Auto Setup H.
... the set time elapses (see page 30) controls the connected equipment with the panel's remote through HDMI (see page 56) 23 En USER MENU FLAT PANEL DISPLAY User Menu screen Input Change AV Selection Film Mode Sleep Timer KURO LINK : Standard : Off Exit User Menu Input Change AV Selection Film Mode Sleep Timer KURO LINK... 38 38 27 53 26 26 53 53 33 36 37 Option AV Selection Contrast Brightness Color Tint Sharpness Color Temp Red Green Blue Gamma Pro Adjust Reset Auto Setup H.

Owner's Manual
Page 26
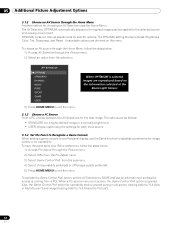
...to exit the menu. 26 En Picture Image Position Each input source stores the picture adjustment settings for that view. Contrast is set to exit the menu. 04 Basic Picture Adjustment For standard picture adjustments, follow the steps below.... 1 ) Access H.Position or V.Position through the Screen menu. AV Selection Contrast Brightness Color Tint Sharpness Color Temp Red Green Blue Gamma Pro Adjust Reset Picture : STANDARD : 40 : 0 : ...
...to exit the menu. 26 En Picture Image Position Each input source stores the picture adjustment settings for that view. Contrast is set to exit the menu. 04 Basic Picture Adjustment For standard picture adjustments, follow the steps below.... 1 ) Access H.Position or V.Position through the Screen menu. AV Selection Contrast Brightness Color Tint Sharpness Color Temp Red Green Blue Gamma Pro Adjust Reset Picture : STANDARD : 40 : 0 : ...
Owner's Manual
Page 32
... ignored during multi-screen viewing (refer to "5.4 View in a normally bright room • USER: allows customizing the settings for each input source 5.1.4 Set the Panel to Recognize a Game Console When adding a game console to your Game preference, follow the steps below . 1 ) Access... Pro Adjust through the Picture menu. 2 ) Select Other from the submenu. option, set the AV Selection to GAME and use the Game function to exit...
... ignored during multi-screen viewing (refer to "5.4 View in a normally bright room • USER: allows customizing the settings for each input source 5.1.4 Set the Panel to Recognize a Game Console When adding a game console to your Game preference, follow the steps below . 1 ) Access... Pro Adjust through the Picture menu. 2 ) Select Other from the submenu. option, set the AV Selection to GAME and use the Game function to exit...
Owner's Manual
Page 36
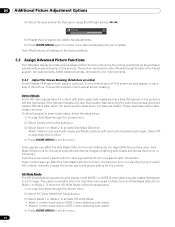
... offered through Pioneer's Pro Adjust support, top quality blacks, better balanced whites, and overall color improvements. 5.3.1 Adjust for any additional adjustments. 6 ) Press HOME MENU again to exit the menu after all settings to the factory defaults. 5.3 Assign Advanced Picture Functions Your flat panel display provides ... 1 or Mode 2 to activate Side Mask Detection. Detect Masks Some HD video signals have 4:3 content with side masks. When the panel is set to Wide Zoom and Side Mask Detection to Mode 1 or Mode 2. Select Off to deactivate this manual. This option is available when...
... offered through Pioneer's Pro Adjust support, top quality blacks, better balanced whites, and overall color improvements. 5.3.1 Adjust for any additional adjustments. 6 ) Press HOME MENU again to exit the menu after all settings to the factory defaults. 5.3 Assign Advanced Picture Functions Your flat panel display provides ... 1 or Mode 2 to activate Side Mask Detection. Detect Masks Some HD video signals have 4:3 content with side masks. When the panel is set to Wide Zoom and Side Mask Detection to Mode 1 or Mode 2. Select Off to deactivate this manual. This option is available when...
Owner's Manual
Page 38
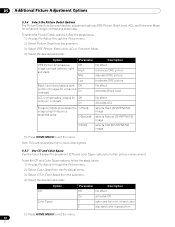
... characteristics (gamma characteristics). The function supports both film and text material. To set the PureCinema level for HD picture quality. Mode Parameter Description Film Mode Off deactivates...option to exit the menu. 5.3.4 Select a PureCinema Level for High Quality Image Pioneer's PureCinema automatically detects and analyses a film-based source (originally encoded at 24 ...recreates each frame for your HD material, follow the directions below . 1 ) Access Pro Adjust through 5 from the Pro Adjust menu. 3 ) Select Film Mode or Text Optimization, depending on the material...
... characteristics (gamma characteristics). The function supports both film and text material. To set the PureCinema level for HD picture quality. Mode Parameter Description Film Mode Off deactivates...option to exit the menu. 5.3.4 Select a PureCinema Level for High Quality Image Pioneer's PureCinema automatically detects and analyses a film-based source (originally encoded at 24 ...recreates each frame for your HD material, follow the directions below . 1 ) Access Pro Adjust through 5 from the Pro Adjust menu. 3 ) Select Film Mode or Text Optimization, depending on the material...

Owner's Manual
Page 39
... quality, tint and brightness changes may be visible. setting under the Option menu disables the PureCinema setting. This setting applies only to exit the menu. To select the Intelligent Mode, follow the steps below. 1 ) Access Pro Adjust through the Picture menu. 2 ) Select Intelligent... Mode from the Pro Adjust menu. 3 ) Select Mode 1 or Mode 2 (or Off ). ...
... quality, tint and brightness changes may be visible. setting under the Option menu disables the PureCinema setting. This setting applies only to exit the menu. To select the Intelligent Mode, follow the steps below. 1 ) Access Pro Adjust through the Picture menu. 2 ) Select Intelligent... Mode from the Pro Adjust menu. 3 ) Select Mode 1 or Mode 2 (or Off ). ...
Owner's Manual
Page 40
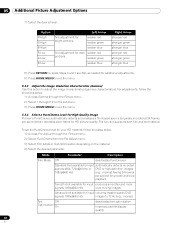
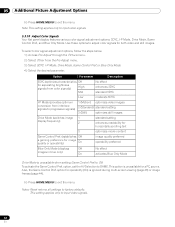
...images for enhanced contrast) On No effect activates Black Level ACL (compensates images for enhanced image contrast and sharpness. Note: This setting applies only to input video signals. 5.3.7 Use CTI and Color Space Use the Color Transient Improvement (CTI) and Color Space ... selects Natural (SHARPNESS) image 3 (Soft) selects Soft (SHARPNESS) image 5 ) Press HOME MENU to exit the menu. 40 En To set the CTI and Color Space options, follow the steps below . 1 ) Access Pro Adjust through the Picture menu. 2 ) Select Picture Detail from the submenu. 4 ) Select the desired parameter.
...images for enhanced contrast) On No effect activates Black Level ACL (compensates images for enhanced image contrast and sharpness. Note: This setting applies only to input video signals. 5.3.7 Use CTI and Color Space Use the Color Transient Improvement (CTI) and Color Space ... selects Natural (SHARPNESS) image 3 (Soft) selects Soft (SHARPNESS) image 5 ) Press HOME MENU to exit the menu. 40 En To set the CTI and Color Space options, follow the steps below . 1 ) Access Pro Adjust through the Picture menu. 2 ) Select Picture Detail from the submenu. 4 ) Select the desired parameter.

Owner's Manual
Page 41
To set the Color Management option, follow the steps below . 1 ) Access Pro Adjust through the Picture menu. 2 ) Select Noise Reduction from the Pro Adjust menu. 3 ) Select 3DNR, Field NR, Block NR or Mosquito NR. 4 ) Select the desired parameter. Option Parameter Description... This setting applies only to the table below for available video noise reduction. Refer to input video signals. 5.3.9 Reduce Noise from the submenu. 4 ) Select the desired parameter. 5 ) Select the desired level. To select the Noise Reduction options, follow the steps below . 1 ) Access Pro Adjust ...
To set the Color Management option, follow the steps below . 1 ) Access Pro Adjust through the Picture menu. 2 ) Select Noise Reduction from the Pro Adjust menu. 3 ) Select 3DNR, Field NR, Block NR or Mosquito NR. 4 ) Select the desired parameter. Option Parameter Description... This setting applies only to the table below for available video noise reduction. Refer to input video signals. 5.3.9 Reduce Noise from the submenu. 4 ) Select the desired parameter. 5 ) Select the desired level. To select the Noise Reduction options, follow the steps below . 1 ) Access Pro Adjust ...
Owner's Manual
Page 42
...4 ) Select the desired parameter. Notes: Reset returns all settings to input video signals. 42 En To select color signal adjustment options, follow the steps below. 1 ) Access Pro Adjust through the Picture menu. 2 ) Select Other from interlace...setting enhances readability for horizontally scrolling text 3 optimizes movie content Game Control Pref. (establishes Off a gaming preference for operability (On) is ignored during multi-screen viewing (page 43) or image freezes (page 44). 5 ) Press HOME MENU to input video signals. 5.3.10 Adjust Color Signals Your flat panel...
...4 ) Select the desired parameter. Notes: Reset returns all settings to input video signals. 42 En To select color signal adjustment options, follow the steps below. 1 ) Access Pro Adjust through the Picture menu. 2 ) Select Other from interlace...setting enhances readability for horizontally scrolling text 3 optimizes movie content Game Control Pref. (establishes Off a gaming preference for operability (On) is ignored during multi-screen viewing (page 43) or image freezes (page 44). 5 ) Press HOME MENU to input video signals. 5.3.10 Adjust Color Signals Your flat panel...


