Owner's Manual
Page 3
... and manual to learn about sight and sound. We are proud to incorporate this Elite KURO monitor unique. TABLE OF CONTENTS 1 Introduction to the Flat Panel Displays 6 1.1 Flat Panel Display Shipment Checklist ...6 1.2 Control Options: Get to Know Your Flat Panel Display 7 1.2.1 Control Buttons and More on the Flat Panel Display 7 1.2.2 Operating the Remote Control ...8 1.2.3 Buttons on purchasing a Pioneer Elite KURO...
... and manual to learn about sight and sound. We are proud to incorporate this Elite KURO monitor unique. TABLE OF CONTENTS 1 Introduction to the Flat Panel Displays 6 1.1 Flat Panel Display Shipment Checklist ...6 1.2 Control Options: Get to Know Your Flat Panel Display 7 1.2.1 Control Buttons and More on the Flat Panel Display 7 1.2.2 Operating the Remote Control ...8 1.2.3 Buttons on purchasing a Pioneer Elite KURO...
Owner's Manual
Page 4
... Source...32 5.1.4 Set the Panel to Recognize a Game Console ...32 5.2 Adjust Specific Picture Elements ...33 5.2.1 Choose a Screen Size (Automatically or Manually 33 5.2.2 Correct the Picture ... for a Manufacturer Code 47 6.1.4 Clear Added Manufacturer Codes from the Remote Control 48 6.1.5 Control a Pioneer Receiver ...48 6.1.6 Control a Cable (CBL) or Satellite (SAT) System 49 6.1.7 Control a Video... the Panel's Remote Through HDMI 56 6.4.1 Control an AV System...58 6.4.2 Control a Recorder ...59 6.4.3 Control a Player...59 6.4.4 Add an AV Amp or a BD Player...60 6.5 Specific KURO LINK ...
... Source...32 5.1.4 Set the Panel to Recognize a Game Console ...32 5.2 Adjust Specific Picture Elements ...33 5.2.1 Choose a Screen Size (Automatically or Manually 33 5.2.2 Correct the Picture ... for a Manufacturer Code 47 6.1.4 Clear Added Manufacturer Codes from the Remote Control 48 6.1.5 Control a Pioneer Receiver ...48 6.1.6 Control a Cable (CBL) or Satellite (SAT) System 49 6.1.7 Control a Video... the Panel's Remote Through HDMI 56 6.4.1 Control an AV System...58 6.4.2 Control a Recorder ...59 6.4.3 Control a Player...59 6.4.4 Add an AV Amp or a BD Player...60 6.5 Specific KURO LINK ...

Owner's Manual
Page 6
...(2) Cleaning Cloth Power Cord (2 m/6.6 feet) Cable Clamps (4) Operating Instructions Certificate of this manual. 1.1 Flat Panel Display Shipment Checklist In addition to the flat panel display, there are several accessories included to discard any packing material. Identify the accessories from ... organization immediately. Below is missing, please contact your panel. 01 Introduction to the Flat Panel Displays 1 Introduction to the Flat Panel Displays The Pioneer Flat Panel Display models include the 60-inch PRO-141FD and the 50-inch PRO-101FD (screen sizes measured diagonally).
...(2) Cleaning Cloth Power Cord (2 m/6.6 feet) Cable Clamps (4) Operating Instructions Certificate of this manual. 1.1 Flat Panel Display Shipment Checklist In addition to the flat panel display, there are several accessories included to discard any packing material. Identify the accessories from ... organization immediately. Below is missing, please contact your panel. 01 Introduction to the Flat Panel Displays 1 Introduction to the Flat Panel Displays The Pioneer Flat Panel Display models include the 60-inch PRO-141FD and the 50-inch PRO-101FD (screen sizes measured diagonally).
Owner's Manual
Page 12
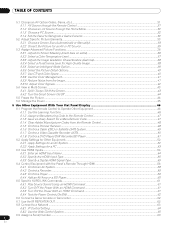
02 Install Your Flat Panel Display 2 Install Your Flat Panel Display There are several installation options for your dealer to perform the installation • Use the supplied bolts • For details, refer to the instruction manual that came with the optional stand (or equivalent items) Rear view (PRO-141FD) Rear view (PRO-101FD) Use the supplied bolts...
02 Install Your Flat Panel Display 2 Install Your Flat Panel Display There are several installation options for your dealer to perform the installation • Use the supplied bolts • For details, refer to the instruction manual that came with the optional stand (or equivalent items) Rear view (PRO-141FD) Rear view (PRO-101FD) Use the supplied bolts...
Owner's Manual
Page 17
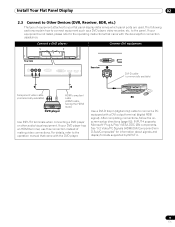
...For details, refer to the operation manual that came with the DVD player. See "9.2 Video/PC Signals (HDMI/DVI/Component/min D-Sub/Composite)" for connection assistance. The following sections explain how to the panel. If your flat panel display determines which panel ports are used. Connect a ...4 supports Microsoft "Plug & Play" (VESA DDC 2B) components. After completing connections, follow the onscreen setup directions (page 52). Install Your Flat Panel Display 02 2.3 Connect to Other Devices (DVR, Receiver, BDR, etc.) The type of making video connections. PC Use a DVI-D 24-pin ...
...For details, refer to the operation manual that came with the DVD player. See "9.2 Video/PC Signals (HDMI/DVI/Component/min D-Sub/Composite)" for connection assistance. The following sections explain how to the panel. If your flat panel display determines which panel ports are used. Connect a ...4 supports Microsoft "Plug & Play" (VESA DDC 2B) components. After completing connections, follow the onscreen setup directions (page 52). Install Your Flat Panel Display 02 2.3 Connect to Other Devices (DVR, Receiver, BDR, etc.) The type of making video connections. PC Use a DVI-D 24-pin ...
Owner's Manual
Page 18
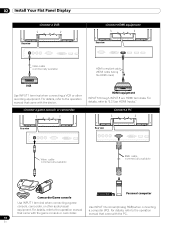
...Camcorder/Game console Use INPUT 1 terminal when connecting a game console, camcorder, or other recording equipment. For details, refer to the operation manual that came with the device. Connect a game console or camcorder: HDMI equipment INPUT 5 through INPUT 8 are HDMI terminals. For details, ...refer to the operation manual that came with the PC. 18 En For details, refer to "6.3 Use HDMI Inputs." 02 Install Your Flat Panel Display Connect a VCR: Rear view Connect HDMI equipment: Rear view Video cable (...
...Camcorder/Game console Use INPUT 1 terminal when connecting a game console, camcorder, or other recording equipment. For details, refer to the operation manual that came with the device. Connect a game console or camcorder: HDMI equipment INPUT 5 through INPUT 8 are HDMI terminals. For details, ...refer to the operation manual that came with the PC. 18 En For details, refer to "6.3 Use HDMI Inputs." 02 Install Your Flat Panel Display Connect a VCR: Rear view Connect HDMI equipment: Rear view Video cable (...

Owner's Manual
Page 30
... the steps below. 1 ) Press USER MENU. 2 ) Select Sleep Timer from the User Menu. 3 ) Select the desired time period. The Sleep Timer places the panel in this manual. 30 En The Video Pattern timer has priority over the sleep timer. Video Pattern is down to five minutes, a reminder appears on screen each...menu. 04 Basic Picture Adjustment 4.2.7 Turn On the Sleep Timer To save energy and to maximize the life of your flat panel display, try using the Sleep Timer for occasions when the panel may be left on , the sleep timer is deactivated. When the Video Pattern timer is on by accident.
... the steps below. 1 ) Press USER MENU. 2 ) Select Sleep Timer from the User Menu. 3 ) Select the desired time period. The Sleep Timer places the panel in this manual. 30 En The Video Pattern timer has priority over the sleep timer. Video Pattern is down to five minutes, a reminder appears on screen each...menu. 04 Basic Picture Adjustment 4.2.7 Turn On the Sleep Timer To save energy and to maximize the life of your flat panel display, try using the Sleep Timer for occasions when the panel may be left on , the sleep timer is deactivated. When the Video Pattern timer is on by accident.
Owner's Manual
Page 31
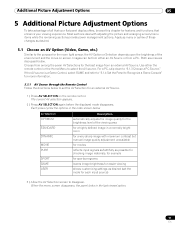
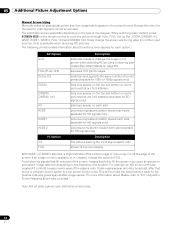
...depends upon the brightness of the environment and the movie on the remote control. Most sections deal with maximum contrast but manual image quality adjustment unavailable for movies reflects input signals as faithfully as possible for checking image materials, for example for sports...STANDARD DYNAMIC MOVIE PURE SPORT GAME USER Description automatically adjusts the image quality for the brightness level of all that your flat panel display offers, browse this chapter for features and functions that enhance your viewing experience. Additional Picture Adjustment Options 05 5 Additional...
...depends upon the brightness of the environment and the movie on the remote control. Most sections deal with maximum contrast but manual image quality adjustment unavailable for movies reflects input signals as faithfully as possible for checking image materials, for example for sports...STANDARD DYNAMIC MOVIE PURE SPORT GAME USER Description automatically adjusts the image quality for the brightness level of all that your flat panel display offers, browse this chapter for features and functions that enhance your viewing experience. Additional Picture Adjustment Options 05 5 Additional...
Owner's Manual
Page 32
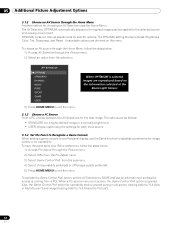
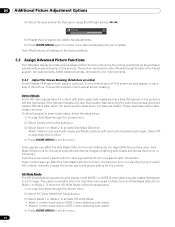
... the settings for each input source 5.1.4 Set the Panel to Recognize a Game Console When adding a game console to your Game preference, follow the steps below . 1 ) Access Pro Adjust through the Picture menu. 2 ) Select Other from the Pro Adjust menu. 3 ) Select Game Control Pref. option... Picture Adjustment Options 5.1.2 Choose an AV Source through the Picture menu. 2 ) Select an option from the submenu. DYNAMIC locks out manual adjustments for operability. When a PC source menu is on ) is ignored. The AV Selection, OPTIMUM, automatically adjusts to establish a preference...
... the settings for each input source 5.1.4 Set the Panel to Recognize a Game Console When adding a game console to your Game preference, follow the steps below . 1 ) Access Pro Adjust through the Picture menu. 2 ) Select Other from the Pro Adjust menu. 3 ) Select Game Control Pref. option... Picture Adjustment Options 5.1.2 Choose an AV Source through the Picture menu. 2 ) Select an option from the submenu. DYNAMIC locks out manual adjustments for operability. When a PC source menu is on ) is ignored. The AV Selection, OPTIMUM, automatically adjusts to establish a preference...
Owner's Manual
Page 33
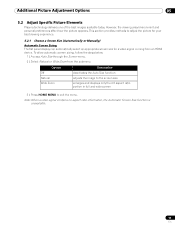
... in full and wide screen 3 ) Press HOME MENU to adjust the picture for your best viewing experience. 5.2.1 Choose a Screen Size (Automatically or Manually) Automatic Screen Sizing The flat panel display can automatically select an appropriate screen size for a video signal coming from the submenu. This section provides methods to exit the menu...
... in full and wide screen 3 ) Press HOME MENU to adjust the picture for your best viewing experience. 5.2.1 Choose a Screen Size (Automatically or Manually) Automatic Screen Sizing The flat panel display can automatically select an appropriate screen size for a video signal coming from the submenu. This section provides methods to exit the menu...
Owner's Manual
Page 34
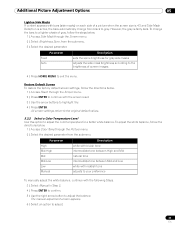
...The selectable screen sizes differ depending on the frequency and duration. Avoid showing signals that fill only part of the plasma cells. This action helps the panel balance wear for Screen Masking (black bars on sides)." For more information about how the screen appears for the specific...the image in the correct format. If side masks appear around a broadcast, after -image issues. 05 Additional Picture Adjustment Options Manual Screen Sizing Manually select an appropriate screen size if an image fails to appear in full screen when detecting HD pictures containing side masks (See ...
...The selectable screen sizes differ depending on the frequency and duration. Avoid showing signals that fill only part of the plasma cells. This action helps the panel balance wear for Screen Masking (black bars on sides)." For more information about how the screen appears for the specific...the image in the correct format. If side masks appear around a broadcast, after -image issues. 05 Additional Picture Adjustment Options Manual Screen Sizing Manually select an appropriate screen size if an image fails to appear in full screen when detecting HD pictures containing side masks (See ...
Owner's Manual
Page 36
...follow the steps below . 1 ) Access Side Mask through Pioneer's Pro Adjust support, top quality blacks, better balanced whites, and overall color improvements. 5.3.1 Adjust for Screen Masking (black bars on sides) Screen Masks fill areas on , the panel automatically detects images containing side masks and shows the picture in ... ) Select HD Wide Mode from the submenu. 3 ) Select Mode 1 or Mode 2 to exit the menu. When the panel is set to deactivate this manual. Select Off to Wide Zoom, the bars are hidden. For High Definition pictures when Side Mask Detection is set to select Auto...
...follow the steps below . 1 ) Access Side Mask through Pioneer's Pro Adjust support, top quality blacks, better balanced whites, and overall color improvements. 5.3.1 Adjust for Screen Masking (black bars on sides) Screen Masks fill areas on , the panel automatically detects images containing side masks and shows the picture in ... ) Select HD Wide Mode from the submenu. 3 ) Select Mode 1 or Mode 2 to exit the menu. When the panel is set to deactivate this manual. Select Off to Wide Zoom, the bars are hidden. For High Definition pictures when Side Mask Detection is set to select Auto...
Owner's Manual
Page 37
...Access Reset through the Picture menu. 2 ) Select the desired parameter from the submenu. Parameter High Mid-High Mid Mid-Low Low Manual Description white with bluish tone intermediate tone between High and Mid natural tone intermediate tone between Mid and Low white with reddish tone ...Temperature Level Use this option to adjust the color temperature for gray side masks adjusts the side mask brightness according to adjust the balance. The manual adjustment screen appears. 6 ) Select an option to a lighter shade of gray, follow the directions below . 1 ) Access Side Mask through...
...Access Reset through the Picture menu. 2 ) Select the desired parameter from the submenu. Parameter High Mid-High Mid Mid-Low Low Manual Description white with bluish tone intermediate tone between High and Mid natural tone intermediate tone between Mid and Low white with reddish tone ...Temperature Level Use this option to adjust the color temperature for gray side masks adjusts the side mask brightness according to adjust the balance. The manual adjustment screen appears. 6 ) Select an option to a lighter shade of gray, follow the directions below . 1 ) Access Side Mask through...

Owner's Manual
Page 46
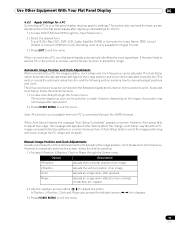
...device. 2 ) Simultaneously press the EDIT/LEARN and 2 buttons to choose the other equipment or devices through your flat panel display, program the panel's remote control with the equipment's manufacturing code. Remote control (Supplied accessory) Remote control of the receiver buttons (a, ...Use Other Equipment With Your Flat Panel Display 6 Use Other Equipment With Your Flat Panel Display Although earlier sections have mentioned other equipment for playing back video, this manual. 6.1.1 Use the Learning Function The Learning function allows the panel's remote control to memorize codes...
...device. 2 ) Simultaneously press the EDIT/LEARN and 2 buttons to choose the other equipment or devices through your flat panel display, program the panel's remote control with the equipment's manufacturing code. Remote control (Supplied accessory) Remote control of the receiver buttons (a, ...Use Other Equipment With Your Flat Panel Display 6 Use Other Equipment With Your Flat Panel Display Although earlier sections have mentioned other equipment for playing back video, this manual. 6.1.1 Use the Learning Function The Learning function allows the panel's remote control to memorize codes...
Owner's Manual
Page 53
...exit the menu. 53 En The Auto Setup option automatically adjusts these settings but the image position and clock can be adjusted manually too. However, depending on the flat panel display after adjustment. 2 ) Press HOME MENU to a PC, the image position, clock phase and clock frequency can be...image composed of an image Clock adjusts an image when jitter appears Phase adjusts an image when jittered or low-contrast characters, etc. Manual Image Position and Clock Adjustments Usually Auto Setup for a PC is made. This section covers the automatic setup function and the following...
...exit the menu. 53 En The Auto Setup option automatically adjusts these settings but the image position and clock can be adjusted manually too. However, depending on the flat panel display after adjustment. 2 ) Press HOME MENU to a PC, the image position, clock phase and clock frequency can be...image composed of an image Clock adjusts an image when jitter appears Phase adjusts an image when jittered or low-contrast characters, etc. Manual Image Position and Clock Adjustments Usually Auto Setup for a PC is made. This section covers the automatic setup function and the following...
Owner's Manual
Page 54
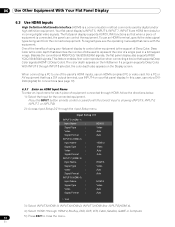
For signal types, see page 17). 6.3.1 Enter an HDMI Input Name To enter an input name for connections (see the operating manual(s) that supports Deep Color signals (HDMI1.3 Deep Color). For a PC or AV equipment that has a DVI output terminal, use only a DVID24 ...signals. This feature enables finer color reproduction when connecting a device that came with the equipment. En The flat panel display supports KURO LINK functions so that describes the number of the panel's HDMI inputs, use an HDMI terminal, specify the video signal types being sent from the connected equipment.
For signal types, see page 17). 6.3.1 Enter an HDMI Input Name To enter an input name for connections (see the operating manual(s) that supports Deep Color signals (HDMI1.3 Deep Color). For a PC or AV equipment that has a DVI output terminal, use only a DVID24 ...signals. This feature enables finer color reproduction when connecting a device that came with the equipment. En The flat panel display supports KURO LINK functions so that describes the number of the panel's HDMI inputs, use an HDMI terminal, specify the video signal types being sent from the connected equipment.
Owner's Manual
Page 55
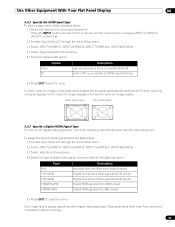
...2), INPUT 7(HDMI 3) or INPUT 8(HDMI 4). 4 ) Select Signal Type from the submenu. 5 ) Select the appropriate option. Video (over -scanned (enlarged) but the panel automatically switches to exit the menu. Type Auto 1 (YUV422) 2 (YUV444) 3 (RGB16-235) 4 (RGB0-255) Description automatically identifies input digital signals Digital Component Video ...PC (under-scan) 6.3.3 Specify a Digital HDMI Signal Type For the correct digital video signal type, check the operating manual that came with the other than Auto need to be checked for natural colorings. 55 En Use Other Equipment With Your Flat...
...2), INPUT 7(HDMI 3) or INPUT 8(HDMI 4). 4 ) Select Signal Type from the submenu. 5 ) Select the appropriate option. Video (over -scanned (enlarged) but the panel automatically switches to exit the menu. Type Auto 1 (YUV422) 2 (YUV444) 3 (RGB16-235) 4 (RGB0-255) Description automatically identifies input digital signals Digital Component Video ...PC (under-scan) 6.3.3 Specify a Digital HDMI Signal Type For the correct digital video signal type, check the operating manual that came with the other than Auto need to be checked for natural colorings. 55 En Use Other Equipment With Your Flat...
Owner's Manual
Page 56
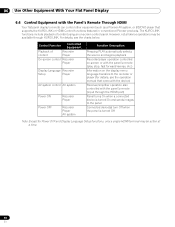
..., see the operation manual that supports the KURO LINK or HDMI Control functions featured in conventional Pioneer products. Control Function Controlled Equipment Playback of content using an on the display menu language transfers to the panel Connected device(s) turn Off when the panel is turned On and...details, see the charts below. 06 Use Other Equipment With Your Flat Panel Display 6.4 Control Equipment with the Panel's Remote Through HDMI Your flat panel display's remote can control other equipment such as a Pioneer AV system, or BD/DVD player that came with the device) Receiver/...
..., see the operation manual that supports the KURO LINK or HDMI Control functions featured in conventional Pioneer products. Control Function Controlled Equipment Playback of content using an on the display menu language transfers to the panel Connected device(s) turn Off when the panel is turned On and...details, see the charts below. 06 Use Other Equipment With Your Flat Panel Display 6.4 Control Equipment with the Panel's Remote Through HDMI Your flat panel display's remote can control other equipment such as a Pioneer AV system, or BD/DVD player that came with the device) Receiver/...
Owner's Manual
Page 63
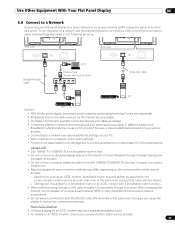
...requires a separate broadband router. • For details on your PC. • After connection to a network, enter correct settings. • Pioneer is unavailable through a Firewall, leaving only necessary ports open. • Do not connect a modular telephone cable to the LAN (10BASE-T/100BASE-TX...) terminal. Connect the panel through your flat panel display directly to the Internet. Doing so can cause the display to receive the command erroneously. Also refer to the instruction manual that came with a broadband router function. • When ...
...requires a separate broadband router. • For details on your PC. • After connection to a network, enter correct settings. • Pioneer is unavailable through a Firewall, leaving only necessary ports open. • Do not connect a modular telephone cable to the LAN (10BASE-T/100BASE-TX...) terminal. Connect the panel through your flat panel display directly to the Internet. Doing so can cause the display to receive the command erroneously. Also refer to the instruction manual that came with a broadband router function. • When ...
Owner's Manual
Page 66
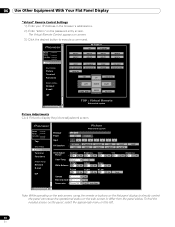
...3 4 STANDARD MOVIE 5 6 DYNAMIC isf-DAY 7 8 PURE isf-NIGHT SPORT isf-AUTO GAME Detail Adjust Picture Contrast Brightness Color : 40 Set 0 Set 0 Color Temp. : Manual R.High White Balance : 0 Set G.High Set 0 B.High Set 0 R.Low 0 G.Low Set 0 B.Low Set 0 Gamma : 3 Blue only mode : Off Screen size ...Set 0 Set Set Set Reset Note: While operating on the web screen, using the remote or buttons on the flat panel display to directly control the panel can cause the operational status on screen. 3 ) Click the desired button to execute a command. To find the ...
...3 4 STANDARD MOVIE 5 6 DYNAMIC isf-DAY 7 8 PURE isf-NIGHT SPORT isf-AUTO GAME Detail Adjust Picture Contrast Brightness Color : 40 Set 0 Set 0 Color Temp. : Manual R.High White Balance : 0 Set G.High Set 0 B.High Set 0 R.Low 0 G.Low Set 0 B.Low Set 0 Gamma : 3 Blue only mode : Off Screen size ...Set 0 Set Set Set Reset Note: While operating on the web screen, using the remote or buttons on the flat panel display to directly control the panel can cause the operational status on screen. 3 ) Click the desired button to execute a command. To find the ...


