Owner's Manual
Page 2
... receptacles, and the point where they exit from the apparatus. 11) Only use attachments/accessories specified by the manufacturer. 12) Use only with the cart, stand, tripod, bracket, or table specified by the manufacturer, or sold with a properly grounded one wider than the other reproductive harm. NO USERSERVICEABLE PARTS INSIDE. The...
... receptacles, and the point where they exit from the apparatus. 11) Only use attachments/accessories specified by the manufacturer. 12) Use only with the cart, stand, tripod, bracket, or table specified by the manufacturer, or sold with a properly grounded one wider than the other reproductive harm. NO USERSERVICEABLE PARTS INSIDE. The...
Owner's Manual
Page 3
... CONTENTS 1 Introduction to the Flat Panel Displays 6 1.1 Flat Panel Display Shipment Checklist ...6 1.2 Control Options: Get to Know Your Flat Panel Display 7 1.2.1 Control Buttons and More on the Flat Panel Display 7 1.2.2 Operating the Remote Control ...8 1.2.3 Buttons on purchasing a Pioneer Elite KURO monitor. This exclusive series of Elite KURO monitors does just that make the Elite KURO monitor one of the finest in...
... CONTENTS 1 Introduction to the Flat Panel Displays 6 1.1 Flat Panel Display Shipment Checklist ...6 1.2 Control Options: Get to Know Your Flat Panel Display 7 1.2.1 Control Buttons and More on the Flat Panel Display 7 1.2.2 Operating the Remote Control ...8 1.2.3 Buttons on purchasing a Pioneer Elite KURO monitor. This exclusive series of Elite KURO monitors does just that make the Elite KURO monitor one of the finest in...

Owner's Manual
Page 6
...discard any packing material. Please check contents before discarding or allowing your dealer or our Service organization immediately. Shipped with your panel. Service contact information is a list of all accessories shipped with both models Remote Control Batteries for Remote (2) Cleaning Cloth Power... your installer to the Flat Panel Displays The Pioneer Flat Panel Display models include the 60-inch PRO-141FD and the 50-inch PRO-101FD (screen sizes measured diagonally). You will need a Philips screwdriver if removing or attaching the stand. Below is listed on the...
...discard any packing material. Please check contents before discarding or allowing your dealer or our Service organization immediately. Shipped with your panel. Service contact information is a list of all accessories shipped with both models Remote Control Batteries for Remote (2) Cleaning Cloth Power... your installer to the Flat Panel Displays The Pioneer Flat Panel Display models include the 60-inch PRO-141FD and the 50-inch PRO-101FD (screen sizes measured diagonally). You will need a Philips screwdriver if removing or attaching the stand. Below is listed on the...
Owner's Manual
Page 12
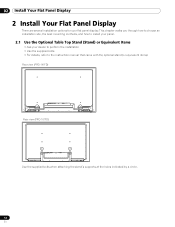
.... 02 Install Your Flat Panel Display 2 Install Your Flat Panel Display There are several installation options for your dealer to perform the installation • Use the supplied bolts • For details, refer to the instruction manual that came with the optional stand (or equivalent items) Rear view (PRO-141FD) Rear view (PRO-101FD) Use the supplied...
.... 02 Install Your Flat Panel Display 2 Install Your Flat Panel Display There are several installation options for your dealer to perform the installation • Use the supplied bolts • For details, refer to the instruction manual that came with the optional stand (or equivalent items) Rear view (PRO-141FD) Rear view (PRO-101FD) Use the supplied...
Owner's Manual
Page 14
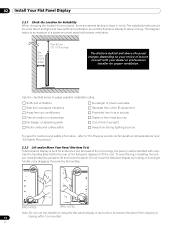
... to lift and move the flat panel display by holding only a single handle or by dragging the panel by its handles. (PRO-141FD) (PRO-101FD) Note: Do not use the handles to hang the flat panel display or as anchors to prevent the panel from strong lighting sources For specific ...site should be handled with proper ventilation. Consult with your dealer or professional installer for your choice of a stand-mounted panel with care. Do not move the panel. Sufficient ventilation Safe from excessive vibrations Away from air conditioners Free of moisture or dampness No danger of splashing ...
... to lift and move the flat panel display by holding only a single handle or by dragging the panel by its handles. (PRO-141FD) (PRO-101FD) Note: Do not use the handles to hang the flat panel display or as anchors to prevent the panel from strong lighting sources For specific ...site should be handled with proper ventilation. Consult with your dealer or professional installer for your choice of a stand-mounted panel with care. Do not move the panel. Sufficient ventilation Safe from excessive vibrations Away from air conditioners Free of moisture or dampness No danger of splashing ...
Owner's Manual
Page 15
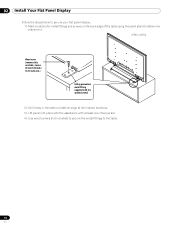
...cord. Fitting 12 mm to 18 mm (0.5 inches to 0.7 inches) M8 (PRO-141FD) To stabilize the flat panel display on a table or platform, use the metal fittings and screws supplied with the optional stand to anchor the panel to purchase hooks, cords, and fittings through your installer or from tipping over.... Recommended hook: Nominal diameter 8 mm (3/8 inch), length 12 mm to 18 mm (0.5 inches to 0.7 inches) To anchor the panel when using a stand, stabilize the panel to anchor the metal fittings when mounting on the back of the wire is attached. Do not use the metal fittings and screws...
...cord. Fitting 12 mm to 18 mm (0.5 inches to 0.7 inches) M8 (PRO-141FD) To stabilize the flat panel display on a table or platform, use the metal fittings and screws supplied with the optional stand to anchor the panel to purchase hooks, cords, and fittings through your installer or from tipping over.... Recommended hook: Nominal diameter 8 mm (3/8 inch), length 12 mm to 18 mm (0.5 inches to 0.7 inches) To anchor the panel when using a stand, stabilize the panel to anchor the metal fittings when mounting on the back of the wire is attached. Do not use the metal fittings and screws...
Owner's Manual
Page 16
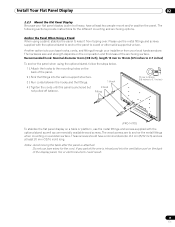
02 Install Your Flat Panel Display Follow the steps below to secure your flat panel display. 1 ) Mark locations for metal fittings and screws on the back edge of the table using the panel stand to determine placement. (PRO-141FD) Wood screw (commercially available, 4 mm x 20 mm (5/32 inch x 13/16... inch) min.) Falling prevention metal fitting (supplied with the optional stand) 2 ) Drill holes in the table or platform edge at...
02 Install Your Flat Panel Display Follow the steps below to secure your flat panel display. 1 ) Mark locations for metal fittings and screws on the back edge of the table using the panel stand to determine placement. (PRO-141FD) Wood screw (commercially available, 4 mm x 20 mm (5/32 inch x 13/16... inch) min.) Falling prevention metal fitting (supplied with the optional stand) 2 ) Drill holes in the table or platform edge at...
Owner's Manual
Page 80
... when not in any material such as blankets, loose cloth, or carpeting as this could block the panel vents. • Use a proper mount or stand rather than leaning the panel against a wall or other than the Pioneer stand or installation brackets may damage the panel or cause a malfunction. 8.3 Usage Guidelines For maximum enjoyment of the flat...
... when not in any material such as blankets, loose cloth, or carpeting as this could block the panel vents. • Use a proper mount or stand rather than leaning the panel against a wall or other than the Pioneer stand or installation brackets may damage the panel or cause a malfunction. 8.3 Usage Guidelines For maximum enjoyment of the flat...

Owner's Manual
Page 83
... for ventilation to excessive vibrations or impact shock. D3-4-2-3-3_En CAUTION: This PRO-141FD for use or store batteries in a damp basement, by operating the equipment on the equipment. Turn OFF the panel before connecting any naked flame sources (such as a lighted candle) on thick...(or strong artificial light) D3-4-2-1-7c_A_En WARNING: Do not use only with KRP-TS01 (Pioneer Corporation.) stand. To avoid danger please follow the instructions below when installing, operating, and cleaning your panel close to +104 ºF); For the minimum space required, see page 14. Use...
... for ventilation to excessive vibrations or impact shock. D3-4-2-3-3_En CAUTION: This PRO-141FD for use or store batteries in a damp basement, by operating the equipment on the equipment. Turn OFF the panel before connecting any naked flame sources (such as a lighted candle) on thick...(or strong artificial light) D3-4-2-1-7c_A_En WARNING: Do not use only with KRP-TS01 (Pioneer Corporation.) stand. To avoid danger please follow the instructions below when installing, operating, and cleaning your panel close to +104 ºF); For the minimum space required, see page 14. Use...


