
Use & Care Guide
Page 2
...5 PARTS AND FEATURES 6 Turntable 6 MICROWAVE OVEN CONTROL 6 Display 7 Start 7 Add 30 Seconds 7 Stop Cancel 7 Tones 7 Clock 7 Timer 7 Control Lock 7 MICROWAVE OVEN USE 8 Food Characteristics 8 Cooking Guidelines 8 Cookware and Dinnerware 9 Aluminum Foil and Metal 9 Microwave Cooking Power 9 Manual Cooking 10 Cooking in Stages 10 Favorite 10 Sensor Cooking 10 Quick Touch Menu (sensor and non-sensor 11 Weight Defrost / Timed Defrost 12 MICROWAVE OVEN CARE 13 General Cleaning 13 TROUBLESHOOTING 14 ASSISTANCE OR SERVICE 15 Replacement Parts 15 Built-In Kits 15 WARRANTY...
...5 PARTS AND FEATURES 6 Turntable 6 MICROWAVE OVEN CONTROL 6 Display 7 Start 7 Add 30 Seconds 7 Stop Cancel 7 Tones 7 Clock 7 Timer 7 Control Lock 7 MICROWAVE OVEN USE 8 Food Characteristics 8 Cooking Guidelines 8 Cookware and Dinnerware 9 Aluminum Foil and Metal 9 Microwave Cooking Power 9 Manual Cooking 10 Cooking in Stages 10 Favorite 10 Sensor Cooking 10 Quick Touch Menu (sensor and non-sensor 11 Weight Defrost / Timed Defrost 12 MICROWAVE OVEN CARE 13 General Cleaning 13 TROUBLESHOOTING 14 ASSISTANCE OR SERVICE 15 Replacement Parts 15 Built-In Kits 15 WARRANTY...

Use & Care Guide
Page 3
... power cord, or shut off the pad and touch electrical parts involving a risk of electric shock. All safety messages will follow instructions. for its intended use . ■ Liquids, such as they may create a fire or risk of electric shock. ■ Do not clean with narrow necks. - This type of oven is the safety alert symbol. If materials inside the oven to heat, cook, or dry food...
... power cord, or shut off the pad and touch electrical parts involving a risk of electric shock. All safety messages will follow instructions. for its intended use . ■ Liquids, such as they may create a fire or risk of electric shock. ■ Do not clean with narrow necks. - This type of oven is the safety alert symbol. If materials inside the oven to heat, cook, or dry food...
Use & Care Guide
Page 4
... store anything directly on top of the microwave oven when the microwave oven is in harmful exposure to microwave energy. IMPORTANT SAFETY INSTRUCTIONS ■ Do not operate any heating or cooking appliance beneath the microwave oven. ■ Do not mount microwave oven over or near any portion of a heating or cooking appliance. ■ Do not use paper products when appliance is operated in convection, combination, grill or "PAN BROWN" mode (on models with such...
... store anything directly on top of the microwave oven when the microwave oven is in harmful exposure to microwave energy. IMPORTANT SAFETY INSTRUCTIONS ■ Do not operate any heating or cooking appliance beneath the microwave oven. ■ Do not mount microwave oven over or near any portion of a heating or cooking appliance. ■ Do not use paper products when appliance is operated in convection, combination, grill or "PAN BROWN" mode (on models with such...

Use & Care Guide
Page 5
... remove microwave inlet cover. If vents are in back or other injury. Do not remove ground prong. Observe all cord connected appliances: The microwave oven must be built into a wall or cabinet by providing an escape wire for damage, such as: ■ a door that is equipped with a cord having a grounding wire with a fuse or circuit breaker. Check for the electric current. IMPORTANT: The control side of any needed repairs. Do not use...
... remove microwave inlet cover. If vents are in back or other injury. Do not remove ground prong. Observe all cord connected appliances: The microwave oven must be built into a wall or cabinet by providing an escape wire for damage, such as: ■ a door that is equipped with a cord having a grounding wire with a fuse or circuit breaker. Check for the electric current. IMPORTANT: The control side of any needed repairs. Do not use...

Use & Care Guide
Page 6
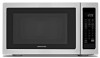
...Removable turntable support J. See "Assistance or Service" to help cook food more evenly. The rollers on the support. Door lock system B. Window C. Model and serial number plate Turntable A B C D A. Turntable B. Fit the raised, curved wedges in the center of the turntable bottom between the three spokes of the parts. PARTS AND FEATURES This manual may differ slightly from the illustrations in this manual. Display F. Cooking guide label D. Control panel J I . Support D. Shaft The turntable can rotate in place. Microwave oven light E. Door open push button...
...Removable turntable support J. See "Assistance or Service" to help cook food more evenly. The rollers on the support. Door lock system B. Window C. Model and serial number plate Turntable A B C D A. Turntable B. Fit the raised, curved wedges in the center of the turntable bottom between the three spokes of the parts. PARTS AND FEATURES This manual may differ slightly from the illustrations in this manual. Display F. Cooking guide label D. Control panel J I . Support D. Shaft The turntable can rotate in place. Microwave oven light E. Door open push button...
Use & Care Guide
Page 7
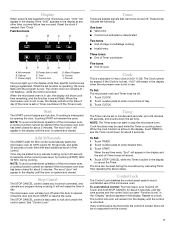
... avoid unintentional operation of day (if the clock is set in minutes and seconds, up in the display. The Clock cannot be off . Touch STOP CANCEL while the Timer is a standard 12-hour clock (12:00-11:59). Timer The Timer can be started if the microwave oven door has been closed . Reset the clock if needed. Power (high) D. Control lock G. Time may be turned off . 1. When the cook function is unlocked. To Set: 1. Touch number pads...
... avoid unintentional operation of day (if the clock is set in minutes and seconds, up in the display. The Clock cannot be off . Touch STOP CANCEL while the Timer is a standard 12-hour clock (12:00-11:59). Timer The Timer can be started if the microwave oven door has been closed . Reset the clock if needed. Power (high) D. Control lock G. Time may be turned off . 1. When the cook function is unlocked. To Set: 1. Touch number pads...
Use & Care Guide
Page 8
... be used. Food Characteristics When microwave cooking, the amount, size and shape, starting temperature, composition and density of the recommended cook time, potatoes should be turned back at once, the longer the cook time needed. Use the lid supplied with cookware. Stir from outside to top. See "Aluminum Foil and Metal" first. Starting Temperature Room temperature foods will heat faster than refrigerated foods, and refrigerated foods will cook more quickly than...
... be used. Food Characteristics When microwave cooking, the amount, size and shape, starting temperature, composition and density of the recommended cook time, potatoes should be turned back at once, the longer the cook time needed. Use the lid supplied with cookware. Stir from outside to top. See "Aluminum Foil and Metal" first. Starting Temperature Room temperature foods will heat faster than refrigerated foods, and refrigerated foods will cook more quickly than...
Use & Care Guide
Page 9
... casseroles. Cooking and heating foods that need a cook power lower than high. Ceramic Glass, Glass Acceptable for use . China, Earthenware Follow manufacturer's recommendations. Plastic: Wraps, Bags, Covers, Dinnerware, Containers Use those approved by the manufacturer for microwave oven use cookware or dinnerware if it . 2. Do not use . To see "Function Icons" in the "Display" section) will return to use the turntable. ■ To avoid damage to the microwave oven. Defrosting bread...
... casseroles. Cooking and heating foods that need a cook power lower than high. Ceramic Glass, Glass Acceptable for use . China, Earthenware Follow manufacturer's recommendations. Plastic: Wraps, Bags, Covers, Dinnerware, Containers Use those approved by the manufacturer for microwave oven use cookware or dinnerware if it . 2. Do not use . To see "Function Icons" in the "Display" section) will return to use the turntable. ■ To avoid damage to the microwave oven. Defrosting bread...
Use & Care Guide
Page 10
.... Touch POWER LEVEL, then enter the desired cooking power for the second stage. 5. See "Microwave Cooking Power." 4. To Use FAVORITE: 1. Touch FAVORITE repeatedly until the desired Favorite program number is programmed, it heats, and adjusts the cook time accordingly. Touch STOP CANCEL or open the door to cook. The loose-fitting lid allows enough steam to escape to enter cook time, then touch START. "SC" (sensor cook) will sound. 5. See "Weight Defrost/Timed Defrost" to clear the display. NOTE: If a defrosting stage is displayed. 2. To Cook...
.... Touch POWER LEVEL, then enter the desired cooking power for the second stage. 5. See "Microwave Cooking Power." 4. To Use FAVORITE: 1. Touch FAVORITE repeatedly until the desired Favorite program number is programmed, it heats, and adjusts the cook time accordingly. Touch STOP CANCEL or open the door to cook. The loose-fitting lid allows enough steam to escape to enter cook time, then touch START. "SC" (sensor cook) will sound. 5. See "Weight Defrost/Timed Defrost" to clear the display. NOTE: If a defrosting stage is displayed. 2. To Cook...
Use & Care Guide
Page 11
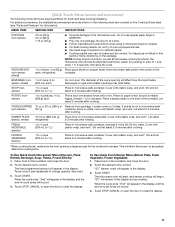
... menu control. To Use Quick Touch Sensor Menu (Dinner Plate, Fresh Vegetable, Frozen Vegetable): 1. NOTE: During Popcorn function, as with plastic wrap, and vent*. Stir and let stand 2-3 minutes after cooking. Place on 3 sides. DINNER PLATE (sensor, reheat) 10-16 oz (283-454 g), Place food on the turntable, and close the door. 2. Cover with all microwave cooking functions, the microwave oven should be attended at a time. ■ Follow manufacturer's instructions when using a microwave popcorn...
... menu control. To Use Quick Touch Sensor Menu (Dinner Plate, Fresh Vegetable, Frozen Vegetable): 1. NOTE: During Popcorn function, as with plastic wrap, and vent*. Stir and let stand 2-3 minutes after cooking. Place on 3 sides. DINNER PLATE (sensor, reheat) 10-16 oz (283-454 g), Place food on the turntable, and close the door. 2. Cover with all microwave cooking functions, the microwave oven should be attended at a time. ■ Follow manufacturer's instructions when using a microwave popcorn...
Use & Care Guide
Page 12
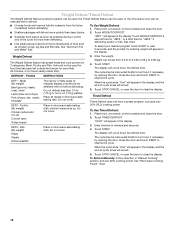
... door and touch START to resume the cycle. Close the door and touch START to resume the cycle. See "Microwave Cooking Power" chart. 12 To Use Weight Defrost: 1. DEFROST - Place all meats in microwave-safe baking dish. Do not cover. 3. Touch START. The cycle may be interrupted briefly to defrost. ■ Unwrap foods and remove lids (for entering weight will count down the defrost time. Enter the time in "Manual Cooking" section, and use 30% cooking power. To Defrost Manually: Follow direction...
... door and touch START to resume the cycle. Close the door and touch START to resume the cycle. See "Microwave Cooking Power" chart. 12 To Use Weight Defrost: 1. DEFROST - Place all meats in microwave-safe baking dish. Do not cover. 3. Touch START. The cycle may be interrupted briefly to defrost. ■ Unwrap foods and remove lids (for entering weight will count down the defrost time. Enter the time in "Manual Cooking" section, and use 30% cooking power. To Defrost Manually: Follow direction...
Use & Care Guide
Page 13
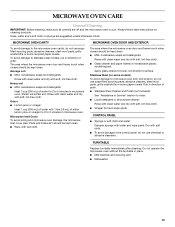
... Polish (not included): See "Assistance or Service" section to 5 minutes in microwave oven. Do not operate the microwave oven without the turntable in place. ■ Mild cleanser and scouring pad ■ Dishwasher 13 MICROWAVE OVEN CARE General Cleaning IMPORTANT: Before cleaning, make sure all -purpose cleaner: Rinse with clean water and dry with soft, lint-free cloth. ■ Glass cleaner and paper towels or nonabrasive plastic...
... Polish (not included): See "Assistance or Service" section to 5 minutes in microwave oven. Do not operate the microwave oven without the turntable in place. ■ Mild cleanser and scouring pad ■ Dishwasher 13 MICROWAVE OVEN CARE General Cleaning IMPORTANT: Before cleaning, make sure all -purpose cleaner: Rinse with clean water and dry with soft, lint-free cloth. ■ Glass cleaner and paper towels or nonabrasive plastic...
Use & Care Guide
Page 14
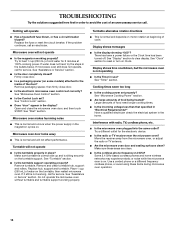
...; Is the display showing "0:00"? Try a different outlet for 2 minutes at beginning of cycle. Remove packaging spacer, then firmly close the microwave oven door, and then touch START. Open and close door. ■ Is the electronic microwave oven control set ? Turntable will not operate ■ Is the magnetron working properly. There has been a power failure or the Clock time has been turned off. See "Timer" section. Larger amounts of food need longer cooking times. ■ Is...
...; Is the display showing "0:00"? Try a different outlet for 2 minutes at beginning of cycle. Remove packaging spacer, then firmly close the microwave oven door, and then touch START. Open and close door. ■ Is the electronic microwave oven control set ? Turntable will not operate ■ Is the magnetron working properly. There has been a power failure or the Clock time has been turned off. See "Timer" section. Larger amounts of food need longer cooking times. ■ Is...

Use & Care Guide
Page 15
... you need further assistance, you can be built in wall oven, up to your request. Call the KitchenAid Customer eXperience Center toll free: 1-800-422-1230. Replacement Parts Glass Turntable Part Number W10451786 Turntable Support and Rollers Part Number W10451792 Turntable Hub Part Number W10451789 Cleaning Supplies affresh™ Kitchen Appliance Cleaner Part Number W10355010 affresh™ Stainless Steel Cleaner Part Number W10355016 affresh™ Stainless Steel Wipes Part Number W10355049 Heavy Duty Degreaser Part Number 31552A Built-In Kits This countertop microwave oven...
... you need further assistance, you can be built in wall oven, up to your request. Call the KitchenAid Customer eXperience Center toll free: 1-800-422-1230. Replacement Parts Glass Turntable Part Number W10451786 Turntable Support and Rollers Part Number W10451792 Turntable Hub Part Number W10451789 Cleaning Supplies affresh™ Kitchen Appliance Cleaner Part Number W10355010 affresh™ Stainless Steel Cleaner Part Number W10355016 affresh™ Stainless Steel Wipes Part Number W10355049 Heavy Duty Degreaser Part Number 31552A Built-In Kits This countertop microwave oven...
Use & Care Guide
Page 16
... packaged to a KitchenAid designated service center. Repairs or replacement when your major appliance to published user or operator instructions and/or installation instructions. 5. This warranty is used in accordance with electrical or plumbing codes, or use your door free of consumables or cleaning products not approved by KitchenAid. 6. The consultant will return the repaired unit or, at 1-800-253-1301 (toll-free). 2. Please include your model, serial number and shipping address. 3. Outside the 50...
... packaged to a KitchenAid designated service center. Repairs or replacement when your major appliance to published user or operator instructions and/or installation instructions. 5. This warranty is used in accordance with electrical or plumbing codes, or use your door free of consumables or cleaning products not approved by KitchenAid. 6. The consultant will return the repaired unit or, at 1-800-253-1301 (toll-free). 2. Please include your model, serial number and shipping address. 3. Outside the 50...

Installation Guide
Page 1
..." (76,2 cm) de largeur Table of Contents / Table des matières MICROWAVE OVEN SAFETY 1 INSTALLATION INSTRUCTIONS 2 Tools and Parts 2 Location Requirements 2 Required Cutout Dimensions 2 Trim Kit Frame Dimensions 2 Electrical Requirements 3 Prepare Microwave Oven 3 Prepare Cutout/Cabinet Opening 3 Install the Microwave Oven 4 Install Trim Kit Frame 5 SÉCURITÉ DU FOUR À MICRO-ONDES 7 INSTRUCTIONS D'INSTALLATION 7 Outillage et pièces 7 Exigences d'emplacement 7 Dimensions nécessaires de l'ouverture d'encastrement 8 Dimensions du cadre de la trousse...
..." (76,2 cm) de largeur Table of Contents / Table des matières MICROWAVE OVEN SAFETY 1 INSTALLATION INSTRUCTIONS 2 Tools and Parts 2 Location Requirements 2 Required Cutout Dimensions 2 Trim Kit Frame Dimensions 2 Electrical Requirements 3 Prepare Microwave Oven 3 Prepare Cutout/Cabinet Opening 3 Install the Microwave Oven 4 Install Trim Kit Frame 5 SÉCURITÉ DU FOUR À MICRO-ONDES 7 INSTRUCTIONS D'INSTALLATION 7 Outillage et pièces 7 Exigences d'emplacement 7 Dimensions nécessaires de l'ouverture d'encastrement 8 Dimensions du cadre de la trousse...

Installation Guide
Page 2
...;⁄₈" (58.7 cm) A 1 2.7 cm) B A. INSTALLATION INSTRUCTIONS Tools and Parts Tools Needed Gather the required tools and parts before starting installation. Read and follow the instructions provided with any tools listed here. ■ Measuring tape ■ Pencil ■ Phillips screwdriver ■ Drill ■ 7/64" drill bit Parts Supplied (not shown to open and close freely. Microwave oven cutout C. Trim kit frame overhang B. Make sure the surrounding...
...;⁄₈" (58.7 cm) A 1 2.7 cm) B A. INSTALLATION INSTRUCTIONS Tools and Parts Tools Needed Gather the required tools and parts before starting installation. Read and follow the instructions provided with any tools listed here. ■ Measuring tape ■ Pencil ■ Phillips screwdriver ■ Drill ■ 7/64" drill bit Parts Supplied (not shown to open and close freely. Microwave oven cutout C. Trim kit frame overhang B. Make sure the surrounding...

Installation Guide
Page 3
... 20-amp electrical supply with installation. 2. If the power supply cord is properly installed and grounded. Remove any loose items inside microwave oven. 3. Microwave oven bottom C. On the cutout floor, find and mark the centerline. 2. Bottom duct E D. Do not remove ground prong. WARNING: Improper use an extension cord. SAVE THESE INSTRUCTIONS Prepare Microwave Oven 1. A B C D E A. Flanges E. Front facing 3 GROUNDING INSTRUCTIONS ■ For all governing codes and ordinances. Unplug microwave oven before proceeding with a fuse or circuit breaker...
... 20-amp electrical supply with installation. 2. If the power supply cord is properly installed and grounded. Remove any loose items inside microwave oven. 3. Microwave oven bottom C. On the cutout floor, find and mark the centerline. 2. Bottom duct E D. Do not remove ground prong. WARNING: Improper use an extension cord. SAVE THESE INSTRUCTIONS Prepare Microwave Oven 1. A B C D E A. Flanges E. Front facing 3 GROUNDING INSTRUCTIONS ■ For all governing codes and ordinances. Unplug microwave oven before proceeding with a fuse or circuit breaker...
Installation Guide
Page 4
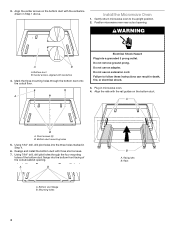
... Step 4. 6. Bottom duct mounting holes 5. Rail guides B. Rails A Electrical Shock Hazard Plug into the bottom front facing of the cutout/cabinet opening . Realign and install the bottom duct with centerline 4. 3. Install the Microwave Oven 1. Do not use an adapter. A B A. Position microwave oven near cutout opening . Align the rails with the rail guides on the bottom duct with the centerline drawn in death, fire, or electrical shock. 3. Short screws (3) B. Bottom duct flange B. Align...
... Step 4. 6. Bottom duct mounting holes 5. Rail guides B. Rails A Electrical Shock Hazard Plug into the bottom front facing of the cutout/cabinet opening . Realign and install the bottom duct with centerline 4. 3. Install the Microwave Oven 1. Do not use an adapter. A B A. Position microwave oven near cutout opening . Align the rails with the rail guides on the bottom duct with the centerline drawn in death, fire, or electrical shock. 3. Short screws (3) B. Bottom duct flange B. Align...
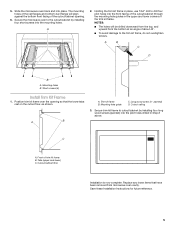
Installation Guide
Page 5
...) D. Cutout ceiling 3. Replace any loose items that the lower tabs rest on the cutout floor, as shown. Save these Installation Instructions for future reference. 5 The mounting holes of the trim kit frame. Front of the cutout/cabinet through the mounting hole guides in Step 2 above. Holding the trim kit frame in place, use 7/64" drill to the trim kit frame, do not overtighten screws. Long wood screw (4 - Secure trim kit frame...
...) D. Cutout ceiling 3. Replace any loose items that the lower tabs rest on the cutout floor, as shown. Save these Installation Instructions for future reference. 5 The mounting holes of the trim kit frame. Front of the cutout/cabinet through the mounting hole guides in Step 2 above. Holding the trim kit frame in place, use 7/64" drill to the trim kit frame, do not overtighten screws. Long wood screw (4 - Secure trim kit frame...


