
Use & Care Guide
Page 5
... and made any packing materials. 2. The microwave oven should be grounded. NOTE: To avoid damage to follow these instructions can result in a risk of the trim kits listed in place to move and install microwave oven. Required: ■ A 120 volt, 60 Hz, AC only, 15- or 20-amp electrical supply with a soft...
... and made any packing materials. 2. The microwave oven should be grounded. NOTE: To avoid damage to follow these instructions can result in a risk of the trim kits listed in place to move and install microwave oven. Required: ■ A 120 volt, 60 Hz, AC only, 15- or 20-amp electrical supply with a soft...

Use & Care Guide
Page 15
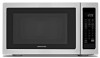
.../COLORS 27" (68.6 cm) MK2167AW / White MK2167AB / Black MK2167AS / Stainless 30" (76.2 cm) MK2160AW / White MK2160AB / Black MK2160AS / Stainless *The built-in trim kits can be built in your nearest KitchenAid designated service center. Proof of the original consumer purchase. It may save you still need further assistance, you use only factory specified...
.../COLORS 27" (68.6 cm) MK2167AW / White MK2167AB / Black MK2167AS / Stainless 30" (76.2 cm) MK2160AW / White MK2160AB / Black MK2160AS / Stainless *The built-in trim kits can be built in your nearest KitchenAid designated service center. Proof of the original consumer purchase. It may save you still need further assistance, you use only factory specified...

Installation Guide
Page 1
... 1 INSTALLATION INSTRUCTIONS 2 Tools and Parts 2 Location Requirements 2 Required Cutout Dimensions 2 Trim Kit Frame Dimensions 2 Electrical Requirements 3 Prepare Microwave Oven 3 Prepare Cutout/Cabinet Opening 3 Install the Microwave Oven 4 Install Trim Kit Frame 5 SÉCURITÉ DU FOUR À MICRO-ONDES 7 INSTRUCTIONS D'INSTALLATION...follow the safety alert symbol and either the word "DANGER" or "WARNING." MICROWAVE OVEN BUILT-IN TRIM KIT INSTALLATION INSTRUCTIONS Built-In Trim Kit Models MK2167, MK2160 UL listed for use over any electric or gas built-in this manual and...
... 1 INSTALLATION INSTRUCTIONS 2 Tools and Parts 2 Location Requirements 2 Required Cutout Dimensions 2 Trim Kit Frame Dimensions 2 Electrical Requirements 3 Prepare Microwave Oven 3 Prepare Cutout/Cabinet Opening 3 Install the Microwave Oven 4 Install Trim Kit Frame 5 SÉCURITÉ DU FOUR À MICRO-ONDES 7 INSTRUCTIONS D'INSTALLATION...follow the safety alert symbol and either the word "DANGER" or "WARNING." MICROWAVE OVEN BUILT-IN TRIM KIT INSTALLATION INSTRUCTIONS Built-In Trim Kit Models MK2167, MK2160 UL listed for use over any electric or gas built-in this manual and...

Installation Guide
Page 2
... Measuring tape ■ Pencil ■ Phillips screwdriver ■ Drill ■ 7/64" drill bit Parts Supplied (not shown to open and close freely. Trim Kit Frame Dimensions 26 68.2 cm)** 29 ³⁄₄" (75.6 cm)** 19 ¹⁄₈" (48.6 cm) 22 ³⁄₄" ...57.8 cm) 2 5.2 cm)** 3 ¹⁄₂" (8.9 cm)** 3 8.7 cm) 12 ¹⁄₄" (31.1 cm) *27" (68.6 cm) trim kit **30" (76.2 cm) trim kit 1 3.0 cm) 2 The microwave oven may be installed in a cabinet by itself (without a built-in oven), and a clearance of at least 1 4.0 cm)...
... Measuring tape ■ Pencil ■ Phillips screwdriver ■ Drill ■ 7/64" drill bit Parts Supplied (not shown to open and close freely. Trim Kit Frame Dimensions 26 68.2 cm)** 29 ³⁄₄" (75.6 cm)** 19 ¹⁄₈" (48.6 cm) 22 ³⁄₄" ...57.8 cm) 2 5.2 cm)** 3 ¹⁄₂" (8.9 cm)** 3 8.7 cm) 12 ¹⁄₄" (31.1 cm) *27" (68.6 cm) trim kit **30" (76.2 cm) trim kit 1 3.0 cm) 2 The microwave oven may be installed in a cabinet by itself (without a built-in oven), and a clearance of at least 1 4.0 cm)...
Installation Guide
Page 5
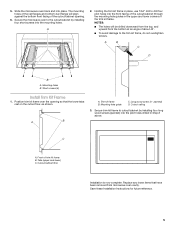
... will align against the bottom front facing of the cutout/cabinet opening so that have been removed from the bottom at an angle of the trim kit frame. Mounting holes B. A B A. Slide the microwave oven back and into the front facing of the cutout/cabinet through the mounting hole guides ...in place, use 7/64" drill to the trim kit frame, do not overtighten screws. The mounting holes of trim kit frame B. Holding the trim kit frame in the upper and lower corners of about 45°. ■ To avoid damage to drill ...
... will align against the bottom front facing of the cutout/cabinet opening so that have been removed from the bottom at an angle of the trim kit frame. Mounting holes B. A B A. Slide the microwave oven back and into the front facing of the cutout/cabinet through the mounting hole guides ...in place, use 7/64" drill to the trim kit frame, do not overtighten screws. The mounting holes of trim kit frame B. Holding the trim kit frame in the upper and lower corners of about 45°. ■ To avoid damage to drill ...


