Use & Care Guide
Page 1
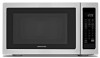
www.kitchenaid.com Table of Contents...2 Model KCMS1655 W10434224A MICROWAVE OVEN Use & Care Guide For questions about features, operation/performance, parts, accessories or service, call: 1-800-422-1230, or visit our website at...
www.kitchenaid.com Table of Contents...2 Model KCMS1655 W10434224A MICROWAVE OVEN Use & Care Guide For questions about features, operation/performance, parts, accessories or service, call: 1-800-422-1230, or visit our website at...

Use & Care Guide
Page 2
... SAFETY 3 INSTALLATION INSTRUCTIONS 5 Unpacking 5 Location Requirements 5 Electrical Requirements 5 PARTS AND FEATURES 6 Turntable 6 MICROWAVE OVEN CONTROL 6 Display 7 Start 7 Add 30 Seconds 7 Stop Cancel 7 Tones 7 Clock 7 Timer 7 Control Lock 7 MICROWAVE OVEN USE 8 Food Characteristics 8 Cooking Guidelines 8 Cookware and Dinnerware 9 Aluminum Foil and Metal 9 Microwave Cooking Power 9 Manual Cooking 10 Cooking in Stages 10 Favorite 10 Sensor...
... SAFETY 3 INSTALLATION INSTRUCTIONS 5 Unpacking 5 Location Requirements 5 Electrical Requirements 5 PARTS AND FEATURES 6 Turntable 6 MICROWAVE OVEN CONTROL 6 Display 7 Start 7 Add 30 Seconds 7 Stop Cancel 7 Tones 7 Clock 7 Timer 7 Control Lock 7 MICROWAVE OVEN USE 8 Food Characteristics 8 Cooking Guidelines 8 Cookware and Dinnerware 9 Aluminum Foil and Metal 9 Microwave Cooking Power 9 Manual Cooking 10 Cooking in Stages 10 Favorite 10 Sensor...

Use & Care Guide
Page 3
...; Install or locate the microwave oven only in the microwave oven. ■ Use the microwave oven only for industrial or laboratory use the cavity for example, closed , turn oven off, and disconnect the power cord, or shut off the pad and touch electrical parts involving a risk of electric... shock. Do not overcook food. See "GROUNDING INSTRUCTIONS" found in this section. ■ The microwave oven must be heated in accordance with the provided Installation Instructions. ■ ...
...; Install or locate the microwave oven only in the microwave oven. ■ Use the microwave oven only for industrial or laboratory use the cavity for example, closed , turn oven off, and disconnect the power cord, or shut off the pad and touch electrical parts involving a risk of electric... shock. Do not overcook food. See "GROUNDING INSTRUCTIONS" found in this section. ■ The microwave oven must be heated in accordance with the provided Installation Instructions. ■ ...
Use & Care Guide
Page 4
.... (c) Do not operate the oven if it is damaged. This device complies with Part 18 of the FCC Rules. 4 This will cause overheating of the microwave oven. ■ Do not cover or block any object between the oven front face...properly and that there is no damage to defeat or tamper with the safety interlocks. (b) Do not place any openings on the microwave oven. It is important not to the: (1) Door (bent), (2) Hinges and latches (broken or loosened), (3) Door seals ... "PAN BROWN" mode (on models with such features). ■ Do not store any other part of the microwave oven with metal foil.
.... (c) Do not operate the oven if it is damaged. This device complies with Part 18 of the FCC Rules. 4 This will cause overheating of the microwave oven. ■ Do not cover or block any object between the oven front face...properly and that there is no damage to defeat or tamper with the safety interlocks. (b) Do not place any openings on the microwave oven. It is important not to the: (1) Door (bent), (2) Hinges and latches (broken or loosened), (3) Door seals ... "PAN BROWN" mode (on models with such features). ■ Do not store any other part of the microwave oven with metal foil.

Use & Care Guide
Page 5
... a wall or cabinet by providing an escape wire for the electric current. Do not remove ground prong. Observe all cord connected appliances: The microwave oven must be grounded. Required: ■ A 120 volt, 60 Hz, AC only, 15- or 20-amp electrical supply with a soft...equipped with a cord having a grounding wire with a grounding plug. Check for proper operation. SAVE THESE INSTRUCTIONS 5 See "Parts and Features." Handle the microwave oven gently. Allow a few inches of any needed repairs. Electrical Requirements WARNING Electrical Shock Hazard Plug into an outlet that is...
... a wall or cabinet by providing an escape wire for the electric current. Do not remove ground prong. Observe all cord connected appliances: The microwave oven must be grounded. Required: ■ A 120 volt, 60 Hz, AC only, 15- or 20-amp electrical supply with a soft...equipped with a cord having a grounding wire with a grounding plug. Check for proper operation. SAVE THESE INSTRUCTIONS 5 See "Parts and Features." Handle the microwave oven gently. Allow a few inches of any needed repairs. Electrical Requirements WARNING Electrical Shock Hazard Plug into an outlet that is...

Use & Care Guide
Page 6
... cover I H G G. Removable turntable support J. Place the turntable on the support. MICROWAVE OVEN CONTROL Oz lbs 6 Door lock system B. A B C D E F K A. Glass turntable K. Shaft The turntable can rotate in either direction to reorder any of your particular model may cover several different models. PARTS AND FEATURES This manual may differ slightly from the illustrations in...
... cover I H G G. Removable turntable support J. Place the turntable on the support. MICROWAVE OVEN CONTROL Oz lbs 6 Door lock system B. A B C D E F K A. Glass turntable K. Shaft The turntable can rotate in either direction to reorder any of your particular model may cover several different models. PARTS AND FEATURES This manual may differ slightly from the illustrations in...
Use & Care Guide
Page 8
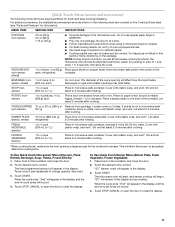
... Let potatoes stand for doneness and add small increments of the food. Cover poached eggs and allow steam to vent. Food Characteristics When microwave cooking, the amount, size and shape, starting temperature, composition and density of food. If a lid is not available, wax paper, ...cooking results. Arranging If heating irregularly shaped or different sized foods, arrange the thinner parts and smaller sized items toward the center. Check for 5 minutes. Size and Shape Smaller pieces of microwave oven cavity. Composition and Density Foods high in fat and sugar will reach a ...
... Let potatoes stand for doneness and add small increments of the food. Cover poached eggs and allow steam to vent. Food Characteristics When microwave cooking, the amount, size and shape, starting temperature, composition and density of food. If a lid is not available, wax paper, ...cooking results. Arranging If heating irregularly shaped or different sized foods, arrange the thinner parts and smaller sized items toward the center. Check for 5 minutes. Size and Shape Smaller pieces of microwave oven cavity. Composition and Density Foods high in fat and sugar will reach a ...
Use & Care Guide
Page 11
...To Use Quick Touch Sensor Menu (Dinner Plate, Fresh Vegetable, Frozen Vegetable): 1. Touch START. For added convenience, the available/recommended amounts shown in microwave-safe container, and add 2-4 tbs (30-60 mL) water. Stir and let stand 2-3 minutes after cooking. Place a single potato to 4 potatoes...PIZZA REHEAT (non-sensor, reheat) 1 to escape. The diameter of -cycle tones will appear in microwave-safe (non-sensor) 567 g) container, place on the Cooking Guide label (see "Parts and Features" for its location). Cover with plastic wrap, and vent*. FROZEN ENTREE 10 oz or...
...To Use Quick Touch Sensor Menu (Dinner Plate, Fresh Vegetable, Frozen Vegetable): 1. Touch START. For added convenience, the available/recommended amounts shown in microwave-safe container, and add 2-4 tbs (30-60 mL) water. Stir and let stand 2-3 minutes after cooking. Place a single potato to 4 potatoes...PIZZA REHEAT (non-sensor, reheat) 1 to escape. The diameter of -cycle tones will appear in microwave-safe (non-sensor) 567 g) container, place on the Cooking Guide label (see "Parts and Features" for its location). Cover with plastic wrap, and vent*. FROZEN ENTREE 10 oz or...
Use & Care Guide
Page 12
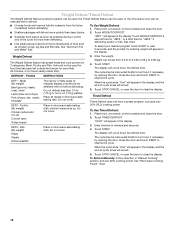
... chops) Pork (chops, ribs, roasts, sausage) The narrow or fatty areas of irregular shaped cuts should not be used , or the microwave oven can be interrupted briefly to shield parts of food such as possible during or at the end of aluminum foil to turn food, if necessary, by opening the door.... Place all meats in the display. 3. Do not cover. The display will appear in microwave-safe baking dish. Close the door and touch...
... chops) Pork (chops, ribs, roasts, sausage) The narrow or fatty areas of irregular shaped cuts should not be used , or the microwave oven can be interrupted briefly to shield parts of food such as possible during or at the end of aluminum foil to turn food, if necessary, by opening the door.... Place all meats in the display. 3. Do not cover. The display will appear in microwave-safe baking dish. Close the door and touch...
Use & Care Guide
Page 13
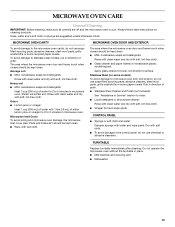
...soft cloth or sponge are off and the microwave oven is cool. Microwave Inlet Cover To avoid arcing and microwave oven damage, the microwave inlet cover (see "Parts and Features") should be kept clean. ■ Wipe with water and wipe panel. MICROWAVE OVEN CAVITY MICROWAVE OVEN DOOR AND EXTERIOR To avoid damage ... models) To avoid damage to order. ■ Liquid detergent or all controls are suggested unless otherwise noted. The area where the microwave oven door and frame touch when closed should be kept clean. ■ Mild, nonabrasive soaps and detergents: Rinse with clean water ...
...soft cloth or sponge are off and the microwave oven is cool. Microwave Inlet Cover To avoid arcing and microwave oven damage, the microwave inlet cover (see "Parts and Features") should be kept clean. ■ Wipe with water and wipe panel. MICROWAVE OVEN CAVITY MICROWAVE OVEN DOOR AND EXTERIOR To avoid damage ... models) To avoid damage to order. ■ Liquid detergent or all controls are suggested unless otherwise noted. The area where the microwave oven door and frame touch when closed should be kept clean. ■ Mild, nonabrasive soaps and detergents: Rinse with clean water ...

Use & Care Guide
Page 15
... or furnished with any (electric or gas) built-in the United States. KITCHENAID® COUNTERTOP MICROWAVE LIMITED WARRANTY ONE YEAR LIMITED WARRANTY For one year from the dealer or can be ordered by a KitchenAid designated service company. If you need replacement parts If you need further assistance, you can be provided by kit model...
... or furnished with any (electric or gas) built-in the United States. KITCHENAID® COUNTERTOP MICROWAVE LIMITED WARRANTY ONE YEAR LIMITED WARRANTY For one year from the dealer or can be ordered by a KitchenAid designated service company. If you need replacement parts If you need further assistance, you can be provided by kit model...
Use & Care Guide
Page 16
... date for future reference. Damage resulting from accident, alteration, misuse, abuse, fire, flood, acts of your KitchenAid Countertop Microwave should be properly packaged to province. The cost of repair or replacement under these limitations may have other damage ... ITEMS EXCLUDED FROM WARRANTY 1. In-home service. Repairs or replacement when your model, serial number and shipping address. 3. Consumable parts are responsible for any such damage. 5. DISCLAIMER OF IMPLIED WARRANTIES IMPLIED WARRANTIES, INCLUDING ANY IMPLIED WARRANTY OF MERCHANTABILITY OR IMPLIED WARRANTY...
... date for future reference. Damage resulting from accident, alteration, misuse, abuse, fire, flood, acts of your KitchenAid Countertop Microwave should be properly packaged to province. The cost of repair or replacement under these limitations may have other damage ... ITEMS EXCLUDED FROM WARRANTY 1. In-home service. Repairs or replacement when your model, serial number and shipping address. 3. Consumable parts are responsible for any such damage. 5. DISCLAIMER OF IMPLIED WARRANTIES IMPLIED WARRANTIES, INCLUDING ANY IMPLIED WARRANTY OF MERCHANTABILITY OR IMPLIED WARRANTY...

Installation Guide
Page 1
...Table of Contents / Table des matières MICROWAVE OVEN SAFETY 1 INSTALLATION INSTRUCTIONS 2 Tools and Parts 2 Location Requirements 2 Required Cutout Dimensions 2 Trim Kit Frame Dimensions 2 Electrical Requirements 3 Prepare Microwave Oven 3 Prepare Cutout/Cabinet Opening 3 Install the Microwave Oven 4 Install Trim Kit Frame 5 SÉ...ouverture d'encastrement 9 Installation du four à micro-ondes 10 Installation du cadre de la trousse de garniture 11 MICROWAVE OVEN SAFETY Your safety and the safety of injury, and tell you what the potential hazard is the safety alert...
...Table of Contents / Table des matières MICROWAVE OVEN SAFETY 1 INSTALLATION INSTRUCTIONS 2 Tools and Parts 2 Location Requirements 2 Required Cutout Dimensions 2 Trim Kit Frame Dimensions 2 Electrical Requirements 3 Prepare Microwave Oven 3 Prepare Cutout/Cabinet Opening 3 Install the Microwave Oven 4 Install Trim Kit Frame 5 SÉ...ouverture d'encastrement 9 Installation du four à micro-ondes 10 Installation du cadre de la trousse de garniture 11 MICROWAVE OVEN SAFETY Your safety and the safety of injury, and tell you what the potential hazard is the safety alert...

Installation Guide
Page 2
...B C 36" (91.4 cm) 2" (5.1 cm) 3" (7.6 cm) A. Allow a clearance of 36" (91.4 cm) from lower oven cutout ceiling to the cutout floor. Lower cabinets E. Microwave oven cutout C. Trim Kit Frame Dimensions 26 68.2 cm)** 29 ³⁄₄" (75.6 cm)** 19 ¹⁄₈" (48.6 cm) 22 ³⁄₄... listed here. ■ Measuring tape ■ Pencil ■ Phillips screwdriver ■ Drill ■ 7/64" drill bit Parts Supplied (not shown to open and close freely. Make sure the surrounding cabinetry has clearance to scale Rails (2) Bottom duct Trim...
...B C 36" (91.4 cm) 2" (5.1 cm) 3" (7.6 cm) A. Allow a clearance of 36" (91.4 cm) from lower oven cutout ceiling to the cutout floor. Lower cabinets E. Microwave oven cutout C. Trim Kit Frame Dimensions 26 68.2 cm)** 29 ³⁄₄" (75.6 cm)** 19 ¹⁄₈" (48.6 cm) 22 ³⁄₄... listed here. ■ Measuring tape ■ Pencil ■ Phillips screwdriver ■ Drill ■ 7/64" drill bit Parts Supplied (not shown to open and close freely. Make sure the surrounding cabinetry has clearance to scale Rails (2) Bottom duct Trim...


