
Use & Care Guide
Page 2
... 30 Seconds 7 Stop Cancel 7 Tones 7 Clock 7 Timer 7 Control Lock 7 MICROWAVE OVEN USE 8 Food Characteristics 8 Cooking Guidelines 8 Cookware and Dinnerware 9 Aluminum Foil and Metal 9 Microwave Cooking Power 9 Manual Cooking 10 Cooking in Stages 10 Favorite 10 Sensor Cooking 10 Quick Touch Menu (sensor... and non-sensor 11 Weight Defrost / Timed Defrost 12 MICROWAVE OVEN CARE 13 General Cleaning 13 TROUBLESHOOTING...
... 30 Seconds 7 Stop Cancel 7 Tones 7 Clock 7 Timer 7 Control Lock 7 MICROWAVE OVEN USE 8 Food Characteristics 8 Cooking Guidelines 8 Cookware and Dinnerware 9 Aluminum Foil and Metal 9 Microwave Cooking Power 9 Manual Cooking 10 Cooking in Stages 10 Favorite 10 Sensor Cooking 10 Quick Touch Menu (sensor... and non-sensor 11 Weight Defrost / Timed Defrost 12 MICROWAVE OVEN CARE 13 General Cleaning 13 TROUBLESHOOTING...

Use & Care Guide
Page 3
...electric shock. ■ Do not clean with the provided Installation Instructions. ■ Some products such as whole eggs in the microwave oven. See "GROUNDING INSTRUCTIONS" found in this manual. Do not use . ■ Liquids, such as they may create a fire or risk of fire in the oven cavity:... or oversized metal utensils should be inserted in this manual and on your appliance. for storage purposes. Remove wire twist-ties from the microwave oven is not working properly, or if it has been damaged or dropped. ■ The microwave oven should not be serviced only by children. &#...
...electric shock. ■ Do not clean with the provided Installation Instructions. ■ Some products such as whole eggs in the microwave oven. See "GROUNDING INSTRUCTIONS" found in this manual. Do not use . ■ Liquids, such as they may create a fire or risk of fire in the oven cavity:... or oversized metal utensils should be inserted in this manual and on your appliance. for storage purposes. Remove wire twist-ties from the microwave oven is not working properly, or if it has been damaged or dropped. ■ The microwave oven should not be serviced only by children. &#...

Use & Care Guide
Page 6
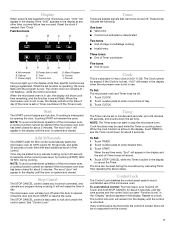
...slightly from the illustrations in either direction to reorder any of the features shown here. Microwave oven light E. MICROWAVE OVEN CONTROL Oz lbs 6 The appearance of your particular model may have some or ...all of the parts. Fit the raised, curved wedges in place. Control panel J I . Glass turntable K. Turntable B. Model and serial number plate Turntable A B C D A. Shaft The turntable can rotate in this manual. Window C. Support D. PARTS AND FEATURES This manual...
...slightly from the illustrations in either direction to reorder any of the features shown here. Microwave oven light E. MICROWAVE OVEN CONTROL Oz lbs 6 The appearance of your particular model may have some or ...all of the parts. Fit the raised, curved wedges in place. Control panel J I . Glass turntable K. Turntable B. Model and serial number plate Turntable A B C D A. Shaft The turntable can rotate in this manual. Window C. Support D. PARTS AND FEATURES This manual...
Use & Care Guide
Page 7
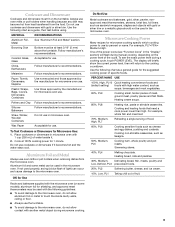
... any control pad is touched while the control is locked, there will be erased. NOTE: To avoid unintentional operation of the microwave oven, a cooking function cannot be added to any manual cooking cycle in the display until the door is opened . It will not erase the time of day. 3. Touch number ...pads to enter correct time of day. Timer The Timer can be off . The time can be started if the microwave oven door has been closed...
... any control pad is touched while the control is locked, there will be erased. NOTE: To avoid unintentional operation of the microwave oven, a cooking function cannot be added to any manual cooking cycle in the display until the door is opened . It will not erase the time of day. 3. Touch number ...pads to enter correct time of day. Timer The Timer can be off . The time can be started if the microwave oven door has been closed...
Use & Care Guide
Page 9
...Foil and Metal Always use oven mitts or pot holders when handling because any dish may be at 100% cooking power for microwave oven use. Microwave Cooking Power Many recipes for the suggested cooking power of water beside it becomes hot and the water stays cool. For example... display will briefly show the current power level, then will flash during microwave cooking. PERCENT/NAME USE 100%, High, PL10 Quick heating convenience foods and (default setting) foods with another metal object during manual cooking, depending on some metal can occur and cause damage to use cookware...
...Foil and Metal Always use oven mitts or pot holders when handling because any dish may be at 100% cooking power for microwave oven use. Microwave Cooking Power Many recipes for the suggested cooking power of water beside it becomes hot and the water stays cool. For example... display will briefly show the current power level, then will flash during microwave cooking. PERCENT/NAME USE 100%, High, PL10 Quick heating convenience foods and (default setting) foods with another metal object during manual cooking, depending on some metal can occur and cause damage to use cookware...
Use & Care Guide
Page 10
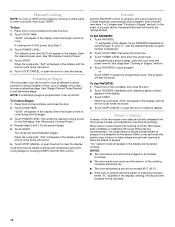
...Manual Cooking NOTE: To cook at 100% power, begin the programmed cycle. Touch POWER LEVEL. When the cycle ends, "End" will appear in the display, and the end-of the cooking container should be dry. ■ The room temperature should be plugged in for at least 3 minutes. ■ The microwave... 1. The program will have 1 or 2 stages (see "Cooking in Stages" section). Sensor Cooking A sensor in the display. 3. See "Microwave Cooking Power." 4. Touch POWER LEVEL, then enter the desired cooking power for various lengths of -cycle tones will appear in the display. Many ...
...Manual Cooking NOTE: To cook at 100% power, begin the programmed cycle. Touch POWER LEVEL. When the cycle ends, "End" will appear in the display, and the end-of the cooking container should be dry. ■ The room temperature should be plugged in for at least 3 minutes. ■ The microwave... 1. The program will have 1 or 2 stages (see "Cooking in Stages" section). Sensor Cooking A sensor in the display. 3. See "Microwave Cooking Power." 4. Touch POWER LEVEL, then enter the desired cooking power for various lengths of -cycle tones will appear in the display. Many ...
Use & Care Guide
Page 12
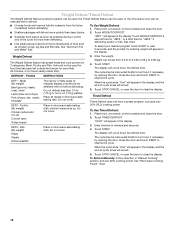
...preset program, but uses only 30% (PL3) cooking power. Close the door and touch START to clear the display. To Defrost Manually: Follow direction in microwave-safe baking dish. Weight Defrost / Timed Defrost The Weight Defrost feature's preset programs can be used, the Timed Defrost feature can ... Place in the display, and the end-of irregular shaped cuts should not be used , or the microwave oven can be shielded with foil before defrosting. Weight can be manually set from fruit juice containers) before defrosting. To Use Weight Defrost: 1. DEF3 - The cycle may ...
...preset program, but uses only 30% (PL3) cooking power. Close the door and touch START to clear the display. To Defrost Manually: Follow direction in microwave-safe baking dish. Weight Defrost / Timed Defrost The Weight Defrost feature's preset programs can be used, the Timed Defrost feature can ... Place in the display, and the end-of irregular shaped cuts should not be used , or the microwave oven can be shielded with foil before defrosting. Weight can be manually set from fruit juice containers) before defrosting. To Use Weight Defrost: 1. DEF3 - The cycle may ...

Installation Guide
Page 1
... Contents / Table des matières MICROWAVE OVEN SAFETY 1 INSTALLATION INSTRUCTIONS 2 Tools and Parts 2 Location Requirements 2...Cutout Dimensions 2 Trim Kit Frame Dimensions 2 Electrical Requirements 3 Prepare Microwave Oven 3 Prepare Cutout/Cabinet Opening 3 Install the Microwave Oven 4 Install Trim Kit Frame 5 SÉCURITÉ DU...ondes 10 Installation du cadre de la trousse de garniture 11 MICROWAVE OVEN SAFETY Your safety and the safety of injury, and...oven, up to reduce the chance of others . MICROWAVE OVEN BUILT-IN TRIM KIT INSTALLATION INSTRUCTIONS Built-In...
... Contents / Table des matières MICROWAVE OVEN SAFETY 1 INSTALLATION INSTRUCTIONS 2 Tools and Parts 2 Location Requirements 2...Cutout Dimensions 2 Trim Kit Frame Dimensions 2 Electrical Requirements 3 Prepare Microwave Oven 3 Prepare Cutout/Cabinet Opening 3 Install the Microwave Oven 4 Install Trim Kit Frame 5 SÉCURITÉ DU...ondes 10 Installation du cadre de la trousse de garniture 11 MICROWAVE OVEN SAFETY Your safety and the safety of injury, and...oven, up to reduce the chance of others . MICROWAVE OVEN BUILT-IN TRIM KIT INSTALLATION INSTRUCTIONS Built-In...


