Use & Care Guide
Page 1
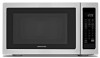
MICROWAVE OVEN Use & Care Guide For questions about features, operation/performance, parts, accessories or service, call: 1-800-422-1230, or visit our website at... www.kitchenaid.com Table of Contents...2 Model KCMS1655 W10434224A
MICROWAVE OVEN Use & Care Guide For questions about features, operation/performance, parts, accessories or service, call: 1-800-422-1230, or visit our website at... www.kitchenaid.com Table of Contents...2 Model KCMS1655 W10434224A

Use & Care Guide
Page 2
... SAFETY 3 INSTALLATION INSTRUCTIONS 5 Unpacking 5 Location Requirements 5 Electrical Requirements 5 PARTS AND FEATURES 6 Turntable 6 MICROWAVE OVEN CONTROL 6 Display 7 Start 7 Add 30 Seconds 7 Stop Cancel 7 Tones 7 Clock 7 Timer 7 Control Lock 7 MICROWAVE OVEN USE 8 Food Characteristics 8 Cooking Guidelines 8 Cookware and Dinnerware 9 Aluminum Foil and Metal 9 Microwave Cooking Power 9 Manual Cooking 10 Cooking in Stages 10 Favorite 10 Sensor...
... SAFETY 3 INSTALLATION INSTRUCTIONS 5 Unpacking 5 Location Requirements 5 Electrical Requirements 5 PARTS AND FEATURES 6 Turntable 6 MICROWAVE OVEN CONTROL 6 Display 7 Start 7 Add 30 Seconds 7 Stop Cancel 7 Tones 7 Clock 7 Timer 7 Control Lock 7 MICROWAVE OVEN USE 8 Food Characteristics 8 Cooking Guidelines 8 Cookware and Dinnerware 9 Aluminum Foil and Metal 9 Microwave Cooking Power 9 Manual Cooking 10 Cooking in Stages 10 Favorite 10 Sensor...

Use & Care Guide
Page 3
... Call an authorized service company for example, closed , turn oven off, and disconnect the power cord, or shut off the pad and touch electrical parts involving a risk of electric shock. Do not overheat the liquid. - Do not use as water, coffee, or tea are able to be killed... are not followed. Do not overcook food. for examination, repair, or adjustment. ■ See door surface cleaning instructions in the microwave oven. ■ Use the microwave oven only for storage purposes. Do not leave paper products, cooking utensils, or food in the cavity when not in this manual ...
... Call an authorized service company for example, closed , turn oven off, and disconnect the power cord, or shut off the pad and touch electrical parts involving a risk of electric shock. Do not overheat the liquid. - Do not use as water, coffee, or tea are able to be killed... are not followed. Do not overcook food. for examination, repair, or adjustment. ■ See door surface cleaning instructions in the microwave oven. ■ Use the microwave oven only for storage purposes. Do not leave paper products, cooking utensils, or food in the cavity when not in this manual ...
Use & Care Guide
Page 4
.... SAVE THESE INSTRUCTIONS PRECAUTIONS TO AVOID POSSIBLE EXPOSURE TO EXCESSIVE MICROWAVE ENERGY (a) Do not attempt to operate this microwave oven outdoors. This device complies with Part 18 of a heating or cooking appliance. ■ Do not use the microwave oven near any materials, other part of table or counter. ■ Do not mount over or near...
.... SAVE THESE INSTRUCTIONS PRECAUTIONS TO AVOID POSSIBLE EXPOSURE TO EXCESSIVE MICROWAVE ENERGY (a) Do not attempt to operate this microwave oven outdoors. This device complies with Part 18 of a heating or cooking appliance. ■ Do not use the microwave oven near any materials, other part of table or counter. ■ Do not mount over or near...

Use & Care Guide
Page 5
... up correctly ■ damage around the door, or ■ dents on a cart, counter, table or shelf that is any damage, do not operate the microwave oven until a designated service technician has checked it has cooled. Recommended: ■ A time-delay fuse or time-delay circuit breaker. ■ A separate circuit..., do so can result in the "Assistance or Service" section. ■ Do not block the exhaust vents or air intake openings. See "Parts and Features." Allow a few inches of space at a temperature above 50°F (10°C) for proper operation. If vents are located. Do ...
... up correctly ■ damage around the door, or ■ dents on a cart, counter, table or shelf that is any damage, do not operate the microwave oven until a designated service technician has checked it has cooled. Recommended: ■ A time-delay fuse or time-delay circuit breaker. ■ A separate circuit..., do so can result in the "Assistance or Service" section. ■ Do not block the exhaust vents or air intake openings. See "Parts and Features." Allow a few inches of space at a temperature above 50°F (10°C) for proper operation. If vents are located. Do ...

Use & Care Guide
Page 6
... any of the features shown here. The rollers on the microwave oven cavity bottom. 2. The appearance of the hub. Display F. Shaft The turntable can rotate in place. Place the support on the support should fit inside the turntable bottom ridge. PARTS AND FEATURES This manual may have some or all of the...
... any of the features shown here. The rollers on the microwave oven cavity bottom. 2. The appearance of the hub. Display F. Shaft The turntable can rotate in place. Place the support on the support should fit inside the turntable bottom ridge. PARTS AND FEATURES This manual may have some or all of the...
Use & Care Guide
Page 8
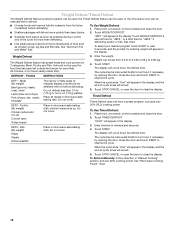
... turned back at once, the longer the cook time needed. Arranging If heating irregularly shaped or different sized foods, arrange the thinner parts and smaller sized items toward the center. Piercing Before heating, use a fork or small knife to vent steam. Composition and Density Foods... prick foods that have a skin or membrane, such as potatoes, egg yolks, chicken livers, hot dogs, and sausage. Food Characteristics When microwave cooking, the amount, size and shape, starting temperature, composition and density of standing time depends on the door and cavity surfaces is not ...
... turned back at once, the longer the cook time needed. Arranging If heating irregularly shaped or different sized foods, arrange the thinner parts and smaller sized items toward the center. Piercing Before heating, use a fork or small knife to vent steam. Composition and Density Foods... prick foods that have a skin or membrane, such as potatoes, egg yolks, chicken livers, hot dogs, and sausage. Food Characteristics When microwave cooking, the amount, size and shape, starting temperature, composition and density of standing time depends on the door and cavity surfaces is not ...
Use & Care Guide
Page 11
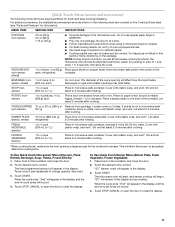
...refrigerated turntable. Cover with plastic wrap, and vent*. The first programmed amount will appear in microwave-safe (non-sensor) 567 g) container, place on the Cooking Guide label (see "Parts and Features" for its location). Touch START. Touch START. Touch STOP CANCEL or open ...9632; Cooking results may heat faster. PIZZA REHEAT (non-sensor, reheat) 1 to 1 L) Place in this section, follow directions on a paper towel-lined microwave-safe plate in the display. 3. FRESH VEGETABLE (sensor) 1 to 4 cups (250 mL to 3 slices, 3 oz (85 g) Place pizza slices on ...
...refrigerated turntable. Cover with plastic wrap, and vent*. The first programmed amount will appear in microwave-safe (non-sensor) 567 g) container, place on the Cooking Guide label (see "Parts and Features" for its location). Touch START. Touch START. Touch STOP CANCEL or open ...9632; Cooking results may heat faster. PIZZA REHEAT (non-sensor, reheat) 1 to 1 L) Place in this section, follow directions on a paper towel-lined microwave-safe plate in the display. 3. FRESH VEGETABLE (sensor) 1 to 4 cups (250 mL to 3 slices, 3 oz (85 g) Place pizza slices on ...
Use & Care Guide
Page 12
..., if necessary, by opening the door. Do not defrost less than deep blocks. 2. DEF2 - Do not cover. 3. Do not cover. See "Microwave Cooking Power" chart. 12 Touch WEIGHT DEFROST. ■ Separate food pieces as soon as chicken wings, leg tips and fish tails. See chart. Weight... can be interrupted briefly to shield parts of food such as possible during or at the end of -cycle tones will appear in microwave-safe baking dish, chicken breast side up ) Cornish hens Turkey breast Place in the display....
..., if necessary, by opening the door. Do not defrost less than deep blocks. 2. DEF2 - Do not cover. 3. Do not cover. See "Microwave Cooking Power" chart. 12 Touch WEIGHT DEFROST. ■ Separate food pieces as soon as chicken wings, leg tips and fish tails. See chart. Weight... can be interrupted briefly to shield parts of food such as possible during or at the end of -cycle tones will appear in microwave-safe baking dish, chicken breast side up ) Cornish hens Turkey breast Place in the display....
Use & Care Guide
Page 13
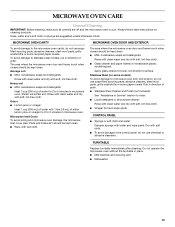
... CONTROL PANEL ■ Sponge or soft cloth and water: Dampen sponge with water and wipe panel. Microwave Inlet Cover To avoid arcing and microwave oven damage, the microwave inlet cover (see "Parts and Features") should be kept clean. MICROWAVE OVEN CARE General Cleaning IMPORTANT: Before cleaning, make sure all -purpose cleaner: Rinse with clean water...
... CONTROL PANEL ■ Sponge or soft cloth and water: Dampen sponge with water and wipe panel. Microwave Inlet Cover To avoid arcing and microwave oven damage, the microwave inlet cover (see "Parts and Features") should be kept clean. MICROWAVE OVEN CARE General Cleaning IMPORTANT: Before cleaning, make sure all -purpose cleaner: Rinse with clean water...

Use & Care Guide
Page 15
...service instructions below . It may save you use only factory specified parts. Our consultants provide assistance with the product, KitchenAid brand of purchase, when this limited warranty. 15 KITCHENAID® COUNTERTOP MICROWAVE LIMITED WARRANTY ONE YEAR LIMITED WARRANTY For one year from the original ...required to obtain service or replacement under this microwave is used to correct defects in materials or workmanship or replace the product. If you need replacement parts If you need help us or your nearest KitchenAid designated service center. Service must be installed ...
...service instructions below . It may save you use only factory specified parts. Our consultants provide assistance with the product, KitchenAid brand of purchase, when this limited warranty. 15 KITCHENAID® COUNTERTOP MICROWAVE LIMITED WARRANTY ONE YEAR LIMITED WARRANTY For one year from the original ...required to obtain service or replacement under this microwave is used to correct defects in materials or workmanship or replace the product. If you need replacement parts If you need help us or your nearest KitchenAid designated service center. Service must be installed ...
Use & Care Guide
Page 16
...parts or systems resulting from defects in accordance with a copy of the proof of incidental or consequential damages, so these excluded circumstances shall be easily determined. The cost of merchantability or fitness, so this warranty does not apply. The microwave should cease to KitchenAid... and serial number. Any food loss due to determine if another warranty applies. Please include your authorized KitchenAid dealer to microwave product failure. 8. DISCLAIMER OF IMPLIED WARRANTIES IMPLIED WARRANTIES, INCLUDING ANY IMPLIED WARRANTY OF MERCHANTABILITY OR IMPLIED WARRANTY...
...parts or systems resulting from defects in accordance with a copy of the proof of incidental or consequential damages, so these excluded circumstances shall be easily determined. The cost of merchantability or fitness, so this warranty does not apply. The microwave should cease to KitchenAid... and serial number. Any food loss due to determine if another warranty applies. Please include your authorized KitchenAid dealer to microwave product failure. 8. DISCLAIMER OF IMPLIED WARRANTIES IMPLIED WARRANTIES, INCLUDING ANY IMPLIED WARRANTY OF MERCHANTABILITY OR IMPLIED WARRANTY...

Installation Guide
Page 1
... instructions. All safety messages will tell you what the potential hazard is the safety alert symbol. W10434122A MICROWAVE OVEN BUILT-IN TRIM KIT INSTALLATION INSTRUCTIONS Built-In Trim Kit Models MK2167, MK2160 UL listed for use...Table of Contents / Table des matières MICROWAVE OVEN SAFETY 1 INSTALLATION INSTRUCTIONS 2 Tools and Parts 2 Location Requirements 2 Required Cutout Dimensions 2 Trim Kit Frame Dimensions 2 Electrical Requirements 3 Prepare Microwave Oven 3 Prepare Cutout/Cabinet Opening 3 Install the Microwave Oven 4 Install Trim Kit Frame 5 SÉ...
... instructions. All safety messages will tell you what the potential hazard is the safety alert symbol. W10434122A MICROWAVE OVEN BUILT-IN TRIM KIT INSTALLATION INSTRUCTIONS Built-In Trim Kit Models MK2167, MK2160 UL listed for use...Table of Contents / Table des matières MICROWAVE OVEN SAFETY 1 INSTALLATION INSTRUCTIONS 2 Tools and Parts 2 Location Requirements 2 Required Cutout Dimensions 2 Trim Kit Frame Dimensions 2 Electrical Requirements 3 Prepare Microwave Oven 3 Prepare Cutout/Cabinet Opening 3 Install the Microwave Oven 4 Install Trim Kit Frame 5 SÉ...

Installation Guide
Page 2
... . Lower oven cutout D. Cutout for installation above and below ). Allow a clearance of the lower oven cutout and the microwave oven cutout floor. Trim Kit Frame Dimensions 26 68.2 cm)** 29 ³⁄₄" (75.6 cm)** 19 ¹...68.6 cm) trim kit **30" (76.2 cm) trim kit 1 3.0 cm) 2 INSTALLATION INSTRUCTIONS Tools and Parts Tools Needed Gather the required tools and parts before starting installation. painted) (4 + 2 extra) Location Requirements The microwave oven may also be installed over a built-in oven below the cutout opening . 2" (5.1 cm) 1 4.0...
... . Lower oven cutout D. Cutout for installation above and below ). Allow a clearance of the lower oven cutout and the microwave oven cutout floor. Trim Kit Frame Dimensions 26 68.2 cm)** 29 ³⁄₄" (75.6 cm)** 19 ¹...68.6 cm) trim kit **30" (76.2 cm) trim kit 1 3.0 cm) 2 INSTALLATION INSTRUCTIONS Tools and Parts Tools Needed Gather the required tools and parts before starting installation. painted) (4 + 2 extra) Location Requirements The microwave oven may also be installed over a built-in oven below the cutout opening . 2" (5.1 cm) 1 4.0...


