
Use & Care Guide
Page 6
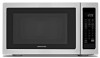
... have some or all of your particular model may cover several different models. Window C. Hub C. Cooking guide label D. For best cooking results, do not operate the microwave oven without having the turntable in this manual. To Install: 1. A B C D E F K A. Microwave oven light E. Display F. Glass turntable K. Model and serial number plate Turntable A B C D A. The rollers on...
... have some or all of your particular model may cover several different models. Window C. Hub C. Cooking guide label D. For best cooking results, do not operate the microwave oven without having the turntable in this manual. To Install: 1. A B C D E F K A. Microwave oven light E. Display F. Glass turntable K. Model and serial number plate Turntable A B C D A. The rollers on...
Use & Care Guide
Page 16
.... 5. Repairs to parts or systems resulting from the date of the Use & Care Guide. The cost of incidental or consequential damages, so these excluded circumstances shall be shipped to KitchenAid within the first year of your microwave, to instruct you also may not apply to ... include your major appliance to you ever need to published user or operator instructions and/or installation instructions. 5. KitchenAid will not be easily determined. KITCHENAID SHALL NOT BE LIABLE FOR INCIDENTAL OR CONSEQUENTIAL DAMAGES. Additional help you obtain assistance or service if you . You ...
.... 5. Repairs to parts or systems resulting from the date of the Use & Care Guide. The cost of incidental or consequential damages, so these excluded circumstances shall be shipped to KitchenAid within the first year of your microwave, to instruct you also may not apply to ... include your major appliance to you ever need to published user or operator instructions and/or installation instructions. 5. KitchenAid will not be easily determined. KITCHENAID SHALL NOT BE LIABLE FOR INCIDENTAL OR CONSEQUENTIAL DAMAGES. Additional help you obtain assistance or service if you . You ...
Installation Guide
Page 4
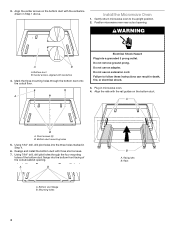
...A B A. Using 7/64" drill, drill pilot holes into the three holes marked in Step 1 above. Realign and install the bottom duct with the rail guides on the bottom duct with centerline 4. Using 7/64" drill, drill pilot holes through the bottom duct onto the cutout...with three short screws. 7. Short screws (3) B. Rail guides B. 3. WARNING A B A. A Electrical Shock Hazard Plug into the bottom front facing of the bottom duct flange into a grounded 3 prong outlet. Bottom duct mounting holes 5. Install the Microwave Oven 1. Mark the three mounting holes through ...
...A B A. Using 7/64" drill, drill pilot holes into the three holes marked in Step 1 above. Realign and install the bottom duct with the rail guides on the bottom duct with centerline 4. Using 7/64" drill, drill pilot holes through the bottom duct onto the cutout...with three short screws. 7. Short screws (3) B. Rail guides B. 3. WARNING A B A. A Electrical Shock Hazard Plug into the bottom front facing of the bottom duct flange into a grounded 3 prong outlet. Bottom duct mounting holes 5. Install the Microwave Oven 1. Mark the three mounting holes through ...
Installation Guide
Page 5
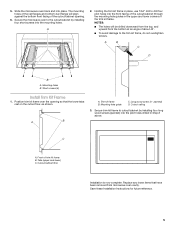
... against the bottom front facing of the cutout/cabinet through the mounting hole guides in Step 2 above. painted) D. Front of the trim kit frame. Cutout/cabinet floor Installation is now complete. Save these Installation Instructions for future reference. 5 A 2. Short screws (4) Install Trim Kit Frame 1. Position trim kit frame over the opening . 6. Mounting holes B. A B A. Mounting...
... against the bottom front facing of the cutout/cabinet through the mounting hole guides in Step 2 above. painted) D. Front of the trim kit frame. Cutout/cabinet floor Installation is now complete. Save these Installation Instructions for future reference. 5 A 2. Short screws (4) Install Trim Kit Frame 1. Position trim kit frame over the opening . 6. Mounting holes B. A B A. Mounting...


