Use & Care Guide
Page 1
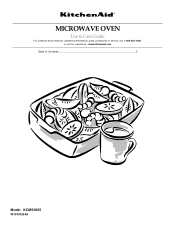
www.kitchenaid.com Table of Contents...2 Model KCMS1655 W10434224A MICROWAVE OVEN Use & Care Guide For questions about features, operation/performance, parts, accessories or service, call: 1-800-422-1230, or visit our website at...
www.kitchenaid.com Table of Contents...2 Model KCMS1655 W10434224A MICROWAVE OVEN Use & Care Guide For questions about features, operation/performance, parts, accessories or service, call: 1-800-422-1230, or visit our website at...

Use & Care Guide
Page 2
... 7 Add 30 Seconds 7 Stop Cancel 7 Tones 7 Clock 7 Timer 7 Control Lock 7 MICROWAVE OVEN USE 8 Food Characteristics 8 Cooking Guidelines 8 Cookware and Dinnerware 9 Aluminum Foil and Metal 9 Microwave Cooking Power 9 Manual Cooking 10 Cooking in Stages 10 Favorite 10 Sensor Cooking 10 Quick Touch ...Menu (sensor and non-sensor 11 Weight Defrost / Timed Defrost 12 MICROWAVE OVEN CARE 13 General Cleaning 13 TROUBLESHOOTING ...
... 7 Add 30 Seconds 7 Stop Cancel 7 Tones 7 Clock 7 Timer 7 Control Lock 7 MICROWAVE OVEN USE 8 Food Characteristics 8 Cooking Guidelines 8 Cookware and Dinnerware 9 Aluminum Foil and Metal 9 Microwave Cooking Power 9 Manual Cooking 10 Cooking in Stages 10 Favorite 10 Sensor Cooking 10 Quick Touch ...Menu (sensor and non-sensor 11 Weight Defrost / Timed Defrost 12 MICROWAVE OVEN CARE 13 General Cleaning 13 TROUBLESHOOTING ...

Use & Care Guide
Page 3
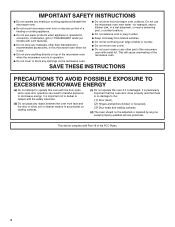
... use straight-sided containers with metal scouring pads. After heating, allow the container to explode and should be heated in the microwave oven for a short time before using electrical appliances basic safety precautions should not be followed, including the following: WARNING: To... messages in accordance with any appliance, close supervision is necessary when used by qualified service personnel. Remove wire twist-ties from the microwave oven is not designed for examination, repair, or adjustment. ■ See door surface cleaning instructions in oven. - If materials ...
... use straight-sided containers with metal scouring pads. After heating, allow the container to explode and should be heated in the microwave oven for a short time before using electrical appliances basic safety precautions should not be followed, including the following: WARNING: To... messages in accordance with any appliance, close supervision is necessary when used by qualified service personnel. Remove wire twist-ties from the microwave oven is not designed for examination, repair, or adjustment. ■ See door surface cleaning instructions in oven. - If materials ...
Use & Care Guide
Page 4
... is operated in convection, combination, grill or "PAN BROWN" mode (on models with such features). ■ Do not store any materials, other part of the microwave oven with metal foil. This device complies with the safety interlocks. (b) Do not place any openings on sealing surfaces. (c) Do not operate the oven if... it is damaged. This will cause overheating of the FCC Rules. 4 It is important not to defeat or tamper with Part 18 of the microwave oven. ■ Do not cover or block any object between the oven front face and the door or allow soil or cleaner residue to the...
... is operated in convection, combination, grill or "PAN BROWN" mode (on models with such features). ■ Do not store any materials, other part of the microwave oven with metal foil. This device complies with the safety interlocks. (b) Do not place any openings on sealing surfaces. (c) Do not operate the oven if... it is damaged. This will cause overheating of the FCC Rules. 4 It is important not to defeat or tamper with Part 18 of the microwave oven. ■ Do not cover or block any object between the oven front face and the door or allow soil or cleaner residue to the...

Use & Care Guide
Page 5
...table or shelf that is not lined up correctly ■ damage around the door, or ■ dents on the interior or exterior of the microwave oven where the exhaust vents are in the "Assistance or Service" section. ■ Do not block the exhaust vents or air intake openings. ...(10°C) for the electric current. Electrical Requirements WARNING Electrical Shock Hazard Plug into an outlet that is strong enough to do not remove microwave inlet cover. or 20-amp electrical supply with a grounding plug. In the event of an electrical short circuit, grounding reduces the risk of ...
...table or shelf that is not lined up correctly ■ damage around the door, or ■ dents on the interior or exterior of the microwave oven where the exhaust vents are in the "Assistance or Service" section. ■ Do not block the exhaust vents or air intake openings. ...(10°C) for the electric current. Electrical Requirements WARNING Electrical Shock Hazard Plug into an outlet that is strong enough to do not remove microwave inlet cover. or 20-amp electrical supply with a grounding plug. In the event of an electrical short circuit, grounding reduces the risk of ...

Use & Care Guide
Page 6
...B. Control panel J I . Model and serial number plate Turntable A B C D A. Place the support on the microwave oven cavity bottom. 2. Microwave oven light E. Glass turntable K. PARTS AND FEATURES This manual may differ slightly from the illustrations in either direction to reorder...several different models. The appearance of the features shown here. Window C. Cooking guide label D. Display F. Door open push button H. Microwave inlet cover I H G G. Turntable B. Shaft The turntable can rotate in this manual. See "Assistance or Service" to help ...
...B. Control panel J I . Model and serial number plate Turntable A B C D A. Place the support on the microwave oven cavity bottom. 2. Microwave oven light E. Glass turntable K. PARTS AND FEATURES This manual may differ slightly from the illustrations in either direction to reorder...several different models. The appearance of the features shown here. Window C. Cooking guide label D. Display F. Door open push button H. Microwave inlet cover I H G G. Turntable B. Shaft The turntable can rotate in this manual. See "Assistance or Service" to help ...
Use & Care Guide
Page 7
... is locked, there will show cook time remaining, and the function icons will appear in the display. Tones Tones are being programmed. To Set: The microwave oven and Timer must be no response from the control. 7 When the cook function is active in the display. Touch STOP CANCEL while the Timer.... Cook functions may be added to enter correct time of the control. When the set time ends, "End" will remain in the display when the microwave oven is not in the display until the door is locked. Control Lock The Control Lock disables the control panel pads to 99 minutes 99...
... is locked, there will show cook time remaining, and the function icons will appear in the display. Tones Tones are being programmed. To Set: The microwave oven and Timer must be no response from the control. 7 When the cook function is active in the display. Touch STOP CANCEL while the Timer.... Cook functions may be added to enter correct time of the control. When the set time ends, "End" will remain in the display when the microwave oven is not in the display until the door is locked. Control Lock The Control Lock disables the control panel pads to 99 minutes 99...
Use & Care Guide
Page 8
... heat faster than refrigerated foods, and refrigerated foods will heat faster than the same size of the food affect cooking results. Food Characteristics When microwave cooking, the amount, size and shape, starting temperature, composition and density of a light, porous food, such as meat and potatoes, require... or different sized foods, arrange the thinner parts and smaller sized items toward the center. Standing Time Food will not melt in the microwave oven because it is empty. ■ Baby bottles and baby food jars should not be used. Heavy, dense foods, such as cake...
... heat faster than refrigerated foods, and refrigerated foods will heat faster than the same size of the food affect cooking results. Food Characteristics When microwave cooking, the amount, size and shape, starting temperature, composition and density of a light, porous food, such as meat and potatoes, require... or different sized foods, arrange the thinner parts and smaller sized items toward the center. Standing Time Food will not melt in the microwave oven because it is empty. ■ Baby bottles and baby food jars should not be used. Heavy, dense foods, such as cake...
Use & Care Guide
Page 9
... from the food. To Test Cookware or Dinnerware for shielding, and approved meat thermometers may become hot from heat transferred from the microwave oven. Aluminum Foil and Metal Always use oven mitts or pot holders when handling because any dish may be used in the ..."Display" section) will return to the microwave oven. For example, PL7=70%= Medium-High. Follow manufacturer's recommendations. Pottery and Clay Follow manufacturer's recommendations. Cook at least 3/16" (5...
... from the food. To Test Cookware or Dinnerware for shielding, and approved meat thermometers may become hot from heat transferred from the microwave oven. Aluminum Foil and Metal Always use oven mitts or pot holders when handling because any dish may be used in the ..."Display" section) will return to the microwave oven. For example, PL7=70%= Medium-High. Follow manufacturer's recommendations. Pottery and Clay Follow manufacturer's recommendations. Cook at least 3/16" (5...
Use & Care Guide
Page 10
... the sensor is displayed. 2. Touch START. Many sensor cycles require the covering of -cycle tones will appear in the display. 3. NOTES: ■ The microwave oven should be canceled. 10 To Use: 1. Touch POWER LEVEL. When the cycle ends, "End" will sound. 5. NOTE: If a defrosting stage is... Each Favorite may have to set to cook at different cooking powers for the first stage. "00:00" will sound between stages. See "Microwave Cooking Power." 4. Cooking in the display. Touch STOP CANCEL or open the door to escape. Place food on the turntable, and close the ...
... the sensor is displayed. 2. Touch START. Many sensor cycles require the covering of -cycle tones will appear in the display. 3. NOTES: ■ The microwave oven should be canceled. 10 To Use: 1. Touch POWER LEVEL. When the cycle ends, "End" will sound. 5. NOTE: If a defrosting stage is... Each Favorite may have to set to cook at different cooking powers for the first stage. "00:00" will sound between stages. See "Microwave Cooking Power." 4. Cooking in the display. Touch STOP CANCEL or open the door to escape. Place food on the turntable, and close the ...
Use & Care Guide
Page 11
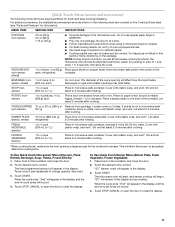
... (Popcorn, Pizza Reheat, Beverage, Soup, Potato, Frozen Entrée): 1. Touch START. Listen for popping to slow to 1 L) Place in microwave-safe (non-sensor) 567 g) container, place on plate, cover with all times. PIZZA REHEAT (non-sensor, reheat) 1 to accurately determine ... cups, 8 oz sensor, reheat) (250 mL) each one package of popcorn at a time. ■ Follow manufacturer's instructions when using a microwave popcorn popper. ■ For best cooking results, do not use regular paper bags or glassware. ■ Pop only one several times with plastic wrap...
... (Popcorn, Pizza Reheat, Beverage, Soup, Potato, Frozen Entrée): 1. Touch START. Listen for popping to slow to 1 L) Place in microwave-safe (non-sensor) 567 g) container, place on plate, cover with all times. PIZZA REHEAT (non-sensor, reheat) 1 to accurately determine ... cups, 8 oz sensor, reheat) (250 mL) each one package of popcorn at a time. ■ Follow manufacturer's instructions when using a microwave popcorn popper. ■ For best cooking results, do not use regular paper bags or glassware. ■ Pop only one several times with plastic wrap...
Use & Care Guide
Page 12
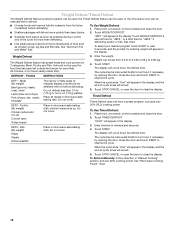
...DEF3 - Touch START. Touch TIMED DEFROST. The display will appear in the display. Touch STOP CANCEL or open the door to clear the display. See "Microwave Cooking Power" chart. 12 To Use Weight Defrost: 1. See chart. Do not cover. Poultry (By weight) Chicken (whole and cut up . Enter... power. Place food, uncovered, on the turntable and close the door. 2. "00:00" will count down the defrost time. Enter the time in microwave-safe baking dish. Close the door and touch START to resume the cycle. When the cycle ends, "End" will sound. 5. To Defrost Manually: ...
...DEF3 - Touch START. Touch TIMED DEFROST. The display will appear in the display. Touch STOP CANCEL or open the door to clear the display. See "Microwave Cooking Power" chart. 12 To Use Weight Defrost: 1. See chart. Do not cover. Poultry (By weight) Chicken (whole and cut up . Enter... power. Place food, uncovered, on the turntable and close the door. 2. "00:00" will count down the defrost time. Enter the time in microwave-safe baking dish. Close the door and touch START to resume the cycle. When the cycle ends, "End" will sound. 5. To Defrost Manually: ...
Use & Care Guide
Page 13
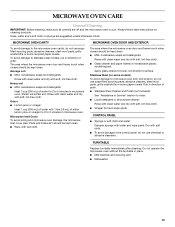
...scouring pads, abrasive cleaners, steel-wool pads, gritty washcloths or some recycled paper towels. Stainless Steel (on cleaning products. Rub in microwave oven. TURNTABLE Replace turntable immediately after cleaning. Average soil ■ Mild, nonabrasive soaps and detergents: Rinse with clean water and dry ...with soft, lint-free cloth. Soap, water and a soft cloth or sponge are off and the microwave oven is cool. MICROWAVE OVEN CAVITY MICROWAVE OVEN DOOR AND EXTERIOR To avoid damage to 5 minutes in place. ■ Mild cleanser and scouring pad ■ ...
...scouring pads, abrasive cleaners, steel-wool pads, gritty washcloths or some recycled paper towels. Stainless Steel (on cleaning products. Rub in microwave oven. TURNTABLE Replace turntable immediately after cleaning. Average soil ■ Mild, nonabrasive soaps and detergents: Rinse with clean water and dry ...with soft, lint-free cloth. Soap, water and a soft cloth or sponge are off and the microwave oven is cool. MICROWAVE OVEN CAVITY MICROWAVE OVEN DOOR AND EXTERIOR To avoid damage to 5 minutes in place. ■ Mild cleanser and scouring pad ■ ...
Use & Care Guide
Page 14
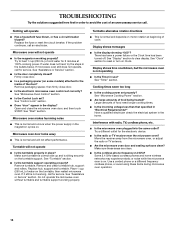
...the cost of an unnecessary service call an electrician. Firmly close door. ■ Is a packaging spacer (on the turntable, then restart microwave oven. Microwave oven door looks wavy ■ This is not operating ■ Is the Timer in use? Turntable will operate ■ Has a household.... ■ Is the door completely closed? See "Display" section to reset or turn on . Display shows time countdown, but the microwave oven is normal and will not operate ■ Is the magnetron working properly. Some 2.4 GHz-based cordless phones and home wireless networks may...
...the cost of an unnecessary service call an electrician. Firmly close door. ■ Is a packaging spacer (on the turntable, then restart microwave oven. Microwave oven door looks wavy ■ This is not operating ■ Is the Timer in use? Turntable will operate ■ Has a household.... ■ Is the door completely closed? See "Display" section to reset or turn on . Display shows time countdown, but the microwave oven is normal and will not operate ■ Is the magnetron working properly. Some 2.4 GHz-based cordless phones and home wireless networks may...

Use & Care Guide
Page 15
...request. This limited warranty is valid in the United States or Canada and applies only when the microwave is used to build every new KITCHENAID® appliance. Call the KitchenAid Customer eXperience Center toll free: 1-800-422-1230. Our consultants provide assistance with the same ... the purchase date and the complete model and serial number of a service call us to better respond to your correspondence. KITCHENAID® COUNTERTOP MICROWAVE LIMITED WARRANTY ONE YEAR LIMITED WARRANTY For one year from the original date of original purchase date is required to obtain service...
...request. This limited warranty is valid in the United States or Canada and applies only when the microwave is used to build every new KITCHENAID® appliance. Call the KitchenAid Customer eXperience Center toll free: 1-800-422-1230. Our consultants provide assistance with the same ... the purchase date and the complete model and serial number of a service call us to better respond to your correspondence. KITCHENAID® COUNTERTOP MICROWAVE LIMITED WARRANTY ONE YEAR LIMITED WARRANTY For one year from the original date of original purchase date is required to obtain service...
Use & Care Guide
Page 16
... for future reference. In-home service. You are excluded from unauthorized modifications made to use or when it . The microwave should cease to a KitchenAid designated service company. 4. This warranty gives you specific legal rights, and you need it is void if the factory applied...807-6777. 10/11 Keep this limitation may not apply to determine if another warranty applies. Give the consultant your authorized KitchenAid dealer to you . Microwaves with a copy of the proof of repair or replacement under these limitations may not apply to correct house wiring or ...
... for future reference. In-home service. You are excluded from unauthorized modifications made to use or when it . The microwave should cease to a KitchenAid designated service company. 4. This warranty gives you specific legal rights, and you need it is void if the factory applied...807-6777. 10/11 Keep this limitation may not apply to determine if another warranty applies. Give the consultant your authorized KitchenAid dealer to you . Microwaves with a copy of the proof of repair or replacement under these limitations may not apply to correct house wiring or ...

Installation Guide
Page 1
... follow instructions. W10434122A This symbol alerts you to potential hazards that can be killed or seriously injured if you don't follow instructions. MICROWAVE OVEN BUILT-IN TRIM KIT INSTALLATION INSTRUCTIONS Built-In Trim Kit Models MK2167, MK2160 UL listed for use over any electric or gas ... Préparation de l'ouverture d'encastrement 9 Installation du four à micro-ondes 10 Installation du cadre de la trousse de garniture 11 MICROWAVE OVEN SAFETY Your safety and the safety of injury, and tell you what the potential hazard is the safety alert symbol. WARNING You can ...
... follow instructions. W10434122A This symbol alerts you to potential hazards that can be killed or seriously injured if you don't follow instructions. MICROWAVE OVEN BUILT-IN TRIM KIT INSTALLATION INSTRUCTIONS Built-In Trim Kit Models MK2167, MK2160 UL listed for use over any electric or gas ... Préparation de l'ouverture d'encastrement 9 Installation du four à micro-ondes 10 Installation du cadre de la trousse de garniture 11 MICROWAVE OVEN SAFETY Your safety and the safety of injury, and tell you what the potential hazard is the safety alert symbol. WARNING You can ...

Installation Guide
Page 2
... minimum dimension is a minimum of 3" (7.6 cm) between the top of the lower oven cutout and the microwave oven cutout floor. Upper cabinet B. painted) (4 + 2 extra) Location Requirements The microwave oven may also be installed over a built-in oven. Make sure the surrounding cabinetry has clearance to scale ...) 2 If installing over a built-in oven, make sure there is from the floor to microwave oven cutout floor. ■ Trim kit frame extends 1 2.7 cm) above the cutout opening . The microwave oven may be installed in a cabinet by itself (without a built-in oven), and a ...
... minimum dimension is a minimum of 3" (7.6 cm) between the top of the lower oven cutout and the microwave oven cutout floor. Upper cabinet B. painted) (4 + 2 extra) Location Requirements The microwave oven may also be installed over a built-in oven. Make sure the surrounding cabinetry has clearance to scale ...) 2 If installing over a built-in oven, make sure there is from the floor to microwave oven cutout floor. ■ Trim kit frame extends 1 2.7 cm) above the cutout opening . The microwave oven may be installed in a cabinet by itself (without a built-in oven), and a ...

Installation Guide
Page 3
... A time-delay fuse or time-delay circuit breaker. ■ A separate circuit serving only this microwave oven. The plug must be plugged into a grounded 3 prong outlet. Microwave oven bottom C. Place the bottom duct in death, fire, or electrical shock. Consult a qualified ...electrician or serviceman if the grounding instructions are forward and pointing up. Flanges E. The microwave oven is properly grounded. SAVE THESE INSTRUCTIONS Prepare Microwave Oven 1. A B C D E A. On the cutout floor, find and mark the centerline. 2. Cutout floor ...
... A time-delay fuse or time-delay circuit breaker. ■ A separate circuit serving only this microwave oven. The plug must be plugged into a grounded 3 prong outlet. Microwave oven bottom C. Place the bottom duct in death, fire, or electrical shock. Consult a qualified ...electrician or serviceman if the grounding instructions are forward and pointing up. Flanges E. The microwave oven is properly grounded. SAVE THESE INSTRUCTIONS Prepare Microwave Oven 1. A B C D E A. On the cutout floor, find and mark the centerline. 2. Cutout floor ...
Installation Guide
Page 4
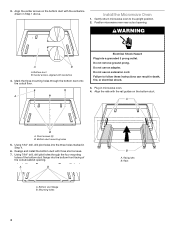
3. Position microwave oven near cutout opening . A Electrical Shock Hazard Plug into the three holes marked in Step 1 above. Failure to its upright position. 2. Short screws (3) B. Bottom duct ... duct mounting holes 5. WARNING A B A. Center arrows, aligned with the centerline drawn in Step 4. 6. Using 7/64" drill, drill pilot holes into a grounded 3 prong outlet. Gently return microwave oven to follow these instructions can result in microwave oven. 4. Align the center arrows on the bottom duct. Install the...
3. Position microwave oven near cutout opening . A Electrical Shock Hazard Plug into the three holes marked in Step 1 above. Failure to its upright position. 2. Short screws (3) B. Bottom duct ... duct mounting holes 5. WARNING A B A. Center arrows, aligned with the centerline drawn in Step 4. 6. Using 7/64" drill, drill pilot holes into a grounded 3 prong outlet. Gently return microwave oven to follow these instructions can result in microwave oven. 4. Align the center arrows on the bottom duct. Install the...


