Use & Care Guide
Page 1
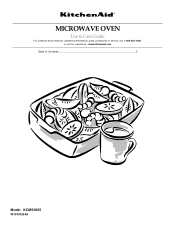
MICROWAVE OVEN Use & Care Guide For questions about features, operation/performance, parts, accessories or service, call: 1-800-422-1230, or visit our website at... www.kitchenaid.com Table of Contents...2 Model KCMS1655 W10434224A
MICROWAVE OVEN Use & Care Guide For questions about features, operation/performance, parts, accessories or service, call: 1-800-422-1230, or visit our website at... www.kitchenaid.com Table of Contents...2 Model KCMS1655 W10434224A

Use & Care Guide
Page 2
TABLE OF CONTENTS MICROWAVE OVEN SAFETY 3 INSTALLATION INSTRUCTIONS 5 Unpacking 5 Location Requirements 5 Electrical Requirements 5 PARTS AND FEATURES 6 Turntable 6 MICROWAVE OVEN CONTROL 6 Display 7 Start 7 Add 30 Seconds 7 Stop Cancel 7 Tones 7 Clock 7 Timer 7 Control Lock 7 MICROWAVE OVEN USE 8 Food Characteristics 8 Cooking Guidelines 8 ... Menu (sensor and non-sensor 11 Weight Defrost / Timed Defrost 12 MICROWAVE OVEN CARE 13 General Cleaning 13 TROUBLESHOOTING 14 ASSISTANCE OR SERVICE 15 Replacement Parts 15 Built-In Kits 15 WARRANTY 15 2
TABLE OF CONTENTS MICROWAVE OVEN SAFETY 3 INSTALLATION INSTRUCTIONS 5 Unpacking 5 Location Requirements 5 Electrical Requirements 5 PARTS AND FEATURES 6 Turntable 6 MICROWAVE OVEN CONTROL 6 Display 7 Start 7 Add 30 Seconds 7 Stop Cancel 7 Tones 7 Clock 7 Timer 7 Control Lock 7 MICROWAVE OVEN USE 8 Food Characteristics 8 Cooking Guidelines 8 ... Menu (sensor and non-sensor 11 Weight Defrost / Timed Defrost 12 MICROWAVE OVEN CARE 13 General Cleaning 13 TROUBLESHOOTING 14 ASSISTANCE OR SERVICE 15 Replacement Parts 15 Built-In Kits 15 WARRANTY 15 2

Use & Care Guide
Page 3
... containers - Do not use the cavity for example, closed , turn oven off, and disconnect the power cord, or shut off the pad and touch electrical parts involving a risk of electric shock. Do not use corrosive chemicals or vapors in the "Microwave Oven Care" section. - Visible bubbling or boiling when the container...
... containers - Do not use the cavity for example, closed , turn oven off, and disconnect the power cord, or shut off the pad and touch electrical parts involving a risk of electric shock. Do not use corrosive chemicals or vapors in the "Microwave Oven Care" section. - Visible bubbling or boiling when the container...
Use & Care Guide
Page 4
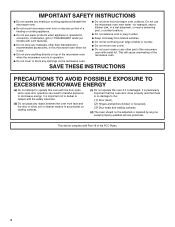
...Do not attempt to operate this microwave oven outdoors. This device complies with such features). ■ Do not store any materials, other part of the microwave oven with the door open since open-door operation can result in harmful exposure to microwave energy. It is particularly ...cooking appliance. ■ Do not use paper products when appliance is operated in convection, combination, grill or "PAN BROWN" mode (on models with Part 18 of the FCC Rules. 4 IMPORTANT SAFETY INSTRUCTIONS ■ Do not operate any heating or cooking appliance beneath the microwave oven. ■ ...
...Do not attempt to operate this microwave oven outdoors. This device complies with such features). ■ Do not store any materials, other part of the microwave oven with the door open since open-door operation can result in harmful exposure to microwave energy. It is particularly ...cooking appliance. ■ Do not use paper products when appliance is operated in convection, combination, grill or "PAN BROWN" mode (on models with Part 18 of the FCC Rules. 4 IMPORTANT SAFETY INSTRUCTIONS ■ Do not operate any heating or cooking appliance beneath the microwave oven. ■ ...

Use & Care Guide
Page 5
... microwave oven is properly grounded. If vents are located. SAVE THESE INSTRUCTIONS 5 Check for damage, such as to do not remove microwave inlet cover. See "Parts and Features." Handle the microwave oven gently. Do not remove ground prong. Recommended: ■ A time-delay fuse or time-delay circuit breaker. ■ A separate circuit...
... microwave oven is properly grounded. If vents are located. SAVE THESE INSTRUCTIONS 5 Check for damage, such as to do not remove microwave inlet cover. See "Parts and Features." Handle the microwave oven gently. Do not remove ground prong. Recommended: ■ A time-delay fuse or time-delay circuit breaker. ■ A separate circuit...

Use & Care Guide
Page 6
... cook food more evenly. The rollers on the support should fit inside the turntable bottom ridge. The model you have some or all of the parts. Model and serial number plate Turntable A B C D A. PARTS AND FEATURES This manual may cover several different models.
... cook food more evenly. The rollers on the support should fit inside the turntable bottom ridge. The model you have some or all of the parts. Model and serial number plate Turntable A B C D A. PARTS AND FEATURES This manual may cover several different models.
Use & Care Guide
Page 8
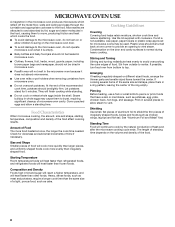
.... Microwaves are attracted to avoid overcooking the outer edges of microwave oven cavity. Arranging If heating irregularly shaped or different sized foods, arrange the thinner parts and smaller sized items toward the center. Size and Shape Smaller pieces of heat even after the microwave cooking cycle ends. Cover poached eggs and...
.... Microwaves are attracted to avoid overcooking the outer edges of microwave oven cavity. Arranging If heating irregularly shaped or different sized foods, arrange the thinner parts and smaller sized items toward the center. Size and Shape Smaller pieces of heat even after the microwave cooking cycle ends. Cover poached eggs and...
Use & Care Guide
Page 11
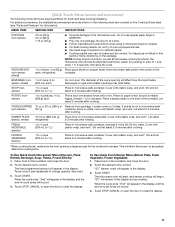
..., and vent*. POTATO (nonsensor) 1 to pop unpopped kernels. ■ Use fresh bags of popcorn at least 1" (2.5 cm) apart. Place on the Cooking Guide label (see "Parts and Features" for optimal results. ■ Cooking results may heat faster. Place a single potato to clear the display. Let stand 5 minutes after heating. Loosen cover...
..., and vent*. POTATO (nonsensor) 1 to pop unpopped kernels. ■ Use fresh bags of popcorn at least 1" (2.5 cm) apart. Place on the Cooking Guide label (see "Parts and Features" for optimal results. ■ Cooking results may heat faster. Place a single potato to clear the display. Let stand 5 minutes after heating. Loosen cover...
Use & Care Guide
Page 12
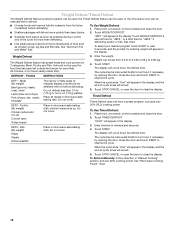
... sound. 5. Timed Defrost Timed Defrost does not have a preset program, but uses only 30% (PL3) cooking power. The cycle may be interrupted briefly to shield parts of irregular shaped cuts should not be used , or the microwave oven can be shielded with foil before defrosting. Place all meats in minutes and...
... sound. 5. Timed Defrost Timed Defrost does not have a preset program, but uses only 30% (PL3) cooking power. The cycle may be interrupted briefly to shield parts of irregular shaped cuts should not be used , or the microwave oven can be shielded with foil before defrosting. Place all meats in minutes and...
Use & Care Guide
Page 13
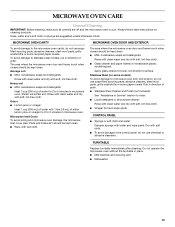
... cleaner to towel, not directly to 5 minutes in microwave oven. Microwave Inlet Cover To avoid arcing and microwave oven damage, the microwave inlet cover (see "Parts and Features") should be kept clean. ■ Wipe with soft, lint-free cloth. Steam will soften soil. TURNTABLE Replace turntable immediately after cleaning. Odors ■...
... cleaner to towel, not directly to 5 minutes in microwave oven. Microwave Inlet Cover To avoid arcing and microwave oven damage, the microwave inlet cover (see "Parts and Features") should be kept clean. ■ Wipe with soft, lint-free cloth. Steam will soften soil. TURNTABLE Replace turntable immediately after cleaning. Odors ■...

Use & Care Guide
Page 15
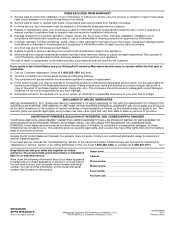
...one-year limited warranty of purchase, when this limited warranty. 15 If you can be ordered by a KitchenAid designated service company. If you need replacement parts If you the cost of your request. See service instructions below . This limited warranty is used to... call us to better respond to correct defects in your correspondence. These kits are trained to local dealers, repair parts distributors and service companies. KITCHENAID® COUNTERTOP MICROWAVE LIMITED WARRANTY ONE YEAR LIMITED WARRANTY For one of original purchase date is installed, operated and...
...one-year limited warranty of purchase, when this limited warranty. 15 If you can be ordered by a KitchenAid designated service company. If you need replacement parts If you the cost of your request. See service instructions below . This limited warranty is used to... call us to better respond to correct defects in your correspondence. These kits are trained to local dealers, repair parts distributors and service companies. KITCHENAID® COUNTERTOP MICROWAVE LIMITED WARRANTY ONE YEAR LIMITED WARRANTY For one of original purchase date is installed, operated and...
Use & Care Guide
Page 16
... your sales slip together for in China In Canada call 1-800-422-1230. You can be borne by KitchenAid. 6. Consumable parts are responsible for other damage to determine if another warranty applies. Any food loss due to repair or replace light ...253-1301 (toll-free). 2. All rights reserved. ®Registered Trademark/TM Trademark of purchase. 7. Repairs or replacement when your microwave, to a KitchenAid designated service center. In the event of repair, you ever need service, first see the "Troubleshooting" section of your microwave is used for insurance and...
... your sales slip together for in China In Canada call 1-800-422-1230. You can be borne by KitchenAid. 6. Consumable parts are responsible for other damage to determine if another warranty applies. Any food loss due to repair or replace light ...253-1301 (toll-free). 2. All rights reserved. ®Registered Trademark/TM Trademark of purchase. 7. Repairs or replacement when your microwave, to a KitchenAid designated service center. In the event of repair, you ever need service, first see the "Troubleshooting" section of your microwave is used for insurance and...

Installation Guide
Page 1
...;lectriques ou gaz, jusqu'à 30" (76,2 cm) de largeur Table of Contents / Table des matières MICROWAVE OVEN SAFETY 1 INSTALLATION INSTRUCTIONS 2 Tools and Parts 2 Location Requirements 2 Required Cutout Dimensions 2 Trim Kit Frame Dimensions 2 Electrical Requirements 3 Prepare Microwave Oven 3 Prepare Cutout/Cabinet Opening 3 Install the Microwave Oven 4 Install Trim Kit...
...;lectriques ou gaz, jusqu'à 30" (76,2 cm) de largeur Table of Contents / Table des matières MICROWAVE OVEN SAFETY 1 INSTALLATION INSTRUCTIONS 2 Tools and Parts 2 Location Requirements 2 Required Cutout Dimensions 2 Trim Kit Frame Dimensions 2 Electrical Requirements 3 Prepare Microwave Oven 3 Prepare Cutout/Cabinet Opening 3 Install the Microwave Oven 4 Install Trim Kit...

Installation Guide
Page 2
.... Upper cabinet B. If installing over a built-in oven below). Lower cabinets E. INSTALLATION INSTRUCTIONS Tools and Parts Tools Needed Gather the required tools and parts before starting installation. Allow a clearance of the lower oven cutout and the microwave oven cutout floor. Cutout for...instructions provided with any tools listed here. ■ Measuring tape ■ Pencil ■ Phillips screwdriver ■ Drill ■ 7/64" drill bit Parts Supplied (not shown to open and close freely. Floor Required Cutout Dimensions 22 ³⁄₄" (57.8 cm) 1 2.7 cm) 17" (...
.... Upper cabinet B. If installing over a built-in oven below). Lower cabinets E. INSTALLATION INSTRUCTIONS Tools and Parts Tools Needed Gather the required tools and parts before starting installation. Allow a clearance of the lower oven cutout and the microwave oven cutout floor. Cutout for...instructions provided with any tools listed here. ■ Measuring tape ■ Pencil ■ Phillips screwdriver ■ Drill ■ 7/64" drill bit Parts Supplied (not shown to open and close freely. Floor Required Cutout Dimensions 22 ³⁄₄" (57.8 cm) 1 2.7 cm) 17" (...

