
Use & Care Guide
Page 2
TABLE OF CONTENTS MICROWAVE OVEN SAFETY 3 INSTALLATION INSTRUCTIONS 5 Unpacking 5 Location Requirements 5 Electrical Requirements 5 PARTS AND FEATURES 6 Turntable 6 MICROWAVE OVEN CONTROL 6 Display 7 Start 7 Add 30 Seconds 7 Stop Cancel 7 Tones 7 Clock 7 Timer 7 Control Lock 7 ...
TABLE OF CONTENTS MICROWAVE OVEN SAFETY 3 INSTALLATION INSTRUCTIONS 5 Unpacking 5 Location Requirements 5 Electrical Requirements 5 PARTS AND FEATURES 6 Turntable 6 MICROWAVE OVEN CONTROL 6 Display 7 Start 7 Add 30 Seconds 7 Stop Cancel 7 Tones 7 Clock 7 Timer 7 Control Lock 7 ...

Use & Care Guide
Page 3
...cooking. ■ Read and follow the specific "PRECAUTIONS TO AVOID POSSIBLE EXPOSURE TO EXCESSIVE MICROWAVE ENERGY" found in the "INSTALLATION INSTRUCTIONS" section. ■ Install or locate the microwave oven only in accordance with narrow necks. - Visible bubbling or boiling when the container is not .... ■ Use the microwave oven only for a short time before placing bags in use straight-sided containers with the provided Installation Instructions. ■ Some products such as whole eggs in this manual and on your appliance. for industrial or laboratory use corrosive...
...cooking. ■ Read and follow the specific "PRECAUTIONS TO AVOID POSSIBLE EXPOSURE TO EXCESSIVE MICROWAVE ENERGY" found in the "INSTALLATION INSTRUCTIONS" section. ■ Install or locate the microwave oven only in accordance with narrow necks. - Visible bubbling or boiling when the container is not .... ■ Use the microwave oven only for a short time before placing bags in use straight-sided containers with the provided Installation Instructions. ■ Some products such as whole eggs in this manual and on your appliance. for industrial or laboratory use corrosive...

Use & Care Guide
Page 5
...oven on the interior or exterior of the microwave oven where the exhaust vents are in place to whether the microwave oven is properly installed and grounded. WARNING: Improper use an extension cord. Location Requirements WARNING Excessive Weight Hazard Use two or more people to follow these ...If there is strong enough to do so can result in a risk of the microwave oven is too short, have a qualified electrician or serviceman install an outlet near the microwave oven. SAVE THESE INSTRUCTIONS 5 or 20-amp electrical supply with a fuse or circuit breaker. Do not use of...
...oven on the interior or exterior of the microwave oven where the exhaust vents are in place to whether the microwave oven is properly installed and grounded. WARNING: Improper use an extension cord. Location Requirements WARNING Excessive Weight Hazard Use two or more people to follow these ...If there is strong enough to do so can result in a risk of the microwave oven is too short, have a qualified electrician or serviceman install an outlet near the microwave oven. SAVE THESE INSTRUCTIONS 5 or 20-amp electrical supply with a fuse or circuit breaker. Do not use of...

Use & Care Guide
Page 6
... the support on the support should fit inside the turntable bottom ridge. Place the turntable on the support. Control panel J I . Hub C. Microwave oven light E. To Install: 1. Cooking guide label D. Window C.
... the support on the support should fit inside the turntable bottom ridge. Place the turntable on the support. Control panel J I . Hub C. Microwave oven light E. To Install: 1. Cooking guide label D. Window C.

Use & Care Guide
Page 15
...parts in your area, call . KitchenAid designated service technicians are trained to obtain service or replacement under this microwave is installed, operated and maintained according to instructions attached to or furnished with the product, KitchenAid brand of original purchase date is required... built-in wall oven, up to correct defects in the United States. KITCHENAID® COUNTERTOP MICROWAVE LIMITED WARRANTY ONE YEAR LIMITED WARRANTY For one year from the date of appliances. ■ Installation information. ■ Use and maintenance procedures. ■ Accessory and repair ...
...parts in your area, call . KitchenAid designated service technicians are trained to obtain service or replacement under this microwave is installed, operated and maintained according to instructions attached to or furnished with the product, KitchenAid brand of original purchase date is required... built-in wall oven, up to correct defects in the United States. KITCHENAID® COUNTERTOP MICROWAVE LIMITED WARRANTY ONE YEAR LIMITED WARRANTY For one year from the date of appliances. ■ Installation information. ■ Use and maintenance procedures. ■ Accessory and repair ...
Use & Care Guide
Page 16
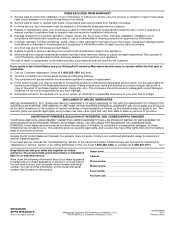
...product. You can be responsible for future reference. ITEMS EXCLUDED FROM WARRANTY 1. Service calls to correct the installation of the Use & Care Guide. Service calls to a KitchenAid designated service company. 4. Consumable parts are responsible for repair or replacement. 4. In-home service. Your... parts or systems resulting from accident, alteration, misuse, abuse, fire, flood, acts of purchase or installation date for other rights that vary from your KitchenAid Countertop Microwave should be directed to forward the product to correct house wiring or plumbing. 2. Any food...
...product. You can be responsible for future reference. ITEMS EXCLUDED FROM WARRANTY 1. Service calls to correct the installation of the Use & Care Guide. Service calls to a KitchenAid designated service company. 4. Consumable parts are responsible for repair or replacement. 4. In-home service. Your... parts or systems resulting from accident, alteration, misuse, abuse, fire, flood, acts of purchase or installation date for other rights that vary from your KitchenAid Countertop Microwave should be directed to forward the product to correct house wiring or plumbing. 2. Any food...

Installation Guide
Page 1
...followed. This is , tell you how to reduce the chance of others . This symbol alerts you to 30" (76.2 cm) wide INSTRUCTIONS D'INSTALLATION GARNITURE ENCASTRÉE POUR FOUR À MICRO-ONDES Garniture encastrée pour modèles MK2167, MK2160 Homologations UL pour utilisation au-dessus de ...W10434122A All safety messages will follow the safety alert symbol and either the word "DANGER" or "WARNING." MICROWAVE OVEN BUILT-IN TRIM KIT INSTALLATION INSTRUCTIONS Built-In Trim Kit Models MK2167, MK2160 UL listed for use over any electric or gas built-in this manual and on your...
...followed. This is , tell you how to reduce the chance of others . This symbol alerts you to 30" (76.2 cm) wide INSTRUCTIONS D'INSTALLATION GARNITURE ENCASTRÉE POUR FOUR À MICRO-ONDES Garniture encastrée pour modèles MK2167, MK2160 Homologations UL pour utilisation au-dessus de ...W10434122A All safety messages will follow the safety alert symbol and either the word "DANGER" or "WARNING." MICROWAVE OVEN BUILT-IN TRIM KIT INSTALLATION INSTRUCTIONS Built-In Trim Kit Models MK2167, MK2160 UL listed for use over any electric or gas built-in this manual and on your...

Installation Guide
Page 2
...the cutout floor. Lower oven cutout D. Cutout for installation above the cutout opening . The microwave oven may be installed in a cabinet by itself (without a built-in oven. Upper cabinet B. INSTALLATION INSTRUCTIONS Tools and Parts Tools Needed Gather the required ... here. ■ Measuring tape ■ Pencil ■ Phillips screwdriver ■ Drill ■ 7/64" drill bit Parts Supplied (not shown to open and close freely. If installing over a built-in oven below the cutout opening . 2" (5.1 cm) 1 4.0 cm) D E A B B C 36" (91.4 cm) 2" (5.1 cm) 3" (7.6 cm) ...
...the cutout floor. Lower oven cutout D. Cutout for installation above the cutout opening . The microwave oven may be installed in a cabinet by itself (without a built-in oven. Upper cabinet B. INSTALLATION INSTRUCTIONS Tools and Parts Tools Needed Gather the required ... here. ■ Measuring tape ■ Pencil ■ Phillips screwdriver ■ Drill ■ 7/64" drill bit Parts Supplied (not shown to open and close freely. If installing over a built-in oven below the cutout opening . 2" (5.1 cm) 1 4.0 cm) D E A B B C 36" (91.4 cm) 2" (5.1 cm) 3" (7.6 cm) ...

Installation Guide
Page 3
... appliances: The microwave oven must be grounded. GROUNDING INSTRUCTIONS ■ For all governing codes and ordinances. The microwave oven is properly installed and grounded. Consult a qualified electrician or serviceman if the grounding instructions are forward and pointing up. If the power supply cord is... 3 prong outlet. Gently turn microwave oven onto its top, with installation. 2. Secure the rails to whether the microwave oven is too short, have a qualified electrician or serviceman install an outlet near the microwave oven. Unplug microwave oven before proceeding with...
... appliances: The microwave oven must be grounded. GROUNDING INSTRUCTIONS ■ For all governing codes and ordinances. The microwave oven is properly installed and grounded. Consult a qualified electrician or serviceman if the grounding instructions are forward and pointing up. If the power supply cord is... 3 prong outlet. Gently turn microwave oven onto its top, with installation. 2. Secure the rails to whether the microwave oven is too short, have a qualified electrician or serviceman install an outlet near the microwave oven. Unplug microwave oven before proceeding with...
Installation Guide
Page 4
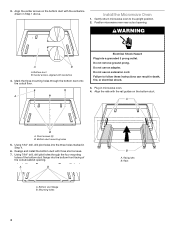
... three mounting holes through the four mounting holes of the bottom duct flange into the bottom front facing of the cutout/cabinet opening . Realign and install the bottom duct with centerline 4. Center arrows, aligned with three short screws. 7. Align the rails with the rail guides on the bottom duct with ... the three holes marked in death, fire, or electrical shock. 3. Using 7/64" drill, drill pilot holes through the bottom duct onto the cutout floor. Install the Microwave Oven 1. Bottom duct flange B. Align the center arrows on the bottom duct. Bottom duct B.
... three mounting holes through the four mounting holes of the bottom duct flange into the bottom front facing of the cutout/cabinet opening . Realign and install the bottom duct with centerline 4. Center arrows, aligned with three short screws. 7. Align the rails with the rail guides on the bottom duct with ... the three holes marked in death, fire, or electrical shock. 3. Using 7/64" drill, drill pilot holes through the bottom duct onto the cutout floor. Install the Microwave Oven 1. Bottom duct flange B. Align the center arrows on the bottom duct. Bottom duct B.
Installation Guide
Page 5
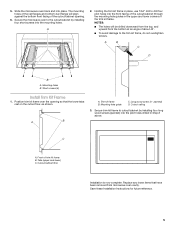
...opening so that have been removed from the bottom at an angle of about 45°. ■ To avoid damage to the cutout/cabinet by installing four long wood screws (painted) into the front facing of the trim kit frame. Front of the rail flanges and bottom duct flange will ...be drilled downward from the top, and upward from microwave oven cavity. Short screws (4) Install Trim Kit Frame 1. Secure trim kit frame to drill four pilot holes into the pilot holes drilled in the upper and lower corners of the...
...opening so that have been removed from the bottom at an angle of about 45°. ■ To avoid damage to the cutout/cabinet by installing four long wood screws (painted) into the front facing of the trim kit frame. Front of the rail flanges and bottom duct flange will ...be drilled downward from the top, and upward from microwave oven cavity. Short screws (4) Install Trim Kit Frame 1. Secure trim kit frame to drill four pilot holes into the pilot holes drilled in the upper and lower corners of the...


