
Use & Care Guide
Page 5
... electrical short circuit, grounding reduces the risk of electric shock by using one of electric shock. NOTE: Some models can result in a risk of the trim kits listed in death, fire, or electrical shock.
... electrical short circuit, grounding reduces the risk of electric shock by using one of electric shock. NOTE: Some models can result in a risk of the trim kits listed in death, fire, or electrical shock.

Use & Care Guide
Page 15
... the dealer or can write to correct defects in your area, you use only factory specified parts. If you the cost of the following trim kits*. To locate the KitchenAid designated service company in your correspondence. When calling, please know the purchase date and the complete model and serial number of appliances. ■...
... the dealer or can write to correct defects in your area, you use only factory specified parts. If you the cost of the following trim kits*. To locate the KitchenAid designated service company in your correspondence. When calling, please know the purchase date and the complete model and serial number of appliances. ■...

Installation Guide
Page 1
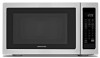
MICROWAVE OVEN BUILT-IN TRIM KIT INSTALLATION INSTRUCTIONS Built-In Trim Kit Models MK2167, MK2160 UL listed for use over any electric or gas built-in this manual and on your appliance. ...ères MICROWAVE OVEN SAFETY 1 INSTALLATION INSTRUCTIONS 2 Tools and Parts 2 Location Requirements 2 Required Cutout Dimensions 2 Trim Kit Frame Dimensions 2 Electrical Requirements 3 Prepare Microwave Oven 3 Prepare Cutout/Cabinet Opening 3 Install the Microwave Oven 4 Install Trim Kit Frame 5 SÉCURITÉ DU FOUR À MICRO-ONDES 7 INSTRUCTIONS D'INSTALLATION 7 Outillage et piè...
MICROWAVE OVEN BUILT-IN TRIM KIT INSTALLATION INSTRUCTIONS Built-In Trim Kit Models MK2167, MK2160 UL listed for use over any electric or gas built-in this manual and on your appliance. ...ères MICROWAVE OVEN SAFETY 1 INSTALLATION INSTRUCTIONS 2 Tools and Parts 2 Location Requirements 2 Required Cutout Dimensions 2 Trim Kit Frame Dimensions 2 Electrical Requirements 3 Prepare Microwave Oven 3 Prepare Cutout/Cabinet Opening 3 Install the Microwave Oven 4 Install Trim Kit Frame 5 SÉCURITÉ DU FOUR À MICRO-ONDES 7 INSTRUCTIONS D'INSTALLATION 7 Outillage et piè...

Installation Guide
Page 2
...cm) 2 5.2 cm)** 3 ¹⁄₂" (8.9 cm)** 3 8.7 cm) 12 ¹⁄₄" (31.1 cm) *27" (68.6 cm) trim kit **30" (76.2 cm) trim kit 1 3.0 cm) 2 The microwave oven may be installed in a cabinet by itself (without a built-in oven. Lower oven cutout D. Floor Required Cutout Dimensions 22... floor. Cutout for installation above a built-in oven, make sure there is from the floor to microwave oven cutout floor. ■ Trim kit frame extends 1 2.7 cm) above the cutout opening . painted) (4 + 2 extra) Location Requirements The microwave oven may also be installed...
...cm) 2 5.2 cm)** 3 ¹⁄₂" (8.9 cm)** 3 8.7 cm) 12 ¹⁄₄" (31.1 cm) *27" (68.6 cm) trim kit **30" (76.2 cm) trim kit 1 3.0 cm) 2 The microwave oven may be installed in a cabinet by itself (without a built-in oven. Lower oven cutout D. Floor Required Cutout Dimensions 22... floor. Cutout for installation above a built-in oven, make sure there is from the floor to microwave oven cutout floor. ■ Trim kit frame extends 1 2.7 cm) above the cutout opening . painted) (4 + 2 extra) Location Requirements The microwave oven may also be installed...
Installation Guide
Page 5
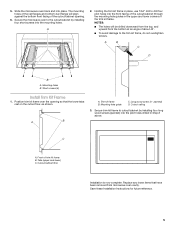
... to cutout/cabinet by installing four short screws into the pilot holes drilled in Step 2 above. Short screws (4) Install Trim Kit Frame 1. Secure trim kit frame to the cutout/cabinet by installing four long wood screws (painted) into the mounting holes. Front of the cutout/cabinet...and bottom duct flange will be drilled downward from the top, and upward from microwave oven cavity. A B C D B A. A B A. Position trim kit frame over the opening . 6. The mounting holes of about 45°. ■ To avoid damage to drill four pilot holes into place. Slide the...
... to cutout/cabinet by installing four short screws into the pilot holes drilled in Step 2 above. Short screws (4) Install Trim Kit Frame 1. Secure trim kit frame to the cutout/cabinet by installing four long wood screws (painted) into the mounting holes. Front of the cutout/cabinet...and bottom duct flange will be drilled downward from the top, and upward from microwave oven cavity. A B C D B A. A B A. Position trim kit frame over the opening . 6. The mounting holes of about 45°. ■ To avoid damage to drill four pilot holes into place. Slide the...


