
Use & Care Guide
Page 2
... Seconds 7 Stop Cancel 7 Tones 7 Clock 7 Timer 7 Control Lock 7 MICROWAVE OVEN USE 8 Food Characteristics 8 Cooking Guidelines 8 Cookware and Dinnerware 9 Aluminum Foil and Metal 9 Microwave Cooking Power 9 Manual Cooking 10 Cooking in Stages 10 Favorite 10 Sensor Cooking 10 Quick Touch Menu (sensor and non-sensor 11 Weight Defrost / Timed Defrost 12 MICROWAVE...
... Seconds 7 Stop Cancel 7 Tones 7 Clock 7 Timer 7 Control Lock 7 MICROWAVE OVEN USE 8 Food Characteristics 8 Cooking Guidelines 8 Cookware and Dinnerware 9 Aluminum Foil and Metal 9 Microwave Cooking Power 9 Manual Cooking 10 Cooking in Stages 10 Favorite 10 Sensor Cooking 10 Quick Touch Menu (sensor and non-sensor 11 Weight Defrost / Timed Defrost 12 MICROWAVE...

Use & Care Guide
Page 3
... food. Do not use corrosive chemicals or vapors in the oven cavity: - Stir the liquid both before placing bags in this manual and on your appliance. WARNING You can happen if the instructions are placed inside the oven ignite, keep oven door closed glass ...the microwave oven. ■ Use the microwave oven only for industrial or laboratory use . ■ Liquids, such as whole eggs in this manual. All safety messages will follow instructions. See "GROUNDING INSTRUCTIONS" found in oven. - Use extreme care when inserting a spoon or other combustible...
... food. Do not use corrosive chemicals or vapors in the oven cavity: - Stir the liquid both before placing bags in this manual and on your appliance. WARNING You can happen if the instructions are placed inside the oven ignite, keep oven door closed glass ...the microwave oven. ■ Use the microwave oven only for industrial or laboratory use . ■ Liquids, such as whole eggs in this manual. All safety messages will follow instructions. See "GROUNDING INSTRUCTIONS" found in oven. - Use extreme care when inserting a spoon or other combustible...

Use & Care Guide
Page 6
... the hub. Microwave inlet cover I H G G. Hub C. MICROWAVE OVEN CONTROL Oz lbs 6 Glass turntable K. The rollers on the microwave oven cavity bottom. 2. PARTS AND FEATURES This manual may have some or all of the features shown here. The model you have purchased may cover several different models. A B C D E F K A. Window C. Cooking guide label D. Microwave... open push button H. Removable turntable support J. Model and serial number plate Turntable A B C D A. Place the turntable on the support. Fit the raised, curved wedges in this manual.
... the hub. Microwave inlet cover I H G G. Hub C. MICROWAVE OVEN CONTROL Oz lbs 6 Glass turntable K. The rollers on the microwave oven cavity bottom. 2. PARTS AND FEATURES This manual may have some or all of the features shown here. The model you have purchased may cover several different models. A B C D E F K A. Window C. Cooking guide label D. Microwave... open push button H. Removable turntable support J. Model and serial number plate Turntable A B C D A. Place the turntable on the support. Fit the raised, curved wedges in this manual.
Use & Care Guide
Page 7
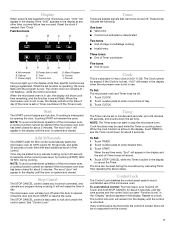
... may be added to unlock. Display When power is first supplied to the microwave oven, "0:00" will be no response from the control. 7 If any manual cooking cycle in the display while their specific functions are audible signals that cannot be turned off . 1. Close the door and touch START to resume...
... may be added to unlock. Display When power is first supplied to the microwave oven, "0:00" will be no response from the control. 7 If any manual cooking cycle in the display while their specific functions are audible signals that cannot be turned off . 1. Close the door and touch START to resume...
Use & Care Guide
Page 9
... for use cookware and dinnerware with 1 cup (250 mL) of specific foods. The display will briefly show the current power level, then will flash during manual cooking, depending on the turntable. Do not use by the manufacturer for use oven mitts or pot holders when handling because any dish may be...
... for use cookware and dinnerware with 1 cup (250 mL) of specific foods. The display will briefly show the current power level, then will flash during manual cooking, depending on the turntable. Do not use by the manufacturer for use oven mitts or pot holders when handling because any dish may be...
Use & Care Guide
Page 10
...:00" will appear in Stages" section). 4. Enter the length of a power failure, the saved Favorites will be saved. In the event of time to escape. Manual Cooking NOTE: To cook at 100% power, begin the programmed cycle. "00:00" will appear in the display during the first stage. 3. NOTE: If a defrosting... Use the FAVORITE control to clear the display. Touch STOP CANCEL or open the door to program, store and recall the top 3 most frequently used manual cook programs. Each Favorite may include a defrosting stage.
...:00" will appear in Stages" section). 4. Enter the length of a power failure, the saved Favorites will be saved. In the event of time to escape. Manual Cooking NOTE: To cook at 100% power, begin the programmed cycle. "00:00" will appear in the display during the first stage. 3. NOTE: If a defrosting... Use the FAVORITE control to clear the display. Touch STOP CANCEL or open the door to program, store and recall the top 3 most frequently used manual cook programs. Each Favorite may include a defrosting stage.
Use & Care Guide
Page 12
... resume the cycle. Timed Defrost Timed Defrost does not have a preset program, but uses only 30% (PL3) cooking power. "00:00" will appear in "Manual Cooking" section, and use 30% cooking power. Close the door and touch START to clear the display. To Defrost... Defrost: 1. Touch START. Weight Defrost The Weight Defrost feature has preset times and cook powers for "dEF3," if defrosting poultry or fish. It should be manually set from 0.3 lb to 6.3 lbs (136 g to defrost. ■ Unwrap foods and remove lids (for example, from fruit juice containers) before defrosting. Do not ...
... resume the cycle. Timed Defrost Timed Defrost does not have a preset program, but uses only 30% (PL3) cooking power. "00:00" will appear in "Manual Cooking" section, and use 30% cooking power. Close the door and touch START to clear the display. To Defrost... Defrost: 1. Touch START. Weight Defrost The Weight Defrost feature has preset times and cook powers for "dEF3," if defrosting poultry or fish. It should be manually set from 0.3 lb to 6.3 lbs (136 g to defrost. ■ Unwrap foods and remove lids (for example, from fruit juice containers) before defrosting. Do not ...

Installation Guide
Page 1
... BUILT-IN TRIM KIT INSTALLATION INSTRUCTIONS Built-In Trim Kit Models MK2167, MK2160 UL listed for use over any electric or gas built-in this manual and on your appliance. This symbol alerts you to potential hazards that can kill or hurt you don't follow instructions. This is , tell you how...
... BUILT-IN TRIM KIT INSTALLATION INSTRUCTIONS Built-In Trim Kit Models MK2167, MK2160 UL listed for use over any electric or gas built-in this manual and on your appliance. This symbol alerts you to potential hazards that can kill or hurt you don't follow instructions. This is , tell you how...


