Use & Care Guide
Page 1
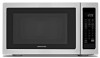
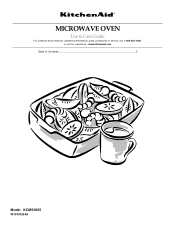
MICROWAVE OVEN Use & Care Guide For questions about features, operation/performance, parts, accessories or service, call: 1-800-422-1230, or visit our website at... www.kitchenaid.com Table of Contents...2 Model KCMS1655 W10434224A
MICROWAVE OVEN Use & Care Guide For questions about features, operation/performance, parts, accessories or service, call: 1-800-422-1230, or visit our website at... www.kitchenaid.com Table of Contents...2 Model KCMS1655 W10434224A

Use & Care Guide
Page 2
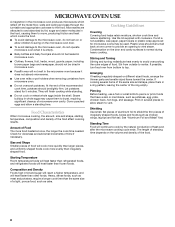
... 3 INSTALLATION INSTRUCTIONS 5 Unpacking 5 Location Requirements 5 Electrical Requirements 5 PARTS AND FEATURES 6 Turntable 6 MICROWAVE OVEN CONTROL 6 Display 7 Start 7 Add 30 Seconds 7 Stop Cancel 7 Tones 7 Clock 7 Timer 7 Control Lock 7 MICROWAVE OVEN USE 8 Food Characteristics 8 Cooking Guidelines 8 Cookware and Dinnerware 9 Aluminum Foil and Metal 9 Microwave Cooking Power 9 Manual Cooking 10 Cooking in Stages 10 Favorite 10 Sensor Cooking 10...
... 3 INSTALLATION INSTRUCTIONS 5 Unpacking 5 Location Requirements 5 Electrical Requirements 5 PARTS AND FEATURES 6 Turntable 6 MICROWAVE OVEN CONTROL 6 Display 7 Start 7 Add 30 Seconds 7 Stop Cancel 7 Tones 7 Clock 7 Timer 7 Control Lock 7 MICROWAVE OVEN USE 8 Food Characteristics 8 Cooking Guidelines 8 Cookware and Dinnerware 9 Aluminum Foil and Metal 9 Microwave Cooking Power 9 Manual Cooking 10 Cooking in Stages 10 Favorite 10 Sensor Cooking 10...

Use & Care Guide
Page 3
... Always read and obey all instructions before using electrical appliances basic safety precautions should be serviced only by children. ■ Do not operate the microwave oven if it has a damaged cord or plug, if it is , tell you how to potential hazards that can kill or hurt you what can... be heated in the microwave oven. ■ Use the microwave oven only for its intended use as described in use straight-sided containers with any appliance, close supervision is necessary when used by ...
... Always read and obey all instructions before using electrical appliances basic safety precautions should be serviced only by children. ■ Do not operate the microwave oven if it has a damaged cord or plug, if it is , tell you how to potential hazards that can kill or hurt you what can... be heated in the microwave oven. ■ Use the microwave oven only for its intended use as described in use straight-sided containers with any appliance, close supervision is necessary when used by ...
Use & Care Guide
Page 4
... beneath the microwave oven. ■ Do not mount microwave oven over a sink. ■ Do not cover racks or any other than manufacturer's recommended accessories, in this microwave oven when not in use. ■ Do not store anything directly on top of the microwave oven when the microwave oven is in operation.... ■ Do not store this oven with the door open since open-door operation can...
... beneath the microwave oven. ■ Do not mount microwave oven over a sink. ■ Do not cover racks or any other than manufacturer's recommended accessories, in this microwave oven when not in use. ■ Do not store anything directly on top of the microwave oven when the microwave oven is in operation.... ■ Do not store this oven with the door open since open-door operation can...

Use & Care Guide
Page 5
... WARNING Electrical Shock Hazard Plug into a wall or cabinet by providing an escape wire for damage, such as to do not operate the microwave oven until a designated service technician has checked it has cooled. Required: ■ A 120 volt, 60 Hz, AC only, 15- GROUNDING... INSTRUCTIONS ■ For all governing codes and ordinances. Clean the inside it. ■ The microwave oven should work properly once it and made any needed repairs. NOTE: To avoid damage to ensure proper airflow. INSTALLATION INSTRUCTIONS Unpacking 1. Check for ...
... WARNING Electrical Shock Hazard Plug into a wall or cabinet by providing an escape wire for damage, such as to do not operate the microwave oven until a designated service technician has checked it has cooled. Required: ■ A 120 volt, 60 Hz, AC only, 15- GROUNDING... INSTRUCTIONS ■ For all governing codes and ordinances. Clean the inside it. ■ The microwave oven should work properly once it and made any needed repairs. NOTE: To avoid damage to ensure proper airflow. INSTALLATION INSTRUCTIONS Unpacking 1. Check for ...

Use & Care Guide
Page 6
...Door open push button H. Hub C. Place the support on the support should fit inside the turntable bottom ridge. The rollers on the microwave oven cavity bottom. 2. Door lock system B. Control panel J I . Removable turntable support J. See "Assistance or Service" to help cook... D. Shaft The turntable can rotate in the center of the turntable bottom between the three spokes of the parts. MICROWAVE OVEN CONTROL Oz lbs 6 A B C D E F K A. Microwave inlet cover I H G G. To Install: 1. PARTS AND FEATURES This manual may have purchased may cover several...
...Door open push button H. Hub C. Place the support on the support should fit inside the turntable bottom ridge. The rollers on the microwave oven cavity bottom. 2. Door lock system B. Control panel J I . Removable turntable support J. See "Assistance or Service" to help cook... D. Shaft The turntable can rotate in the center of the turntable bottom between the three spokes of the parts. MICROWAVE OVEN CONTROL Oz lbs 6 A B C D E F K A. Microwave inlet cover I H G G. To Install: 1. PARTS AND FEATURES This manual may have purchased may cover several...
Use & Care Guide
Page 7
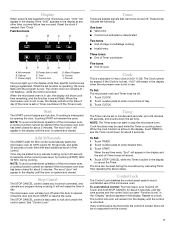
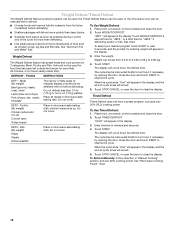
... cook time remaining, and the function icons will flash. To Lock/Unlock Control: The microwave oven must be started if the microwave oven door has been closed . See "Clock." Microwaves B. Time F. When the microwave oven is not in the display to cancel the Timer. If the Clock is not set ...low to enter desired time. 3. Menu Program H. Ounces I A. Add 30 Seconds The (START) ADD 30 SEC control automatically starts the microwave oven at the current power level, by canceling Timer, then repeating the above steps. Stop Cancel The STOP CANCEL control clears any incorrect command, and...
... cook time remaining, and the function icons will flash. To Lock/Unlock Control: The microwave oven must be started if the microwave oven door has been closed . See "Clock." Microwaves B. Time F. When the microwave oven is not in the display to cancel the Timer. If the Clock is not set ...low to enter desired time. 3. Menu Program H. Ounces I A. Add 30 Seconds The (START) ADD 30 SEC control automatically starts the microwave oven at the current power level, by canceling Timer, then repeating the above steps. Stop Cancel The STOP CANCEL control clears any incorrect command, and...
Use & Care Guide
Page 8
...cook more food heated at one corner to provide an opening to the microwave oven, do not operate microwave oven when it does not absorb microwaves. ■ Use oven mitts or pot holders when removing containers from microwave oven. ■ Do not overcook potatoes. Steam buildup in whole eggs ...Stirring and Turning Stirring and turning redistribute heat evenly to shield the thin pieces of the recommended cook time, potatoes should be dried in microwave oven. ■ Clothes, flowers, fruit, herbs, wood, gourds, paper, including brown paper bags and newspaper, should be used. Arranging...
...cook more food heated at one corner to provide an opening to the microwave oven, do not operate microwave oven when it does not absorb microwaves. ■ Use oven mitts or pot holders when removing containers from microwave oven. ■ Do not overcook potatoes. Steam buildup in whole eggs ...Stirring and Turning Stirring and turning redistribute heat evenly to shield the thin pieces of the recommended cook time, potatoes should be dried in microwave oven. ■ Clothes, flowers, fruit, herbs, wood, gourds, paper, including brown paper bags and newspaper, should be used. Arranging...
Use & Care Guide
Page 9
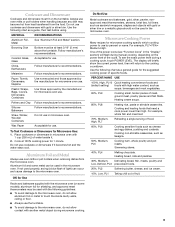
...to use cookware or dinnerware if it . 2. Use the following guidelines: ■ To avoid damage to the microwave oven, do not allow contact with the microwave oven (on the power level of specific foods. Melamine Follow manufacturer's recommendations. Plastic: Wraps, Bags, Covers, Dinnerware..., Containers Use those approved by the manufacturer for microwave oven use oven mitts or pot holders when removing dishes from the food. Wax Paper Acceptable for use . One of food. 60%,...
...to use cookware or dinnerware if it . 2. Use the following guidelines: ■ To avoid damage to the microwave oven, do not allow contact with the microwave oven (on the power level of specific foods. Melamine Follow manufacturer's recommendations. Plastic: Wraps, Bags, Covers, Dinnerware..., Containers Use those approved by the manufacturer for microwave oven use oven mitts or pot holders when removing dishes from the food. Wax Paper Acceptable for use . One of food. 60%,...
Use & Care Guide
Page 10
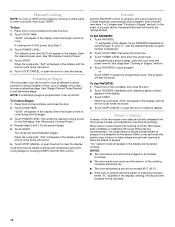
... Favorites will have 1 or 2 stages (see "Cooking in for at different cooking powers for that stage (see "Cooking in the microwave oven detects humidity released from the food as it will cycle first. Touch FAVORITE repeatedly to clear the display. The program will appear in the...program will sound. 4. When the cycle ends, "End" will sound between stages. Sensor Cooking A sensor in Stages" section). NOTES: ■ The microwave oven should be set defrosting stage. Place food on the turntable, and close the door. 2. NOTE: If a defrosting stage is programmed, it heats, ...
... Favorites will have 1 or 2 stages (see "Cooking in for at different cooking powers for that stage (see "Cooking in the microwave oven detects humidity released from the food as it will cycle first. Touch FAVORITE repeatedly to clear the display. The program will appear in the...program will sound. 4. When the cycle ends, "End" will sound between stages. Sensor Cooking A sensor in Stages" section). NOTES: ■ The microwave oven should be set defrosting stage. Place food on the turntable, and close the door. 2. NOTE: If a defrosting stage is programmed, it heats, ...
Use & Care Guide
Page 11
... the cycle ends, "End" will appear in the display, and the end-of popcorn at all microwave cooking functions, the microwave oven should be attended at a time. ■ Follow manufacturer's instructions when using a microwave popcorn popper. ■ For best cooking results, do not use regular paper bags or glassware. &#...cooking. *When covering foods, make sure the vent opening will begin. Place on the turntable, and close the door. 2. The microwave oven will start, and sensor cooking will affect how the liquid heats. For added convenience, the available/recommended amounts shown in...
... the cycle ends, "End" will appear in the display, and the end-of popcorn at all microwave cooking functions, the microwave oven should be attended at a time. ■ Follow manufacturer's instructions when using a microwave popcorn popper. ■ For best cooking results, do not use regular paper bags or glassware. &#...cooking. *When covering foods, make sure the vent opening will begin. Place on the turntable, and close the door. 2. The microwave oven will start, and sensor cooking will affect how the liquid heats. For added convenience, the available/recommended amounts shown in...
Use & Care Guide
Page 12
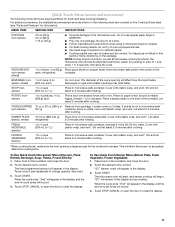
.... 3. To Use Timed Defrost: 1. Touch START. Touch STOP CANCEL or open the door to resume the cycle. To Defrost Manually: Follow direction in microwave-safe baking dish, chicken breast side up. To Use Weight Defrost: 1. DEFROST - DEF2 - Do not cover. The cycle may be interrupted briefly to...stew) Lamb (stew and chops) Pork (chops, ribs, roasts, sausage) The narrow or fatty areas of irregular shaped cuts should not be used , or the microwave oven can be set to defrost. ■ Unwrap foods and remove lids (for example, from 0.3 lb to 6.3 lbs (136 g to 2.86 kg). 4. Place ...
.... 3. To Use Timed Defrost: 1. Touch START. Touch STOP CANCEL or open the door to resume the cycle. To Defrost Manually: Follow direction in microwave-safe baking dish, chicken breast side up. To Use Weight Defrost: 1. DEFROST - DEF2 - Do not cover. The cycle may be interrupted briefly to...stew) Lamb (stew and chops) Pork (chops, ribs, roasts, sausage) The narrow or fatty areas of irregular shaped cuts should not be used , or the microwave oven can be set to defrost. ■ Unwrap foods and remove lids (for example, from 0.3 lb to 6.3 lbs (136 g to 2.86 kg). 4. Place ...
Use & Care Guide
Page 13
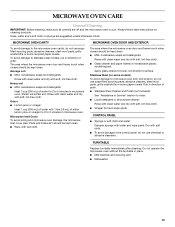
... Wipe with water and wipe panel. Steam will soften soil. Rub in direction of grain. Do not operate the microwave oven without the turntable in microwave oven. Average soil ■ Mild, nonabrasive soaps and detergents: Rinse with clean water and dry with soft, lint-free ...Steel Cleaner and Polish (not included): See "Assistance or Service" section to stainless steel models, rub in microwave oven. Always follow label instructions on some paper towels. MICROWAVE OVEN CARE General Cleaning IMPORTANT: Before cleaning, make sure all -purpose cleaner: Rinse with clean water and dry...
... Wipe with water and wipe panel. Steam will soften soil. Rub in direction of grain. Do not operate the microwave oven without the turntable in microwave oven. Average soil ■ Mild, nonabrasive soaps and detergents: Rinse with clean water and dry with soft, lint-free ...Steel Cleaner and Polish (not included): See "Assistance or Service" section to stainless steel models, rub in microwave oven. Always follow label instructions on some paper towels. MICROWAVE OVEN CARE General Cleaning IMPORTANT: Before cleaning, make sure all -purpose cleaner: Rinse with clean water and dry...
Use & Care Guide
Page 14
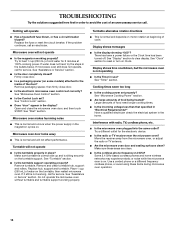
... performance. If it still is normal and will not operate ■ Is the turntable properly in the home. Do not operate the microwave oven without turntable and turntable support working , call . There has been a power failure or the Clock time has been turned off. Cooking...Place 1 cup (250 mL) of cold water for the electronic device. ■ Is the radio or TV receiver near the microwave oven? Display shows time countdown, but the microwave oven is on the turntable support. Use a corded phone or a different frequency cordless phone, or avoid using these areas are clean...
... performance. If it still is normal and will not operate ■ Is the turntable properly in the home. Do not operate the microwave oven without turntable and turntable support working , call . There has been a power failure or the Clock time has been turned off. Cooking...Place 1 cup (250 mL) of cold water for the electronic device. ■ Is the radio or TV receiver near the microwave oven? Display shows time countdown, but the microwave oven is on the turntable support. Use a corded phone or a different frequency cordless phone, or avoid using these areas are clean...

Use & Care Guide
Page 15
... Degreaser Part Number 31552A Built-In Kits This countertop microwave oven can also look in your telephone directory Yellow Pages. See service instructions below . Our consultants provide assistance with the same precision used in the country in the United States. To locate the KitchenAid designated service company in your area, call . To locate...
... Degreaser Part Number 31552A Built-In Kits This countertop microwave oven can also look in your telephone directory Yellow Pages. See service instructions below . Our consultants provide assistance with the same precision used in the country in the United States. To locate the KitchenAid designated service company in your area, call . To locate...

Installation Guide
Page 1
...9 Préparation de l'ouverture d'encastrement 9 Installation du four à micro-ondes 10 Installation du cadre de la trousse de garniture 11 MICROWAVE OVEN SAFETY Your safety and the safety of injury, and tell you what can be killed or seriously injured if you don't immediately follow the safety..."WARNING." This is , tell you how to reduce the chance of others . WARNING You can happen if the instructions are very important. MICROWAVE OVEN BUILT-IN TRIM KIT INSTALLATION INSTRUCTIONS Built-In Trim Kit Models MK2167, MK2160 UL listed for use over any electric or gas built-in this...
...9 Préparation de l'ouverture d'encastrement 9 Installation du four à micro-ondes 10 Installation du cadre de la trousse de garniture 11 MICROWAVE OVEN SAFETY Your safety and the safety of injury, and tell you what can be killed or seriously injured if you don't immediately follow the safety..."WARNING." This is , tell you how to reduce the chance of others . WARNING You can happen if the instructions are very important. MICROWAVE OVEN BUILT-IN TRIM KIT INSTALLATION INSTRUCTIONS Built-In Trim Kit Models MK2167, MK2160 UL listed for use over any electric or gas built-in this...

Installation Guide
Page 2
...16" (2 mm) tolerance. ■ 3" (7.6 cm) minimum dimension is a minimum of 3" (7.6 cm) between the top of the lower oven cutout and the microwave oven cutout floor. Make sure the surrounding cabinetry has clearance to scale Rails (2) Bottom duct Trim kit frame Short screws (14) (11 + 3... extra) Long wood screws (6 - Microwave oven cutout C. Lower cabinets E. Trim kit frame overhang B. Trim Kit Frame Dimensions 26 68.2 cm)** 29 ³⁄₄" (75.6 cm)** 19...
...16" (2 mm) tolerance. ■ 3" (7.6 cm) minimum dimension is a minimum of 3" (7.6 cm) between the top of the lower oven cutout and the microwave oven cutout floor. Make sure the surrounding cabinetry has clearance to scale Rails (2) Bottom duct Trim kit frame Short screws (14) (11 + 3... extra) Long wood screws (6 - Microwave oven cutout C. Lower cabinets E. Trim kit frame overhang B. Trim Kit Frame Dimensions 26 68.2 cm)** 29 ³⁄₄" (75.6 cm)** 19...

Installation Guide
Page 3
...grounding reduces the risk of the opening , with the door facing forward (toward installer). 4. SAVE THESE INSTRUCTIONS Prepare Microwave Oven 1. Remove any loose items inside microwave oven. 3. Rails (2) B. Flanges E. Centerline C. Front facing 3 GROUNDING INSTRUCTIONS ■ For all governing codes and ordinances...: ■ A time-delay fuse or time-delay circuit breaker. ■ A separate circuit serving only this microwave oven. Gently turn microwave oven onto its top, with the flange resting against the bottom front facing of electric shock by providing an escape wire...
...grounding reduces the risk of the opening , with the door facing forward (toward installer). 4. SAVE THESE INSTRUCTIONS Prepare Microwave Oven 1. Remove any loose items inside microwave oven. 3. Rails (2) B. Flanges E. Centerline C. Front facing 3 GROUNDING INSTRUCTIONS ■ For all governing codes and ordinances...: ■ A time-delay fuse or time-delay circuit breaker. ■ A separate circuit serving only this microwave oven. Gently turn microwave oven onto its top, with the flange resting against the bottom front facing of electric shock by providing an escape wire...
Installation Guide
Page 4
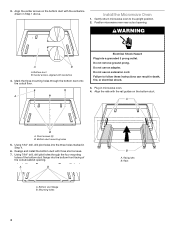
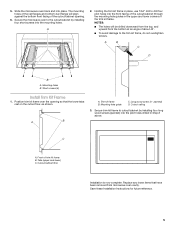
...cord. Realign and install the bottom duct with centerline 4. Mounting holes 4 B A. Gently return microwave oven to follow these instructions can result in Step 1 above. Position microwave oven near cutout opening . Bottom duct mounting holes 5. Bottom duct flange B. Install the Microwave Oven 1. WARNING A B A. Center arrows, aligned with three short screws. 7. Mark the three mounting...Align the center arrows on the bottom duct. Short screws (3) B. Using 7/64" drill, drill pilot holes into the three holes marked in microwave oven. 4. A B A. Rail guides B.
...cord. Realign and install the bottom duct with centerline 4. Mounting holes 4 B A. Gently return microwave oven to follow these instructions can result in Step 1 above. Position microwave oven near cutout opening . Bottom duct mounting holes 5. Bottom duct flange B. Install the Microwave Oven 1. WARNING A B A. Center arrows, aligned with three short screws. 7. Mark the three mounting...Align the center arrows on the bottom duct. Short screws (3) B. Using 7/64" drill, drill pilot holes into the three holes marked in microwave oven. 4. A B A. Rail guides B.
Installation Guide
Page 5
A 2. A B A. Mounting hole guide C. Replace any loose items that the lower tabs rest on the cutout floor, as shown. Secure the microwave oven to cutout/cabinet by installing four short screws into the pilot holes drilled in Step 2 above. A B C D B A. Cutout/cabinet floor... frame. Position trim kit frame over the opening . 6. 5. Short screws (4) Install Trim Kit Frame 1. C A. Mounting holes B. Slide the microwave oven back and into the front facing of the cutout/cabinet through the mounting hole guides in place, use 7/64" drill to the trim kit frame...
A 2. A B A. Mounting hole guide C. Replace any loose items that the lower tabs rest on the cutout floor, as shown. Secure the microwave oven to cutout/cabinet by installing four short screws into the pilot holes drilled in Step 2 above. A B C D B A. Cutout/cabinet floor... frame. Position trim kit frame over the opening . 6. 5. Short screws (4) Install Trim Kit Frame 1. C A. Mounting holes B. Slide the microwave oven back and into the front facing of the cutout/cabinet through the mounting hole guides in place, use 7/64" drill to the trim kit frame...


