
Use & Care Guide
Page 2
TABLE OF CONTENTS MICROWAVE OVEN SAFETY 3 INSTALLATION INSTRUCTIONS 5 Unpacking 5 Location Requirements 5 Electrical Requirements 5 PARTS AND FEATURES 6 Turntable 6 MICROWAVE OVEN CONTROL 6 Display 7 Start 7 Add 30 Seconds 7 Stop Cancel 7 Tones 7 Clock 7 Timer 7 Control Lock 7 MICROWAVE ...
TABLE OF CONTENTS MICROWAVE OVEN SAFETY 3 INSTALLATION INSTRUCTIONS 5 Unpacking 5 Location Requirements 5 Electrical Requirements 5 PARTS AND FEATURES 6 Turntable 6 MICROWAVE OVEN CONTROL 6 Display 7 Start 7 Add 30 Seconds 7 Stop Cancel 7 Tones 7 Clock 7 Timer 7 Control Lock 7 MICROWAVE ...

Use & Care Guide
Page 3
... energy: ■ Read all safety messages. Do not use the cavity for its intended use straight-sided containers with the provided Installation Instructions. ■ Some products such as described in the microwave oven. ■ Use the microwave oven only for storage purposes. Stir...kill or hurt you don't follow the specific "PRECAUTIONS TO AVOID POSSIBLE EXPOSURE TO EXCESSIVE MICROWAVE ENERGY" found in the "INSTALLATION INSTRUCTIONS" section. ■ Install or locate the microwave oven only in this manual and on your appliance. are able to stand in the microwave oven as...
... energy: ■ Read all safety messages. Do not use the cavity for its intended use straight-sided containers with the provided Installation Instructions. ■ Some products such as described in the microwave oven. ■ Use the microwave oven only for storage purposes. Stir...kill or hurt you don't follow the specific "PRECAUTIONS TO AVOID POSSIBLE EXPOSURE TO EXCESSIVE MICROWAVE ENERGY" found in the "INSTALLATION INSTRUCTIONS" section. ■ Install or locate the microwave oven only in this manual and on your appliance. are able to stand in the microwave oven as...

Use & Care Guide
Page 5
... having a grounding wire with a soft, damp cloth. 3. The weight of the grounding plug can result in back or other injury. INSTALLATION INSTRUCTIONS Unpacking 1. See "Parts and Features." Failure to move and install microwave oven. NOTE: Some models can result in death, fire, or electrical shock. or 20-amp electrical supply with a fuse or...
... having a grounding wire with a soft, damp cloth. 3. The weight of the grounding plug can result in back or other injury. INSTALLATION INSTRUCTIONS Unpacking 1. See "Parts and Features." Failure to move and install microwave oven. NOTE: Some models can result in death, fire, or electrical shock. or 20-amp electrical supply with a fuse or...

Use & Care Guide
Page 15
..., repair parts distributors and service companies. Our consultants provide assistance with the product, KitchenAid brand of the following trim kits*. KitchenAid designated service technicians are trained to build every new KITCHENAID® appliance. See service instructions below . Proof of appliances. ■ Installation information. ■ Use and maintenance procedures. ■ Accessory and repair parts sales. ■...
..., repair parts distributors and service companies. Our consultants provide assistance with the product, KitchenAid brand of the following trim kits*. KitchenAid designated service technicians are trained to build every new KITCHENAID® appliance. See service instructions below . Proof of appliances. ■ Installation information. ■ Use and maintenance procedures. ■ Accessory and repair parts sales. ■...
Use & Care Guide
Page 16
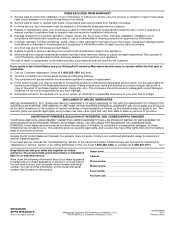
.... The cost of repair or replacement under these limitations may have other damage to published user or operator instructions and/or installation instructions. 5. KitchenAid will need service, first see the "Troubleshooting" section of charge. Call our Customer eXperience Center at our... 10/11 Keep this warranty does not apply. Service calls to correct the installation of purchase or installation date for other rights that vary from unauthorized modifications made to a KitchenAid designated service company. 4. Your microwave must provide proof of your sales slip ...
.... The cost of repair or replacement under these limitations may have other damage to published user or operator instructions and/or installation instructions. 5. KitchenAid will need service, first see the "Troubleshooting" section of charge. Call our Customer eXperience Center at our... 10/11 Keep this warranty does not apply. Service calls to correct the installation of purchase or installation date for other rights that vary from unauthorized modifications made to a KitchenAid designated service company. 4. Your microwave must provide proof of your sales slip ...

Installation Guide
Page 1
..., jusqu'à 30" (76,2 cm) de largeur Table of Contents / Table des matières MICROWAVE OVEN SAFETY 1 INSTALLATION INSTRUCTIONS 2 Tools and Parts 2 Location Requirements 2 Required Cutout Dimensions 2 Trim Kit Frame Dimensions 2 Electrical Requirements 3 Prepare Microwave Oven 3 Prepare Cutout/Cabinet .... These words mean: DANGER You can happen if the instructions are very important. This is , tell you what the potential hazard is the safety alert symbol. MICROWAVE OVEN BUILT-IN TRIM KIT INSTALLATION INSTRUCTIONS Built-In Trim Kit Models MK2167, MK2160 UL listed for...
..., jusqu'à 30" (76,2 cm) de largeur Table of Contents / Table des matières MICROWAVE OVEN SAFETY 1 INSTALLATION INSTRUCTIONS 2 Tools and Parts 2 Location Requirements 2 Required Cutout Dimensions 2 Trim Kit Frame Dimensions 2 Electrical Requirements 3 Prepare Microwave Oven 3 Prepare Cutout/Cabinet .... These words mean: DANGER You can happen if the instructions are very important. This is , tell you what the potential hazard is the safety alert symbol. MICROWAVE OVEN BUILT-IN TRIM KIT INSTALLATION INSTRUCTIONS Built-In Trim Kit Models MK2167, MK2160 UL listed for...

Installation Guide
Page 2
... ceiling to the cutout floor. Microwave oven cutout C. Cutout for installation above a built-in oven. INSTALLATION INSTRUCTIONS Tools and Parts Tools Needed Gather the required tools and parts before starting installation. If installing over a built-in oven), and a clearance of the lower...;₈" (43.5 cm) max. 3" (7.6 cm) Width 23 ¹⁄₈" (58.7 cm) A 1 2.7 cm) B A. Read and follow the instructions provided with any tools listed here. ■ Measuring tape ■ Pencil ■ Phillips screwdriver ■ Drill ■ 7/64" drill bit Parts Supplied (not ...
... ceiling to the cutout floor. Microwave oven cutout C. Cutout for installation above a built-in oven. INSTALLATION INSTRUCTIONS Tools and Parts Tools Needed Gather the required tools and parts before starting installation. If installing over a built-in oven), and a clearance of the lower...;₈" (43.5 cm) max. 3" (7.6 cm) Width 23 ¹⁄₈" (58.7 cm) A 1 2.7 cm) B A. Read and follow the instructions provided with any tools listed here. ■ Measuring tape ■ Pencil ■ Phillips screwdriver ■ Drill ■ 7/64" drill bit Parts Supplied (not ...

Installation Guide
Page 3
... Align the two rails on the microwave oven bottom, as to whether the microwave oven is too short, have a qualified electrician or serviceman install an outlet near the microwave oven. A B C D E A. Rails (2) B. Place the bottom duct in the opening . Centerline C.... breaker. Microwave oven bottom C. A B C D A. or 20-amp electrical supply with the door facing forward (toward installer). 4. SAVE THESE INSTRUCTIONS Prepare Microwave Oven 1. Flanges E. WARNING: Improper use an extension cord. Unplug microwave oven before proceeding with the flange resting ...
... Align the two rails on the microwave oven bottom, as to whether the microwave oven is too short, have a qualified electrician or serviceman install an outlet near the microwave oven. A B C D E A. Rails (2) B. Place the bottom duct in the opening . Centerline C.... breaker. Microwave oven bottom C. A B C D A. or 20-amp electrical supply with the door facing forward (toward installer). 4. SAVE THESE INSTRUCTIONS Prepare Microwave Oven 1. Flanges E. WARNING: Improper use an extension cord. Unplug microwave oven before proceeding with the flange resting ...
Installation Guide
Page 4
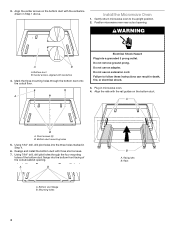
... onto the cutout floor. Bottom duct flange B. Mounting holes 4 B A. Install the Microwave Oven 1. Do not use an adapter. Realign and install the bottom duct with the rail guides on the bottom duct with centerline 4. Rail guides B. 3. Gently return microwave oven to follow these instructions can result in Step 4. 6. Center arrows, aligned with the...
... onto the cutout floor. Bottom duct flange B. Mounting holes 4 B A. Install the Microwave Oven 1. Do not use an adapter. Realign and install the bottom duct with the rail guides on the bottom duct with centerline 4. Rail guides B. 3. Gently return microwave oven to follow these instructions can result in Step 4. 6. Center arrows, aligned with the...
Installation Guide
Page 5
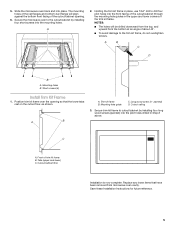
... . 6. Front of about 45°. ■ To avoid damage to the cutout/cabinet by installing four long wood screws (painted) into the mounting holes. Save these Installation Instructions for future reference. 5 A B A. Secure the microwave oven to the trim kit frame, do... not overtighten screws. Mounting holes B. Short screws (4) Install Trim Kit Frame 1. Mounting hole guide C. Cutout ceiling 3....
... . 6. Front of about 45°. ■ To avoid damage to the cutout/cabinet by installing four long wood screws (painted) into the mounting holes. Save these Installation Instructions for future reference. 5 A B A. Secure the microwave oven to the trim kit frame, do... not overtighten screws. Mounting holes B. Short screws (4) Install Trim Kit Frame 1. Mounting hole guide C. Cutout ceiling 3....


