Use & Care Guide
Page 1
www.kitchenaid.com Table of Contents...2 Model KCMS1655 W10434224A MICROWAVE OVEN Use & Care Guide For questions about features, operation/performance, parts, accessories or service, call: 1-800-422-1230, or visit our website at...
www.kitchenaid.com Table of Contents...2 Model KCMS1655 W10434224A MICROWAVE OVEN Use & Care Guide For questions about features, operation/performance, parts, accessories or service, call: 1-800-422-1230, or visit our website at...

Use & Care Guide
Page 2
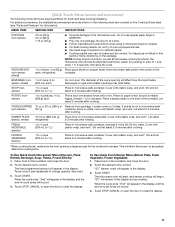
TABLE OF CONTENTS MICROWAVE OVEN SAFETY 3 INSTALLATION INSTRUCTIONS 5 Unpacking 5 Location Requirements 5 Electrical Requirements 5 PARTS AND FEATURES 6 Turntable 6 MICROWAVE OVEN CONTROL 6 Display 7 Start 7 Add 30 Seconds 7 Stop Cancel 7 Tones 7 Clock 7 Timer 7 Control Lock 7 MICROWAVE OVEN USE 8 Food Characteristics 8 Cooking Guidelines 8 ... Menu (sensor and non-sensor 11 Weight Defrost / Timed Defrost 12 MICROWAVE OVEN CARE 13 General Cleaning 13 TROUBLESHOOTING 14 ASSISTANCE OR SERVICE 15 Replacement Parts 15 Built-In Kits 15 WARRANTY 15 2
TABLE OF CONTENTS MICROWAVE OVEN SAFETY 3 INSTALLATION INSTRUCTIONS 5 Unpacking 5 Location Requirements 5 Electrical Requirements 5 PARTS AND FEATURES 6 Turntable 6 MICROWAVE OVEN CONTROL 6 Display 7 Start 7 Add 30 Seconds 7 Stop Cancel 7 Tones 7 Clock 7 Timer 7 Control Lock 7 MICROWAVE OVEN USE 8 Food Characteristics 8 Cooking Guidelines 8 ... Menu (sensor and non-sensor 11 Weight Defrost / Timed Defrost 12 MICROWAVE OVEN CARE 13 General Cleaning 13 TROUBLESHOOTING 14 ASSISTANCE OR SERVICE 15 Replacement Parts 15 Built-In Kits 15 WARRANTY 15 2

Use & Care Guide
Page 3
... present. Do not use the cavity for example, closed , turn oven off, and disconnect the power cord, or shut off the pad and touch electrical parts involving a risk of electric shock. It is not designed for its intended use straight-sided containers with metal scouring pads. Remove wire twist-ties from...
... present. Do not use the cavity for example, closed , turn oven off, and disconnect the power cord, or shut off the pad and touch electrical parts involving a risk of electric shock. It is not designed for its intended use straight-sided containers with metal scouring pads. Remove wire twist-ties from...
Use & Care Guide
Page 4
... products when appliance is operated in convection, combination, grill or "PAN BROWN" mode (on models with such features). ■ Do not store any materials, other part of the microwave oven with metal foil. Do not use . ■ Do not store anything directly on the microwave oven. This device complies with the...
... products when appliance is operated in convection, combination, grill or "PAN BROWN" mode (on models with such features). ■ Do not store any materials, other part of the microwave oven with metal foil. Do not use . ■ Do not store anything directly on the microwave oven. This device complies with the...

Use & Care Guide
Page 5
Clean the inside it. ■ The microwave oven should work properly once it and made any needed repairs. See "Parts and Features." Allow a few inches of electric shock. Electrical Requirements WARNING Electrical Shock Hazard Plug into a wall or cabinet by providing an escape wire for ...
Clean the inside it. ■ The microwave oven should work properly once it and made any needed repairs. See "Parts and Features." Allow a few inches of electric shock. Electrical Requirements WARNING Electrical Shock Hazard Plug into a wall or cabinet by providing an escape wire for ...

Use & Care Guide
Page 6
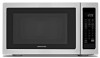
... microwave oven without having the turntable in this manual. Place the turntable on the microwave oven cavity bottom. 2. The appearance of the parts. Window C. Microwave inlet cover I H G G. Hub C. MICROWAVE OVEN CONTROL Oz lbs 6 Fit the raised, curved wedges in ... the turntable bottom between the three spokes of the features shown here. Place the support on the support. A B C D E F K A. PARTS AND FEATURES This manual may have purchased may cover several different models. Cooking guide label D. Control panel J I . To Install: 1. See "Assistance...
... microwave oven without having the turntable in this manual. Place the turntable on the microwave oven cavity bottom. 2. The appearance of the parts. Window C. Microwave inlet cover I H G G. Hub C. MICROWAVE OVEN CONTROL Oz lbs 6 Fit the raised, curved wedges in ... the turntable bottom between the three spokes of the features shown here. Place the support on the support. A B C D E F K A. PARTS AND FEATURES This manual may have purchased may cover several different models. Cooking guide label D. Control panel J I . To Install: 1. See "Assistance...
Use & Care Guide
Page 8
... supplied with cookware. Condensation on the volume and density of time if necessary. Arranging If heating irregularly shaped or different sized foods, arrange the thinner parts and smaller sized items toward the center. Shielding Use small, flat pieces of aluminum foil to avoid overcooking the outer edges of irregularly shaped foods...
... supplied with cookware. Condensation on the volume and density of time if necessary. Arranging If heating irregularly shaped or different sized foods, arrange the thinner parts and smaller sized items toward the center. Shielding Use small, flat pieces of aluminum foil to avoid overcooking the outer edges of irregularly shaped foods...
Use & Care Guide
Page 11
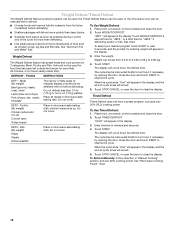
... package. Touch the desired menu control. For added convenience, the available/recommended amounts shown in this section, follow directions on the Cooking Guide label (see "Parts and Features" for quick and easy cooking/reheating. When the cycle ends, "End" will appear in the display, and the end-of -cycle tones will...
... package. Touch the desired menu control. For added convenience, the available/recommended amounts shown in this section, follow directions on the Cooking Guide label (see "Parts and Features" for quick and easy cooking/reheating. When the cycle ends, "End" will appear in the display, and the end-of -cycle tones will...
Use & Care Guide
Page 12
... fish tails. Touch WEIGHT DEFROST a second time for "dEF2," or a third time for more even defrosting. ■ Use small pieces of aluminum foil to shield parts of food such as possible during or at the end of irregular shaped cuts should not be manually set from fruit juice containers) before defrosting...
... fish tails. Touch WEIGHT DEFROST a second time for "dEF2," or a third time for more even defrosting. ■ Use small pieces of aluminum foil to shield parts of food such as possible during or at the end of irregular shaped cuts should not be manually set from fruit juice containers) before defrosting...
Use & Care Guide
Page 13
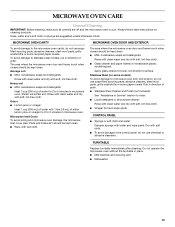
...; Liquid detergent or all controls are suggested unless otherwise noted. Microwave Inlet Cover To avoid arcing and microwave oven damage, the microwave inlet cover (see "Parts and Features") should be kept clean. ■ Wipe with soft, lint-free cloth. Rub in direction of water for hard water spots CONTROL PANEL ■...
...; Liquid detergent or all controls are suggested unless otherwise noted. Microwave Inlet Cover To avoid arcing and microwave oven damage, the microwave inlet cover (see "Parts and Features") should be kept clean. ■ Wipe with soft, lint-free cloth. Rub in direction of water for hard water spots CONTROL PANEL ■...

Use & Care Guide
Page 15
... appliance. ASSISTANCE OR SERVICE Before calling for the toll-free number. It may save you use only factory specified parts. If you need to local dealers, repair parts distributors and service companies. Call the KitchenAid Customer eXperience Center toll free: 1-800-422-1230. Our consultants provide assistance with the same precision used in...
... appliance. ASSISTANCE OR SERVICE Before calling for the toll-free number. It may save you use only factory specified parts. If you need to local dealers, repair parts distributors and service companies. Call the KitchenAid Customer eXperience Center toll free: 1-800-422-1230. Our consultants provide assistance with the same precision used in...
Use & Care Guide
Page 16
... calls to microwave product failure. 8. Your microwave must provide proof of merchantability or fitness, so this warranty does not apply. KITCHENAID SHALL NOT BE LIABLE FOR INCIDENTAL OR CONSEQUENTIAL DAMAGES. You must be responsible for repair or replacement. 4. Dealer name Address Phone... call 1-800-807-6777. 10/11 Keep this information on the model and serial number label located on a piece of KitchenAid, U.S.A. Consumable parts are responsible for in materials or workmanship and is void if the factory applied serial number has been altered or removed from...
... calls to microwave product failure. 8. Your microwave must provide proof of merchantability or fitness, so this warranty does not apply. KITCHENAID SHALL NOT BE LIABLE FOR INCIDENTAL OR CONSEQUENTIAL DAMAGES. You must be responsible for repair or replacement. 4. Dealer name Address Phone... call 1-800-807-6777. 10/11 Keep this information on the model and serial number label located on a piece of KitchenAid, U.S.A. Consumable parts are responsible for in materials or workmanship and is void if the factory applied serial number has been altered or removed from...

Installation Guide
Page 1
...;lectriques ou gaz, jusqu'à 30" (76,2 cm) de largeur Table of Contents / Table des matières MICROWAVE OVEN SAFETY 1 INSTALLATION INSTRUCTIONS 2 Tools and Parts 2 Location Requirements 2 Required Cutout Dimensions 2 Trim Kit Frame Dimensions 2 Electrical Requirements 3 Prepare Microwave Oven 3 Prepare Cutout/Cabinet Opening 3 Install the Microwave Oven 4 Install Trim Kit...
...;lectriques ou gaz, jusqu'à 30" (76,2 cm) de largeur Table of Contents / Table des matières MICROWAVE OVEN SAFETY 1 INSTALLATION INSTRUCTIONS 2 Tools and Parts 2 Location Requirements 2 Required Cutout Dimensions 2 Trim Kit Frame Dimensions 2 Electrical Requirements 3 Prepare Microwave Oven 3 Prepare Cutout/Cabinet Opening 3 Install the Microwave Oven 4 Install Trim Kit...

Installation Guide
Page 2
...tools listed here. ■ Measuring tape ■ Pencil ■ Phillips screwdriver ■ Drill ■ 7/64" drill bit Parts Supplied (not shown to open and close freely. Make sure the surrounding cabinetry has clearance to scale Rails (2) Bottom duct Trim ... + 2 extra) Location Requirements The microwave oven may also be installed over a built-in oven. INSTALLATION INSTRUCTIONS Tools and Parts Tools Needed Gather the required tools and parts before starting installation. Microwave oven cutout C. If installing over a built-in oven, make sure there is from the floor ...
...tools listed here. ■ Measuring tape ■ Pencil ■ Phillips screwdriver ■ Drill ■ 7/64" drill bit Parts Supplied (not shown to open and close freely. Make sure the surrounding cabinetry has clearance to scale Rails (2) Bottom duct Trim ... + 2 extra) Location Requirements The microwave oven may also be installed over a built-in oven. INSTALLATION INSTRUCTIONS Tools and Parts Tools Needed Gather the required tools and parts before starting installation. Microwave oven cutout C. If installing over a built-in oven, make sure there is from the floor ...

