
Use & Care Guide
Page 5
... side. Recommended: ■ A time-delay fuse or time-delay circuit breaker. ■ A separate circuit serving only this microwave oven. The plug must be grounded. NOTE: Some models can result in a risk of the trim kits listed in death, fire, or electrical shock. WARNING: Improper use an adapter. If the power supply cord is...
... side. Recommended: ■ A time-delay fuse or time-delay circuit breaker. ■ A separate circuit serving only this microwave oven. The plug must be grounded. NOTE: Some models can result in a risk of the trim kits listed in death, fire, or electrical shock. WARNING: Improper use an adapter. If the power supply cord is...

Use & Care Guide
Page 15
...Cleaner Part Number W10355016 affresh™ Stainless Steel Wipes Part Number W10355049 Heavy Duty Degreaser Part Number 31552A Built-In Kits This countertop microwave oven can be ordered by the remaining one-year limited warranty of a service call us to better respond to ... will fit right and work right because they are made with the product, KitchenAid brand of the following trim kits*. In the U.S.A. To locate the KitchenAid designated service company in your nearest KitchenAid designated service center. This limited warranty is effective from the dealer or can ...
...Cleaner Part Number W10355016 affresh™ Stainless Steel Wipes Part Number W10355049 Heavy Duty Degreaser Part Number 31552A Built-In Kits This countertop microwave oven can be ordered by the remaining one-year limited warranty of a service call us to better respond to ... will fit right and work right because they are made with the product, KitchenAid brand of the following trim kits*. In the U.S.A. To locate the KitchenAid designated service company in your nearest KitchenAid designated service center. This limited warranty is effective from the dealer or can ...

Installation Guide
Page 1
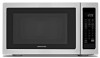
... the word "DANGER" or "WARNING." All safety messages will follow instructions. This symbol alerts you to reduce the chance of others . MICROWAVE OVEN BUILT-IN TRIM KIT INSTALLATION INSTRUCTIONS Built-In Trim Kit Models MK2167, MK2160 UL listed for use over any electric or gas built-in this manual and on your appliance. All safety...
... the word "DANGER" or "WARNING." All safety messages will follow instructions. This symbol alerts you to reduce the chance of others . MICROWAVE OVEN BUILT-IN TRIM KIT INSTALLATION INSTRUCTIONS Built-In Trim Kit Models MK2167, MK2160 UL listed for use over any electric or gas built-in this manual and on your appliance. All safety...

Installation Guide
Page 2
... 1 2.7 cm) above and below the cutout floor (3" [7.6 cm] for installation above the cutout opening . Lower cabinets E. Trim kit frame overhang B. painted) (4 + 2 extra) Location Requirements The microwave oven may also be installed over a built-in oven below). Trim Kit Frame Dimensions 26 68.2 cm)** 29 ³⁄₄" (75.6 cm)** 19 ¹⁄₈" (48.6 cm...
... 1 2.7 cm) above and below the cutout floor (3" [7.6 cm] for installation above the cutout opening . Lower cabinets E. Trim kit frame overhang B. painted) (4 + 2 extra) Location Requirements The microwave oven may also be installed over a built-in oven below). Trim Kit Frame Dimensions 26 68.2 cm)** 29 ³⁄₄" (75.6 cm)** 19 ¹⁄₈" (48.6 cm...
Installation Guide
Page 5
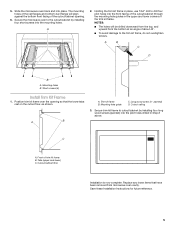
...lower tabs rest on the cutout floor, as shown. Slide the microwave oven back and into the pilot holes drilled in the upper and lower corners of trim kit frame B. A 2. A B A. painted) D. Secure trim kit frame to drill four pilot holes into the mounting holes. Tabs ...cutout/cabinet through the mounting hole guides in Step 2 above. Mounting hole guide C. C A. Position trim kit frame over the opening . 6. Secure the microwave oven to the trim kit frame, do not overtighten screws. Cutout ceiling 3. Cutout/cabinet floor Installation is now complete. Save ...
...lower tabs rest on the cutout floor, as shown. Slide the microwave oven back and into the pilot holes drilled in the upper and lower corners of trim kit frame B. A 2. A B A. painted) D. Secure trim kit frame to drill four pilot holes into the mounting holes. Tabs ...cutout/cabinet through the mounting hole guides in Step 2 above. Mounting hole guide C. C A. Position trim kit frame over the opening . 6. Secure the microwave oven to the trim kit frame, do not overtighten screws. Cutout ceiling 3. Cutout/cabinet floor Installation is now complete. Save ...


