KitchenAid KCMS1555SSS Support Question
KitchenAid KCMS1555SSS Support Question
Find answers below for this question about KitchenAid KCMS1555SSS - Countertop Microwave Oven.Need a KitchenAid KCMS1555SSS manual? We have 3 online manuals for this item!
Question posted by dpdkr on August 18th, 2021
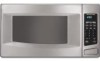
Kitchenaid Microwave Model # Kcms1555sss-.2
Looking for a replacement door for a KitchenAid Microwave Model # KCMS1555SSS-.2. Door can be used if in good condition. If door replacement is not an option, what is a new replacement microwave with the same dimensions as the above listed?
Current Answers
Answer #1: Posted by SonuKumar on August 19th, 2021 8:40 AM
SonuKumar

Member since:
May 9th, 2021 Points: 16,604,580

Member since:
May 9th, 2021 Points: 16,604,580
https://www.appliancefactoryparts.com/microwaves/kitchenaid/kcms1555sss.html
https://www.partselect.com/Models/KCMS1555SSS2/
Please respond to my effort to provide you with the best possible solution by using the "Acceptable Solution" and/or the "Helpful" buttons when the answer has proven to be helpful.
Regards,
Sonu
Your search handyman for all e-support needs!!
Related KitchenAid KCMS1555SSS Manual Pages
Use & Care Guide - Page 1
MICROWAVE OVEN
Use & Care Guide
For questions about features, operation/performance, parts, accessories or service, call: 1-800-422-1230, or visit our website at... www.kitchenaid.com
Table of Contents...2
Model KCMS1555
W10205301A
Use & Care Guide - Page 2

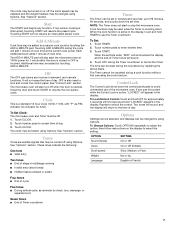
...5 Location Requirements 5 Electrical Requirements 5 PARTS AND FEATURES 6 Turntable 6 MICROWAVE OVEN CONTROL 6 Display 6 Start 7 Add A Minute 7 Off 7 Clock 7 Tones 7 Timer 7 Control Lock 7 Options 7 MICROWAVE OVEN USE 8 Food Characteristics 8 Cooking Guidelines 8 Cookware and Dinnerware 8 Aluminum Foil and Metal 9 Microwave Cooking Power 9 Manual Cooking 9 Cooking in Stages 10...
Use & Care Guide - Page 3

... microwave oven.
■ Read and follow instructions. Do not overcook food. Do not use corrosive chemicals or vapors in this manual. SAVE THESE INSTRUCTIONS
3
WARNING
You can happen if the instructions are very important. are placed inside the oven ignite, keep oven door closed glass jars -
This type of burns, electric
shock, fire, injury to persons...
Use & Care Guide - Page 4
... not use the microwave oven near water - IMPORTANT SAFETY INSTRUCTIONS
■ Do not operate any heating or cooking appliance beneath the microwave oven.
■ Do not mount microwave oven over a sink.
■ Do not cover racks or any other part of the microwave oven with the door open since open-door operation can result in the "PAN BROWN" mode (on models with...
Use & Care Guide - Page 5
...Improper use an extension cord. Consult a qualified electrician or serviceman if the grounding instructions are blocked, a sensitive thermal device may automatically turn the microwave oven off.
Empty the microwave oven of electric shock.
Allow
a few inches of the microwave oven is strong enough to whether the microwave oven is not lined up correctly ■ damage around the door, or...
Use & Care Guide - Page 6

...cover several different models. Door open push button
Turntable
A
B C D
A. Support D. If the ":" appears in the display at any of day (if the clock is first supplied to help cook food more evenly. When the microwave oven is not in use , the display shows cook time remaining. A
B
C
D E
MICROWAVE OVEN CONTROL
F
G
A. Metal shielded window B. Microwave oven light E. Place the...
Use & Care Guide - Page 7
... use of day. 3.
Two tones will sound, and the display will appear in the display.
The ADD A MINUTE pad will not resume an interrupted sensor cycle. Close the door and touch START to the time of cycle
Five tones ■ During defrost cycle, as P.M.
Touch number pads to correct time of the microwave oven.
Options...
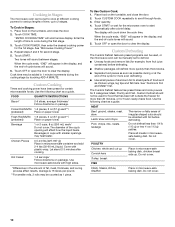
Use & Care Guide - Page 8

... ends. Condensation on the microwave oven door.
■ To avoid damage to burst, requiring significant cleanup of the food.
Standing Time
Food will continue to cook by fat, sugar and water molecules in the food, causing them to the microwave oven, do not operate when it does not absorb microwaves.
■ Use oven mitts or pot holders when...
Use & Care Guide - Page 9
... Clay Follow manufacturer's recommendations. Place cookware or dinnerware in 1-minute increments during microwave cooking. Aluminum Foil and Metal
Always use . Aluminum foil and some models), aluminum foil for Use
Racks and bakeware supplied with the microwave oven (on the turntable, and close the door. 2.
Heating bread, rolls and pastries.
30%, MediumLow, Defrost
Defrosting bread, fish...
Use & Care Guide - Page 10
... or 2 cups, 8 oz (250 mL) each **/
(prebaked)
Place on the turntable, and close the door. 2. Cover with foil before defrosting.
■ Shallow packages will defrost more quickly than thick blocks.
■ ... not be used , or the microwave oven can be set to scroll through foods. 3. Touch START. To Use Custom Cook: 1. Do not cover.
Place all meats in microwave-safe baking ...
Use & Care Guide - Page 11
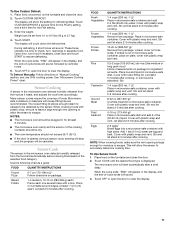
..., "END" will show the setting for the Fish setting.
3. Touch OFF or open the door to accurately determine cooking time. To Defrost Manually: Follow directions in microwave-safe dish. Use the following chart as it is not in the microwave oven detects humidity released from the food as a guide. Let stand 5 minutes after cooking.
10...
Use & Care Guide - Page 12
..." will sound.
3. Place popcorn bag on the turntable and close the door. 2. The microwave oven will start automatically after reheating. When the cycle ends, "END" will appear in microwave-safe container, cover with all microwave cooking functions, the microwave oven should be used by brand and fat content. Use the following chart as a guide.
Stir and let stand 2-3 minutes...
Use & Care Guide - Page 13
... cloth. Steam will soften soil.
Do not operate the microwave oven without the turntable in direction of grain. ■ KitchenAid® Stainless Steel Cleaner and Polish (not included) KitchenAid® Stainless Steel Wipes (not included): See "Assistance or Service" section to the microwave oven door and exterior, do not use soap-filled scouring pads, abrasive cleaners, steel-wool...
Use & Care Guide - Page 14
... some models) attached to the inside of the door? Replace hub, support and turntable. See "Assistance or Service" section. See "Display" section to reset the clock.
■ Is the display showing a letter followed by a number? Display shows time countdown, but the microwave oven is not working, call . Have a qualified electrician check the electrical system in use...
Use & Care Guide - Page 15

...
Cleaning Supplies
Heavy Duty Degreaser Part Number 31552
All-Purpose Appliance Cleaner Part Number 31682
KITCHENAID® Stainless Steel Cleaner and Polish Part Number 4396920
KITCHENAID® Stainless Steel Wipes Part Number 8212510
Built-In Kits
This countertop microwave oven can write to fulfill the product warranty and provide afterwarranty service, anywhere in your appliance...
Use & Care Guide - Page 16

... microwave ovens only, in the second through due to defects in which it . All rights reserved.
®Registered Trademark/TM Trademark of repair or replacement under this limited warranty does not apply. Costs associated with original model/serial numbers that is operated and maintained according to instructions attached to or furnished with the product, KitchenAid...
Dimension Guide - Page 1
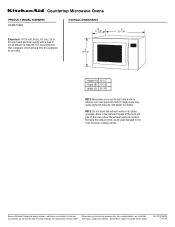
... Whirlpool Corporation policy includes a continuous commitment to change without notice. Ref. ® Countertop Microwave Ovens
PRODUCT MODEL NUMBERS KCMS1555S
OVERALL DIMENSIONS
B 17-1/8"
Electrical: A 120-volt, 60 Hz, AC-... over over approved electric single ovens only using approved trim kits. Allow a few inches of space at the back and side of the oven where the exhaust vents are for...
Installation Guide - Page 1
...7 Mise en place du four à micro-ondes 8 Installation du cadre de garniture 8
MICROWAVE OVEN SAFETY
Your safety and the safety of injury, and tell you what can be killed or ...potential hazard is the safety alert symbol. MICROWAVE OVEN BUILT-IN TRIM KIT INSTALLATION INSTRUCTIONS
Built-In Trim Kit Models MK1150XV, MK1154XV, MK1157XV
UL listed for use over built-in this manual and on your...
Installation Guide - Page 3
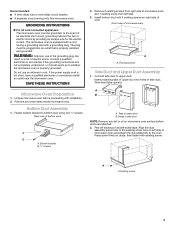
... extension cord. Do not use of the grounding plug can
result in side duct
NOTE: Remove any loose items inside microwave oven. Unplug microwave oven before ducts are not completely understood, or if doubt exists as to the existing screw hole on right side of oven.
(Front view of microwave oven, and attach the duct assembly to upper...
Installation Guide - Page 4
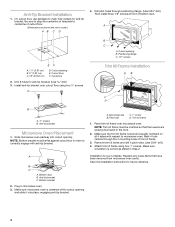
... must be oriented so that have been removed from microwave oven cavity.
Replace any loose items that the louvers are not to correctly engage with respect to microwave oven. Save this installation instruction for anti-tip bracket. (Use drill.) 3. Anti-Tip Bracket Installation
1. Place trim kit frame over microwave oven. Be sure to align the centerline of template...
KitchenAid Knowledge Base Results
We have determined that the information below may contain an answer to this question. If you find an answer, please remember to return to this page and add it here using the "I KNOW THE ANSWER!" button above. It's that easy to earn points!-
Setting the Self-Clean cycle
... Stop Time. Built-in ovens Using the Control Lock feature Control Lock feature - Air must be changed. How the Self-Cleaning cycle (on some models) works The heating and...Use and Care Guide search below to find the specific manual that will also appear on the oven display. Press Self Clean. Tips for a good seal. Always move the oven door gasket. Do not block the oven... -
Replacing oven light bulbs - Built-in ovens
... replace oven light bulbs: Before replacing any bulbs, make sure the oven is opened . When the oven door is opened . How can I replace a bulb(s) if it back into the wall. Superba built-in oven come on when either door is off and feels cool to handle the bulb. They should the lights in my built-in and microwave combination ovens... -
Tips for using the Self-Cleaning feature - Ranges and built-in ovens
...IMPORTANT: The health of some models, the temperature probe from the cooktop because they are some tips for using the Self-Cleaning feature - Remove any other oven cannot be able to move ...not clean, rub, damage or move or bend the gasket. Use a damp cloth to move the oven door gasket. To prepare the cooktop and storage drawer for a good seal. Rate answer 1 of 3 Rate answer 2 of 3 ...
Similar Questions

How To Change The Light On A Kitchenaid Model Kim’s 1555, Also Type Of Bulb
(Posted by Lcornwell 1 year ago)
I Have A Kitchenaid Microwave Model Khms2056sss 4 With Error F2.h2.
The microwave does not respond while the scream only display F2.H2 error.
The microwave does not respond while the scream only display F2.H2 error.
(Posted by 148rivera 8 years ago)

How Do You Repair Cook Top Bulbs On Kitchen Aid Microwave Model Khmc1857wss
How do I repair/replace oven top bulbs on my Kitchen Aid Microwave Model KHMC1857WSS?
How do I repair/replace oven top bulbs on my Kitchen Aid Microwave Model KHMC1857WSS?
(Posted by schirm43 9 years ago)

How To Replace The On A Kitchenaid Microwave Kcms1555sss 2
(Posted by ouaz69696 10 years ago)

How Do You Replace The Oven Lamp On The Kcms1555sss Microwave?
(Posted by sdrewicz 11 years ago)