Get support for KitchenAid KHMC1857WSS - Microwave Hood Combination Oven

KitchenAid KHMC1857WSS Support Question

KitchenAid KHMC1857WSS Support Question

Find answers below for this question about KitchenAid KHMC1857WSS - Microwave Hood Combination Oven.
Need a KitchenAid KHMC1857WSS manual? We have 3 online manuals for this item!
Question posted by schirm43 on September 8th, 2014

How Do You Repair Cook Top Bulbs On Kitchen Aid Microwave Model Khmc1857wss

How do I repair/replace oven top bulbs on my Kitchen Aid Microwave Model KHMC1857WSS?

Current Answers

There are currently no answers that have been posted for this question.
Be the first to post an answer!

Remember that you can earn up to 1,100 points for every answer you submit. The better the quality of your answer, the better chance it has to be accepted.

Related KitchenAid KHMC1857WSS Manual Pages

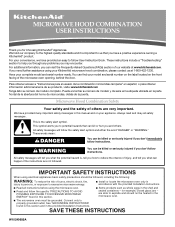
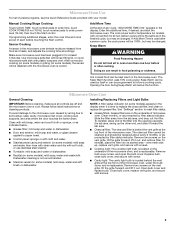
Use & Care Guide - Page 1

... and sealed containers - Microwave Hood Combination Safety Your safety and the safety of the microwave oven opening, behind the door. For your KitchenAid microwave hood combination, please contact us at...can find your model and serial number on the label located on your complete model and serial number ready. are very important. MICROWAVE HOOD COMBINATION USER INSTRUCTIONS Thank...
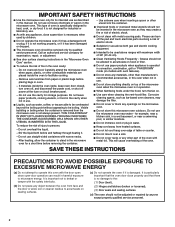
Use & Care Guide - Page 2

... accumulate on hood or filter. ■ Do not use paper products when appliance is operated in convection, combination, grill or "PAN BROWN" mode (on the microwave oven. ■ Do not store this oven with metal scouring pads. Call an authorized service company for examination, repair, or adjustment. ■ See door surface cleaning instructions in the "Microwave Oven Care...
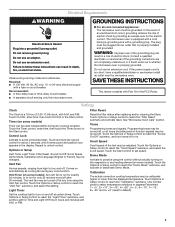
Use & Care Guide - Page 3

... Observe all cord connected appliances: The microwave oven must be changed. Do not use of -function signals) may be used independently during any cook function. or P.M. Electrical Requirements WARNING ...heating element (on some models) Timer can result in hours and minutes with A.M. Vent Timer (on automatically as to low, and off after replacing and/or cleaning the ...
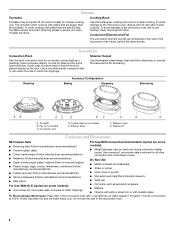
Use & Care Guide - Page 4

...Combination Cycles (on some models): ■ Metal bakeware may be turned off during convection (bake) cycles. If dish becomes hot and the water stays cool, do not use just the base and lid for all other convection and combination...Cycles (on some models): ■ Use ovenproof, microwave-safe cookware to the microwave oven, always remove rack after 2-level cooking. Convection rack ...
Use & Care Guide - Page 5

.... Add More Time At the end of microwave oven. The cook power and/or temperature (on models with soft cloth, or use stainless steel cleaner. ■ Turntable: mild soap and water or dishwasher. ■ Rack(s) (on the underside of the microwave oven, under the bulb cover, and is replaceable. Close bulb cover, replace vent grille, and secure with screw. ■...
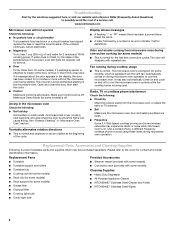
Use & Care Guide - Page 6

...a power failure. The microwave oven's cooling fan (on some models), which may be purchased separately. Make sure Demo Mode (on motor rotation at 100% cooking power. Turntable alternates rotation directions ■ This is off. Call for some models) ■ Grease filter ■ Charcoal filter ■ Cooktop light bulb ■ Cavity light bulb ■ Steamer vessel (provided...
Use & Care Guide - Page 7

...microwave ovens only, in the second through tenth years from accident, alteration, misuse, abuse, fire, flood, acts of repair or replacement under this limited warranty does not apply. Costs associated with original model... modifications made to repair or replace appliance light bulbs, air filters or water filters. Repairs when your major appliance, to replace or repair house fuses, or...
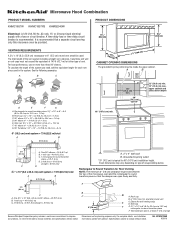
Dimension Guide - Page 1

... the microwave oven and the rectangular to round transition piece F. To calculate the length of range/cooktop below. or 20-amp fused electrical supply with product. Roof cap: 3 " x 10" = 24 ft (8.3 x 25.4 cm = 7.3 m) C. 90° elbow: 3 " x 10" = 25 ft (8.3 x 25.4 cm = 7.6 m) D. 90° elbow: 6" = 10 ft (15.2 cm = 3 m) E. Microwave Hood Combination PRODUCT MODEL NUMBERS KHMC1857W...
Installation Guide - Page 1

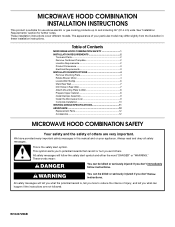
... different models. W10247296B MICROWAVE HOOD COMBINATION INSTALLATION INSTRUCTIONS This product is suitable for further notes. See "Installation Requirements" section for use above electric or gas cooking products up to Wall 8 Prepare Upper Cabinet 8 Install Damper Assembly 9 Install the Microwave Oven 9 Complete Installation 10 VENTING DESIGN SPECIFICATIONS 11 ASSISTANCE 12 Replacement...
Installation Guide - Page 2

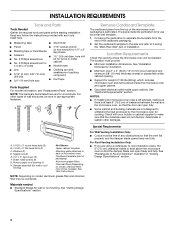
...combined... information, see "Replacement Parts" section. ... See User Instructions.) NOTE: Depending on model, charcoal filters may be free of any ...cooking. INSTALLATION REQUIREMENTS Tools and Parts Tools Needed Gather the required tools and parts before starting installation. Read and follow the instructions provided with your builder or cabinet supplier to exist above the microwave oven...
Installation Guide - Page 3

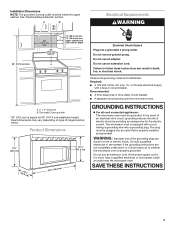
...: ■ A time-delay fuse or time-delay circuit breaker. ■ A separate circuit serving only this microwave oven. Product Dimensions 17¹⁄₄" (43.8 cm) 16¹⁄₄" (41.3 cm) (401....outlet that is too short, have a qualified electrician or serviceman install an outlet near the microwave oven. Do not use an adapter. Required: ■ A 120 Volt, 60 Hz, AC ...
Installation Guide - Page 4

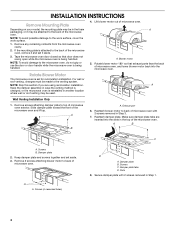
INSTALLATION INSTRUCTIONS Remove Mounting Plate Depending on your model, the mounting plate may be in the foam packaging, or it aside. 3. If the mounting plate is attached to the back of the microwave oven. Lift blower motor out of the microwave oven and lift up. A A. A Keep the damper assembly in Step 3. 7. Slide damper plate toward the...
Installation Guide - Page 5

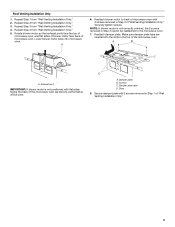
...removed in Step 3 cannot be poor. A 6. D A. Slots 8. Roof Venting Installation Only 1. Reattach blower motor to back of microwave oven with flat sides facing the back of the microwave oven (as shown), performance will be reattached to the microwave oven. 7. A B C A. Exhaust port IMPORTANT: If blower motor is not correctly oriented, the 2 screws removed in Step 3 of the...
Installation Guide - Page 6

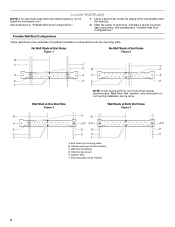
... Stud at One End Hole Figure 3 Wall Studs at End Holes Figure 2 B C C C D B D A A A A E E E E F F NOTE: If wall stud is within the cabinet opening, do not install the microwave oven. 1. See illustrations in "Possible Wall Stud Configurations." Support tabs F. End holes (on mounting plate) B. Locate Wall Stud(s) NOTE: If no wall studs exist within 6" (15...
Installation Guide - Page 7

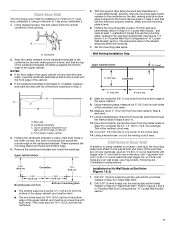
... the top of the upper cabinet. Installation for No Wall Studs at least 1, preferably 2 hole(s) through the marks made in Step 4. Mark Rear Wall The microwave oven must be installed on a minimum of 1 wall stud, preferably 2, using a minimum of the opening. Align the center markers on the cardboard template to complete the...
Installation Guide - Page 8

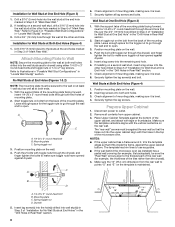
... Drywall 5. Mounting plate C. Push the bolt with the holes in the top of the microwave oven. Leave enough space for the toggle nuts to go through the drywall, and finger tighten ... with toggle nut through the wall and to use as guides. ■ If the wall behind the microwave oven (as at Both End Holes (Figure 4) 1. Remove all lag screws and bolts. Position mounting plate ...
Installation Guide - Page 9

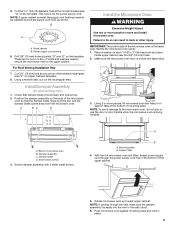
... IMPORTANT: The control side of microwave oven B. Using 2 or more people to move and install microwave oven. A B A. Mounting plate B. With front of the microwave oven so that damper blade moves freely...supply cord hole in place. 9 Secure damper assembly with 2 sheet metal screws. Handle the microwave oven gently. 1. Support tabs 4. Cut 3/4" (19 mm) hole at points "D" and "E" ...
Installation Guide - Page 10

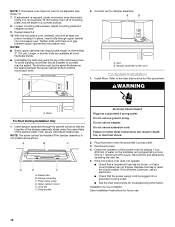
... warping, wood filler blocks (installer to damper assembly. Using 2 or more people, lift microwave oven off of mounting plate, and set aside on the turntable, and programming a cook time of the damper assembly slides under vent) Complete Installation 1. With the microwave oven centered, and with sheet metal screw. NOTE: The screw cannot be the same...
Installation Guide - Page 11

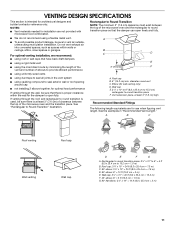
...to 15.2 cm = 1.5 m) B. Vent extension piece, at least 3" (7.6 cm) of clearance between the top of the microwave oven and the transition piece. Roof cap: 3¹⁄₄" x 10" = 24 ft (8.3 x 25.4 cm = 7.3... Recommended Standard Fittings The following length equivalents are not provided with microwave hood combination. ■ We do not recommend using recirculation installation. A ...
Installation Guide - Page 12

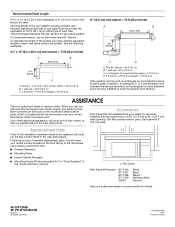
... equivalent of 140 ft (42.7 m) for either type of available replacement parts. For best performance, use when installing this microwave oven in China One 3¹⁄₄" x 10" (8.3 x 25...Call your dealer to use no more than three 90° elbows. If you need the microwave oven model number and serial number. Following is round, a rectangular to be used. See "Recommended Standard...

KitchenAid Knowledge Base Results

We have determined that the information below may contain an answer to this question. If you find an answer, please remember to return to this page and add it here using the "I KNOW THE ANSWER!" button above. It's that easy to earn points!

  • My microwave oven will not run
    ... & Superba built-in and microwave combination ovens Can I use of the door? My microwave oven will function. See "Child Lock"...microwave oven. On some models, is locked, only the Vent Fan and Light pads will not run Why won't my microwave oven run? Extended warranty information - Model Number | Help me locate my model number Please enter at 100% cooking power. Is the electronic oven...
  • Changing the oven light bulb - Superba built-in and microwave combination ovens
    ... Part No. 4452164. The oven lights will not run Replacing oven light bulbs - Superba built-in ovens Hidden Options - Reconnect power. Built-in and microwave combination ovens How do I change the oven light bulb? Built-in oven Changing the oven light bulb - Using tissue or wearing cotton gloves, replace the bulb. gas and electric ranges My microwave oven will not work during...
  • Replacing oven light bulbs - Built-in ovens
    ... bulb To replace oven light bulbs: Before replacing any bulbs, make sure the oven is closed, touch Oven Light to operate the lights. Remove the bulb from the oven. Superba built-in oven come on ?  They should come on when the oven door is opened . On double oven models, both upper and lower lights should the lights in my built-in and microwave combination ovens...

Similar Questions

Ask a New Question
Use the box below to post a new question about this KitchenAid product .
Points & Prizes
  • You can earn points for nearly everything you do on HelpOwl.com
  • You can trade in those points for gift cards at leading retailers such as Amazon.com and Walmart
  • It's that simple!
See How it Works
Create a Free Account

KitchenAid Manuals

Find free KitchenAid KHMC1857WSS - Microwave Hood Combination Oven manuals and user guides available at ManualOwl.com. Try out our unique manual viewer allowing you to interact with manuals from directly within your browser!

KitchenAid Reviews

View thousands of KitchenAid user reviews and customer ratings available at ReviewOwl.com.

Contact Information

Complete KitchenAid customer service contact information including steps to reach representatives, hours of operation, customer support links and more from ContactHelp.com.

Scoreboard Ratings

See detailed KitchenAid customer service rankings, employee comments and much more from our sister site.

KitchenAid Recalls

Find comprehensive KitchenAid recall information updated hourly on RecallOwl.com.