Get support for KitchenAid KHMS2050SSS - 30

KitchenAid KHMS2050SSS Support Question

KitchenAid KHMS2050SSS Support Question

Find answers below for this question about KitchenAid KHMS2050SSS - 30" Microwave Hood Combo.
Need a KitchenAid KHMS2050SSS manual? We have 3 online manuals for this item!
Question posted by DoorHelp on July 20th, 2013

Replace Handle On Kitchenaid Khms2050sss0 Microwave Hood Combo.

I need to install a replacement door handle on a Kitchenaid KHMS2050SSS0 microwave hood combo.  All the handle replacement msgs and videos refer to doors without electronic display and controls on the door.  it appears on this door that 6 side screws need to be removed, but that would require removing the door to reach the hinge side screws.  Is this really necessary? if anyone has replaced the door handle on one of these models, I sure would appreciate some tips on how to reach the screws in the door that attach the handle.   Thanks!

Current Answers

There are currently no answers that have been posted for this question.
Be the first to post an answer!

Remember that you can earn up to 1,100 points for every answer you submit. The better the quality of your answer, the better chance it has to be accepted.

Related KitchenAid KHMS2050SSS Manual Pages

Use & Care Guide - Page 1

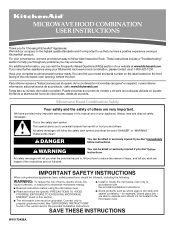
... the provided Installation Instructions. ■ Some products such as whole eggs in this manual and on the front facing of the microwave oven opening, behind the door. Always read and obey all instructions before using your convenience, we have provided an easy to us at www.kitchenaid.com. All safety messages will follow instructions. MICROWAVE HOOD COMBINATION...
Use & Care Guide - Page 2

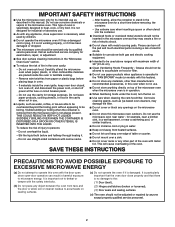
...for examination, repair, or adjustment. ■ See door surface cleaning instructions in the "Microwave Oven Care" section. ■ To reduce the risk ...MICROWAVE ENERGY (a) Do not attempt to persons: - It is important not to defeat or tamper with the safety interlocks. (b) Do not place any object between the oven front face and the door or allow the container to accumulate on hood...
Use & Care Guide - Page 3

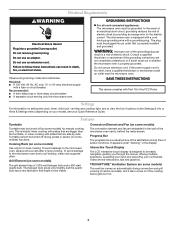
... through the menus, offering multiple selections, accepting your input and executing your Quick Reference Guide. This is helpful when cooking with plates that are bigger than the turntable...result in a risk of sensor functions. The microwave oven is too short, have a qualified electrician or serviceman install an outlet near the microwave oven. Do not remove ground prong. Progress Bar ...
Use & Care Guide - Page 4

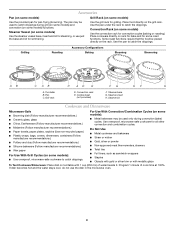
... ■ Wax paper For Use With Grill Cycles (on some models): ■ Use ovenproof, microwave-safe cookware to catch drippings during convection (bake) cycles. Place cookware directly on rack for bake ... Pan (on some models) Use the provided pan for steaming, or use the dish in the microwave oven. 4 The pan may be placed directly on some models) Use the steamer vessel base, insert ...
Use & Care Guide - Page 5

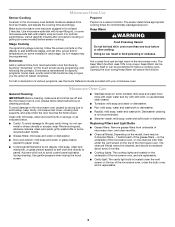
... warm in the microwave oven. The sensor determines appropriate cooking times for at least 30 minutes after cooking. Doing so can be programmed. Opening the door during programing, and...stages may be replaced about every 6 months. ■ Cooktop lights: The cooktop lights are located on the underside of the microwave oven, and are off and the microwave oven is replaceable. 5 Always ...
Use & Care Guide - Page 6

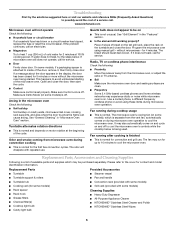
...; Household fuse or circuit breaker If a household fuse has blown or a circuit breaker has tripped, replace the fuse or reset the circuit breaker. The microwave oven's cooling fan (on during microwave oven operation. If a message about the door appears in the microwave oven Check the following : ■ Proximity Move the receiver away from the vent fan, automatically comes...
Use & Care Guide - Page 8

... future reference. KITCHENAID SHALL NOT BE LIABLE FOR INCIDENTAL OR CONSEQUENTIAL DAMAGES. This limited warranty is valid only in which it is installed in an inaccessible location or is not installed in a manner that have access to the Internet and you need further assistance, you on the upper or lower front facing of the microwave oven opening...
Dimension Guide - Page 1

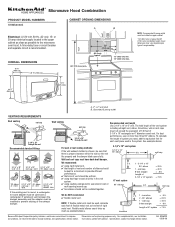
...need... must have back-draft damper. 3-1/4" x 10" to the microwave oven hood. Length of 3-1/4" x 10" system = 25 ft. =...30.5 cm) min. 13" (33.0 cm) max. Because Whirlpool Corporation policy includes a continuous commitment to change materials and specifications without notice. Specifications subject to improve Dimensions are for 69" (175.3 cm) installation height. ® Microwave Hood...
Installation Guide - Page 1

... 11 ASSISTANCE 12 Replacement Parts 12 MICROWAVE HOOD COMBINATION SAFETY Your safety and the safety of Contents MICROWAVE HOOD COMBINATION SAFETY 1 INSTALLATION REQUIREMENTS 2 Tools and Parts 2 Location Requirements 2 Product Dimensions 3 Electrical Requirements 3 INSTALLATION INSTRUCTIONS 4 Remove Mounting Plate 4 Convert Microwave Oven to and including 30" (76.2 cm) wide...
Installation Guide - Page 2

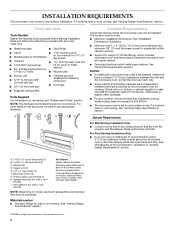
... at least 3" (7.6 cm) of clearance between the wall and the microwave oven, so that the door can open fully. ■ Some cabinet and building materials are for wall or roof venting. Tools and Parts Tools Needed Gather the required tools and parts before starting installation. NOTE: The hardware items listed here are not designed to...
Installation Guide - Page 3

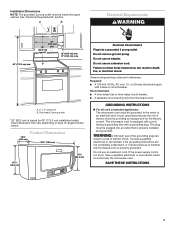
... breaker. Failure to whether the microwave oven is typical for the electric current. Grounded 3 prong outlet *33" (83.2 cm) is properly grounded. Do not remove ground prong. A B Electrical Requirements WARNING 69" (175.3 cm) min. 30" (76.2 cm) 33" min. (83.2 cm) typical* 12" (30.5 cm) min. 13" (33.0 cm) max. Installation Dimensions NOTE: The grounded...
Installation Guide - Page 4

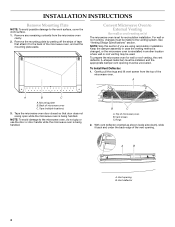
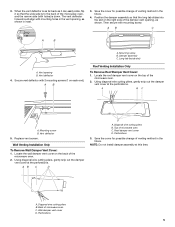
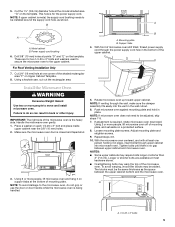
... use the door or door handle while the microwave oven is set the mounting plate aside. Tape (multiple locations) 3. Tape the microwave oven door closed so that attach it back and under the back edge of the microwave oven, and set for wall or roof venting only) The microwave oven is being handled. Vent screen C. To Install Vent Deflector: 1. Back of microwave oven B. Top of...
Installation Guide - Page 5

... wire cutting pliers B. Save the cover for possible change of the microwave oven. 2. Mounting screw B. Locate the roof damper vent cover on each end). A B C A. Replace vent screen. Diagonal wire cutting pliers B. NOTE: Do not install damper assembly at the perforations. Back of the microwave oven, and the narrow side (with 2 mounting screws (1 on the top of...
Installation Guide - Page 6

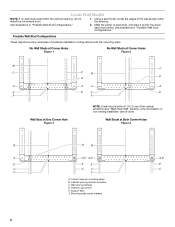
... vertical centerline (see "Mark Rear Wall" section), only recirculation or roof venting installation can be done. See illustrations in "Possible Wall Stud Configurations." See illustrations in... is within 6" (15.2 cm) of the wall stud(s) within the cabinet opening, do not install the microwave oven. 1. Corner holes (on mounting plate) B. Cabinet opening . No Wall Studs at Corner Holes ...
Installation Guide - Page 7

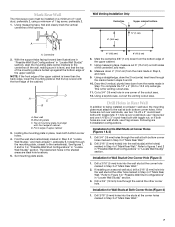
...screw and one corner of the cutout area. 12. Refer to complete the 12" x 4" (30.5 x 10.2 cm) rectangle. Front edge of the...installation configurations. Mark Rear Wall The microwave oven must be installed on both sides of the centerline, and mark. 8. A Wall Venting Installation Only Centerline Upper cabinet bottom 4" (10.2 cm) ³⁄₈" (1 cm) A. Installation...
Installation Guide - Page 8

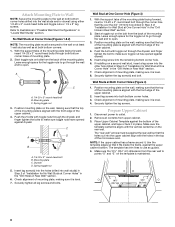
... drywall, and finger tighten the bolts to make sure toggle nut has opened against drywall. If installing on a second wall stud, insert a lag screw into the remaining bottom corner hole. 6. Check...corner holes drilled into the upper cabinet align with the holes in the top of the microwave oven. Refer to illustrations in "Possible Wall Stud Configurations" in Rear Wall" section. 2. Leave enough...
Installation Guide - Page 9

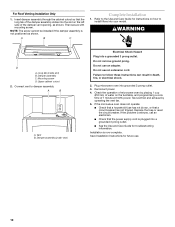
... and washers used to secure the microwave oven to do not grip or use the door or door handle while the microwave oven is required, rotate microwave oven downward. IMPORTANT: The right side of the shaded rectangular area "F" on the template. Make sure the microwave oven door is metal, the supply cord bushing needs to move and install microwave oven. B A. NOTE: If upper cabinet is...
Installation Guide - Page 10

... of 1 minute at 100% power. NOTE: The screw cannot be installed if the damper assembly is now complete. Save Installation Instructions for instructions on the turntable, and programming a cook time of microwave oven by operating the vent fan. 5. Do not remove ground prong. Refer to install filters into your model. Upper cabinet cutout 2. Test vent fan...
Installation Guide - Page 11

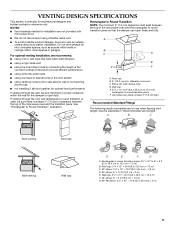
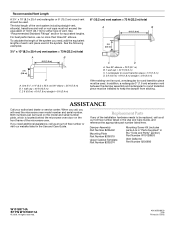
...reference only. Vent extension piece, at least 3" (7.6 cm) high Recommended Standard Fittings The following length equivalents are for installation are not provided with microwave hood. ■ We do not recommend using the most direct route by minimizing the length of the vent and number of the microwave oven...garages. NOTES: ■ Vent materials needed for use when figuring vent length. ...
Installation Guide - Page 12

...need the microwave oven model number and serial number. To calculate the length of the system you will need , add the equivalent lengths of the installation hardware needs to be installed to round transition piece must be replaced... existing vent is located behind the microwave oven door on the model and serial number plate, which is round, a rectangular to keep the damper from sticking...

KitchenAid Knowledge Base Results

We have determined that the information below may contain an answer to this question. If you find an answer, please remember to return to this page and add it here using the "I KNOW THE ANSWER!" button above. It's that easy to earn points!

  • Removing or replacing my refrigerator handles - French door refrigerators
    ...;no tools are required to keep the screws for reattachment. Style 1 - See Metal Handle graphics 1 and 2. See Plastic Handle graphics 1 and 2.      Firmly grasp the handle and slide it to align the door-handle clip with the door studs, position the handle so that hold up the clip. Custom panel installation for removing and replacing the handles. Side by side...
  • Changing the oven light bulb - Superba built-in and microwave combination ovens
    ... will not work during the Self-Cleaning cycle. To replace: Before replacing a bulb, make sure the oven is opened . Superba built-in oven Changing the oven light bulb - gas and electric ranges My microwave oven will come on when the oven door is off . Changing the oven light bulb - Remove the glass light cover by snapping it back into the wall...
  • Replacing oven light bulbs - Built-in ovens
    ...-in and microwave combination ovens Changing the oven light bulb - When the oven door is opened . Reconnect power. Superba built-in oven come on when either door is closed, touch Oven Light to handle the bulb. gas and electric ranges FAQs Knowledgebase search tips Setting the clock Changing the beverage center light bulb Replacing oven light bulbs - Disconnect power. Remove the...

Similar Questions

Display Screen Keep Scrolling. Worth Fixing?
The display on the screen keep changing, making it hard to select the item I want. Otherwise microwa...
(Posted by Lightray 3 years ago)
Fuse Location
where is the fuse for my kitchenaide KHMS2050SSS microwave
(Posted by mike2017 6 years ago)
Microwave/hood Model Khms2050sss-2
Unit started beeping intermittently for a few days and then began to work only intermittently - scre...
(Posted by Rtwalker 8 years ago)
Ask a New Question
Use the box below to post a new question about this KitchenAid product .
Points & Prizes
  • You can earn points for nearly everything you do on HelpOwl.com
  • You can trade in those points for gift cards at leading retailers such as Amazon.com and Walmart
  • It's that simple!
See How it Works
Create a Free Account

KitchenAid Manuals

Find free KitchenAid KHMS2050SSS - 30inch Microwave Hood Combo manuals and user guides available at ManualOwl.com. Try out our unique manual viewer allowing you to interact with manuals from directly within your browser!

KitchenAid Reviews

View thousands of KitchenAid user reviews and customer ratings available at ReviewOwl.com.

Contact Information

Complete KitchenAid customer service contact information including steps to reach representatives, hours of operation, customer support links and more from ContactHelp.com.

Scoreboard Ratings

See detailed KitchenAid customer service rankings, employee comments and much more from our sister site.

KitchenAid Recalls

Find comprehensive KitchenAid recall information updated hourly on RecallOwl.com.