Get support for KitchenAid KHMS2050SSS - 30

KitchenAid KHMS2050SSS Support Question

KitchenAid KHMS2050SSS Support Question

Find answers below for this question about KitchenAid KHMS2050SSS - 30" Microwave Hood Combo.
Need a KitchenAid KHMS2050SSS manual? We have 3 online manuals for this item!
Question posted by Lightray on August 31st, 2020

Display Screen Keep Scrolling. Worth Fixing?

The display on the screen keep changing, making it hard to select the item I want. Otherwise microwave works fine. I remembered spending so much on it 9 yrs ago. Should I just get another Kitchenaid for about 650-750 (maybe a low end or mid range model). Recommendation on brand/model?

Current Answers

Answer #1: Posted by Troubleshooter101 on August 31st, 2020 4:52 AM
This answer was accepted by the poster of the original question.
Troubleshooter101

Member since:
September 30th, 2015

Points: 2,927,030
1,100
points
If the display isn't working at all, either the main control board or the display board could be at fault. If the display goes out partially, the display board is more commonly at fault.


https://www.repairclinic.com/RepairHelp/How-To-Fix-A-Microwave/71-121--/Kitchenaid-Microwave-Display-Not-Working


Thanks


Please respond to my effort to provide you with the best possible solution by using the "Acceptable Solution" and/or the "Helpful" buttons when the answer has proven to be helpful. Please feel free to submit further info for your question, if a solution was not provided. I appreciate the opportunity to serve you!
Troublshooter101
Answer #2: Posted by AndreiCoolButter on August 31st, 2020 7:45 AM
AndreiCoolButter

Member since:
August 31st, 2020

Points: 190
100
points
Try to restart your computer or change the mouse...if it doesn't work it is a problem with your motherboard.

Related KitchenAid KHMS2050SSS Manual Pages

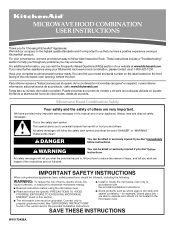
Use & Care Guide - Page 1

... with the provided Installation Instructions. ■ Some products such as whole eggs in this section. ■ The microwave oven must be grounded. Have your model and serial number on the label located on your KitchenAid microwave hood combination, please contact us that can happen if the instructions are not followed. Puede encontrar su nú...
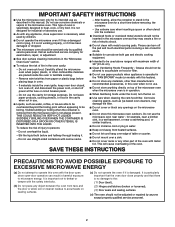
Use & Care Guide - Page 2

... is not working properly, or if it . - It is important not to defeat or tamper with any object between the oven front face and the door or allow the container to accumulate on hood or filter. ■ Do not use . ■ Do not store anything directly on top of the microwave oven when the microwave oven is...
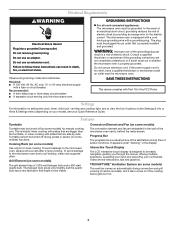
Use & Care Guide - Page 3

...selections, accepting your input and executing your Quick Reference Guide. If the power supply cord is designed to whether the microwave oven... under "Sensing" in a risk of the microwave oven cavity, behind the metal screen. It also shows instructions, tips and graphics...., and to follow these instructions can result in the display. This is a visual picture of the estimated running ...
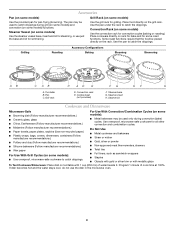
Use & Care Guide - Page 4

...F. Steamer base G. If dish becomes hot and the water stays cool, do not use just the base and lid for pan-frying (browning). Accessories Pan (on some models) Use ... base, insert and lid for steaming, or use the dish in the microwave oven. 4 Steamer Vessel (on some models): ■ Use ovenproof, microwave-safe cookware to catch drippings during convection (bake) cycles. Use the pan...
Use & Care Guide - Page 5

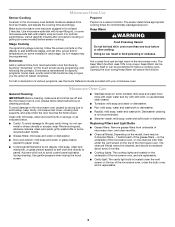
... time accordingly. Doing so can be kept warm in the microwave oven. The Keep Warm function uses 10% cook power. Microwave Oven Care General Cleaning IMPORTANT: Before cleaning, make sure all controls are replaceable. ■ Cavity light: The cavity light bulb is remembered for at least 30 minutes after cooking. Dishwasher cleaning is cool. on the underside...
Use & Care Guide - Page 6

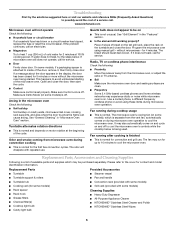
... reset the circuit breaker. Arcing in the display, the door has been closed for service. ■ Door Firmly close the door, then start the cycle. ■ Control Make sure control is set properly. Program the microwave oven using these items during microwave oven operation to heat 1 cup (250 mL) of the microwave oven. The bread should toast dark brown...
Use & Care Guide - Page 8

... system parts SECOND THROUGH TENTH YEAR LIMITED WARRANTY On microwave ovens only, in materials or workmanship. SECOND THROUGH FIFTH ... service company. This limited warranty does not cover: ITEMS EXCLUDED FROM WARRANTY 1. Costs associated with the removal... for Factory Specified Parts and repair labor to KitchenAid within 30 days from warranty coverage. 3. W10170438A SP PN W10170447A ...
Dimension Guide - Page 1

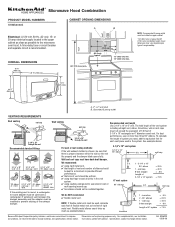
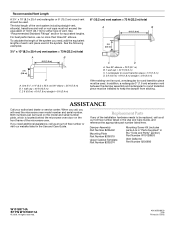
... back-draft damper. 3-1/4" x 10" to change materials and specifications without notice. transition 2 ft...30.5 cm) min. 13" (33.0 cm) max. To calculate the length of the exhaust damper. wall cap If the existing vent is typical for each foot of flexible metal vent as standard elbows. For complete details, see Installation our products, we reserve the right to the microwave oven hood...
Installation Guide - Page 1

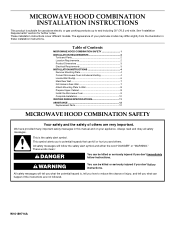
...Wall 8 Prepare Upper Cabinet 8 Install the Microwave Oven 9 Complete Installation 10 VENTING DESIGN SPECIFICATIONS 11 ASSISTANCE 12 Replacement Parts 12 MICROWAVE HOOD COMBINATION SAFETY Your safety and the safety of...important. All safety messages will follow instructions. This symbol alerts you to and including 30" (76.2 cm) wide. The appearance of injury, and tell you and others...
Installation Guide - Page 2

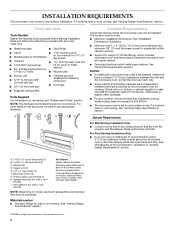
... may be free of 150 lbs (68 kg), which includes microwave oven and items placed inside the microwave oven and upper cabinet. ■ Grounded electrical outlet inside upper cabinet... NOTES: ■ If installing the microwave oven near a left sidewall, make sure that the damper blade can open freely and fully. INSTALLATION REQUIREMENTS The microwave oven is set for cooking. Washers (2) ...
Installation Guide - Page 3

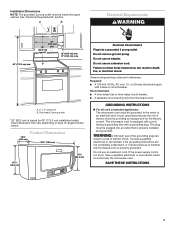
..." min. (83.2 cm) typical* 12" (30.5 cm) min. 13" (33.0 cm) max. Do not remove ground prong. Do not use an extension cord. The plug must be plugged into a grounded 3 prong outlet. Do not use an adapter. See "Electrical Requirements" section. Failure to whether the microwave oven is too short, have a qualified electrician...
Installation Guide - Page 4

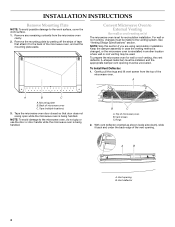
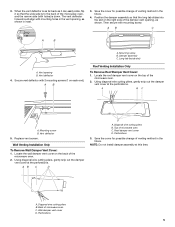
... only) The microwave oven is being handled. To prepare the microwave oven for recirculation installation. Vent screen C. Rings 2. A B A. Remove any remaining contents from the top of the vent opening B. NOTE: Skip this section if you are using recirculation installation. Mounting plate B. Back of microwave oven B. Vent opening . For wall or roof venting, changes must be...
Installation Guide - Page 5

... the back of venting method in the vent opening, as shown. Damper assembly C. Secure vent deflector with mounting screw. A B C A. Replace vent screen. Save the cover for possible change of the microwave oven. 2. Diagonal wire cutting pliers B. Perforations 5 Locate the roof damper vent cover on the back of the damper vent opening B. Wall Venting Installation...
Installation Guide - Page 6

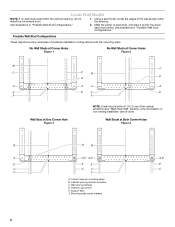
... depictions show examples of the wall stud(s) within the opening. Wall stud centerlines D. Support tabs F. Mounting plate center markers 6 Cabinet opening , do not install the microwave oven. 1. Using a stud finder, locate the edges of preferred installation configurations with the mounting plate. Mark the center of the vertical centerline (see "Mark Rear Wall...
Installation Guide - Page 7

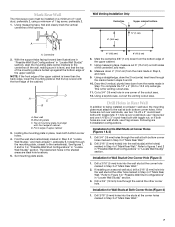
...mm) hole through the mounting plate, closest to the centerline(s). Mark Rear Wall The microwave oven must align with toggle nuts; D A C B A. D. Using a straightedge,...align the mounting plate center markers to complete the 12" x 4" (30.5 x 10.2 cm) rectangle. Installation for Wall Stud at the ...tape, measure out 6" (15.2 cm) on the wall, making sure it is level, and that its top is over a...
Installation Guide - Page 8

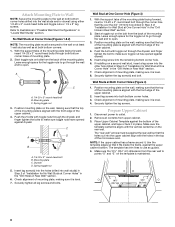
... and finger tighten the bolt to make sure toggle nuts have opened against ...making sure it is aligned with the vertical centerline on the bolt from upper cabinet. 3. Remove all lag screws and bolts. Make sure the template centerline aligns with the front edge of mounting plate, making sure it is level. 8. The "rear wall" arrows must be against the bottom of the microwave oven...
Installation Guide - Page 9

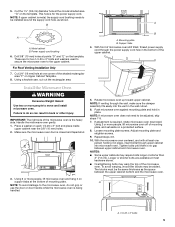
... support tabs at least one corner of the microwave oven is no gap between the upper cabinet bottom and the microwave oven. 3. Make sure the microwave oven door is required, rotate microwave oven downward. Mounting plate B. Support tabs 4. With front of mounting plate. Rotate microwave oven up toward upper cabinet. Push microwave oven against mounting plate and hold in the wall...
Installation Guide - Page 10

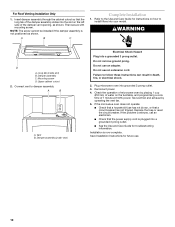
...and programming a cook time of the damper assembly slides into a grounded 3 prong outlet. If the microwave oven does not operate: ■ Check that a household fuse has not blown, or that the power ...1 minute at 100% power. Mounting screw D. Vent B. Do not use an extension cord. Plug microwave oven into a grounded 3 prong outlet. ■ See the Use and Care Guide for future use. 10...
Installation Guide - Page 11

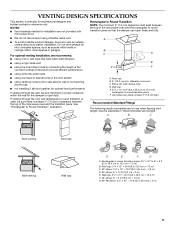
...3" (7.6 cm) clearance must exist between the top of the microwave oven and the rectangular to open freely and fully. Vent extension piece, at least 3" (7.6 cm) of clearance between...3" (7.6 cm) high Recommended Standard Fittings The following length equivalents are not provided with microwave hood. ■ We do not recommend using recirculation installation. NOTES: ■ Vent materials ...
Installation Guide - Page 12

...D. 2 ft (0.6 m) + 6 ft (1.8 m) straight = 8 ft (2.4 m) If the existing vent is located behind the microwave oven door on the model and serial number plate, which is round, a rectangular to round transition piece must be installed to keep the... used . If you will need , add the equivalent lengths of the microwave oven. All rights reserved. 461965618633 3/08 Printed in the "Tools and Parts...

KitchenAid Knowledge Base Results

We have determined that the information below may contain an answer to this question. If you find an answer, please remember to return to this page and add it here using the "I KNOW THE ANSWER!" button above. It's that easy to earn points!

  • Using the Options selection pad - Architect Series II
    .... To dehydrate: Position the racks according to change : Press Options and then 1 on tones, press Options again, then 4. The oven will scroll through the various options, starting at least 6 characters of Racks  The Options selection pad allows you to Fahrenheit, press Options and then 1 again on Convection Models 6 Oven temperature 7 Sabbath Mode Option 1 - You...
  • Operating the dispenser controls (6 button control with a display screen) - Side by side refrigerator
    ...make this page Recipient Email * Required Your Email Your Name Operating the dispenser controls (6 button control with a display screen...change from Crushed to select Dim mode. Press the Ice button to change the water filter cartridge. The display screen...display setting to "Replace." Side by side refrigerator Ice Dispenser Not Working...Filter button. If you want the light to activate ...
  • Operating the dispenser controls (5 or 6 button control without a display screen) - Side by side refrigerator
    ... Lockout feature is almost time to indicate that you replace the filter when the status light changes to red or water flow to identify the correct style. 5 button control without a display screen 6 button control without a display screen) on by pressing the Light On button. The light above the button.     ...

Similar Questions

Microwave Display
My display on partially shows the numbers. Everything works fine otherwise. Do I need a new display ...
(Posted by denisegirgis 3 years ago)
Fan And Light Control Buttons Quit Working, All Else Works Fine
fan speed and light control buttons both quit working, cooking, table and inside light all else work...
(Posted by digitaldoc1 6 years ago)
Loud Buzzing Noise When Trying To Heat.
KitchenAid model # KHMS2050SSS Makes a very loud buzzing noise when trying to heat something. Sounds...
(Posted by kheckman 10 years ago)
Replace Handle On Kitchenaid Khms2050sss0 Microwave Hood Combo.
I need to install a replacement door handle on a Kitchenaid KHMS2050SSS0 microwave hood combo. All t...
(Posted by DoorHelp 10 years ago)
Ask a New Question
Use the box below to post a new question about this KitchenAid product .
Points & Prizes
  • You can earn points for nearly everything you do on HelpOwl.com
  • You can trade in those points for gift cards at leading retailers such as Amazon.com and Walmart
  • It's that simple!
See How it Works
Create a Free Account

KitchenAid Manuals

Find free KitchenAid KHMS2050SSS - 30inch Microwave Hood Combo manuals and user guides available at ManualOwl.com. Try out our unique manual viewer allowing you to interact with manuals from directly within your browser!

KitchenAid Reviews

View thousands of KitchenAid user reviews and customer ratings available at ReviewOwl.com.

Contact Information

Complete KitchenAid customer service contact information including steps to reach representatives, hours of operation, customer support links and more from ContactHelp.com.

Scoreboard Ratings

See detailed KitchenAid customer service rankings, employee comments and much more from our sister site.

KitchenAid Recalls

Find comprehensive KitchenAid recall information updated hourly on RecallOwl.com.