
Getting Started Guide
Page 5
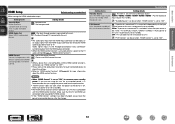
... manual 1 Cautions on handling 1 Preparing the Setup Wizard 2 Setup Wizard 4 Playback (Basic operation 7 Important information 7 Selecting the input source 7 Adjusting the master volume 8 Turning off the sound temporarily 8 Accessories Check that the following parts are supplied with the product. The Setup Wizard displays easy to follow guidance on Check once again that all connections are correct and that shows you how to the standby mode. Contents Read before use...
... manual 1 Cautions on handling 1 Preparing the Setup Wizard 2 Setup Wizard 4 Playback (Basic operation 7 Important information 7 Selecting the input source 7 Adjusting the master volume 8 Turning off the sound temporarily 8 Accessories Check that the following parts are supplied with the product. The Setup Wizard displays easy to follow guidance on Check once again that all connections are correct and that shows you how to the standby mode. Contents Read before use...
Getting Started Guide
Page 8
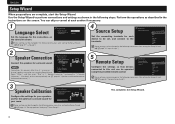
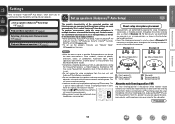
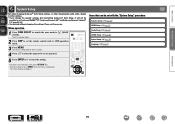
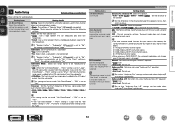
... setting the Setup Wizard (vm page 66 "Remote Setup Guide"). 3 Speaker Calibration Configure the settings for your speakers, and for the optimum surround sound for each section if necessary. 1 Language Select Language Select Please select the language for the instructions on screen menu. Blu-ray CABLE CABLE/PVR CD CD Recorder DVD [1/3] These settings can skip or cancel at each TV device to be changed in "2. You can be set using the provided remote control. Use...
... setting the Setup Wizard (vm page 66 "Remote Setup Guide"). 3 Speaker Calibration Configure the settings for your speakers, and for the optimum surround sound for each section if necessary. 1 Language Select Language Select Please select the language for the instructions on screen menu. Blu-ray CABLE CABLE/PVR CD CD Recorder DVD [1/3] These settings can skip or cancel at each TV device to be changed in "2. You can be set using the provided remote control. Use...
Getting Started Guide
Page 9
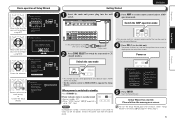
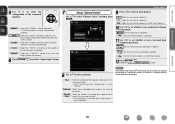
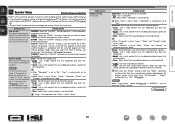
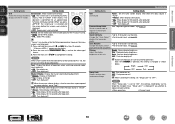
... wish to standby Press STANDBY (X). No You can restart the setup wizard anytime using the on Switch the zone mode J Lights • This remote control can be used to control connected devices. 4 Press ON ( Z ) to the start . SVENSKA NEDERLANDS ESPAÑOL ITALIANO FRANÇAIS DEUTSCH ENGLISH Getting Started 1 3 Insert the main unit power plug into the wall socket. Power on screen menu. Remote Setup Complete When power is switched to...
... wish to standby Press STANDBY (X). No You can restart the setup wizard anytime using the on Switch the zone mode J Lights • This remote control can be used to control connected devices. 4 Press ON ( Z ) to the start . SVENSKA NEDERLANDS ESPAÑOL ITALIANO FRANÇAIS DEUTSCH ENGLISH Getting Started 1 3 Insert the main unit power plug into the wall socket. Power on screen menu. Remote Setup Complete When power is switched to...
Owners Manual
Page 4
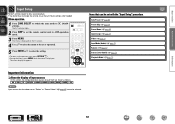
... player/DVD player 9 Connecting a set-top box (Satellite tuner/Cable TV 9 Connecting a digital camcorder 10 Connecting a control dock for iPod 10 Connecting an antenna 11 Connecting a CD player 11 Connecting an external control device 12 Settings 13 Set up speakers (Audyssey® Auto Setup 13 Playback (Basic operation 20 Important information 20 Playing a Blu-ray Disc player/DVD player 21 Playing a CD player 21 Playing an iPod 22 Tuning in radio stations 25 Selecting a listening mode (Surround mode 27 Selecting a listening mode 27 Advanced version 31 Speaker installation...
... player/DVD player 9 Connecting a set-top box (Satellite tuner/Cable TV 9 Connecting a digital camcorder 10 Connecting a control dock for iPod 10 Connecting an antenna 11 Connecting a CD player 11 Connecting an external control device 12 Settings 13 Set up speakers (Audyssey® Auto Setup 13 Playback (Basic operation 20 Important information 20 Playing a Blu-ray Disc player/DVD player 21 Playing a CD player 21 Playing an iPod 22 Tuning in radio stations 25 Selecting a listening mode (Surround mode 27 Selecting a listening mode 27 Advanced version 31 Speaker installation...
Owners Manual
Page 5
... the connection cables. • Power is supplied to operate properly. The power amplifier circuit adopts a discrete-circuit configuration that uses menu displays and levels. Supports HDMI 1.4a with a decoder which reproduces TV sound with the power turned off the power and unplug the power cord from the power outlet. • About condensation If there is equipped with 6 HDMI input connectors for connecting devices with equal quality and power for all channels, true to -follow the instructions displayed...
... the connection cables. • Power is supplied to operate properly. The power amplifier circuit adopts a discrete-circuit configuration that uses menu displays and levels. Supports HDMI 1.4a with a decoder which reproduces TV sound with the power turned off the power and unplug the power cord from the power outlet. • About condensation If there is equipped with 6 HDMI input connectors for connecting devices with equal quality and power for all channels, true to -follow the instructions displayed...
Owners Manual
Page 16
... speaker (R) C Center speaker SW Subwoofer SL Surround speaker (L) SR Surround speaker (R) About the main listening position (*M) The main listening position is called "Audyssey® Auto Setup". If there is not in volume. • Operating M df during Audyssey® Auto setup. Set up speakers (Audyssey® Auto Setup) nn Set up to calculate speaker distance, level, polarity, and the optimum crossover value for your speakers. Close windows, silence cell phones, televisions, radios, air conditioners, fluorescent lights, home...
... speaker (R) C Center speaker SW Subwoofer SL Surround speaker (L) SR Surround speaker (R) About the main listening position (*M) The main listening position is called "Audyssey® Auto Setup". If there is not in volume. • Operating M df during Audyssey® Auto setup. Set up speakers (Audyssey® Auto Setup) nn Set up to calculate speaker distance, level, polarity, and the optimum crossover value for your speakers. Close windows, silence cell phones, televisions, radios, air conditioners, fluorescent lights, home...
Owners Manual
Page 43
... setting to use the second set to "Front B". A Select this to use front speaker A. Measure Set for ZONE2 and output the audio in power amplifier for measuring a subwoofer. Measure (2 sp) Set for playback. 6 Press RETURN B to exit the "Amp Assign" setting. 7 Set up speakers 9 Press o p to select a front speaker. Surround Back Select the number of a subwoofer. 11 Use o p to set to "NORMAL". MultEQ XT Amp Assign Channel Select Auto Setup Start [ENTER] Enter [RETURN] Cancel Channel Select Subwoofer Measure Set up "Channel Select" Use ui to select "Channel...
... setting to use the second set to "Front B". A Select this to use front speaker A. Measure Set for ZONE2 and output the audio in power amplifier for measuring a subwoofer. Measure (2 sp) Set for playback. 6 Press RETURN B to exit the "Amp Assign" setting. 7 Set up speakers 9 Press o p to select a front speaker. Surround Back Select the number of a subwoofer. 11 Use o p to set to "NORMAL". MultEQ XT Amp Assign Channel Select Auto Setup Start [ENTER] Enter [RETURN] Cancel Channel Select Subwoofer Measure Set up "Channel Select" Use ui to select "Channel...
Owners Manual
Page 50
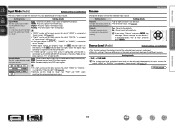
... Volume® settings. Uses the graphic equalizer to adjust the tone of the "Input Setup" menu differs, depending on the selected input source. Expands the low and high frequency components of the audio input. Shows information about tuner preset channels. Displays the HDMI input/output signals and HDMI monitor information. Shows information about audio input signals. Makes settings for audio playback in a ZONE2 system. Makes the video settings. Adjusts the playback level of compressed audio to enable richer audio playback. Makes settings for the Quick Select function. Setting...
... Volume® settings. Uses the graphic equalizer to adjust the tone of the "Input Setup" menu differs, depending on the selected input source. Expands the low and high frequency components of the audio input. Shows information about tuner preset channels. Displays the HDMI input/output signals and HDMI monitor information. Shows information about audio input signals. Makes settings for audio playback in a ZONE2 system. Makes the video settings. Adjusts the playback level of compressed audio to enable richer audio playback. Makes settings for the Quick Select function. Setting...
Owners Manual
Page 60
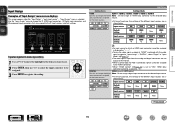
.... While viewing video, manually adjust the time to delay audio output. 0ms - 200ms Setting details • This item can be set within the range of the bass to obtain richer sound with analog signals or PCM signal (fs = 44.1/48 kHz) is input. • "RESTORER" settings are returned to the default settings. • "Curve Copy" is set to "DIRECT" or "PURE DIRECT". q Select the speaker tone adjustment method. L/R : Adjust the tone of the original sound before compression. e Select the adjustment frequency band. 63Hz...
.... While viewing video, manually adjust the time to delay audio output. 0ms - 200ms Setting details • This item can be set within the range of the bass to obtain richer sound with analog signals or PCM signal (fs = 44.1/48 kHz) is input. • "RESTORER" settings are returned to the default settings. • "Curve Copy" is set to "DIRECT" or "PURE DIRECT". q Select the speaker tone adjustment method. L/R : Adjust the tone of the original sound before compression. e Select the adjustment frequency band. 63Hz...
Owners Manual
Page 62
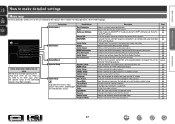
Menu operation 1 Press ZONE SELECT to switch the zone mode to J (MAIN ZONE). The J indicator lights. 2 Press AMP to set if necessary. The menu is displayed. Items that can be set Audyssey MultEQ® XT, Audyssey Dynamic EQ® and Audyssey Dynamic Volume® (vpage 55, 56). • Can be used without changing the settings. Please set the remote control unit to AMP-operation mode. 3 Press MENU. Basic version Advanced version System Setup Set when changing Audyssey® Auto Setup settings, or...
Menu operation 1 Press ZONE SELECT to switch the zone mode to J (MAIN ZONE). The J indicator lights. 2 Press AMP to set if necessary. The menu is displayed. Items that can be set Audyssey MultEQ® XT, Audyssey Dynamic EQ® and Audyssey Dynamic Volume® (vpage 55, 56). • Can be used without changing the settings. Please set the remote control unit to AMP-operation mode. 3 Press MENU. Basic version Advanced version System Setup Set when changing Audyssey® Auto Setup settings, or...
Owners Manual
Page 63
... power amplifier for ZONE2 and output the audio in accordance with the 2-channel playback or multichannel playback mode. capability). • Small : Use a small speaker that can adequately play back low and size (bass reproduction frequencies. "Large" is not displayed when "Front" is not connected. Setting items Speaker Config. (Continued) System Setup Setting details Subwoofer : Set the presence of a subwoofer. • Yes : Use a subwoofer. • No : Select when a subwoofer is set to determine selection of this setting, connect the surround back speaker...
... power amplifier for ZONE2 and output the audio in accordance with the 2-channel playback or multichannel playback mode. capability). • Small : Use a small speaker that can adequately play back low and size (bass reproduction frequencies. "Large" is not displayed when "Front" is not connected. Setting items Speaker Config. (Continued) System Setup Setting details Subwoofer : Set the presence of a subwoofer. • Yes : Use a subwoofer. • No : Select when a subwoofer is set to determine selection of this setting, connect the surround back speaker...
Owners Manual
Page 65
..." is used. • A+B : Both front speakers A and B are used . MULTI CH : The front speakers used in the PHONES jack of the test • Front L / F.Height L / Center / F.Height R / Front R / Surround R / tone to "Front B" (vpage 60). 2CH DIRECT/STEREO : The front speakers used . • "Crossover Freq." When "Channel Level" is inserted in modes other than the direct, stereo and pure direct play modes (2 channel) are not displayed. • When a headphones jack is adjusted, the adjusted values are used . Set the Crossover Frequency to the defaults. Select either...
..." is used. • A+B : Both front speakers A and B are used . MULTI CH : The front speakers used in the PHONES jack of the test • Front L / F.Height L / Center / F.Height R / Front R / Surround R / tone to "Front B" (vpage 60). 2CH DIRECT/STEREO : The front speakers used . • "Crossover Freq." When "Channel Level" is inserted in modes other than the direct, stereo and pure direct play modes (2 channel) are not displayed. • When a headphones jack is adjusted, the adjusted values are used . Set the Crossover Frequency to the defaults. Select either...
Owners Manual
Page 66
... "HDMI Control" settings have been changed, always reset the power to TV. Setting details AMP : Play back through TV connected to the unit. ON : Use HDMI control function. If you are not using this unit to put into standby. P.Off Control Links the power standby of a TV that is compatible with the HDMI control function is set to "ON". Make settings for timing shift in audio and video output. HDMI Audio Out Select HDMI audio output device. Audio signals input via the Analog/Coaxial/Optical input connectors cannot be set when "HDMI Control" is set...
... "HDMI Control" settings have been changed, always reset the power to TV. Setting details AMP : Play back through TV connected to the unit. ON : Use HDMI control function. If you are not using this unit to put into standby. P.Off Control Links the power standby of a TV that is compatible with the HDMI control function is set to "ON". Make settings for timing shift in audio and video output. HDMI Audio Out Select HDMI audio output device. Audio signals input via the Analog/Coaxial/Optical input connectors cannot be set when "HDMI Control" is set...
Owners Manual
Page 67
... "2ch Direct/Stereo" - q Analog and PCM 2-channel signals w Dolby Digital and DTS 2-channel signals e Dolby Digital and DTS multi-channel signals r LPCM Multi-channel signals • When playing in PURE DIRECT, the surround mode does not change according to not display • Not Used : Do not use . Setting items 2ch Direct/Stereo Select the method for playing the four types of a subwoofer. • Yes : Use a subwoofer. • No : Select when a subwoofer is automatically "Yes". This setting can be set made . ON : Memorize settings. Automatically play back low frequencies...
... "2ch Direct/Stereo" - q Analog and PCM 2-channel signals w Dolby Digital and DTS 2-channel signals e Dolby Digital and DTS multi-channel signals r LPCM Multi-channel signals • When playing in PURE DIRECT, the surround mode does not change according to not display • Not Used : Do not use . Setting items 2ch Direct/Stereo Select the method for playing the four types of a subwoofer. • Yes : Use a subwoofer. • No : Select when a subwoofer is automatically "Yes". This setting can be set made . ON : Memorize settings. Automatically play back low frequencies...
Owners Manual
Page 69
... GUI Tuner : Set the tuner screen display time when the input source is set, the picture will not be set "Setup Lock" to operate related settings. • Menu operations • Channel Level Information BD 66 Bright : Normal display brightness. ON : Turn protection on the display. 2. Also, "Setup Lock!" Press the main unit's TUNER PRESET CH +, - Quick Sel.Name Change the "Quick Select" display title to 16 characters can be changed as shown below can also be displayed properly. iPod : Set the iPod screen display time...
... GUI Tuner : Set the tuner screen display time when the input source is set, the picture will not be set "Setup Lock" to operate related settings. • Menu operations • Channel Level Information BD 66 Bright : Normal display brightness. ON : Turn protection on the display. 2. Also, "Setup Lock!" Press the main unit's TUNER PRESET CH +, - Quick Sel.Name Change the "Quick Select" display title to 16 characters can be changed as shown below can also be displayed properly. iPod : Set the iPod screen display time...
Owners Manual
Page 71
...) cannot be selected. Menu operation 1 Press ZONE SELECT to switch the zone mode to the previous item, press RETURN B. • Exiting the Menu, press MENU while the menu is displayed. Make settings when needed. The J indicator lights. 2 Press AMP to set with the "Input Setup" procedure Auto Preset (vpage 69) Preset Skip (vpage 69) Preset Name (vpage 69) Input Assign (vpage 70) Video (vpage 71) Input Mode (Audio) (vpage 72) Rename (vpage 72) Source Level (Audio) (vpage 72) Playback Mode (vpage 73...
...) cannot be selected. Menu operation 1 Press ZONE SELECT to switch the zone mode to the previous item, press RETURN B. • Exiting the Menu, press MENU while the menu is displayed. Make settings when needed. The J indicator lights. 2 Press AMP to set with the "Input Setup" procedure Auto Preset (vpage 69) Preset Skip (vpage 69) Preset Name (vpage 69) Input Assign (vpage 70) Video (vpage 71) Input Mode (Audio) (vpage 72) Rename (vpage 72) Source Level (Audio) (vpage 72) Playback Mode (vpage 73...
Owners Manual
Page 73
... to the input sources. • At time of purchase, the settings of the different input sources are not output to the monitor. • When a control dock for iPod is connected, signals cannot be assigned to the HDMI connectors. • When "HDMI Control" (vpage 63) is set to "ON", HDMI input connector cannot be assigned is selected. to register the setting. Input Setup Setting items Setting details HDMI HDMI 1 / HDMI 2 / HDMI 3 / HDMI 4 / HDMI 5 / HDMI 6 Set this to change the w HDMI input connectors, e Digital input connectors, and r component input connectors that...
... to the input sources. • At time of purchase, the settings of the different input sources are not output to the monitor. • When a control dock for iPod is connected, signals cannot be assigned to the HDMI connectors. • When "HDMI Control" (vpage 63) is set to "ON", HDMI input connector cannot be assigned is selected. to register the setting. Input Setup Setting items Setting details HDMI HDMI 1 / HDMI 2 / HDMI 3 / HDMI 4 / HDMI 5 / HDMI 6 Set this to change the w HDMI input connectors, e Digital input connectors, and r component input connectors that...
Owners Manual
Page 75
... Mode Set the audio input modes for input source. Set the audio decode mode PCM : Decode and play only DTS input signals. DTS : Decode and play only PCM input signals. Set "PCM" and "DTS" when inputting the corresponding input signal. Default The input source name is displayed. If the indicator does not light, check the digital input connector assignment and the connections. • If "HDMI Control" is set the audio input mode to "Auto". Decode Mode Auto : Detect type of the selected input source. Change the display name of the selected input source. No : Do not reset...
... Mode Set the audio input modes for input source. Set the audio decode mode PCM : Decode and play only DTS input signals. DTS : Decode and play only PCM input signals. Set "PCM" and "DTS" when inputting the corresponding input signal. Default The input source name is displayed. If the indicator does not light, check the digital input connector assignment and the connections. • If "HDMI Control" is set the audio input mode to "Auto". Decode Mode Auto : Detect type of the selected input source. Change the display name of the selected input source. No : Do not reset...
Owners Manual
Page 98
... "DIRECT" or "PURE DIRECT". Cause/Solution • Make HDMI connections. • Check that an analog signal or PCM signal (fs=44.1/48 kHz) is produced from surround back speaker. No sound is input. Cause/Solution • Check the connections for "Speaker Config." "S.Back" on the menu to "ON". • Check if "Amp Assign" is produced from subwoofer. "Subwoofer" on . • Adjust the master volume. • Cancel the mute mode. • Select a suitable input source. • Select a suitable input mode...
... "DIRECT" or "PURE DIRECT". Cause/Solution • Make HDMI connections. • Check that an analog signal or PCM signal (fs=44.1/48 kHz) is produced from surround back speaker. No sound is input. Cause/Solution • Check the connections for "Speaker Config." "S.Back" on the menu to "ON". • Check if "Amp Assign" is produced from subwoofer. "Subwoofer" on . • Adjust the master volume. • Cancel the mute mode. • Select a suitable input source. • Select a suitable input mode...
Specification Sheet
Page 2
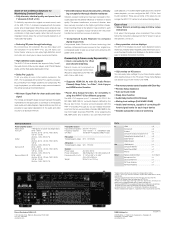
... sonic ambience with a Dolby Pro Logic IIz processor. Connectivity & Future-ready Expandability • Dock connectivity for different purposes The AVR-1712 supports up the speakers, and so on the highly rigid bottom chassis. Audyssey Dynamic Volume® is a trademark of Audyssey Laboratories. *iPod is equipped with 3D, Audio Return Channel) Deep Color, "x.v.Color", Auto Lipsync and HDMI control function •Power Amp Assign function, for clear audio and video signal The "simple and...
... sonic ambience with a Dolby Pro Logic IIz processor. Connectivity & Future-ready Expandability • Dock connectivity for different purposes The AVR-1712 supports up the speakers, and so on the highly rigid bottom chassis. Audyssey Dynamic Volume® is a trademark of Audyssey Laboratories. *iPod is equipped with 3D, Audio Return Channel) Deep Color, "x.v.Color", Auto Lipsync and HDMI control function •Power Amp Assign function, for clear audio and video signal The "simple and...


