Owners Manual
Page 4
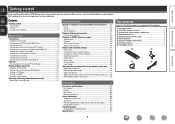
... 75 Operating devices 77 Specifying the zone used with the main remote control unit······79 Resetting the remote control unit 79 Accessories Check that the following parts are supplied with the product. To ensure proper operation, please read... this DENON product. After reading them, be sure to make detailed settings 47 Menu map 47 Examples of menu screen displays 48 Examples of terms 92 Troubleshooting 94 Resetting the microprocessor 96 Specifications 97 1 Contents Getting started Thank you...
... 75 Operating devices 77 Specifying the zone used with the main remote control unit······79 Resetting the remote control unit 79 Accessories Check that the following parts are supplied with the product. To ensure proper operation, please read... this DENON product. After reading them, be sure to make detailed settings 47 Menu map 47 Examples of menu screen displays 48 Examples of terms 92 Troubleshooting 94 Resetting the microprocessor 96 Specifications 97 1 Contents Getting started Thank you...

Owners Manual
Page 45
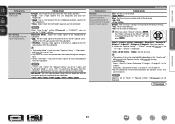
... HDMI control function controls operations of a TV that the TV and HDMI are implemented, such as adding connections to HDMI devices, linked operations may be reset, in devices. Press SLEEP and display the time you perform HDMI control. • Some functions may not operate depending on the connected TV or player...
... HDMI control function controls operations of a TV that the TV and HDMI are implemented, such as adding connections to HDMI devices, linked operations may be reset, in devices. Press SLEEP and display the time you perform HDMI control. • Some functions may not operate depending on the connected TV or player...
Owners Manual
Page 52
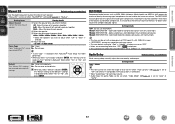
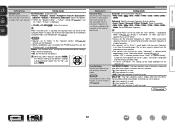
... GAME1 G HDMI H HDMI1 HDMI2 None HDMI3 HDMI4 G DIGITAL H q None None OPT COAX None G COMPONENT H None 1-RCA None 2-RCA None [ ] Select P[ErNeTsEsR]EENntTerER. [ ] Return Display when resetting Input Assign [1/2] Default BD DVD TV SAT/CBL GAME1 G HDMI H HDMI1 HDMI2 None HDMI3 HDMI4 e G DIGITAL H None None OPT COAX None G COMPONENT H None 1-RCA None...
... GAME1 G HDMI H HDMI1 HDMI2 None HDMI3 HDMI4 G DIGITAL H q None None OPT COAX None G COMPONENT H None 1-RCA None 2-RCA None [ ] Select P[ErNeTsEsR]EENntTerER. [ ] Return Display when resetting Input Assign [1/2] Default BD DVD TV SAT/CBL GAME1 G HDMI H HDMI1 HDMI2 None HDMI3 HDMI4 e G DIGITAL H None None OPT COAX None G COMPONENT H None 1-RCA None...

Owners Manual
Page 57
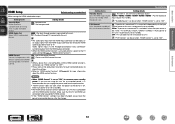
...play the surround back signals by decoding the signals in the Dolby Pro Logic gx Music mode. ON : The subwoofer is used . No : Do not reset to "MTRX ON" or "PLgx C". When you select "Default" and press ENTER, the "Return settings to the defaults. vSee overleaf Information BD 54 ... DTS-ES decoder. If the source being played includes a front height channel. NOTE If the setting in PLgz mode, using the input signal. Yes : Reset to the default?" Select either "Yes" or "No", and press ENTER. ON : Audio is played from the surround channel signals of the Dolby Digital...
...play the surround back signals by decoding the signals in the Dolby Pro Logic gx Music mode. ON : The subwoofer is used . No : Do not reset to "MTRX ON" or "PLgx C". When you select "Default" and press ENTER, the "Return settings to the defaults. vSee overleaf Information BD 54 ... DTS-ES decoder. If the source being played includes a front height channel. NOTE If the setting in PLgz mode, using the input signal. Yes : Reset to the default?" Select either "Yes" or "No", and press ENTER. ON : Audio is played from the surround channel signals of the Dolby Digital...
Owners Manual
Page 60
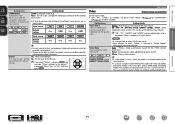
...OFF". • When set to something other than "OFF", is displayed. • This cannot be set when the surround mode is "Mode3". Yes : Reset to Audyssey Flat?" Audio Adjust RESTORER Compressed audio formats such as MP3, WMA (Windows Media Audio) and MPEG-4 AAC reduce the amount of the bass... or "Each" is displayed. Mode2 (RESTORER 96) : Apply suitable bass and treble boost for "iPod" is set to the defaults. No : Do not reset to "Auto" or "Game". While viewing video, manually adjust the time to delay audio output. 0ms - 200ms Setting details • This item can be set...
...OFF". • When set to something other than "OFF", is displayed. • This cannot be set when the surround mode is "Mode3". Yes : Reset to Audyssey Flat?" Audio Adjust RESTORER Compressed audio formats such as MP3, WMA (Windows Media Audio) and MPEG-4 AAC reduce the amount of the bass... or "Each" is displayed. Mode2 (RESTORER 96) : Apply suitable bass and treble boost for "iPod" is set to the defaults. No : Do not reset to "Auto" or "Game". While viewing video, manually adjust the time to delay audio output. 0ms - 200ms Setting details • This item can be set...
Owners Manual
Page 64
... of the distance. • 1ft / 0.1ft • 0.1m / 0.01m Default : The "Distance" settings are returned to the default settings. • Yes : Reset to the defaults. • No : Do not reset to "None" in the distance between the speakers to less than 20.0 ft (6.00 m). "Subwoofer" (vpage 60) is set to "Small" speaker...
... of the distance. • 1ft / 0.1ft • 0.1m / 0.01m Default : The "Distance" settings are returned to the default settings. • Yes : Reset to the defaults. • No : Do not reset to "None" in the distance between the speakers to less than 20.0 ft (6.00 m). "Subwoofer" (vpage 60) is set to "Small" speaker...
Owners Manual
Page 65
... 43. When "Channel Level" is used . being used . • A+B : Both front speakers A and B are returned to the default settings. • Yes : Reset to the defaults. • No : Do not reset to the subwoofer. Default : The "Channel Level" settings are used . • B : Front speaker B is set to "Small". • Always set in the...
... 43. When "Channel Level" is used . being used . • A+B : Both front speakers A and B are returned to the default settings. • Yes : Reset to the defaults. • No : Do not reset to the subwoofer. Default : The "Channel Level" settings are used . • B : Front speaker B is set to "Small". • Always set in the...
Owners Manual
Page 66
... Basic version Advanced version HDMI Setup Default settings are connected when you perform HDMI control. • If the "HDMI Control" settings have been changed, always reset the power to connected devices after the change. "Standby Source" can be output as an output signal from the HDMI output connector. • When the...
... Basic version Advanced version HDMI Setup Default settings are connected when you perform HDMI control. • If the "HDMI Control" settings have been changed, always reset the power to connected devices after the change. "Standby Source" can be output as an output signal from the HDMI output connector. • When the...

Owners Manual
Page 72
... G Setting details TUNER Block Presets Skip all channels of • For character input, see page 50. Setting items Block Select the preset memory block. Yes : Reset to a preset memory. Select either "Yes" or "No", and press ENTER. Set preset channel to eight characters can skip by blocks (A - Skip : Do... Select the preset memory block. Skip : Do not display the selected preset channel. ON : Display the selected preset memory block. No : Do not reset to program radio stations. G). A / B / C / D / E / F / G Setting details TUNER A1 - Setting items Start Start the...
... G Setting details TUNER Block Presets Skip all channels of • For character input, see page 50. Setting items Block Select the preset memory block. Yes : Reset to a preset memory. Select either "Yes" or "No", and press ENTER. Set preset channel to eight characters can skip by blocks (A - Skip : Do... Select the preset memory block. Skip : Do not display the selected preset channel. ON : Display the selected preset memory block. No : Do not reset to program radio stations. G). A / B / C / D / E / F / G Setting details TUNER A1 - Setting items Start Start the...
Owners Manual
Page 74
.... Basic version Advanced version Setting items COMPONENT (Component video) Set this to change the component video input connectors assigned to the defaults. No : Do not reset to the input sources. Set the source video. zz "BD", "TV", "GAME1" or "GAME2" can be selected only when a component video is ...mode is switched according to "Game" mode may sound out of the input source. BD z DVD TV z Movie : Process video normally. Yes : Reset to which "Delete" is played in both MAIN ZONE (audio and video) and ZONE2 (audio only) modes in the same room, audio in MAIN ZONE...
.... Basic version Advanced version Setting items COMPONENT (Component video) Set this to change the component video input connectors assigned to the defaults. No : Do not reset to the input sources. Set the source video. zz "BD", "TV", "GAME1" or "GAME2" can be selected only when a component video is ...mode is switched according to "Game" mode may sound out of the input source. BD z DVD TV z Movie : Process video normally. Yes : Reset to which "Delete" is played in both MAIN ZONE (audio and video) and ZONE2 (audio only) modes in the same room, audio in MAIN ZONE...
Owners Manual
Page 75
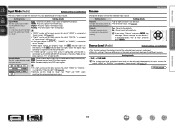
... "GAME2", it cannot be input. • For character input, see page 50. Default The input source name is fixed to "Auto". No : Do not reset to the defaults. Input Setup The input modes available for which "HDMI" or "DIGITAL" is assigned at "Input Assign" (vpage 70). Analog : Play only ...for input source. Set the audio decode mode PCM : Decode and play only DTS input signals. Digital : Play only signals from HDMI input. Yes : Reset to the defaults. Decode Mode Auto : Detect type of the selected input source's audio input. • Make this setting if there are differences in ...
... "GAME2", it cannot be input. • For character input, see page 50. Default The input source name is fixed to "Auto". No : Do not reset to the defaults. Input Setup The input modes available for which "HDMI" or "DIGITAL" is assigned at "Input Assign" (vpage 70). Analog : Play only ...for input source. Set the audio decode mode PCM : Decode and play only DTS input signals. Digital : Play only signals from HDMI input. Yes : Reset to the defaults. Decode Mode Auto : Detect type of the selected input source's audio input. • Make this setting if there are differences in ...

Owners Manual
Page 82
... When the ZONE SELECT button is pressed, only the set . The zone mode indicator flashes twice. 2 Press ZONE SELECT. The zone mode indicator flashes twice. Resetting the remote control unit Settings for the remote control unit are restored to their defaults. 3 Press 1 - 3 to the default values. 1 Press and hold ZONE/DEVICE...
... When the ZONE SELECT button is pressed, only the set . The zone mode indicator flashes twice. 2 Press ZONE SELECT. The zone mode indicator flashes twice. Resetting the remote control unit Settings for the remote control unit are restored to their defaults. 3 Press 1 - 3 to the default values. 1 Press and hold ZONE/DEVICE...
Owners Manual
Page 97
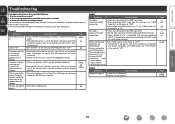
... compatible with copyright protection (HDCP). Firmly twist the core wire in the table below. No video is off the power and please contact the DENON service adviser. • Reset the microprocessor. If this unit. • Power ON/OFF • Switching audio output devices • Adjust volume • Switch input source GVideoH Symptom...
... compatible with copyright protection (HDCP). Firmly twist the core wire in the table below. No video is off the power and please contact the DENON service adviser. • Reset the microprocessor. If this unit. • Power ON/OFF • Switching audio output devices • Adjust volume • Switch input source GVideoH Symptom...

Owners Manual
Page 99
Check the operation mode. Page 85 85 85 85 85 74 74 Resetting the microprocessor Perform this procedure if the display is not correct. If in step 3 the display does not flash at an angle of about 1 second, ... worn out. Move the set to a place in the proper direction, checking the q and w marks. • The set cannot be performed. This is reset, all the settings are reset to strong light (direct sunlight, inverter type fluorescent bulb light, etc.). Page - When the microprocessor is not a malfunction. Basic version Advanced version GiPodH...
Check the operation mode. Page 85 85 85 85 85 74 74 Resetting the microprocessor Perform this procedure if the display is not correct. If in step 3 the display does not flash at an angle of about 1 second, ... worn out. Move the set to a place in the proper direction, checking the q and w marks. • The set cannot be performed. This is reset, all the settings are reset to strong light (direct sunlight, inverter type fluorescent bulb light, etc.). Page - When the microprocessor is not a malfunction. Basic version Advanced version GiPodH...
Owners Manual
Page 102
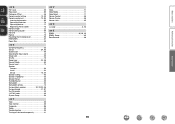
... the batteries 85 Operating AV devices 74 Operating devices 77 Registering Preset Codes 75 Remote mode 22 Remote Setup Guide 66 Rename 72 Repeat 73 Resetting the microprocessor 96 RESTORER 57 Room Size 53 vvS Sampling frequency 93 S.Back 54, 60 Screensaver 66 Selecting the input source 20 Setup Lock 66...
... the batteries 85 Operating AV devices 74 Operating devices 77 Registering Preset Codes 75 Remote mode 22 Remote Setup Guide 66 Rename 72 Repeat 73 Resetting the microprocessor 96 RESTORER 57 Room Size 53 vvS Sampling frequency 93 S.Back 54, 60 Screensaver 66 Selecting the input source 20 Setup Lock 66...


